
 Software Tutorial
Computer Software
How to install office365 to the d drive. Tutorial on the steps to install office365 on the d drive.
Software Tutorial
Computer Software
How to install office365 to the d drive. Tutorial on the steps to install office365 on the d drive.
How to install office365 to the d drive. Tutorial on the steps to install office365 on the d drive.

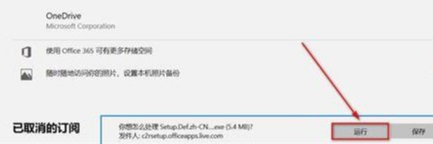
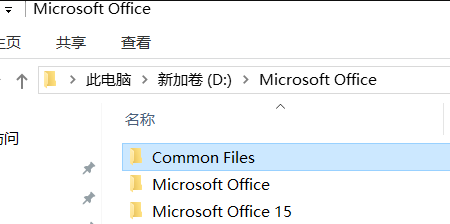
How to install office365 to the d drive? This question is what many users want to know, because the default is to install the C drive, and the software takes up more space. They want to change it to install the D drive, but most users don’t know how to change it. In this issue The content of the software tutorial is here to answer the questions for the majority of users. Let us learn about it together. The specific operations are as follows: 1. First press Ctrl+r and enter regedit to open the registry. Then expand HKEY_LOCAL_MACHINESOFTWAREMicrosoftWindowsCurrentVersion in turn.


The above is the detailed content of How to install office365 to the d drive. Tutorial on the steps to install office365 on the d drive.. For more information, please follow other related articles on the PHP Chinese website!

Hot AI Tools

Undresser.AI Undress
AI-powered app for creating realistic nude photos

AI Clothes Remover
Online AI tool for removing clothes from photos.

Undress AI Tool
Undress images for free

Clothoff.io
AI clothes remover

Video Face Swap
Swap faces in any video effortlessly with our completely free AI face swap tool!

Hot Article
Hot Tools

Notepad++7.3.1
Easy-to-use and free code editor

SublimeText3 Chinese version
Chinese version, very easy to use

Zend Studio 13.0.1
Powerful PHP integrated development environment

Dreamweaver CS6
Visual web development tools

SublimeText3 Mac version
God-level code editing software (SublimeText3)
Hot Topics
 1658
1658
 14
1415
52
1309
25
1257
29
1231
24
14
1415
52
1309
25
1257
29
1231
24

 How much does Microsoft PowerToys cost?
Apr 09, 2025 am 12:03 AM
How much does Microsoft PowerToys cost?
Apr 09, 2025 am 12:03 AM
Microsoft PowerToys is free. This collection of tools developed by Microsoft is designed to enhance Windows system functions and improve user productivity. By installing and using features such as FancyZones, users can customize window layouts and optimize workflows.
 What is the best alternative to PowerToys?
Apr 08, 2025 am 12:17 AM
What is the best alternative to PowerToys?
Apr 08, 2025 am 12:17 AM
ThebestalternativestoPowerToysforWindowsusersareAutoHotkey,WindowGrid,andWinaeroTweaker.1)AutoHotkeyoffersextensivescriptingforautomation.2)WindowGridprovidesintuitivegrid-basedwindowmanagement.3)WinaeroTweakerallowsdeepcustomizationofWindowssettings
 Does Microsoft PowerToys require a license?
Apr 07, 2025 am 12:04 AM
Does Microsoft PowerToys require a license?
Apr 07, 2025 am 12:04 AM
Microsoft PowerToys does not require a license and is a free open source software. 1.PowerToys provides a variety of tools, such as FancyZones for window management, PowerRename for batch renaming, and ColorPicker for color selection. 2. Users can enable or disable these tools according to their needs to improve work efficiency.
 Is Microsoft PowerToys free or paid?
Apr 06, 2025 am 12:14 AM
Is Microsoft PowerToys free or paid?
Apr 06, 2025 am 12:14 AM
Microsoft PowerToys is completely free. This tool set provides open source utilities that enhance Windows operating system, including features such as FancyZones, PowerRename, and KeyboardManager, to help users improve productivity and customize their operating experience.
