Install phpMyAdmin
phpMyAdmin is a Database Administration tool, used for managing the MySQL & MariaDB databases, and it is available in the phpMyAdmin website for cost free as an open source software applications. It was originally written in the PHP scripting language, in order to work around more than one database and related servers. This tool is known for its special features like the provision to import & export multiple formatted files, a web interface, QBE or query by example, global search wizard, database management, and to watch over the current progress for parameters like CPU consumption, database connection range, real time reports, etc.
ADVERTISEMENT Popular Course in this category PHP DEVELOPER - Specialization | 8 Course Series | 3 Mock TestsStart Your Free Software Development Course
Web development, programming languages, Software testing & others
Pre-requisites
In order to install the phpMyAdmin tool, obviously, one needs to have the desired database installed in their computer. It helps when the database servers are connected and the phpMyAdmin is enabled, in order to perform the database management activities. The prerequisites are the most important part, which needs to be taken care of before actually using the phpMyAdmin tool. Keeping this in check leads to the uninterrupted proper functioning of the utilization of this tool, as the minor glitches can be discouraging and tiresome in the hour of need.
There are two ways for installing the phpMyAdmin tool, and both of them need to have the database installed in the computer being installing this tool. Below are the few other prerequisites with respect to the installation processes used.
- With the Apache Server: In this process, the Apache server, the PHP, and the MySQL database are the softwares that are required to be installed beforehand, that is, before installing the actual phpMyAdmin tool to the same system.
- With the help of WAMP: When using the WAMP, the phpMyAdmin tool can be accessed via an existing server already installed in the computer, while it allows just the database management & administration processes.
Installation Steps for phpMyAdmin
The Installation process and steps are different for the two different techniques of setting up a phpMyAdmin application on the computer. Below are the steps for working on the same.
1. With the Apache Server
Step 1: Open the web browser and go to the link: https://www.phpmyadmin.net (Fig. 01) from there. Use the direct link, or google as ‘phpMyAdmin download’ and use the first link from the results.

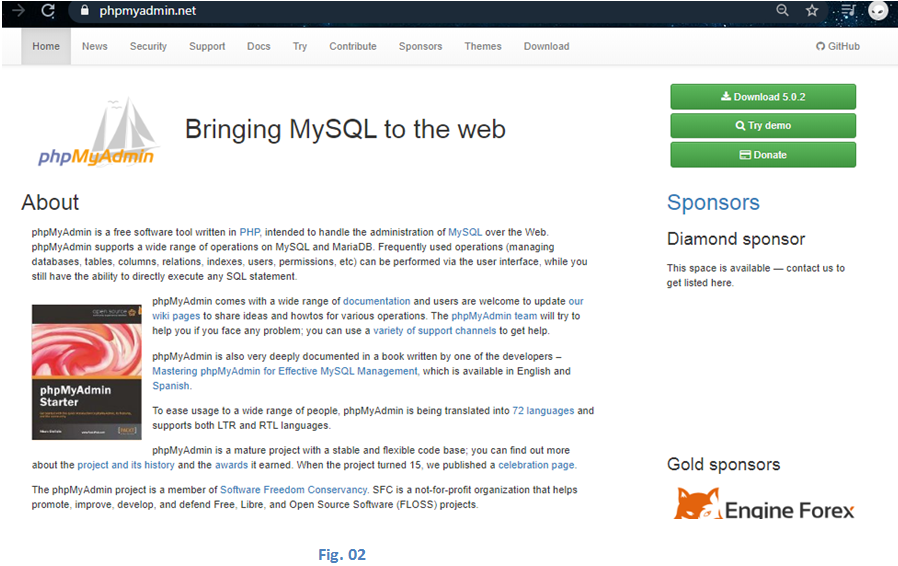
Step 2: The phpMyAdmin application website opens up (Fig. 02), to download the latest version of phpMyAdmin. Please note, the latest version is 5. 0. 2, as of June 2020.
This web page also contains the other details of the software, such as the detailed description, the databases compatible with the tool, an option for taking a demo of tool usage, an option to voluntarily donate the user’s desired amount for the free application, the extensive list of features that the tool is capable of performing, the hosts/ sponsors for creating this tool and the details of the previous version of the tool.
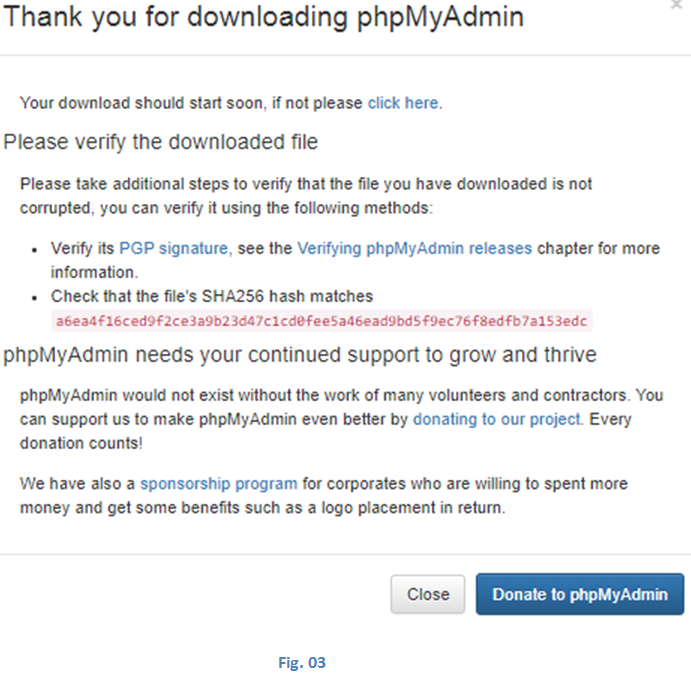
Step 3: Click on the ‘Download’ button from the above web page (Fig. 03), the browser will prompt a pop up as below and a quick download of the ‘phpMyAdmin-5.0.2-all-languages.zip’ ZIP file will take place.
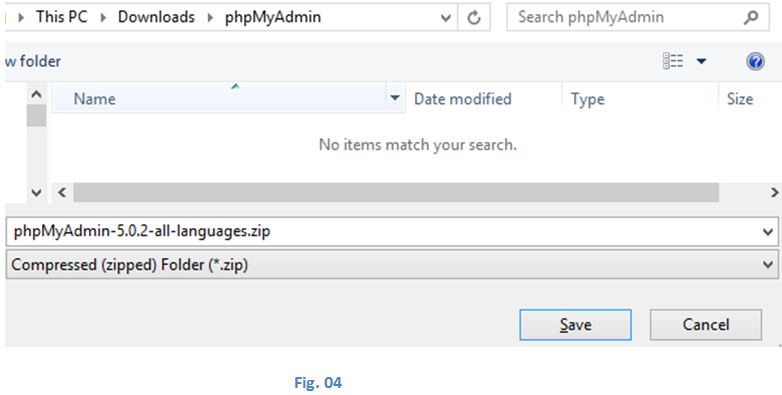
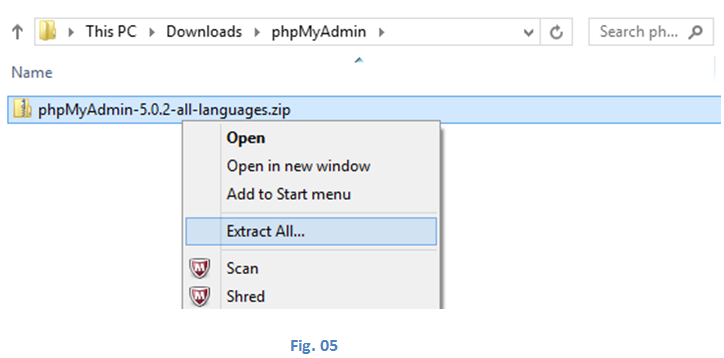
Step 4: Save the file in the desired location in the computer system (Fig. 04), and extract the contents of the file by right-clicking & selecting the ‘Extract All’ option from the list (Fig. 05).
Step 5: Now, as the next step, locate the ‘htdocs’ folder (Fig. 06) in the Apache files from the local memory, typically it will be in the C: (C drive). Copy the contents of the ‘phpMyAdmin’ folder (Fig. 07) after extraction and paste the same to the Apache ‘htdocs’ folder. And then, rename the destination folder to ‘phpMyAdmin’, so as to allow the database to locate the files with the name as an indicator.

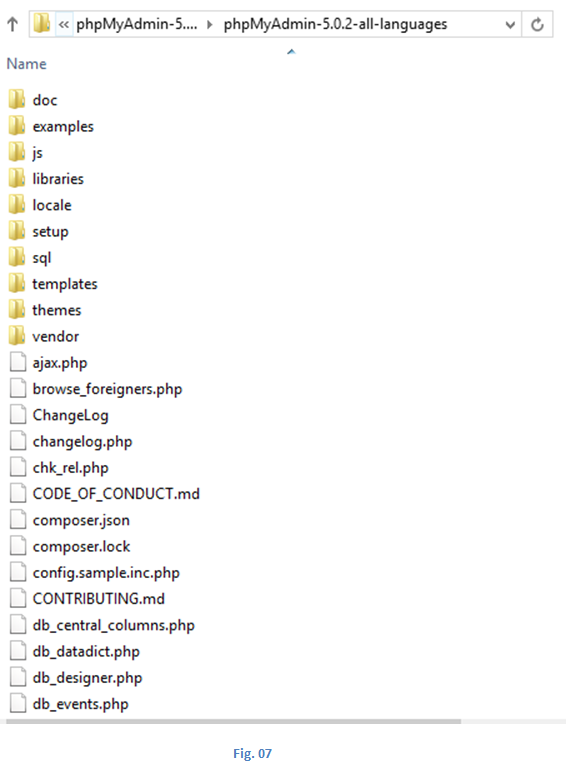
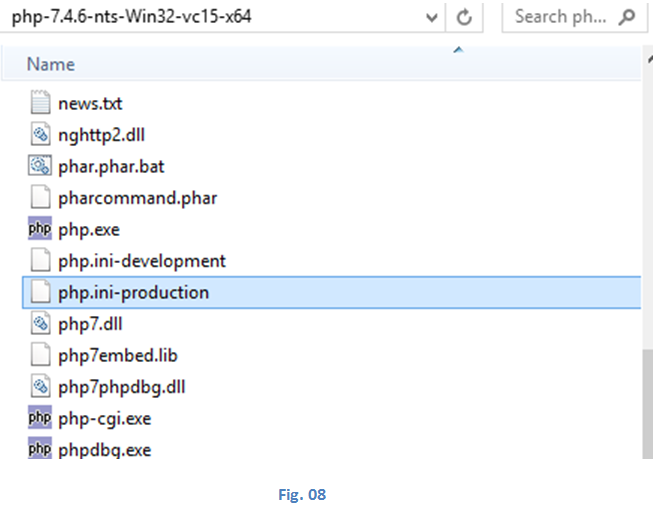
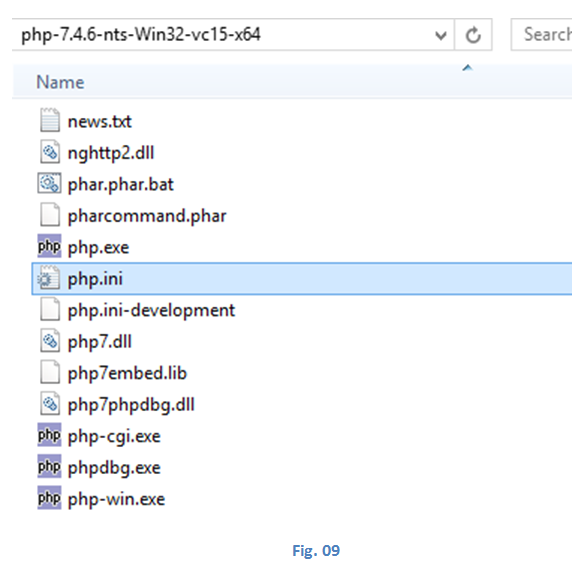
Step 6: Next step is to locate the ‘php.ini-production’ file (Fig. 08) from the PHP folder from the C: (C drive), and rename it into ‘php.ini’ (Fig. 09), as below, in order to make it easy for the phpMyAdmin tool to locate it when it is run,
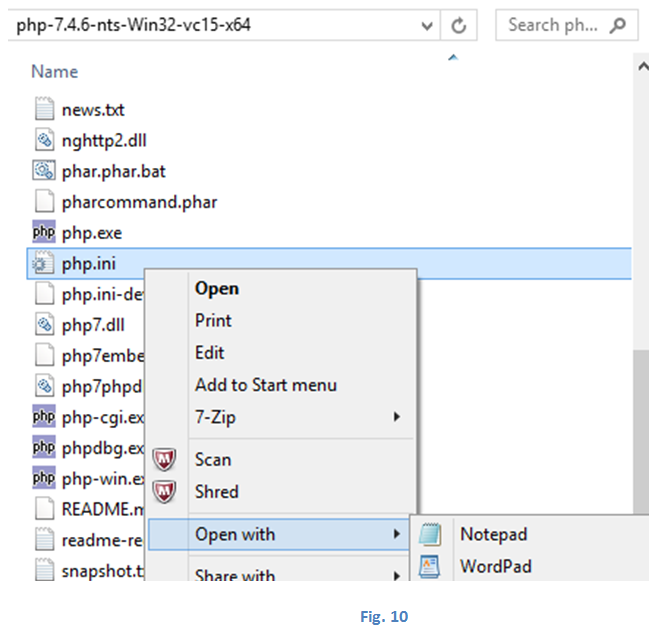
Step 7: For the next step, open the ‘php.ini’ with Notepad (Fig. 10), and edit the line with extension=php_mbstring.dll to remove the semicolon in that line and save the file, as it prevents phpMyAdmin to call in the PHP functions.
Step 8: The phpMyAdmin tool is ready to use now, and if required one can test the same by navigating to ‘http://localhost’ for loading the phpMyAdmin tool’s homepage.
2. With the help of WAMP Servers
Step 1: Open the web browser and go to the link: http://www.wampserver.com/en (Fig. 11) from there. Use the direct link, or google as ‘phpMyAdmin download’ and use the first link from the results.

Step 2: Download the WAMPServer application from there, which is also available for free (Fig. 12). The homepage of WAMPserver also contains details of the software itself, along with the list and features of all the supporting plugins, extensions, public projects, and the aliases such as the phpMyAdmin tool (Fig. 13).
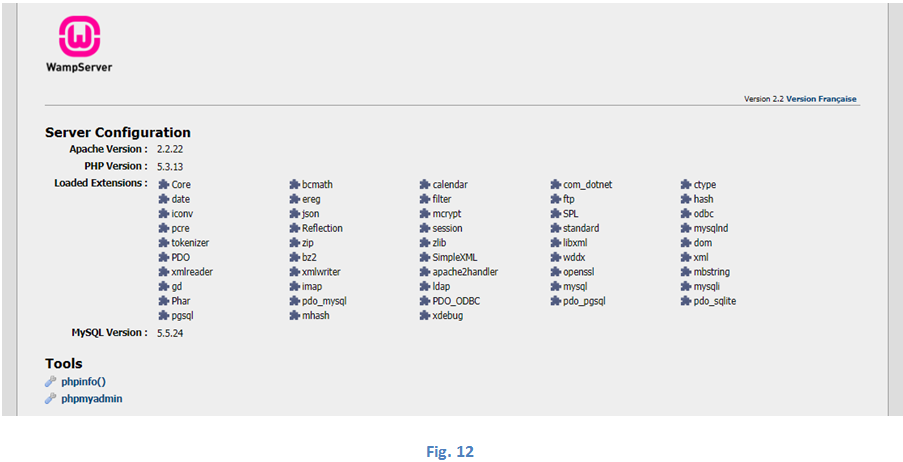
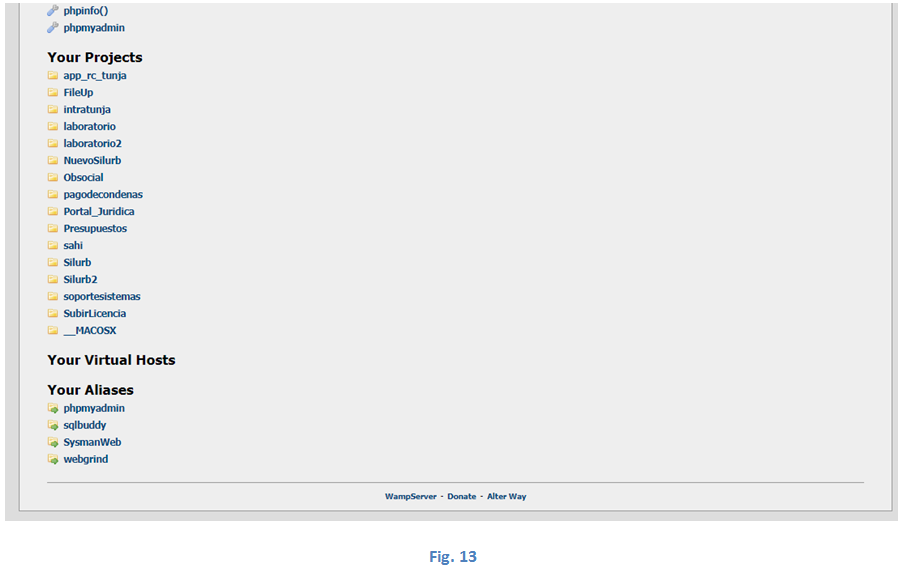
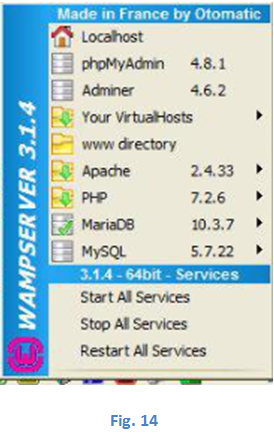
Step 3: Once the installation is complete, the WAMPServer will display all the items that come along with the package, such as in the below Fig. 14. As you can see, it is seen as a whole package of functional material, which includes the server like the Apache & localhost application, the phpMyAdmin supported databases like MySQL & MariaDB, contains options for importing & exporting almost all the common file types and the Administration tools like phpMyAdmin & Adminer. The WAMPServer logo can also be set under the windows notification box in the taskbar that will be shown as a hot pink W surrounded by a disconnected ring.
Conclusion
The phpMyAdmin tool is normally used on the database applications, as it provides easy and straightforward ways for managing and administering, connected to the common server such as the classic Apache server. This tool was created using the PHP scripting language, and it is used for carrying out Administration activities on the MySQL database.
The above is the detailed content of Install phpMyAdmin. For more information, please follow other related articles on the PHP Chinese website!

Hot AI Tools

Undresser.AI Undress
AI-powered app for creating realistic nude photos

AI Clothes Remover
Online AI tool for removing clothes from photos.

Undress AI Tool
Undress images for free

Clothoff.io
AI clothes remover

Video Face Swap
Swap faces in any video effortlessly with our completely free AI face swap tool!

Hot Article

Hot Tools

Notepad++7.3.1
Easy-to-use and free code editor

SublimeText3 Chinese version
Chinese version, very easy to use

Zend Studio 13.0.1
Powerful PHP integrated development environment

Dreamweaver CS6
Visual web development tools

SublimeText3 Mac version
God-level code editing software (SublimeText3)

Hot Topics
 1664
1664
 14
14
 1422
1422
 52
52
 1316
1316
 25
25
 1267
1267
 29
29
 1239
1239
 24
24
 Explain JSON Web Tokens (JWT) and their use case in PHP APIs.
Apr 05, 2025 am 12:04 AM
JWT is an open standard based on JSON, used to securely transmit information between parties, mainly for identity authentication and information exchange. 1. JWT consists of three parts: Header, Payload and Signature. 2. The working principle of JWT includes three steps: generating JWT, verifying JWT and parsing Payload. 3. When using JWT for authentication in PHP, JWT can be generated and verified, and user role and permission information can be included in advanced usage. 4. Common errors include signature verification failure, token expiration, and payload oversized. Debugging skills include using debugging tools and logging. 5. Performance optimization and best practices include using appropriate signature algorithms, setting validity periods reasonably,
 Explain late static binding in PHP (static::).
Apr 03, 2025 am 12:04 AM
Static binding (static::) implements late static binding (LSB) in PHP, allowing calling classes to be referenced in static contexts rather than defining classes. 1) The parsing process is performed at runtime, 2) Look up the call class in the inheritance relationship, 3) It may bring performance overhead.
 PHP Program to Count Vowels in a String
Feb 07, 2025 pm 12:12 PM
A string is a sequence of characters, including letters, numbers, and symbols. This tutorial will learn how to calculate the number of vowels in a given string in PHP using different methods. The vowels in English are a, e, i, o, u, and they can be uppercase or lowercase. What is a vowel? Vowels are alphabetic characters that represent a specific pronunciation. There are five vowels in English, including uppercase and lowercase: a, e, i, o, u Example 1 Input: String = "Tutorialspoint" Output: 6 explain The vowels in the string "Tutorialspoint" are u, o, i, a, o, i. There are 6 yuan in total
 What are PHP magic methods (__construct, __destruct, __call, __get, __set, etc.) and provide use cases?
Apr 03, 2025 am 12:03 AM
What are the magic methods of PHP? PHP's magic methods include: 1.\_\_construct, used to initialize objects; 2.\_\_destruct, used to clean up resources; 3.\_\_call, handle non-existent method calls; 4.\_\_get, implement dynamic attribute access; 5.\_\_set, implement dynamic attribute settings. These methods are automatically called in certain situations, improving code flexibility and efficiency.
 PHP and Python: Comparing Two Popular Programming Languages
Apr 14, 2025 am 12:13 AM
PHP and Python each have their own advantages, and choose according to project requirements. 1.PHP is suitable for web development, especially for rapid development and maintenance of websites. 2. Python is suitable for data science, machine learning and artificial intelligence, with concise syntax and suitable for beginners.
 PHP in Action: Real-World Examples and Applications
Apr 14, 2025 am 12:19 AM
PHP is widely used in e-commerce, content management systems and API development. 1) E-commerce: used for shopping cart function and payment processing. 2) Content management system: used for dynamic content generation and user management. 3) API development: used for RESTful API development and API security. Through performance optimization and best practices, the efficiency and maintainability of PHP applications are improved.
 PHP: A Key Language for Web Development
Apr 13, 2025 am 12:08 AM
PHP is a scripting language widely used on the server side, especially suitable for web development. 1.PHP can embed HTML, process HTTP requests and responses, and supports a variety of databases. 2.PHP is used to generate dynamic web content, process form data, access databases, etc., with strong community support and open source resources. 3. PHP is an interpreted language, and the execution process includes lexical analysis, grammatical analysis, compilation and execution. 4.PHP can be combined with MySQL for advanced applications such as user registration systems. 5. When debugging PHP, you can use functions such as error_reporting() and var_dump(). 6. Optimize PHP code to use caching mechanisms, optimize database queries and use built-in functions. 7
 Explain the match expression (PHP 8 ) and how it differs from switch.
Apr 06, 2025 am 12:03 AM
In PHP8, match expressions are a new control structure that returns different results based on the value of the expression. 1) It is similar to a switch statement, but returns a value instead of an execution statement block. 2) The match expression is strictly compared (===), which improves security. 3) It avoids possible break omissions in switch statements and enhances the simplicity and readability of the code.


