

Hey, fellow developers! ? Ever thought about building a microservices architecture but felt overwhelmed by where to start? Worry no more! In this article, we'll build a basic microservices setup using the API Gateway pattern for an online store. And guess what? We'll do it all in Go (Golang)! ?
By the end of this guide, you’ll know how to:
Before we dive into the code, let’s talk about why:
Who said that? Me ?. Just kidding, but you'll soon be quoting this too when your app handles a gazillion users without breaking a sweat! Imagine your API dancing through the traffic while sipping coffee ☕. Yes, that’s the power of Microservices with Go and an API Gateway.
Oke, without further ado let's start it.
/online-store
├── api-gateway/
├──── cmd/
├────── main.go
├──── internal/
├────── handler/
├──────── handler.go
├── services/
├──── user-service/
├────── cmd/
├──────── main.go
├────── internal/
├──────── handler/
├────────── handler.go
├────── proto/
├──────── user-proto
├────── Dockerfile
├──── <you can add more services>/
├── docker-compose.yml
└── README.md
That's will be the dir structure the project, you can tweak it as you want, later we will also create pb directory do store generated pb file from our proto file.
Clone googleapis https://github.com/googleapis/googleapis, we will need that for our proto later. Just clone in root dir under online-store dir.
git clone https://github.com/googleapis/googleapis.git
Initiate Go Mod
Let's use our terminal and initiate our user-service go mod init
go mod init user-service
you can change "user-service" with your github url, but we will use it for now.
Create our first proto file for user
create a new file under user-service/proto dir with name user.proto, let's use this proto code:
syntax = "proto3";

package order;

option go_package = ".";

import "google/api/annotations.proto";

service OrderService {
    rpc GetMyOrder(GetMyOrderRequest) returns (GetMyOrderResponse) {
        option (google.api.http) = {
            get: "/v1/order/my"
        };
    }
}

message GetMyOrderRequest {
    string user_id = 1;
}

message GetMyOrderResponse {
    string  user_id = 1;
    string order_id = 2;
    string product_id = 3;
    int32 quantity = 4;
    float price = 5;
    string status = 6;
}
protoc --proto_path="services/user-service/proto" \
        --go_out="services/user-service/pb" \
        --go-grpc_out="services/user-service/pb" \
        --grpc-gateway_out="services/user-service/pb" \
        "services/user-service/proto/user.proto"
With that command we will generate 3 files (user_grpc.pb.go, user_pb.go, and user.pb.gw.go) and will place them into services/user-service/pb directory.
But, because we want use the same grpc to our Api Gateway, we need to copy them too into api-gateway/pb directory. You can copy it manually each time you generate grpc, but let's just use script for it.
I create a new dir online-store/scripts to store all scripts. Let's create a new file generate-proto.sh, and put this code:
#!/bin/bash

# Error handling function
handle_error() {
  echo "Error occurred in script at line: $1"
  exit 1
}

# Trap any error and call the handle_error function
trap 'handle_error $LINENO' ERR

# Declare an associative array to map proto directories to their corresponding pb directories
declare -A dir_map=(
  ["services/user-service/proto"]="services/user-service/pb"
  # you can add another directory here
  # e.g ["services/order-service/proto"]="services/order-service/pb"
)

# Define Static Dir Path
GOOGLEAPIS_DIR="googleapis"
API_GATEWAY_PB_DIR="api-gateway/pb"

# Ensure the API_GATEWAY_PB_DIR exists
if [ ! -d "$API_GATEWAY_PB_DIR" ]; then
  mkdir -p "$API_GATEWAY_PB_DIR"
  echo "Directory $API_GATEWAY_PB_DIR created."
else
  echo "Directory $API_GATEWAY_PB_DIR already exists."
fi

# Loop through the associative array and generate Go code for each proto directory
for proto_dir in "${!dir_map[@]}"; do
  pb_dir="${dir_map[$proto_dir]}"

  # Check if the pb directory exists, if not, create it
  if [ ! -d "$pb_dir" ]; then
    mkdir -p "$pb_dir"
    echo "Directory $pb_dir created."
  else
    echo "Directory $pb_dir already exists."
  fi

  # Process each .proto file in the proto directory
  for proto_file in "$proto_dir"/*.proto; do
    # Ensure the proto file exists
    if [ -f "$proto_file" ]; then
      # Generate Go code for the current proto file
      protoc --proto_path="$proto_dir" \
        --proto_path="$GOOGLEAPIS_DIR" \
        --go_out="$pb_dir" \
        --go-grpc_out="$pb_dir" \
        --grpc-gateway_out="$pb_dir" \
        "$proto_file"
      echo "Generated Go code for $proto_file"

      # Copy the generated Go code to the API Gateway directory
      cp -auv "$pb_dir"/* "$API_GATEWAY_PB_DIR/"
      echo "Copied generated Go code to $API_GATEWAY_PB_DIR from $pb_dir"
    else
      echo "No .proto files found in $proto_dir."
    fi
  done
done
That script will create you a new pb directory if it's does not exist.
Now, lets execute our script:
./scripts/generate-proto.sh
You will need to install some packages:
go get github.com/grpc-ecosystem/grpc-gateway/v2
go get google.golang.org/genproto/googleapis/api
go get .golang.org/protobuf
If you get some error regarding import, do this comman go mod tidy
package handler

import (
    "context"
    "log"

    pb "user-service/pb"

    "google.golang.org/grpc"
)

// server implements the UserServiceServer interface
type server struct {
    pb.UnimplementedUserServiceServer
}

// NewServer creates a new instance of server
func NewServer() pb.UserServiceServer {
    return &server{}
}

// Implement the methods defined in your proto file here
func (s *server) GetUser(ctx context.Context, req *pb.GetUserRequest) (*pb.GetUserResponse, error) {
    // Log the request details
    log.Printf("Received GetUser request with ID: %s", req.GetId())

    // Implement your logic to get user information
    response := &pb.GetUserResponse{
        Id:    req.GetId(),
        Name:  "John Doe",
        Email: "john.doe@example.com",
    }

    // Log the response details
    log.Printf("Returning GetUser response: %+v", response)

    return response, nil
}

// Implement GetUserProfile method
func (s *server) GetUserProfile(ctx context.Context, req *pb.GetUserProfileRequest) (*pb.GetUserProfileResponse, error) {
    // Log the request details
    log.Printf("Received GetUserProfile request with ID: %s", req.GetId())

    response := &pb.GetUserProfileResponse{
        Id:      req.GetId(),
        Name:    "John Doe",
        Email:   "john.doe@example.com",
        Phone:   "1234567890",
        Address: "123 Main St",
    }

    // Log the response details
    log.Printf("Returning GetUserProfile response: %+v", response)

    return response, nil
}

// RegisterServices registers the gRPC services with the server
func RegisterServices(s *grpc.Server) {
    pb.RegisterUserServiceServer(s, NewServer())
}
You will need to install some package:
go get google.golang.org/grpc
package main

import (
    "log"
    "net"

    "google.golang.org/grpc"
    "google.golang.org/grpc/reflection"

    "user-service/internal/handler"
)

func main() {
    // Create a new gRPC server
    s := grpc.NewServer()

    // Register the server with the gRPC server
    handler.RegisterServices(s)

    // Register reflection service on gRPC server
    reflection.Register(s)

    // Listen on port 50051
    lis, err := net.Listen("tcp", ":50051")
    if err != nil {
        log.Fatalf("failed to listen: %v", err)
    }

    // Start the gRPC server
    log.Println("Starting gRPC server on :50051")
    if err := s.Serve(lis); err != nil {
        log.Fatalf("failed to serve: %v", err)
    }
}
You need to install google.golang.org/grpc/reflection, with this package we can look into our services.
# Stage 1: Build
FROM golang:1.23 AS builder

WORKDIR /app

# Copy go mod and sum files
COPY go.mod go.sum ./
RUN go mod download

# Copy the application code
COPY . .

# Build the Go application
RUN go build -o user-service ./cmd

# Stage 2: Run
FROM ubuntu:22.04

# Install necessary libraries
RUN apt-get update && apt-get install -y \
    ca-certificates \
    libc6 \
    && rm -rf /var/lib/apt/lists/*

WORKDIR /app

# Copy the binary from the build stage
COPY --from=builder /app/user-service /app/user-service

ENTRYPOINT ["/app/user-service"]

# Expose port
EXPOSE 50051
Because we already have pb files generated under api-gateway/pb directory. Now, we can create handler for our api-gateway, create a new file api-gateway/internal/handler/service-regitry.go, use this code to register our services:
package handler

import (
    "context"
    "log"

    "github.com/grpc-ecosystem/grpc-gateway/v2/runtime"
    "google.golang.org/grpc"

    pb "api-gateway/pb"
)

// ServiceConfig holds the configuration for each service.
type ServiceConfig struct {
    Name    string
    Address string
}

// RegisterServices registers all services with the mux based on the given service configurations.
func RegisterServices(ctx context.Context, mux *runtime.ServeMux, services []ServiceConfig) error {
    for _, svc := range services {
        opts := []grpc.DialOption{grpc.WithInsecure()}
        var err error
        switch svc.Name {
        case "UserService":
            err = pb.RegisterUserServiceHandlerFromEndpoint(ctx, mux, svc.Address, opts)
        // We can create another cases for another services
        default:
            log.Printf("No handler implemented for service %s", svc.Name)
            continue
        }
        if err != nil {
            return err
        }
        log.Printf("Registered service %s at %s", svc.Name, svc.Address)
    }
    return nil
}
You will also need to install these in api-gateway:
go get github.com/grpc-ecosystem/grpc-gateway
go get google.golang.org/grpc
package main

import (
    "context"
    "log"
    "net/http"

    "github.com/grpc-ecosystem/grpc-gateway/v2/runtime"

    "api-gateway/internal/handler"
)

func main() {
    // Define service configurations
    services := []handler.ServiceConfig{
        {Name: "UserService", Address: "user-service:50051"},
        // You can add another services here
    }

    ctx := context.Background()
    ctx, cancel := context.WithCancel(ctx)
    defer cancel()

    mux := runtime.NewServeMux()

    // Register services
    if err := handler.RegisterServices(ctx, mux, services); err != nil {
        log.Fatalf("Failed to register services: %v", err)
    }

    // Start the HTTP server
    if err := http.ListenAndServe(":8080", mux); err != nil {
        log.Fatalf("Failed to start HTTP server: %v", err)
    }
}
# Stage 1: Build
FROM golang:1.23 AS builder

WORKDIR /app

# Copy go mod and sum files
COPY go.mod go.sum ./
RUN go mod download

# Copy the application code
COPY . .

# Build the Go application
RUN go build -o main ./cmd

# Stage 2: Run
FROM ubuntu:22.04

# Install necessary libraries
RUN apt-get update && apt-get install -y \
    ca-certificates \
    libc6 \
    && rm -rf /var/lib/apt/lists/*

WORKDIR /app

# Copy the binary from the build stage
COPY --from=builder /app/main /app/main

ENTRYPOINT ["/app/main"]

# Expose port (if necessary)
EXPOSE 8080
version: '4.0'
services:
  api-gateway:
    build: ./api-gateway
    ports:
      - "8080:8080"
    depends_on:
      - user-service

  user-service:
    build:
      context: ./services/user-service
      dockerfile: Dockerfile
    ports:
      - "50051:50051"

  # Can put another service here
Because we use docker, make sure your docker already active.
And we can run with this command:
docker-compose up --build -d
You will see your services already up. (I use windows)

You can also use this command to see active service:
docker ps

You see that i also have another services, you can also add it to your code.
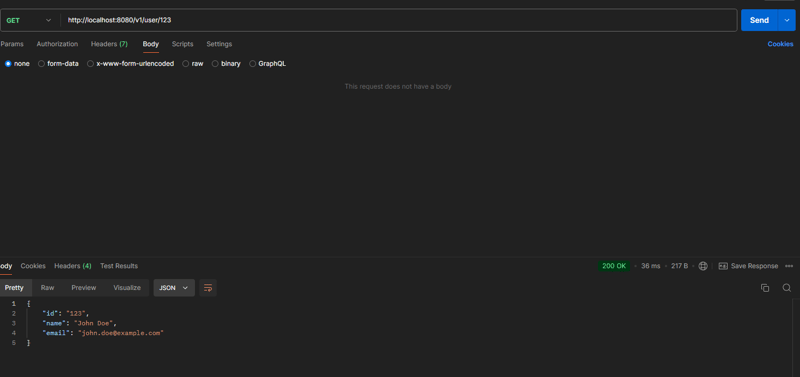
I use postman to hit user-service endpoint
Because we also put log code in our user-service, we can do this command to look into our service logs:
docker logs --follow user-service-1
Make sure service name by looks into our active service docker ps
Then you will see this log:

Congratulations! ? You've just built a basic microservices architecture for an online store using Go, gRPC, Docker. Keep experimenting and improving your setup. We will continue to build our online-store until finish, stay tune ???
Repository: https://github.com/agustrinaldokurniawan/online-store/tree/main/backend
The above is the detailed content of Build basic microservice online store backend with Golang use Api Gateway Pattern - Part 1. For more information, please follow other related articles on the PHP Chinese website!
 The difference between gateway and router
 How to recover files emptied from Recycle Bin
 How to fix libcurl.dll missing from your computer
 Delete exif information
 WiFi shows no access to the Internet
 My computer can't open it by double-clicking it.
 How to restore friends after being blocked on TikTok
 Introduction to javascript special effects code


![[Web front-end] Node.js quick start](https://img.php.cn/upload/course/000/000/067/662b5d34ba7c0227.png)


