

Baby Steps Learning Laravel

Welcome Back, Devs! ✨
In this chapter of our Laravel journey (remember, I’m learning as I write these articles, so this will be one of the most realistic tutorial series you can find!), we’ll dive into our Laravel project. We’ll explore the project structure, get familiar with migrations, and break down the MVC architecture in the simplest way possible.
? Today’s Agenda:
-
Exploring Our Project Structure ?️
- Understand the directory layout and navigate through it smoothly.
-
Setting Up a Database & Learning About Migrations ?️
- Configure our database and get to grips with migrations.
-
Understanding MVC & Creating Some MVC Elements ?
- Learn how the MVC architecture works and tinker with migrations.
So, What Are All These Directories Doing? ?
Upon your first launch of VSCode in your newly created Laravel project, you might find the directory structure a bit intimidating. Here's a quick overview of what each key directory does:
- app/: Contains application logic (controllers, models).
- resources/views/: Where your Blade templates live.
- routes/: Contains route definitions.
- config/: Configuration files for various aspects of Laravel.
- database/: Migrations, seeders, and SQLite database (if used).
- public/: Entry point for web requests, including assets like CSS and JS.
Good News: You don’t need to know everything right now. Keep this cheatsheet handy!
Bad News: You'll need to learn about these as the series progresses. I'll add "knowledge checkpoints" to remind you of their purposes.
Viewing Your Web App in the Browser ?
Let’s get a taste of Laravel! Open your terminal and type:
php artisan serve
Then, head over to your browser and visit localhost:8000. You should see something like this:
Important: Ensure your server and DB are running (if using XAMPP, as explained in my previous article).
What Is Artisan? ?
If you're used to JavaScript, think of php artisan serve as similar to npm run dev.
Artisan is a powerful command-line tool that comes with Laravel, making various tasks easy and quick. The serve command starts a local development server. We'll use Artisan more as we progress, so don’t worry too much about it right now.
Configuring Our Database ?
A web app is essentially a wrapper for a database. Laravel supports various databases:
- SQLite: Default, zero configuration—ideal for small to medium projects.
- MySQL: For larger projects, though SQLite will work for most cases.
Setting Up SQLite
You don’t need to configure it; it’s the default database.
Setting Up MySQL (if using XAMPP)
Edit your .env file to uncomment the MySQL configuration:
SQLite Config
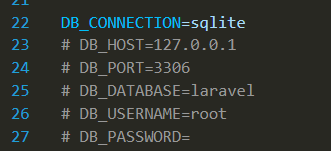
MySQL Config
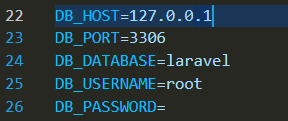
The .env file is like a switchboard for toggling configurations on and off.
? Sneak Peek into MVC: Baby Examples ?
Before diving deeper into MVC in future articles, let’s get a quick overview with some baby examples.
What is MVC? ?
MVC stands for Model-View-Controller. It’s a design pattern that separates concerns in your application:
- Model: ?️ Manages the data and business logic.
- View: ?️ Displays data to the user.
- Controller: ?️ Connects the Model and View, handling input and data flow.
?️ Baby Example: A Simple "Hello World" App
1. Model
Here’s a Greeting model for storing messages:
// app/Models/Greeting.php
namespace App\Models;

use Illuminate\Database\Eloquent\Model;

class Greeting extends Model
{
    protected $table = 'greetings';
    protected $fillable = ['message'];
}
2. View
The view displays the greeting message:
<!-- resources/views/greeting.blade.php -->
<!DOCTYPE html>
<html>
<head>
    <title>Greeting</title>
</head>
<body>
    <h1>{{ $message }}</h1>
</body>
</html>
3. Controller
The controller fetches the greeting message and passes it to the view:
// app/Http/Controllers/GreetingController.php
namespace App\Http\Controllers;

use App\Models\Greeting;
use Illuminate\Http\Request;

class GreetingController extends Controller
{
    public function show()
    {
        $greeting = Greeting::first();
        return view('greeting', ['message' => $greeting->message]);
    }
}
How It All Works Together
- Model: Manages data (Greeting class).
- View: Presents data (greeting.blade.php).
- Controller: Connects Model and View (GreetingController).
In this setup:
- The Model handles the data.
- The View presents the data.
- The Controller connects the two.
In future articles, we'll dive deeper into each component and explore more complex examples. Stay tuned! ?
The above is the detailed content of Baby Steps Learning Laravel. For more information, please follow other related articles on the PHP Chinese website!

Hot AI Tools

Undresser.AI Undress
AI-powered app for creating realistic nude photos

AI Clothes Remover
Online AI tool for removing clothes from photos.

Undress AI Tool
Undress images for free

Clothoff.io
AI clothes remover

Video Face Swap
Swap faces in any video effortlessly with our completely free AI face swap tool!

Hot Article
Hot Tools

Notepad++7.3.1
Easy-to-use and free code editor

SublimeText3 Chinese version
Chinese version, very easy to use

Zend Studio 13.0.1
Powerful PHP integrated development environment

Dreamweaver CS6
Visual web development tools

SublimeText3 Mac version
God-level code editing software (SublimeText3)
Hot Topics
 1664
1664
 14
1422
52
1316
25
1268
29
1240
24
14
1422
52
1316
25
1268
29
1240
24

 PHP and Python: Comparing Two Popular Programming Languages
Apr 14, 2025 am 12:13 AM
PHP and Python: Comparing Two Popular Programming Languages
Apr 14, 2025 am 12:13 AM
PHP and Python each have their own advantages, and choose according to project requirements. 1.PHP is suitable for web development, especially for rapid development and maintenance of websites. 2. Python is suitable for data science, machine learning and artificial intelligence, with concise syntax and suitable for beginners.
 PHP in Action: Real-World Examples and Applications
Apr 14, 2025 am 12:19 AM
PHP in Action: Real-World Examples and Applications
Apr 14, 2025 am 12:19 AM
PHP is widely used in e-commerce, content management systems and API development. 1) E-commerce: used for shopping cart function and payment processing. 2) Content management system: used for dynamic content generation and user management. 3) API development: used for RESTful API development and API security. Through performance optimization and best practices, the efficiency and maintainability of PHP applications are improved.
 Explain secure password hashing in PHP (e.g., password_hash, password_verify). Why not use MD5 or SHA1?
Apr 17, 2025 am 12:06 AM
Explain secure password hashing in PHP (e.g., password_hash, password_verify). Why not use MD5 or SHA1?
Apr 17, 2025 am 12:06 AM
In PHP, password_hash and password_verify functions should be used to implement secure password hashing, and MD5 or SHA1 should not be used. 1) password_hash generates a hash containing salt values to enhance security. 2) Password_verify verify password and ensure security by comparing hash values. 3) MD5 and SHA1 are vulnerable and lack salt values, and are not suitable for modern password security.
 What are HTTP request methods (GET, POST, PUT, DELETE, etc.) and when should each be used?
Apr 09, 2025 am 12:09 AM
What are HTTP request methods (GET, POST, PUT, DELETE, etc.) and when should each be used?
Apr 09, 2025 am 12:09 AM
HTTP request methods include GET, POST, PUT and DELETE, which are used to obtain, submit, update and delete resources respectively. 1. The GET method is used to obtain resources and is suitable for read operations. 2. The POST method is used to submit data and is often used to create new resources. 3. The PUT method is used to update resources and is suitable for complete updates. 4. The DELETE method is used to delete resources and is suitable for deletion operations.
 PHP: A Key Language for Web Development
Apr 13, 2025 am 12:08 AM
PHP: A Key Language for Web Development
Apr 13, 2025 am 12:08 AM
PHP is a scripting language widely used on the server side, especially suitable for web development. 1.PHP can embed HTML, process HTTP requests and responses, and supports a variety of databases. 2.PHP is used to generate dynamic web content, process form data, access databases, etc., with strong community support and open source resources. 3. PHP is an interpreted language, and the execution process includes lexical analysis, grammatical analysis, compilation and execution. 4.PHP can be combined with MySQL for advanced applications such as user registration systems. 5. When debugging PHP, you can use functions such as error_reporting() and var_dump(). 6. Optimize PHP code to use caching mechanisms, optimize database queries and use built-in functions. 7
 Explain the difference between self::, parent::, and static:: in PHP OOP.
Apr 09, 2025 am 12:04 AM
Explain the difference between self::, parent::, and static:: in PHP OOP.
Apr 09, 2025 am 12:04 AM
In PHPOOP, self:: refers to the current class, parent:: refers to the parent class, static:: is used for late static binding. 1.self:: is used for static method and constant calls, but does not support late static binding. 2.parent:: is used for subclasses to call parent class methods, and private methods cannot be accessed. 3.static:: supports late static binding, suitable for inheritance and polymorphism, but may affect the readability of the code.
 How does PHP handle file uploads securely?
Apr 10, 2025 am 09:37 AM
How does PHP handle file uploads securely?
Apr 10, 2025 am 09:37 AM
PHP handles file uploads through the $\_FILES variable. The methods to ensure security include: 1. Check upload errors, 2. Verify file type and size, 3. Prevent file overwriting, 4. Move files to a permanent storage location.
 How does PHP type hinting work, including scalar types, return types, union types, and nullable types?
Apr 17, 2025 am 12:25 AM
How does PHP type hinting work, including scalar types, return types, union types, and nullable types?
Apr 17, 2025 am 12:25 AM
PHP type prompts to improve code quality and readability. 1) Scalar type tips: Since PHP7.0, basic data types are allowed to be specified in function parameters, such as int, float, etc. 2) Return type prompt: Ensure the consistency of the function return value type. 3) Union type prompt: Since PHP8.0, multiple types are allowed to be specified in function parameters or return values. 4) Nullable type prompt: Allows to include null values and handle functions that may return null values.
