HTML Image Padding

WBOY
Release: 2024-09-04 16:49:49
Original
1057 people have browsed it

The padding property in html gives space around the innermost element’s content of the box-like structure. The margin property in html provides space around the outermost element’s content of the box-like structure. The space around the padding and margin is called a border.

The difference between the padding, margin, and border you can observe below:

HTML Image Padding

  • As we know common styles in all the pages, we always preferred CSS over HTML.
  • All common properties are implemented in CSS only.

How does Image Padding Work in HTML or CSS?

  • Padding always creates space between innermost portions, whether image or content.
  • Padding with image defines by img tag in CSS only.

Syntax 1:

img
{
Padding: 10px,10px,10px,10px; //padding positions
}
Copy after login

Syntax 1 Explanation:

If we apply padding with 4 values, the first value is for the top, the second value is for the right, the third is for the bottom, and the fourth is for the left applied, respectively.

Syntax 2:

img
{
Padding: 10px,10px,10px; //padding positions
}
Copy after login

Syntax Explanation:

If we apply padding with 3 values, the first is for the top, the second is for left and right, and the third is for the bottom applied.

Syntax 3:

img
{
Padding: 10px,10px; //padding positions
}
Copy after login

Syntax Explanation:

If we apply padding with 2 values, the first value is for the top and bottom, and the second is for the left and right applied, respectively.

Syntax 4:

img
{
Padding: 10px; //padding positions
}
Copy after login

Syntax Explanation:

If we apply padding with only single values, then use it equally for all four sides.

Examples of HTML Image Padding

Given below are the examples of HTML Image Padding:

Example #1 – Image Padding with 4 Padding Values

HTML Code:

<!DOCTYPE html>
<html>
<head>
<title>Image Padding</title>
<link rel="stylesheet" href="ImagePaddingFourSides.css"></link>
</head>
<body>
<font color="green">
<h2>Image without Padding</h2>
</font>
<p>
<img src="Tulips.jpg" class="noPadding">
</p>
<font color="green">
<h2>Image with Padding</h2>
</font>
<p>
<img src="Tulips.jpg" class="padding">
</p>
</body>
</html>
Copy after login

CSS Code:

.noPadding
{
width:400px;
height:400px;
border: 5px solid brown;
}
.padding
{
width:400px;
height:400px;
padding: 50px 50px 50px 50px;
}
Copy after login

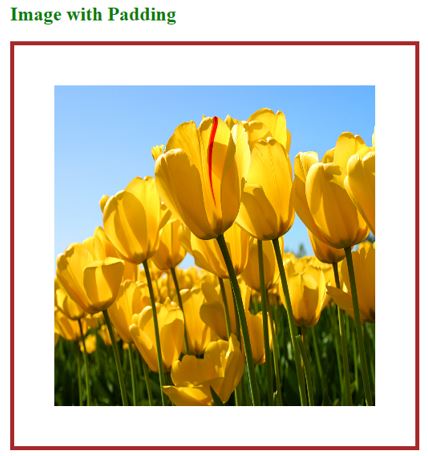
Output:

Before applying padding:

HTML Image Padding

After applying padding:

HTML Image Padding

Explanation:

  • The first image class name, noPadding, and second image class name padding have been taken in HTML code in the above code.
  • In CSS code, the noPadding class has without padding with a 5px border. No padding does not give any space around the image. It strictly sticks to the border. You can see it in the above 1st image.
  • The padding class has padding 50px and 50px border. Due to this padding around the image, we have seen some space from the border. You can see it in the 2nd image.

Example #2 – Image Padding with 3 Padding Values

HTML Code:

<!DOCTYPE html>
<html>
<head>
<title>Image Padding</title>
<link rel="stylesheet" href="ImagePaddingThreeSides.css"></link>
</head>
<body>
<font color="green">
<h2>Image without Padding</h2>
</font>
<p>
<img src="Koala.jpg" class="noPadding">
</p>
<font color="green">
<h2>Image with Padding</h2>
</font>
<p>
<img src="Tulips.jpg" class="padding">
</p>
</body>
</html>
Copy after login

CSS Code:

.noPadding
{
width:400px;
height:400px;
border: 5px solid yellow;
}
.padding
{
width:400px;
height:400px;
padding: 50px 20px 50px;
border: 5px solid yellow;
}
Copy after login

Output:

Before applying padding:

HTML Image Padding

After applying padding:

HTML Image Padding

Explanation:

  • In the above code first image class name, noPadding, and second image class name padding have been taken in HTML code.
  • In CSS code, the noPadding class has without padding with a 5px border. No padding does not give any space around the image. It strictly sticks to the border. You can see it in the above 1st image.
  • The padding class has padding 50px, 20px, 50px, and 5px border. Due to this padding around the image top 50px, left and right 20px, and 50px bottom, respectively. We have seen some space from the border. You can see this in the 2nd image.

Example #3 – Image Padding with 3 Padding Values

HTML Code:

<!DOCTYPE html>
<html>
<head>
<title>Image Padding</title>
<link rel="stylesheet" href="ImagePaddingTwoSides.css"></link>
</head>
<body>
<font color="green">
<h2>Image without Padding</h2>
</font>
<p>
<img src="Desert.jpg" class="noPadding">
</p>
<font color="green">
<h2>Image with Padding</h2>
</font>
<p>
<img src="Desert.jpg" class="padding">
</p&gt
</body>
</html>
Copy after login

CSS Code:

.noPadding
{
width:400px;
height:400px;
border: 5px solid yellow;
}
.padding
{
width:400px;
height:400px;
padding: 75px 50px;
border: 5px solid yellow;
}
Copy after login

Output:

Before applying padding:

HTML Image Padding

After applying padding:

HTML Image Padding

Explanation:

  • The first image class name, noPadding, and second image class name padding have been taken in HTML code in the above code.
  • In CSS code, the noPadding class has without padding with a 5px border. No padding does not give any space around the image. It strictly sticks to the border. You can see it in the above 1st  image.
  • The padding class has padding 75px 50px and 5px border. Due to this, padding around the image’s top and bottom is 50px, and the left and right are 50px, respectively. We have seen some space from the border. You can see it in the 2nd image.

Example #4 – Image Padding with a Single Padding Value

HTML Code:

<!DOCTYPE html>
<html>
<head>
<title>Image Padding</title>
<link rel="stylesheet" href="ImagePaddingSingleSides.css"></link>
</head>
<body>
<font color="green">
<h2>Image without Padding</h2>
</font>
<p>
<img src="Penguins.jpg" class="noPadding">
</p>
<font color="green">
<h2>Image with Padding</h2>
</font>
<p>
<img src="Penguins.jpg" class="padding">
</p>
</body>
</html>
Copy after login

CSS Code:

.noPadding
{
width:400px;
height:400px;
border: 5px solid blue;
}
.padding
{
width:400px;
height:400px;
padding: 70px;
border: 5px solid blue;
}
Copy after login

Output:

Before applying padding:

HTML Image Padding

After applying padding:

HTML Image Padding

Explanation:

  • The first image class name, noPadding, and second image class name padding have been taken in HTML code in the above code.
  • In CSS code, the noPadding class has without padding with a 5px border. No padding does not give any space around the image. It strictly sticks to the border. You can see it in the above 1st image.
  • The padding class has a padding of 70 and a 5px border. Due to this, we were padding around the image top, left, right and bottom 70px around, respectively. We have seen some space from the border. You can see it in the 2nd image.

If we want to apply only particular side padding, then CSS provides predefined properties:

  • Padding-left: 10px: apply padding 10px to the left side.
  • Padding-right: 10px: apply padding 10px to the right side.
  • Padding-top: 10px: apply padding 10px to the top side.
  • Padding-bottom: 10px: apply padding 10px bottom side.
Note: To include css file in HTML, use tag.

Conclusion

Image padding gives space around the innermost portion. We can apply with one, two, three, and four values with padding inside the img tag.

The above is the detailed content of HTML Image Padding. For more information, please follow other related articles on the PHP Chinese website!

source:php
Statement of this Website
The content of this article is voluntarily contributed by netizens, and the copyright belongs to the original author. This site does not assume corresponding legal responsibility. If you find any content suspected of plagiarism or infringement, please contact admin@php.cn
Popular Tutorials
More>
Latest Downloads
More>
Web Effects
Website Source Code
Website Materials
Front End Template
About us Disclaimer Sitemap
php.cn:Public welfare online PHP training,Help PHP learners grow quickly!