

From legacy to cloud serverless - Part 1

Note: This article was originally published on Nov 4, 2023 here. It has been republished here to reach a broader audience.
Welcome to the first article in a series that will walk you through the process of migrating a legacy app from on-premises to the cloud, with a focus on modernization, serverless platforms, and integrated DevOps practices.
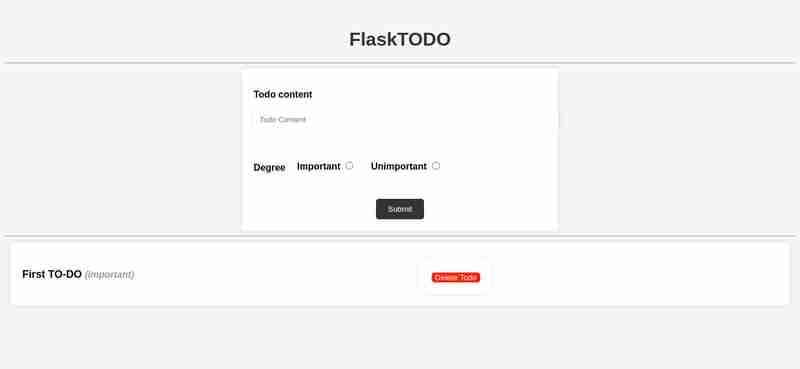
In this article, we will focus on containerizing your app. However, if you're building an app from scratch, that's perfectly fine (in fact, it's even better). For this example, I'm using this DigitalOcean guide to build a simple TODO app using Python (Flask) and MongoDB as the database. I've made some customizations to make it look better, but the main point is to build something that uses a NoSQL document-based database, as this will be required for the upcoming work.
You can clone the repository of the app here on GitHub if you haven't built your own.
Once you have your app built, let's get started!
Dockerfile
Here is the structure of the application directory that we will containerize, followed by the Dockerfile.
.
├── app.py
├── LICENSE
├── README.md
├── requirements.txt
├── static
│   └── style.css
└── templates
    └── index.html
The app.py file is the main application file that contains the Flask app code. The requirements.txt file contains the list of Python dependencies required by the application. The static/ directory contains static files such as CSS, JavaScript, and images. The templates/ directory contains the HTML templates used by the Flask app.
# Use a minimal base image
FROM python:3.9.7-slim-buster AS base

# Create a non-root user
RUN useradd -m -s /bin/bash flaskuser
USER flaskuser

# Set the working directory
WORKDIR /app

# Copy the requirements file and install dependencies
COPY requirements.txt .
RUN pip install --no-cache-dir -r requirements.txt

# Add the directory containing the flask command to the PATH
ENV PATH="/home/flaskuser/.local/bin:${PATH}"

# Use a multi-stage build to minimize the size of the image
FROM base AS final

# Copy the app code
COPY app.py .
COPY templates templates/
COPY static static/

# Set environment variables
ENV FLASK_APP=app.py
ENV FLASK_ENV=production

# Expose the port
EXPOSE 5000

# Run the app
CMD ["flask", "run", "--host=0.0.0.0"]
Here's a walkthrough and breakdown of the Dockerfile:
The Dockerfile starts with a FROM instruction that specifies the base image to use. In this case, it's python:3.9.7-slim-buster, which is a minimal base image that includes Python 3.9.7 and some essential libraries.
The next instruction creates a non-root user named flaskuser using the RUN and useradd commands. This is a security best practice to avoid running the container as the root user.
The WORKDIR instruction sets the working directory to /app, which is where the application code will be copied.
The COPY instruction copies the requirements.txt file to the container's /app directory.
The RUN instruction installs the dependencies listed in requirements.txt using pip. The --no-cache-dir option is used to avoid caching the downloaded packages, which helps to keep the image size small.
The ENV instruction adds the directory containing the flask command to the PATH environment variable. This is necessary to run the flask command later.
The FROM instruction starts a new build stage using the base image defined earlier. This is a multi-stage build that helps to minimize the size of the final image.
The COPY instruction copies the application code (app.py), templates (templates/), and static files (static/) to the container's /app directory.
The ENV instruction sets the FLASK_APP and FLASK_ENV environment variables. FLASK_APP specifies the name of the main application file, and FLASK_ENV sets the environment to production.
The EXPOSE instruction exposes port 5000, which is the default port used by Flask.
The CMD instruction specifies the command to run when the container starts. In this case, it runs the flask run command with the --host=0.0.0.0 option to bind to all network interfaces.
With this Dockerfile, the application can be containerized and executed. However, it's important to note that our app requires a database to store the data created or generated while it's running. Of course, you could separately pull a MongoDB database image and run it independently. Then, make adjustments on both sides to establish communication between the two containers so that the app can successfully store data in the database. While this approach works, it may consume time and be a bit tedious. To streamline the process, we will instead move forward with Docker Compose. In Docker Compose, everything is declared in a YAML file, and by using the docker-compose up command, we can start and operate the different services seamlessly, saving time and effort.
Streamlining Database Integration with Docker Compose
Here is the basic Docker Compose YAML file that we will use to streamline the process.
version: '3.9'

services:
  db:
    image: mongo:4.4.14
    ports:
      - "27017:27017"
    volumes:
      - mongo-data:/data/db

  web:
    build: .
    container_name: "myflaskapp"
    ports:
      - "5000:5000"
    environment:
      - MONGO_URI=mongodb://db:27017
    depends_on:
      - db

volumes:
  mongo-data:
This Docker Compose YAML file is configured to set up two services: a MongoDB database (db) and a web application (web). Here's a breakdown:
Version: Specifies the version of the Docker Compose file format being used (3.9 in this case).
-
Services:
-
Database (db):
- MongoDB バージョン 4.4.14 イメージを使用します。
- ホスト ポート 27017 をコンテナ ポート 27017 にマッピングします。
- mongo-data という名前のボリュームを利用して、MongoDB データを永続的に保存します。
-
Web アプリケーション (Web):
- 現在のディレクトリ (.) から Docker イメージを構築します。
- コンテナ名を「myflaskapp」に設定します。
- ホスト ポート 5000 をコンテナ ポート 5000 にマッピングします。
- 環境変数 MONGO_URI を値 mongodb://db:27017 で定義し、MongoDB サービスへの接続を確立します。
- DB サービスへの依存関係を指定し、データベースが Web サービスより前に開始されるようにします。
-
-
ボリューム:
- MongoDB データを永続化するために、mongo-data という名前のボリュームを定義します。
要約すると、この Docker Compose ファイルは MongoDB データベースと Flask Web アプリケーションのデプロイメントを調整し、それらがシームレスに通信して連携できるようにします。
次に、Docker Compose ファイルのあるディレクトリに移動し、docker-compose up を実行して MongoDB と Flask Web アプリを起動します。 http://localhost:5000 でアプリにアクセスし、すべてが期待どおりに動作することを確認します。
停止するには、docker-compose down を使用します。
大丈夫ですか?次は、次の記事でワークフローを Kubernetes に移行します。

The above is the detailed content of From legacy to cloud serverless - Part 1. For more information, please follow other related articles on the PHP Chinese website!

Hot AI Tools

Undresser.AI Undress
AI-powered app for creating realistic nude photos

AI Clothes Remover
Online AI tool for removing clothes from photos.

Undress AI Tool
Undress images for free

Clothoff.io
AI clothes remover

AI Hentai Generator
Generate AI Hentai for free.

Hot Article
Hot Tools

Notepad++7.3.1
Easy-to-use and free code editor

SublimeText3 Chinese version
Chinese version, very easy to use

Zend Studio 13.0.1
Powerful PHP integrated development environment

Dreamweaver CS6
Visual web development tools

SublimeText3 Mac version
God-level code editing software (SublimeText3)
Hot Topics
 1377
1377
 52
52

 How to solve the permissions problem encountered when viewing Python version in Linux terminal?
Apr 01, 2025 pm 05:09 PM
How to solve the permissions problem encountered when viewing Python version in Linux terminal?
Apr 01, 2025 pm 05:09 PM
Solution to permission issues when viewing Python version in Linux terminal When you try to view Python version in Linux terminal, enter python...
 How to efficiently copy the entire column of one DataFrame into another DataFrame with different structures in Python?
Apr 01, 2025 pm 11:15 PM
How to efficiently copy the entire column of one DataFrame into another DataFrame with different structures in Python?
Apr 01, 2025 pm 11:15 PM
When using Python's pandas library, how to copy whole columns between two DataFrames with different structures is a common problem. Suppose we have two Dats...
 How to teach computer novice programming basics in project and problem-driven methods within 10 hours?
Apr 02, 2025 am 07:18 AM
How to teach computer novice programming basics in project and problem-driven methods within 10 hours?
Apr 02, 2025 am 07:18 AM
How to teach computer novice programming basics within 10 hours? If you only have 10 hours to teach computer novice some programming knowledge, what would you choose to teach...
 How does Uvicorn continuously listen for HTTP requests without serving_forever()?
Apr 01, 2025 pm 10:51 PM
How does Uvicorn continuously listen for HTTP requests without serving_forever()?
Apr 01, 2025 pm 10:51 PM
How does Uvicorn continuously listen for HTTP requests? Uvicorn is a lightweight web server based on ASGI. One of its core functions is to listen for HTTP requests and proceed...
 How to dynamically create an object through a string and call its methods in Python?
Apr 01, 2025 pm 11:18 PM
How to dynamically create an object through a string and call its methods in Python?
Apr 01, 2025 pm 11:18 PM
In Python, how to dynamically create an object through a string and call its methods? This is a common programming requirement, especially if it needs to be configured or run...
 What are some popular Python libraries and their uses?
Mar 21, 2025 pm 06:46 PM
What are some popular Python libraries and their uses?
Mar 21, 2025 pm 06:46 PM
The article discusses popular Python libraries like NumPy, Pandas, Matplotlib, Scikit-learn, TensorFlow, Django, Flask, and Requests, detailing their uses in scientific computing, data analysis, visualization, machine learning, web development, and H
 How to avoid being detected by the browser when using Fiddler Everywhere for man-in-the-middle reading?
Apr 02, 2025 am 07:15 AM
How to avoid being detected by the browser when using Fiddler Everywhere for man-in-the-middle reading?
Apr 02, 2025 am 07:15 AM
How to avoid being detected when using FiddlerEverywhere for man-in-the-middle readings When you use FiddlerEverywhere...
 How to handle comma-separated list query parameters in FastAPI?
Apr 02, 2025 am 06:51 AM
How to handle comma-separated list query parameters in FastAPI?
Apr 02, 2025 am 06:51 AM
Fastapi ...
