
 Java
javaTutorial
Building Synchronous Email Notification Systems in Spring Boot: A Step-by-Step Guide
Java
javaTutorial
Building Synchronous Email Notification Systems in Spring Boot: A Step-by-Step Guide
Building Synchronous Email Notification Systems in Spring Boot: A Step-by-Step Guide

Exploring the Fundamentals of Synchronous Email Delivery in Spring Boot Applications
In today's fast-paced digital world, timely communication is crucial for any application. Whether it's a password reset, a welcome message, or an order confirmation, email notifications play a vital role in enhancing user experience. As developers, we often find ourselves in situations where sending an email notification from our Spring Boot application is not just a requirement but a necessity.
In this blog series, I'll guide you through the process of implementing email notifications in a Spring Boot application. We'll start with the basics—using a synchronous approach to send emails. This method ensures that the email is sent immediately during the execution of the request, providing instant feedback to the user.
While a synchronous approach is simple to implement and can be effective for smaller applications, it’s important to understand its limitations, particularly in high-traffic environments where performance can be impacted.
In this part, we’ll focus on setting up the project, configuring the necessary dependencies, and writing the code to send a basic email notification. By the end of this post, you'll have a working Spring Boot application capable of sending emails synchronously, setting the stage for more advanced topics in the upcoming parts of this series.
Project Setup
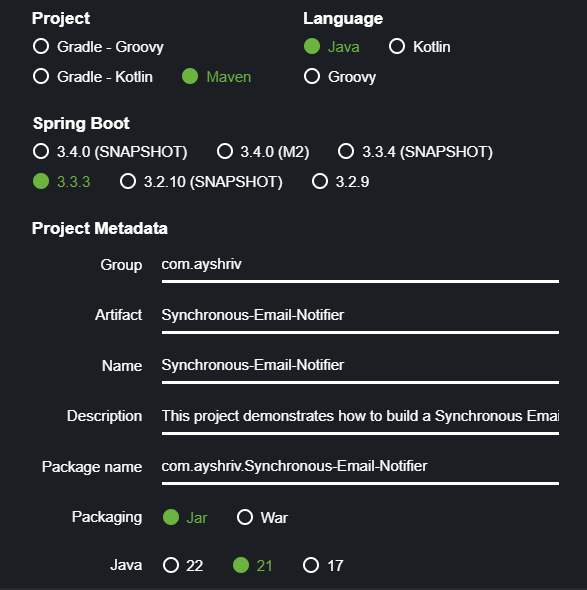
Setting up Dependencies
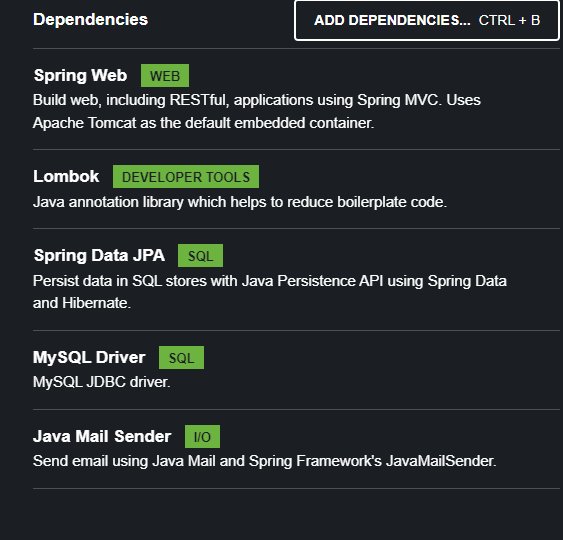
Dependency in your pom.xml file
Spring Boot Starter Data JPA
Artifact: spring-boot-starter-data-jpa
Description: This dependency simplifies data persistence using JPA (Java Persistence API). It provides everything needed for interacting with databases, including entities, repositories, and transactions. In this project, it allows you to save and retrieve user data (e.g., email logs, user information) from a MySQL database easily.
Spring Boot Starter Mail
Artifact: spring-boot-starter-mail
Description: This starter enables sending emails from your Spring Boot application. It includes the necessary components, such as JavaMailSender, to configure and send real-time email notifications for user activities like registration and order confirmations.
*Spring Boot Starter Web
*
Artifact: spring-boot-starter-web
Description: This dependency helps you build RESTful web services and serve web content. It brings in the essential libraries like Spring MVC for creating APIs. In this project, it enables the creation of endpoints to trigger email notifications via HTTP requests.
MySQL Connector
Artifact: mysql-connector-j
Description: This is the JDBC driver required for connecting your Spring Boot application to a MySQL database. It allows the application to interact with the database and perform actions like reading and writing data, such as storing email logs or user information.
Lombok
Artifact: lombok
Description: Lombok is a handy library that reduces boilerplate code by auto-generating common methods like getters, setters, and constructors. It’s marked as optional in this project, and its use can simplify code for data models like User or EmailLog.
Spring Boot Starter Test
Artifact: spring-boot-starter-test
Description: This dependency provides a comprehensive testing framework for Spring Boot applications. It includes libraries like JUnit, Mockito, and Spring Test for unit and integration testing. It helps ensure your email notification system is working as expected with automated tests.
Spring Boot Maven Plugin
Artifact: spring-boot-maven-plugin
Description: This plugin allows you to build and run your Spring Boot application from a Maven command. It simplifies packaging your project into an executable JAR file, making deployment easier. It excludes the Lombok dependency from the build process if necessary.
Configuring Application Properties
To connect your Spring Boot application to an email server, you can configure the application.properties or application.yml file with the necessary SMTP settings. Below is an example for each configuration format.
For application.properties
spring.application.name=Synchronous-Email-Notifier
server.port=8080

spring.datasource.url=jdbc:mysql://localhost:3306/synchronous_email_notifier
spring.datasource.username=root
spring.datasource.password=ayush@123

spring.jpa.hibernate.ddl-auto=update
spring.jpa.show-sql=true

spring.mail.host=smtp.gmail.com
spring.mail.port=587
spring.mail.username=shri@gmail.com
spring.mail.password=
spring.mail.properties.mail.smtp.auth=true
spring.mail.properties.mail.smtp.starttls.enable=true
application.yml の場合
spring:
  mail:
    host: smtp.example.com
    port: 587
    username: your-email@example.com
    password: your-email-password
    properties:
      mail:
        smtp:
          auth: true
          starttls:
            enable: true
ホスト: これは SMTP サーバーのアドレスです。 smtp.example.com を実際の SMTP プロバイダーのアドレスに置き換えます (例: Gmail の場合は smtp.gmail.com、Yahoo の場合は smtp.mail.yahoo.com)。
ポート: ポート 587 は通常、TLS (Transport Layer Security) 経由で電子メールを送信するために使用されます。メールプロバイダーが SSL をサポートしている場合は、ポート 465 を使用できます。
ユーザー名: メールの送信元のメール アドレス。必ず実際のメール アカウントに置き換えてください。
パスワード: 電子メール アカウントのパスワード。セキュリティ上の理由から、Gmail などのサービスを使用している場合は、実際のアカウント パスワードの代わりにアプリ パスワードを使用することをお勧めします。また、パスワードなどの機密情報には環境変数を使用することも検討してください。
SMTP 認証: これにより、SMTP サーバーの認証が有効になります。これは、電子メール プロバイダーが有効なユーザー名とパスワードを必要とする場合に必要になります。
STARTTLS: これにより、電子メール サーバーへの接続が TLS を使用して暗号化されます。これは安全な通信にとって非常に重要です。
プロジェクトのセットアップ
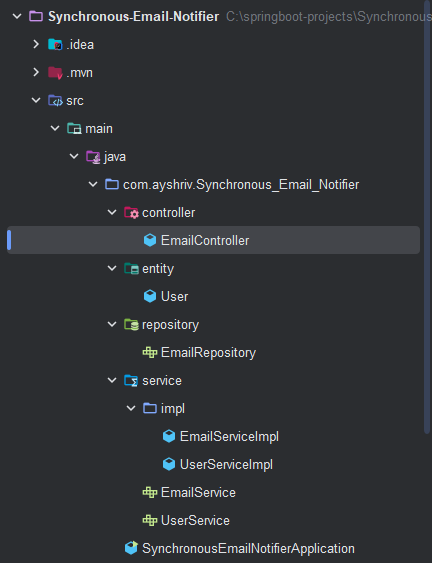
User.java ユーザーのメールやその他の情報をデータベースに保存します。ここでは、データベース内に存在するすべてのユーザーに電子メールを送信します。
@Entity
@AllArgsConstructor
@NoArgsConstructor
@Data
public class User {
    @Id
    @GeneratedValue(strategy = GenerationType.AUTO)
    private int id;
    private String name;
    private String email;
    private String phoneNumber;
}
UserService.java
public interface UserService {
    public void saveUser(User user);
}
UserServiceImpl.java
public class UserServiceImpl implements UserService {

    @Autowired
    private UserRepository userRepository;

    @Override
    public void saveUser(User user) {
        userRepository.save(user);
    }
}
EmailController.java
@RestController
@RequestMapping("/api/email")
public class EmailController {

    @Autowired
    EmailService emailService;

    @Autowired
    UserService userService;

    @PostMapping("/saveUser")
    public String saveUser(@RequestBody User user) {
        userService.saveUser(user);
        return "User saved successfully";
    }
}
EmailService インターフェイスは、Java アプリケーションで電子メールを送信するためのコントラクトを定義します。これには、受信者の電子メール アドレス (to)、電子メールの件名 (subject)、および電子メールの内容 (body) の 3 つのパラメーターを取る sendEmail メソッドが含まれています。このインターフェースを実装すると、電子メール通知を簡単に統合できます。
package com.ayshriv.Synchronous_Email_Notifier.service;

public interface EmailService {
    void sendEmail(String to, String subject,String body);
}
この EmailServiceImpl クラスは EmailService インターフェイスを実装し、Spring の JavaMailSender を使用して電子メールを送信する機能を提供します。 SimpleMailMessage を使用して、受信者 (to)、件名 (件名)、および本文 (テキスト) を設定します。 javaMailSender は、Spring の @Autowired アノテーションを使用して自動的に挿入されます。電子メール送信プロセス中に例外が発生した場合、それらは捕捉され、コンソールに記録されます。
package com.ayshriv.Synchronous_Email_Notifier.service.impl;

import com.ayshriv.Synchronous_Email_Notifier.service.EmailService;
import org.springframework.beans.factory.annotation.Autowired;
import org.springframework.mail.SimpleMailMessage;
import org.springframework.mail.javamail.JavaMailSender;
import org.springframework.stereotype.Service;

@Service
public class EmailServiceImpl implements EmailService {
    @Autowired
    private JavaMailSender javaMailSender;

    public void sendEmail(String to, String subject,String body)
    {
        try {
            SimpleMailMessage simpleMailMessage=new SimpleMailMessage();
            simpleMailMessage.setTo(to);
            simpleMailMessage.setSubject(subject);
            simpleMailMessage.setText(body);
            javaMailSender.send(simpleMailMessage);
        }
        catch (Exception exception)
        {
            System.out.println(exception.getMessage());
        }
    }
}
この EmailScheduler クラスは、スケジュールされたタスクを使用してデータベース内のすべてのユーザーに定期的に電子メールを送信する Spring サービスです。クラスは次のように機能します:
cron 式 ("0 0/1 * 1/1 * ?") を指定した @Scheduled を使用して、fetchUsersAndSendEmail メソッドを毎分実行します。
このメソッドは、UserRepository からすべてのユーザーのリストを取得し、EmailService を使用して各ユーザーに電子メールを送信します。
送信される各メールには、件名が「メールのデモ テキスト」、本文が「デモ」となります。
package com.ayshriv.Synchronous_Email_Notifier.schduler;

import com.ayshriv.Synchronous_Email_Notifier.entity.User;
import com.ayshriv.Synchronous_Email_Notifier.repository.UserRepository;
import com.ayshriv.Synchronous_Email_Notifier.service.EmailService;
import org.springframework.beans.factory.annotation.Autowired;
import org.springframework.scheduling.annotation.Scheduled;
import org.springframework.stereotype.Service;

import java.util.List;

@Service
public class EmailScheduler {
    @Autowired
    private UserRepository userRepository;

    @Autowired
    private EmailService emailService;

    @Scheduled(cron = "0 0/1 * 1/1 * ?")
    public void fetchUsersAndSendEmail()
    {
        List<User> users = userRepository.findAll();
        for (User user:users)
        {
            emailService.sendEmail(user.getEmail(),"Demo text for email","Demo");
        }
    }
}
Synchronous Email Notifier プロジェクトの EmailScheduler クラスは、特定の間隔でユーザーへのマーケティング電子メールの送信を自動化します。 Spring の @Scheduled アノテーションを使用して、毎分タスクを実行し、UserRepository からすべてのユーザーを取得し、EmailService 経由で電子メールを送信します。この設定は、マーケティング電子メール、ニュースレター、または重要な通知の配信を手動介入なしで自動化する企業にとって理想的です。 cron 式を使用してスケジュールを調整できるため、毎日、毎週、または任意のカスタム頻度でメールを柔軟に送信でき、時間ベースのメール キャンペーンの強力なツールになります。
ユーザーの保存

結論
Synchronous Email Notifier プロジェクトの EmailScheduler クラスは、ユーザーに電子メールを送信するプロセスを自動化する実用的かつ効率的な方法を示します。 Spring Boot の @Scheduled アノテーションと cron 式の柔軟性を活用することで、このクラスは電子メール送信タスクが毎分実行されるようにスケジュールを設定します。 UserRepository はすべてのユーザー レコードを取得し、EmailService は各ユーザーが事前定義されたコンテンツを含む電子メールを確実に受信できるようにします。
このアプローチは、企業がニュースレター、プロモーションオファー、または通知などの定期的な電子メールを特定の時間間隔で送信する必要があるマーケティング目的で非常に役立ちます。この設定により、手作業なしで電子メールがすべてのユーザーに一貫して送信されるようになります。この自動化により、コミュニケーション プロセスにかかる時間と労力が削減され、マーケティング担当者は効果的なキャンペーンの作成に集中できるようになります。
これらの電子メールの頻度を毎日、毎週、毎月送信するなどカスタマイズできるため、これはマーケティング キャンペーンに多用途なツールになります。さらに、コンテンツを動的に変更して、さまざまなユーザーや機会に合わせてメッセージを調整することができます。全体として、このソリューションは、スケジュールされたマーケティング電子メールのプロセスを簡素化および合理化し、拡張性があり、さまざまなビジネス ニーズに適応できるようにします。
GitHub で Synchronous Email Notifier プロジェクトの完全なソース コードにアクセスできます。 https://github.com/ishrivasayush/email-scheduling-application.git
このプロジェクトでは、Spring Boot を使用してスケジューラでマーケティング電子メールを自動化する方法を示します。自由に探索して投稿してください!
The above is the detailed content of Building Synchronous Email Notification Systems in Spring Boot: A Step-by-Step Guide. For more information, please follow other related articles on the PHP Chinese website!

Hot AI Tools

Undresser.AI Undress
AI-powered app for creating realistic nude photos

AI Clothes Remover
Online AI tool for removing clothes from photos.

Undress AI Tool
Undress images for free

Clothoff.io
AI clothes remover

Video Face Swap
Swap faces in any video effortlessly with our completely free AI face swap tool!

Hot Article
Hot Tools

Notepad++7.3.1
Easy-to-use and free code editor

SublimeText3 Chinese version
Chinese version, very easy to use

Zend Studio 13.0.1
Powerful PHP integrated development environment

Dreamweaver CS6
Visual web development tools

SublimeText3 Mac version
God-level code editing software (SublimeText3)
Hot Topics


 Is the company's security software causing the application to fail to run? How to troubleshoot and solve it?
Apr 19, 2025 pm 04:51 PM
Is the company's security software causing the application to fail to run? How to troubleshoot and solve it?
Apr 19, 2025 pm 04:51 PM
Troubleshooting and solutions to the company's security software that causes some applications to not function properly. Many companies will deploy security software in order to ensure internal network security. ...
 How to simplify field mapping issues in system docking using MapStruct?
Apr 19, 2025 pm 06:21 PM
How to simplify field mapping issues in system docking using MapStruct?
Apr 19, 2025 pm 06:21 PM
Field mapping processing in system docking often encounters a difficult problem when performing system docking: how to effectively map the interface fields of system A...
 How to elegantly obtain entity class variable names to build database query conditions?
Apr 19, 2025 pm 11:42 PM
How to elegantly obtain entity class variable names to build database query conditions?
Apr 19, 2025 pm 11:42 PM
When using MyBatis-Plus or other ORM frameworks for database operations, it is often necessary to construct query conditions based on the attribute name of the entity class. If you manually every time...
 How do I convert names to numbers to implement sorting and maintain consistency in groups?
Apr 19, 2025 pm 11:30 PM
How do I convert names to numbers to implement sorting and maintain consistency in groups?
Apr 19, 2025 pm 11:30 PM
Solutions to convert names to numbers to implement sorting In many application scenarios, users may need to sort in groups, especially in one...
 How does IntelliJ IDEA identify the port number of a Spring Boot project without outputting a log?
Apr 19, 2025 pm 11:45 PM
How does IntelliJ IDEA identify the port number of a Spring Boot project without outputting a log?
Apr 19, 2025 pm 11:45 PM
Start Spring using IntelliJIDEAUltimate version...
 How to safely convert Java objects to arrays?
Apr 19, 2025 pm 11:33 PM
How to safely convert Java objects to arrays?
Apr 19, 2025 pm 11:33 PM
Conversion of Java Objects and Arrays: In-depth discussion of the risks and correct methods of cast type conversion Many Java beginners will encounter the conversion of an object into an array...
 E-commerce platform SKU and SPU database design: How to take into account both user-defined attributes and attributeless products?
Apr 19, 2025 pm 11:27 PM
E-commerce platform SKU and SPU database design: How to take into account both user-defined attributes and attributeless products?
Apr 19, 2025 pm 11:27 PM
Detailed explanation of the design of SKU and SPU tables on e-commerce platforms This article will discuss the database design issues of SKU and SPU in e-commerce platforms, especially how to deal with user-defined sales...
 How to elegantly get entity class variable name building query conditions when using TKMyBatis for database query?
Apr 19, 2025 pm 09:51 PM
How to elegantly get entity class variable name building query conditions when using TKMyBatis for database query?
Apr 19, 2025 pm 09:51 PM
When using TKMyBatis for database queries, how to gracefully get entity class variable names to build query conditions is a common problem. This article will pin...
