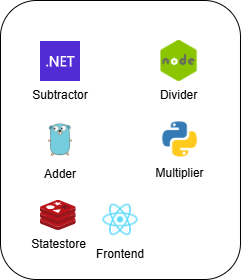
In this article I want to explore how we can leverage a tool such as .NET Aspire to improve the way we build and deploy distributed applications, even when we work with languages and frameworks other than .NET.
.NET Aspire is an opinionated, cloud ready stack designed to improve the experience of building observable, production ready, distributed applications. It is delivered through a collection of NuGet packages that handle specific cloud-native concerns.
.NET Aspire is designed to help you with:
The core of .NET Aspire can be found in the AppHost project that's created when you start working with Aspire from the .NET template. The AppHost project defines the components of our distributed application, from services - such as backend or fronted - to resources - such as databases or caches.
This project can generate a manifest describing from an infrastructure perspective our application. It can therefor be interpreted by the Azure Developer CLI to deploy the application to Azure, without the need to write any Infrastructure as Code.
Of course when we work with distributed applications and microservices we might incur in a scenario in which different teams like to write code in different languages. And of course .NET Aspire belongs to the .NET ecosystem. Nonetheless, it is design to be able to integrate with different languages and frameworks.
Let's consider a simple example. We have a distributed calculator that is composed of different services: a frontend service and a backend for each operation.
We also have a redis cache to store the state of the calculator.

In this scenario we can use .NET Aspire to build the distributed calculator, leveraging all the tool and integrations that come with it. Aspire offers native support for certain languages, but we can also extend it to support other languages using containers.
At the time of writing, .NET Aspire supports the following languages:
Here's how we can configure all the backend services in the AppHost project:
Golang isn't natively supported, so we will add it as a container. Note that we can decide to use different images for the scenarios in which we are running the AppHost for publishing the manifest or for local development.
// Configure Adder in Go
var add = (builder.ExecutionContext.IsPublishMode
    ? builder.AddContainer("addapp", "acrt6xtihl2b3uxe.azurecr.io/addapp")
    : builder.AddContainer("addapp", "addapp"))
        .WithHttpEndpoint(targetPort: 6000, env: "APP_PORT", name: "http")
        .WithOtlpExporter()
        .WithEnvironment("OTEL_SERVICE_NAME", "addapp")
        .PublishAsContainer();
var addEnpoint = add.GetEndpoint("http");
Python is natively supported, so we can use the AddPythonProject method to configure the multiplier service. Please follow this tutorial to correctly configure the Python project.
// Configure Multiplier in Python
var multiply = builder.AddPythonProject("multiplyapp", "../../python-multiplier", "app.py")
    .WithHttpEndpoint(targetPort: 5001, env: "APP_PORT", name: "http")
    .WithEnvironment("OTEL_SERVICE_NAME", "multiplyapp")
    .PublishAsDockerFile();
NodeJS is natively supported, so we can use the AddNodeApp method to configure the divider service.
// Configure Divider in NodeJS
var divide = builder.AddNodeApp(name: "divideapp", scriptPath: "app.js", workingDirectory: "../../node-divider")
    .WithHttpEndpoint(targetPort: 4000, env: "APP_PORT", name: "http")
    .WithEnvironment("OTEL_SERVICE_NAME", "divideapp")
    .PublishAsDockerFile();
No surprise here, .NET Aspire natively supports .NET, so we can use the AddProject method to configure the subtractor service.
// Configure Subtractor in .NET
var subtract = builder.AddProject<Projects.dotnet_subtractor>("subtractapp")
    .WithReference(insights)
    .WithEnvironment("OTEL_SERVICE_NAME", "subtractapp");
The redis cache can be easily configured using the AddRedis method, or in this scenario using Dapr via the AddDaprStateStore method.
// Configure Dapr State Store
var stateStore = builder.AddDaprStateStore("statestore");
Dapr is not the focus of this article, but it is worth mentioning that .NET Aspire can be used in conjunction with Dapr to build distributed applications. For further information regarding Dapr, please reference the official documentation.
Lastly, we can configure the frontend service using the AddNpmApp method.
// Configure Frontend in React
builder.AddNpmApp(name: "calculator-front-end", workingDirectory: "../../react-calculator")
    .WithDaprSidecar(new DaprSidecarOptions
    {
        AppPort = 3000,
        AppProtocol = "http",
        DaprHttpPort = 3500
    })
    .WithEnvironment("DAPR_HTTP_PORT", "3500")
    .WithReference(addEnpoint)
    .WithReference(multiply)
    .WithReference(divide)
    .WithReference(subtract)
    .WithReference(stateStore)
    .WithReference(insights)
    .WithHttpEndpoint(targetPort: 3000, env: "PORT")
    .WithExternalHttpEndpoints()
    .WithEnvironment("OTEL_SERVICE_NAME", "calculator-front-end")
    .PublishAsDockerFile();
Since we are referencing all the previously configured services, we can easily connect them to the frontend service. When we need to invoke the adder from the frontend, we can easily do so by using the environment variable that has been injected by Aspire:
app.post('/calculate/add', async (req, res) => {
  try {
      const serviceUrl = process.env.services__addapp__http__0;

      const appResponse = await axios.post(`${serviceUrl}/add`, req.body);

      // Return expected string result to client
      return res.send(`${appResponse.data}`);
  } catch (err) {
      console.log(err);
  }
});
The entire application can be deployed to Azure using the Azure Developer CLI. The CLI will read the manifest generated by the AppHost project and deploy the application to Azure, creating all the necessary resources. To learn how to integrate Aspire with the Azure Developer CLI, please reference the official tutorial.
All the code for the distributed calculator can be found in the Aspire Multilanguage repository.
The above is the detailed content of .NET Aspire Multilanguage. For more information, please follow other related articles on the PHP Chinese website!


