
 Backend Development
Python Tutorial
Automate Build, Test & Deploy Processes with GitHub Actions
Backend Development
Python Tutorial
Automate Build, Test & Deploy Processes with GitHub Actions
Automate Build, Test & Deploy Processes with GitHub Actions

This project is a quick sample project that demonstrates the automation of the build, test, and deployment process of an application to a staging environment on push to the main branch.
To adequately demonstrate the CI/CD pipeline, we will create a simple Python project with minimal code and then integrate it into GitHub Actions.
Create a Simple Python Project
Like I earlier stated, we will create a simple project that we will use in our pipeline. I chose to do this in python for no particular reason, you can use any other programming language you choose, the main of this project is to demonstrate the pipeline.
Create Project Folder
So go ahead and create the project folder and navigate into that folder:
mkdir automated-testing
cd automated-testing
Write Application File
Now we will write the simple python application. Create a new file app.py in the project folder.
touch app.py
Add the below code block to the file:
def hello():
  return "Hello, World!"

if __name__ == "__main__":
  print(hello())
This is a very simple python "Hello world" function that serves as an example of basic functionality that can be tested in the CI pipeline.
def hello() defines a function named hello which takes no arguments. When this function is called, it returns the string "Hello, World!".
if __name__ == "__main__" is a standard Python construct used to ensure that certain code only runs when the file is executed directly (not when imported as a module). It acts as an entry point for the script.
When app.py is run directly (e.g., by running python app.py), the script will call the hello() function and print the result, which is "Hello, World!".
Create a Requirements File.
A typical project would have dependencies and in a python project they are usually defined in the requirements.txt file.
Create a new file requirements.txt
touch requirements.txt
Add this to the file:
pytest
Create Unit Test
Now we will add a basic test file, test_app.py, to test the function in app.py. Add the below to the file:
from app import hello

def test_hello():
  assert hello() == "Hello, World!"
Now we are ready to create our pipeline.
Set Up GitHub Actions for CI/CD
To configure GitHub actions we need to create a .github/workflows folder inside our repo, this is how we notify GitHub of the CI/CD pipeline in our repo.
Create a new file:
mkdir -p .github/workflows
You can have multiple pipelines in one repo, so create a file proj.yml in the .github/workflows folder. This is where we will define the steps for building, testing, and deploying our Python project.
Add the below code to your file:
name: Build, Test and Deploy

# Trigger the workflow on pushes to the main branch
on:
  push:
    branches:
      - main

jobs:
  build-and-test:
    runs-on: ubuntu-latest

    steps:
    # Checkout the code from the repository
    - name: Checkout repo
      uses: actions/checkout@v4

    # Set up Python environment
    - name: Setup Python
      uses: actions/setup-python@v5
      with:
        python-version: '3.x'

    # Install dependencies
    - name: Install Dependecies
      run: |
        python -m pip install --upgrade pip
        pip install -r requirements.txt

    # Build (this project deosn't require a build but we will simulate a build by creating a file)
    - name: Build Project
      run: |
        mkdir -p build
        # Simulate build output by creating a file
        touch build/output_file.txt

    # Run tests using pytest
    - name: Run tests
      run:
        pytest

    # Upload the build output as an artifact (we created a file in the build step to simulate an artifact)
    - name: Upload build artifact
      uses: actions/upload-artifact@v4
      with:
        name: build-artifact
        path: build/

  deploy:
    runs-on: ubuntu-latest
    needs: build-and-test
    if: success()

    steps:
    # Download the artifact from the build stage
    - name: Download build artifact
      uses: actions/download-artifact@v4
      with:
        name: build-artifact
        path: build/

    - name: Simulate Deployment
      run: |
        echo "Deploying to staging..."
        ls build/
Breakdown of the CI/CD Pipeline Steps
- Trigger on Push to main: The pipeline is triggered whenever there is a push to the main branch.
- Checkout Code: This step uses GitHub’s checkout action to pull our code from the repository.
- Set Up Python: The pipeline sets up a Python environment on the CI runner (GitHub's virtual machine), ensuring that the correct Python version is used.
- Install Dependencies: It installs the required dependencies for our Python project (pytest in this case). This dependency was just added as an example of when a project has dependencies as this particular sample python application does not require any.
- Build: This stage was also just added for demonstration purposes, supposing this was a JavaScript/Node.js project this is where we would run the npm run build command and this will create an artifact we can upload and use in the deploy stage. Since this is a python project and it doesn't really require a build, we will create a file and folder in this stage. The file will serve as our artifact for the deploy stage.
- Run Tests: It runs the tests using pytest to validate the code.
- Upload Build Artifact: After running the tests, the build-and-test stage creates and saves a build artifact (in this case, a simulated output_file.txt in the build folder from the build step). The action upload-artifact is used to store this artifact. You can replace this with whatever actual build output your project creates.
- Deploy Stage: Our application will only be deployed if the test was successful which is why I have added the conditionals needs and if. Using “needs” we can require that the deploy job won’t even run unless the test job is successful. The download-artifact action retrieves the build artifact and the last step "Simulate Deployment" simulates deployment by printing a message and lists the artifact. If this was a live project we would have the actual deployment commands to deploy to a real staging environment here. You can replace the echo and ls commands with actual deployment commands (e.g., deploying to a cloud platform). This approach ensures that the output from the build-and-test stage is properly passed to the deploy stage, simulating how a real deployment would work with build artifacts.
Push to GitHub
If you haven't already, you need to initialize a git repository using the commands below:
git init
git add .
git commit -m "Create project as well as CI/CD pipeline"
Now we push to GitHub. Create a GitHub repository and push your code using the below commands:
git remote add origin <your-repo-url>
git push -u origin main
Verify the Pipeline
After pushing the code, you can visit the Actions tab in your GitHub repository. You should see the pipeline triggered, running the steps defined in your proj.yml file.
If everything is set up correctly, the pipeline will build, test, and simulate deployment. You can changes things around in your project and make new pushes to see the the pipeline works, create errors intentional so you can see how the pipeline works when the tests fail.
On a successful run this is how your Actions tab should look.
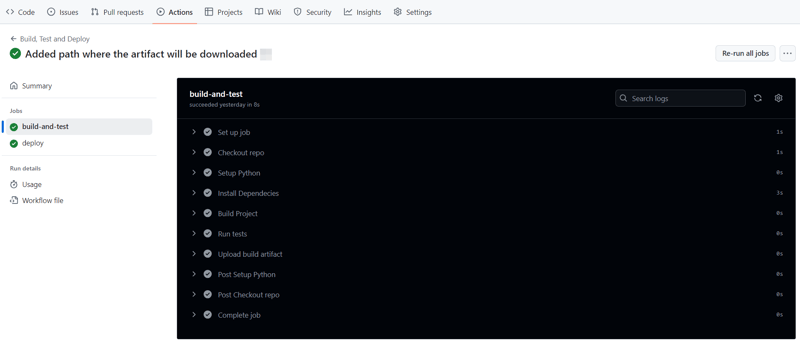
And that's it, this setup provides a working example of a CI/CD pipeline for a very basic Python project. If you found this helpful, please share with your connection and if you have any questions, do not hesitate to drop the question in the comments.
The above is the detailed content of Automate Build, Test & Deploy Processes with GitHub Actions. For more information, please follow other related articles on the PHP Chinese website!

Hot AI Tools

Undresser.AI Undress
AI-powered app for creating realistic nude photos

AI Clothes Remover
Online AI tool for removing clothes from photos.

Undress AI Tool
Undress images for free

Clothoff.io
AI clothes remover

AI Hentai Generator
Generate AI Hentai for free.

Hot Article
Hot Tools

Notepad++7.3.1
Easy-to-use and free code editor

SublimeText3 Chinese version
Chinese version, very easy to use

Zend Studio 13.0.1
Powerful PHP integrated development environment

Dreamweaver CS6
Visual web development tools

SublimeText3 Mac version
God-level code editing software (SublimeText3)
Hot Topics
 1359
1359
 52
52

 How to solve the permissions problem encountered when viewing Python version in Linux terminal?
Apr 01, 2025 pm 05:09 PM
How to solve the permissions problem encountered when viewing Python version in Linux terminal?
Apr 01, 2025 pm 05:09 PM
Solution to permission issues when viewing Python version in Linux terminal When you try to view Python version in Linux terminal, enter python...
 How Do I Use Beautiful Soup to Parse HTML?
Mar 10, 2025 pm 06:54 PM
How Do I Use Beautiful Soup to Parse HTML?
Mar 10, 2025 pm 06:54 PM
This article explains how to use Beautiful Soup, a Python library, to parse HTML. It details common methods like find(), find_all(), select(), and get_text() for data extraction, handling of diverse HTML structures and errors, and alternatives (Sel
 Serialization and Deserialization of Python Objects: Part 1
Mar 08, 2025 am 09:39 AM
Serialization and Deserialization of Python Objects: Part 1
Mar 08, 2025 am 09:39 AM
Serialization and deserialization of Python objects are key aspects of any non-trivial program. If you save something to a Python file, you do object serialization and deserialization if you read the configuration file, or if you respond to an HTTP request. In a sense, serialization and deserialization are the most boring things in the world. Who cares about all these formats and protocols? You want to persist or stream some Python objects and retrieve them in full at a later time. This is a great way to see the world on a conceptual level. However, on a practical level, the serialization scheme, format or protocol you choose may determine the speed, security, freedom of maintenance status, and other aspects of the program
 Mathematical Modules in Python: Statistics
Mar 09, 2025 am 11:40 AM
Mathematical Modules in Python: Statistics
Mar 09, 2025 am 11:40 AM
Python's statistics module provides powerful data statistical analysis capabilities to help us quickly understand the overall characteristics of data, such as biostatistics and business analysis. Instead of looking at data points one by one, just look at statistics such as mean or variance to discover trends and features in the original data that may be ignored, and compare large datasets more easily and effectively. This tutorial will explain how to calculate the mean and measure the degree of dispersion of the dataset. Unless otherwise stated, all functions in this module support the calculation of the mean() function instead of simply summing the average. Floating point numbers can also be used. import random import statistics from fracti
 How to Perform Deep Learning with TensorFlow or PyTorch?
Mar 10, 2025 pm 06:52 PM
How to Perform Deep Learning with TensorFlow or PyTorch?
Mar 10, 2025 pm 06:52 PM
This article compares TensorFlow and PyTorch for deep learning. It details the steps involved: data preparation, model building, training, evaluation, and deployment. Key differences between the frameworks, particularly regarding computational grap
 Scraping Webpages in Python With Beautiful Soup: Search and DOM Modification
Mar 08, 2025 am 10:36 AM
Scraping Webpages in Python With Beautiful Soup: Search and DOM Modification
Mar 08, 2025 am 10:36 AM
This tutorial builds upon the previous introduction to Beautiful Soup, focusing on DOM manipulation beyond simple tree navigation. We'll explore efficient search methods and techniques for modifying HTML structure. One common DOM search method is ex
 What are some popular Python libraries and their uses?
Mar 21, 2025 pm 06:46 PM
What are some popular Python libraries and their uses?
Mar 21, 2025 pm 06:46 PM
The article discusses popular Python libraries like NumPy, Pandas, Matplotlib, Scikit-learn, TensorFlow, Django, Flask, and Requests, detailing their uses in scientific computing, data analysis, visualization, machine learning, web development, and H
 How to Create Command-Line Interfaces (CLIs) with Python?
Mar 10, 2025 pm 06:48 PM
How to Create Command-Line Interfaces (CLIs) with Python?
Mar 10, 2025 pm 06:48 PM
This article guides Python developers on building command-line interfaces (CLIs). It details using libraries like typer, click, and argparse, emphasizing input/output handling, and promoting user-friendly design patterns for improved CLI usability.
