

How To: Containerize a Django and Postgres App with Docker

This article was originally published on the Shipyard Blog.
As you’re building out your Django and PostgreSQL app, you’re probably thinking about a few boxes you’d like it to check:
- Portable: can I distribute this between machines or team members?
- Scalable: is this app able to handle an increase in number of users, requests, or general workload?
- Cloud native: can I host this app in development, ephemeral, staging, and/or production cloud environments?
Using Docker and Docker Compose can help get your app ready for every stage of the development life cycle, from local to production. In this post, we’ll be covering some of the basics for customizing a Dockerfile and Compose file for a Django app with a Postgres database.
TLDR: Shipyard maintains a Django / Postgres starter application, set up to build and run with Docker and Docker Compose. Fork it here. You can use it as a project template or as a reference for your existing app.
What is Django?
Django is an open source Python-based web framework. It’s primarily used as a backend for web apps. Django follows the “batteries included” philosophy — it comes complete with routing support, a login framework, a web server, database tools, and much more. Django is often compared to Flask, and scores more favorably on almost all fronts.
You’re using Django apps every day. Spotify, Doordash, Instagram, Eventbrite, and Pinterest all have Django in their stacks — which speaks volumes to how extensible and scalable it can be.
Benefits of Dockerizing a Django App
Running a Django app with Docker containers unlocks several new use cases. Right off the bat, it’s an improvement to your local development workflows — making setup cleaner and more straightforward.
If you want to cloud-host your project, you’ll typically need it containerized. The great thing about Docker containers is that they can be used throughout every stage of development, from local to production. You can also distribute your Docker image so others can run it instantly without any installation or building.
At the very least, if you’re including a Dockerfile with your project, you can ensure it builds and runs identically every single time, on every system.
Choosing a Python package manager
Our Python app needs a package manager to track, version, and install its dependencies. This helps us manage dependency inits/updates, instead of executing them individually, and preserve package versions across machines.
Both Pip and Poetry are popular dependency managers for Python, although there are quite a few others circulating around (e.g. uv, Conda, Rye).
Pip is incredibly straightforward. Users can list their packages in a requirements.txt file with their respective versions, and run pip install to set them up. Users can capture existing dependencies and their versions by running pip freeze > requirements.txt in a project’s root.
Poetry a highly-capable package manager for apps of any scale, but it’s slightly less straightforward to configure than Pip (it uses a TOML file with tables, metadata, and scripts). Poetry also uses a lockfile (poetry.lock) to “lock” dependencies at their current versions (and their dependencies by version). This way, if your project works at a certain point in time on a particular machine, this state will be preserved. Running poetry init prompts users with a series of options to generate a pyproject.toml file.
Writing a Dockerfile for a Django app
To Dockerize your Django app, you'll follow the classic Dockerfile structure (set the base image, set the working directory, etc.) and then modify it with the project-specific installation instructions, likely found in the README.
Selecting a base image
We can choose a lightweight Python image to act as our base for this Dockerfile. To browse versions by tag, check out the Python page on Docker Hub. I chose Alpine here since it’ll keep our image small:
FROM python:3.8.8-alpine3.13
Setting a working directory
Here, we will define the working directory within the Docker container. All paths mentioned after will be relative to this.
WORKDIR /srv
Installing system dependencies
There are a few libraries we need to add before we can get Poetry configured:
RUN apk add --update --no-cache \
  gcc \
  libc-dev \
  libffi-dev \
  openssl-dev \
  bash \
  git \
  libtool \
  m4 \
  g++ \
  autoconf \
  automake \
  build-base \
  postgresql-dev
Installing Poetry
Next, we’ll ensure we’re using the latest version of Pip, and then use that to install Poetry inside our container:
RUN pip install --upgrade pip
RUN pip install poetry
Installing our project’s dependencies
This app’s dependencies are defined in our pyproject.toml and poetry.lock files. Let’s bring them over to the container’s working directory, and then install from their declarations:
ADD pyproject.toml poetry.lock ./
RUN poetry install
Adding and installing the project itself
Now, we’ll copy over the rest of the project, and install the Django project itself within the container:
ADD src ./src
RUN poetry install
Executing the start command
Finally, we’ll run our project’s start command. In this particular app, it’ll be the command that uses Poetry to start the Django development server:
CMD ["poetry", "run", "python", "src/manage.py", "runserver", "0:8080"]
The complete Dockerfile
When we combine the snippets from above, we’ll get this Dockerfile:
FROM python:3.8.8-alpine3.13

WORKDIR /srv

RUN apk add --update --no-cache \
  gcc \
  libc-dev \
  libffi-dev \
  openssl-dev \
  bash \
  git \
  libtool \
  m4 \
  g++ \
  autoconf \
  automake \
  build-base \
  postgresql-dev

RUN pip install --upgrade pip
RUN pip install poetry

ADD pyproject.toml poetry.lock ./
RUN poetry install

ADD src ./src
RUN poetry install

CMD ["poetry", "run", "python", "src/manage.py", "runserver", "0:8080"]
Writing a Docker Compose service definition for Django
We’re going to split this app into two services: django and postgres. Our django service will be built from our Dockerfile, containing all of our app’s local files.
Setting the build context
For this app, we want to build the django service from our single Dockerfile and use the entire root directory as our build context path. We can set our build label accordingly:
django:
  build: .
Setting host and container ports
We can map port 8080 on our host machine to 8080 within the container. This will also be the port we use to access our Django app — which will soon be live at http://localhost:8080.
ports:
  - '8080:8080'
Adding a service dependency
Since our Django app is connecting to a database, we want to instruct Compose to spin up our database container (postgres) first. We’ll use the depends_on label to make sure that service is ready and running before our django service starts:
depends_on:
  - postgres
Creating a bind mount
Since we’ll be sharing files between our host and this container, we can define a bind mount by using the volumes label. To set the volume, we’ll provide a local path, followed by a colon, followed by a path within the container. The ro flag gives the container read-only permissions for these files:
volumes:
  - './src:/srv/src:ro'
The end result
Combining all the options/configurations from above, our django service should look like this:
django:
  build: .
  ports:
    - '8080:8080'
  depends_on:
    - postgres
  volumes:
    - './src:/srv/src:ro'
Adding a PostgreSQL database
Our Django app is configured to connect to a PostgreSQL database. This is defined in our settings.py:
DATABASES = {
    'default': {
        'ENGINE': 'django.db.backends.postgresql',
        'NAME': 'app',
        'USER': 'obscure-user',
        'PASSWORD': 'obscure-password',
        'HOST': 'postgres',
        'PORT': 5432,
    }
}
Pulling the Postgres image
We can migrate our existing database to its own Docker container to isolate it from the base Django app. First, let’s define a postgres service in our Compose file and pull the latest lightweight Postgres image from Docker Hub:
postgres:
  image: 'postgres:14.13-alpine3.20'
Passing in env vars
To configure our PostgreSQL database, we can pass in a few environment variables to set credentials and paths. You may want to consider using a Secrets Manager for this.
environment:
  - POSTGRES_DB=app
  - POSTGRES_USER=obscure-user
  - POSTGRES_PASSWORD=obscure-password
  - PGDATA=/var/lib/postgresql/data/pgdata
Setting host and container ports
We can expose our container port by setting it to the default Postgres port: 5432. For this service, we’re only specifying a single port, which means that the host port will be randomized. This avoids collisions if you’re running multiple Postgres instances.
ports:
  - '5432'
Adding a named data volume
In our postgres definition, we can add a named volume. This is different from the bind mount that we created for the django service. This will persist our data after the Postgres container spins down.
volumes:
  - 'postgres:/var/lib/postgresql/data'
Outside of the service definitions and at the bottom of the Compose file, we’ll declare the named postgres volume again. By doing so, we can reference it from our other services if needed.
volumes:
  postgres:
Putting it all together
And here’s the resulting PostgreSQL definition in our Compose file:
  postgres:
    image: 'postgres:14.13-alpine3.20'
    environment:
      - POSTGRES_DB=app
      - POSTGRES_USER=obscure-user
      - POSTGRES_PASSWORD=obscure-password
      - PGDATA=/var/lib/postgresql/data/pgdata
    ports:
      - '5432'
    volumes:
      - 'postgres:/var/lib/postgresql/data'

volumes:
  postgres:
Deploying our app in a Shipyard ephemeral environment
We can get our app production-ready by deploying it in a Shipyard application — this means we’ll get an ephemeral environment for our base branch, as well as environments for every PR we open.

Adding Docker Compose labels
Shipyard transpiles Compose files to Kubernetes manifests, so we’ll add some labels to make it Kubernetes-compatible.
Under our django service, we can add two custom Shipyard labels:
labels:
  shipyard.init: 'poetry run python src/manage.py migrate'
  shipyard.route: '/'
- The shipyard.init label will run a database migration before our django service starts
- The shipyard.route label will send HTTP requests to this service’s port
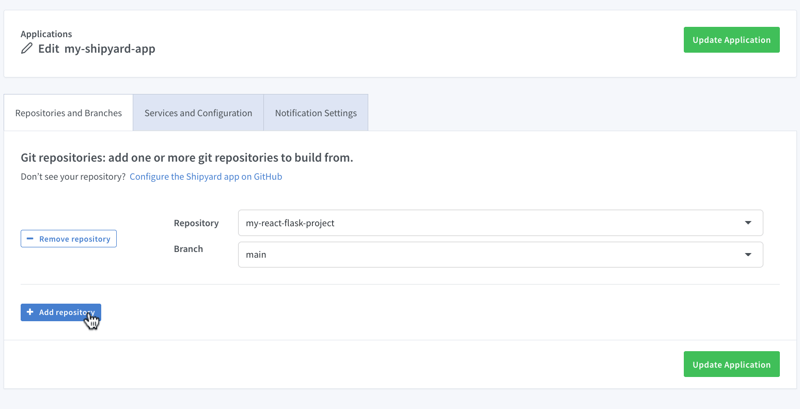
Creating a Shipyard app
Next, you can go to your Shipyard dashboard. If you haven’t already, sign up for a 30-day free trial.
Click the + Application button, then select your repo, services, and import your env vars.
Visiting the app
Once it finishes building, you can click the green Visit button to access your short-lived ephemeral environment. What comes next?
- View your app’s build, deploy, and run logs
- Use our GitHub Action or CircleCI orb to integrate with your CI/CD
- Add SSO visitors to your app
- Create a PR to see your code changes in a new environment
And that’s all!
Now you have a fully containerized Django app with a database! You can run it locally with Docker Compose, preview and test it in an ephemeral environment, and iterate until it’s production-ready.
Want to Dockerize a Yarn app next? Check out our guide!
The above is the detailed content of How To: Containerize a Django and Postgres App with Docker. For more information, please follow other related articles on the PHP Chinese website!

Hot AI Tools

Undresser.AI Undress
AI-powered app for creating realistic nude photos

AI Clothes Remover
Online AI tool for removing clothes from photos.

Undress AI Tool
Undress images for free

Clothoff.io
AI clothes remover

AI Hentai Generator
Generate AI Hentai for free.

Hot Article
Hot Tools

Notepad++7.3.1
Easy-to-use and free code editor

SublimeText3 Chinese version
Chinese version, very easy to use

Zend Studio 13.0.1
Powerful PHP integrated development environment

Dreamweaver CS6
Visual web development tools

SublimeText3 Mac version
God-level code editing software (SublimeText3)
Hot Topics
 1382
1382
 52
52

 How to solve the permissions problem encountered when viewing Python version in Linux terminal?
Apr 01, 2025 pm 05:09 PM
How to solve the permissions problem encountered when viewing Python version in Linux terminal?
Apr 01, 2025 pm 05:09 PM
Solution to permission issues when viewing Python version in Linux terminal When you try to view Python version in Linux terminal, enter python...
 How to efficiently copy the entire column of one DataFrame into another DataFrame with different structures in Python?
Apr 01, 2025 pm 11:15 PM
How to efficiently copy the entire column of one DataFrame into another DataFrame with different structures in Python?
Apr 01, 2025 pm 11:15 PM
When using Python's pandas library, how to copy whole columns between two DataFrames with different structures is a common problem. Suppose we have two Dats...
 How to teach computer novice programming basics in project and problem-driven methods within 10 hours?
Apr 02, 2025 am 07:18 AM
How to teach computer novice programming basics in project and problem-driven methods within 10 hours?
Apr 02, 2025 am 07:18 AM
How to teach computer novice programming basics within 10 hours? If you only have 10 hours to teach computer novice some programming knowledge, what would you choose to teach...
 How to avoid being detected by the browser when using Fiddler Everywhere for man-in-the-middle reading?
Apr 02, 2025 am 07:15 AM
How to avoid being detected by the browser when using Fiddler Everywhere for man-in-the-middle reading?
Apr 02, 2025 am 07:15 AM
How to avoid being detected when using FiddlerEverywhere for man-in-the-middle readings When you use FiddlerEverywhere...
 What are regular expressions?
Mar 20, 2025 pm 06:25 PM
What are regular expressions?
Mar 20, 2025 pm 06:25 PM
Regular expressions are powerful tools for pattern matching and text manipulation in programming, enhancing efficiency in text processing across various applications.
 What are some popular Python libraries and their uses?
Mar 21, 2025 pm 06:46 PM
What are some popular Python libraries and their uses?
Mar 21, 2025 pm 06:46 PM
The article discusses popular Python libraries like NumPy, Pandas, Matplotlib, Scikit-learn, TensorFlow, Django, Flask, and Requests, detailing their uses in scientific computing, data analysis, visualization, machine learning, web development, and H
 How does Uvicorn continuously listen for HTTP requests without serving_forever()?
Apr 01, 2025 pm 10:51 PM
How does Uvicorn continuously listen for HTTP requests without serving_forever()?
Apr 01, 2025 pm 10:51 PM
How does Uvicorn continuously listen for HTTP requests? Uvicorn is a lightweight web server based on ASGI. One of its core functions is to listen for HTTP requests and proceed...
 How to dynamically create an object through a string and call its methods in Python?
Apr 01, 2025 pm 11:18 PM
How to dynamically create an object through a string and call its methods in Python?
Apr 01, 2025 pm 11:18 PM
In Python, how to dynamically create an object through a string and call its methods? This is a common programming requirement, especially if it needs to be configured or run...
