I have spent multiple hours creating a figma design of a landing page. Every color is on point, every pixel is in place with seamless user flow, but now comes the daunting part of actually coding this landing page.
Building a Figma design is a huge task to complete. That is where I got to know about Dualite which translates figma designs into actual code using AI, helping developers like me to minimize the effort of actually coding. Let’s see how i used Dualite to convert my landing page into actual code
What is Dualite ?
Dualite is an innovative AI-powered Figma plugin designed to bridge the gap between design and development. It focuses on converting Figma designs into high-quality, reusable code, with support of popular technologies such as Reactjs, TailwindCSS and more.
Dualite lets you convert any figma design or animations into efficient code with a single click which you can customize according to your project, it comes with exciting features, let me give a summary about them:
-
Modes: Dualite offers two modes, Component Mode and Page Mode, ideal for developers and designers to convert their design into generated code. These modes ensure that the layout, interactivity, animations, and more are accurately translated from design to code.
-
Component Mode: Focuses on individual design elements, allowing for the creation of reusable components.
-
Page Mode: Converts entire pages, maintaining the overall layout and structure.
- Learn more about modes on this blog
-
Advance Features:
- Dualite offers advanced settings where users can provide more technical information about their design. This ensures that the generated code is responsive and accurate.
- These advanced settings give more power to designers and developers, allowing them to customize the output to meet specific project requirements. This feature is particularly useful for complex designs that need precise control over the final code, such as responsive layouts or intricate animations.
To quickly get started with Dualite, you can follow their docs
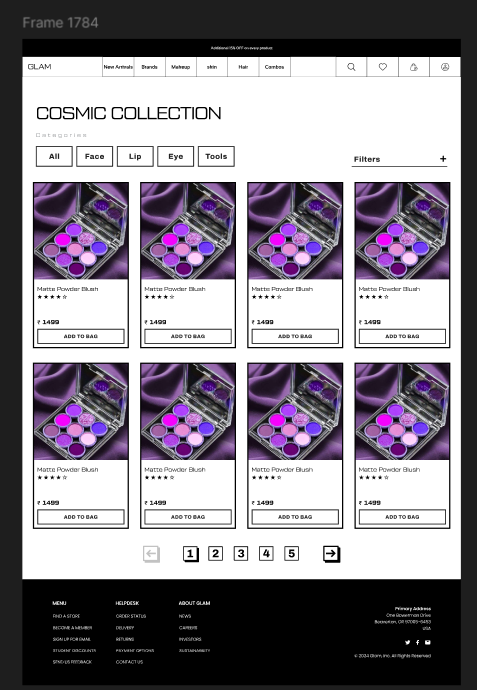
Figma Design
Let’s get started with a figma design of a landing page, see below:

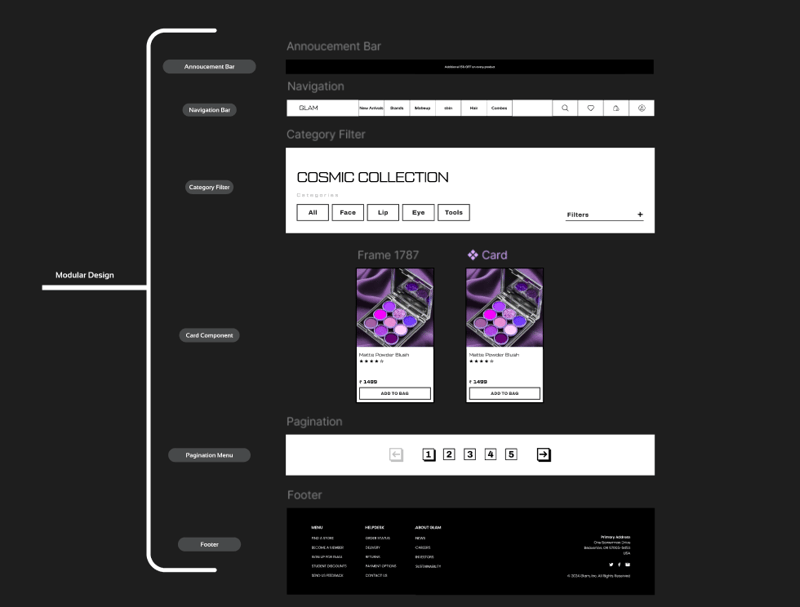
So, Dualite has a mode feature where you can toggle between Page Mode and Component Mode
Basically, Page mode is for converting complete design in a go and Component Mode is to create separate components which we can integrate in our project, learn more about components on the docs
We will be using Component Mode to generate code for all the components present in the design and then we will integrate them in a single project
Let’s start by dividing landing page into components, see below:
Initial Project Setup
I will use Reactjs and Tailwind in Dualite to generate code, so let’s setup the project first:
-
Reactjs App: Create a react app using Vite or any other tool. Vite is a popular choice to create Javascript apps
-
Setup Tailwind: Follow Tailwind Docs to setup tailwind in a Reactjs app without any unnecessary error. Make sure to add the dependencies as well such as PostCSS and autoprefixer for a smooth Tailwind setup.
-
Config Files: Create tailwind.config.js and postcss.config.css in the root of the project. tailwind.config.js might be present if you followed all the steps from the Tailwind docs. If it is already there then update it accordingly
-
Use Javascript: As of now, Dualite does not support Typescript so, make sure to create Reactjs app with Javascript only
Start Converting Components in Dualite
Initial Setup:
-
Mode: We will be using component mode. Use the toggle button from the top right corner to switch between Page Mode and Component Mode
-
Frameworks: When you select a design to convert into code, you will be seeing multiple language and frameworks options. I’ll be using Reactjs and Tailwind to generate code.
- To quickly getting started with using Dualite, read this
Now, let’s get started with converting design into component:
Announcement Bar Component: Check the generated code here
Navigation Bar Component: Check the generated code here
Category Filter Component: Check the generated code here
Card Component Component: Check the generated code here
Pagination Component: Check the generated code here
Footer Component: Check the generated code here
Customizations
- Copy Components:
- Now, copy Components folder from all the above generated code and paste it into the project in a components folder
- You might have noticed that all the components' names are “Component” only, so let’s name all the components accordingly. Example: Announcement bar component will be named as “AnnouncementBar”. Check how i have done it here
- Render all Components:
- Now, import all the components according to the design inside App.jsx file
- Run the project and you will see the output,check the App.jsx file here
- You might have noticed, some components need to be fixed. Let’s start with the customizations
- Fixing Component Styles:
-
Fonts:
- As you can see in the design, we have our own Fonts. Adding them inside the assets folders so i can use the font in the project anywhere.
- Also needs to create @font-face for the all the fonts we are using in index.css file where Tailwind directives are present
-
Navigation Bar Component:
- Layout is inaccurate so, style needs to be fixed
-
Card Component:
-
Star Icon: Added star icon’s inside graphics folder
-
Text.js: Updated Text.js file to fix the button label and other text of the component
-
Styles: Updated styles to add font weight to specific text element and button label
-
Card Component Logic:
- Card Component renders only a single component because it is a single component only.
- To render multiple Card Component, i have to add some demo data to map over it and render multiple Cards
Note: All the changes and the code can be seen on CodeSandBox here
Output
As soon as I made all these customizations and changes in the project, I can see a better version of my design, check the code and output here
Was Dualite helpful ?
Let’s understand it properly, all the components we generated using Dualite were ready to use, yes, we made some customizations into the code to make it as close as the design looks, despite that, all the styles of the components, all the hierarchy of the components with the data in separate files get generated by Dualite.
Instead of spending too much time building the UI, I can use Dualite for that.
Comparing it to manual coding, this would have taken a long enough time. All the components output was really good, nothing can be 100% correct, every code needs a final touch by the developer and that's what we did here
Yes, Dualite was very helpful and fast in generating code for my components.
Conclusion
There you have it, an efficient way to generate code of your Figma designs with very less manual coding. Process of actually coding the designs is a whole roller coaster ride, which can be less complicated if you use Dualite and customize the code according to your needs and the project.
The above is the detailed content of How to Build A Landing Page with Dualite. For more information, please follow other related articles on the PHP Chinese website!


![[Web front-end] Node.js quick start](https://img.php.cn/upload/course/000/000/067/662b5d34ba7c0227.png)


