 System Tutorial
 Windows Series
 How to set up a temporary wireless network in win7. Tutorial on setting up a temporary wireless network in win7.
How to set up a temporary wireless network in win7. Tutorial on setting up a temporary wireless network in win7.
How to easily set up a wireless ad hoc network on Windows 7 Many Windows 7 users want to create a wireless ad hoc network on their computers, but don’t know how to achieve this. In order to meet everyone's needs, PHP editor Yuzai will provide a step-by-step guide to help you set up easily. This article walks you through every step of setting up a wireless ad hoc network, from configuring hardware to setting network properties. If you're looking for clear instructions on creating an ad hoc wireless network, read on to learn the details.
Tutorial on establishing a temporary wireless network in win7
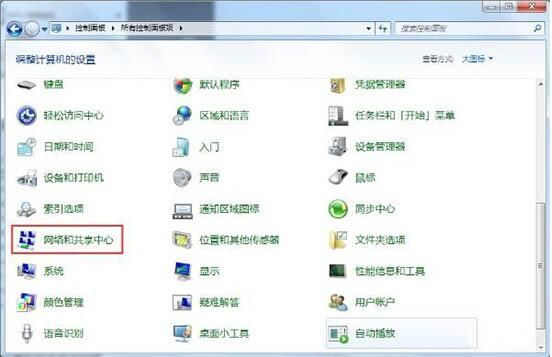
1. Open the Control Panel in the start menu bar.

2. Click on Network and Sharing Center.

3. Click to set up a new connection or network.

4. Pull the drop-down menu to the bottom, click Set up a wireless temporary network, and click Next.

5. Select the wireless network connection and click Next.

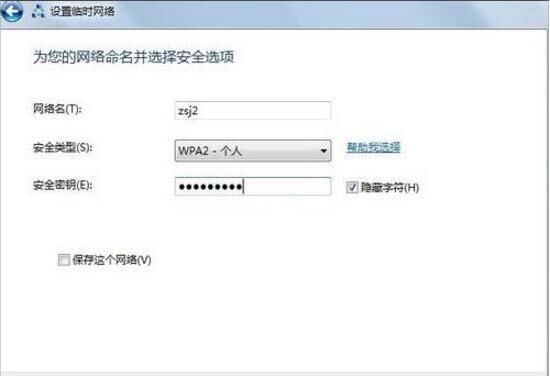
6. Set the network name and security key (password) according to personal needs. It is recommended to select wpa2 as the security type, and click Next.

7. In this way, a point-to-point network connection with zsj2 as the network name is established. Other notebooks can turn on wireless, find this network in the wireless list, and click to connect. Enter the password to connect to the LAN.

8. Notice the option to enable internet connection sharing. Click this option to enable the wireless sharing function of point-to-point connections.

9. In this way, when other computers connect to this point-to-point network, multiple computers can access the Internet together without routing or switches.

The above is the detailed content of How to set up a temporary wireless network in win7. Tutorial on setting up a temporary wireless network in win7.. For more information, please follow other related articles on the PHP Chinese website!

Hot AI Tools

Undresser.AI Undress
AI-powered app for creating realistic nude photos

AI Clothes Remover
Online AI tool for removing clothes from photos.

Undress AI Tool
Undress images for free

Clothoff.io
AI clothes remover

Video Face Swap
Swap faces in any video effortlessly with our completely free AI face swap tool!

Hot Article

Hot Tools

Notepad++7.3.1
Easy-to-use and free code editor

SublimeText3 Chinese version
Chinese version, very easy to use

Zend Studio 13.0.1
Powerful PHP integrated development environment

Dreamweaver CS6
Visual web development tools

SublimeText3 Mac version
God-level code editing software (SublimeText3)

Hot Topics
 1664
1664
 14
14
 1421
1421
 52
52
 1315
1315
 25
25
 1266
1266
 29
29
 1239
1239
 24
24
 Windows kb5054979 update information Update content list
Apr 15, 2025 pm 05:36 PM
KB5054979 is a cumulative security update released on March 27, 2025, for Windows 11 version 24H2. It targets .NET Framework versions 3.5 and 4.8.1, enhancing security and overall stability. Notably, the update addresses an issue with file and directory operations on UNC shares using System.IO APIs. Two installation methods are provided: one through Windows Settings by checking for updates under Windows Update, and the other via a manual download from the Microsoft Update Catalog.
 Nanoleaf Wants to Change How You Charge Your Tech
Apr 17, 2025 am 01:03 AM
Nanoleaf's Pegboard Desk Dock: A Stylish and Functional Desk Organizer Tired of the same old charging setup? Nanoleaf's new Pegboard Desk Dock offers a stylish and functional alternative. This multifunctional desk accessory boasts 32 full-color RGB
 Got an AMD CPU and Aren't Using PBO? You're Missing Out
Apr 12, 2025 pm 09:02 PM
Unlocking Ryzen's Potential: A Simple Guide to Precision Boost Overdrive (PBO) Overclocking your new PC can seem daunting. While performance gains might feel elusive, leaving potential untapped is even less appealing. Fortunately, AMD Ryzen processo
 How to Use Windows 11 as a Bluetooth Audio Receiver
Apr 15, 2025 am 03:01 AM
Turn your Windows 11 PC into a Bluetooth speaker and enjoy your favorite music from your phone! This guide shows you how to easily connect your iPhone or Android device to your computer for audio playback. Step 1: Pair Your Bluetooth Device First, pa
 ASUS' ROG Zephyrus G14 OLED Gaming Laptop Is $300 Off
Apr 16, 2025 am 03:01 AM
ASUS ROG Zephyrus G14 Esports Laptop Special Offer! Buy ASUS ROG Zephyrus G14 Esports Laptop now and enjoy a $300 offer! Original price is $1999, current price is only $1699! Enjoy immersive gaming experience anytime, anywhere, or use it as a reliable portable workstation. Best Buy currently offers offers on this 2024 14-inch ASUS ROG Zephyrus G14 e-sports laptop. Its powerful configuration and performance are impressive. This ASUS ROG Zephyrus G14 e-sports laptop costs 16 on Best Buy
 5 Hidden Windows Features You Should Be Using
Apr 16, 2025 am 12:57 AM
Unlock Hidden Windows Features for a Smoother Experience! Discover surprisingly useful Windows functionalities that can significantly enhance your computing experience. Even seasoned Windows users might find some new tricks here. Dynamic Lock: Auto
 Microsoft Might Finally Fix Windows 11's Start Menu
Apr 10, 2025 pm 12:07 PM
Windows 11's Start Menu Gets a Much-Needed Overhaul Microsoft's Windows 11 Start menu, initially criticized for its less-than-intuitive app access, is undergoing a significant redesign. Early testing reveals a vastly improved user experience. The up
 You Can Get The Razer Basilisk V3 Pro Mouse for 39% off
Apr 09, 2025 am 03:01 AM
##### Razer Basilisk V3 Pro: High-performance wireless gaming mouse The Razer Basilisk V3 Pro is a high-performance wireless gaming mouse with high customization (11 programmable buttons, Chroma RGB) and versatile connectivity. It has excellent sensors, durable switches and extra long battery life. If you are a gamer looking for a high-quality wireless mouse and need excellent customization options, now is a great time to buy the Razer Basilisk V3 Pro. The promotion cuts prices by 39% and has limited promotion periods. This mouse is larger, 5.11 inches long and 2 inches wide


