

Ever thought building a code completion tool like GitHub Copilot was complex? Surprisingly, it’s not as hard as it seems!
As an engineer, I’ve always been fascinated by how code completion tools work under the hood. So, I reverse-engineered the process to see if I could build one myself.
Here is one i build myself and published it - LLM-Autocompleter
With AI-assisted tools becoming the norm in software development, creating your own code completion tool is a great way to learn about Language Server Protocol (LSP), APIs, and integration with advanced models like OpenAI's GPT. Plus, it’s an incredibly rewarding project.
Code completion tools essentially combine a Language Server Protocol (LSP) server with inline code completion mechanisms from platforms like VS Code. In this tutorial, we'll leverage VS Code’s inline completion API and build our own LSP server.
Before we dive in, let's understand what an LSP Server is.
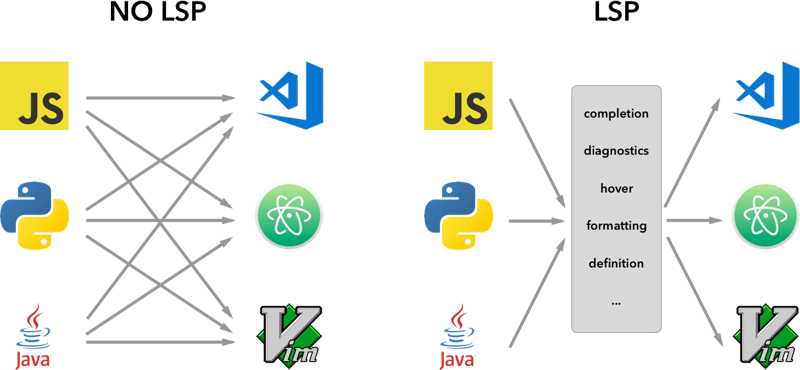
An LSP server is a backend service that provides language-specific features to text editors or Integrated Development Environments (IDEs). It acts as a bridge between the editor (the client) and the language-specific tools, delivering features like:
Code completion (suggesting snippets of code as you type),
Go-to definition (navigating to the part of the code where a symbol is defined),
Error checking (highlighting syntax errors in real-time).
The idea behind the Language Server Protocol (LSP) is to standardize the protocol for how such servers and development tools communicate. This way, a single Language Server can be re-used in multiple development tools and LSP is just a protocol.
By standardizing how these servers communicate with editors through LSP, developers can create language-specific features that work seamlessly across a variety of platforms, like VS Code, Sublime Text, and even Vim.
Now that you understand the basics of LSP, let’s dive into building our own code completion tool, step by step.
We’ll begin by using a sample inline completion extension provided by VS Code. You can clone it directly from GitHub:
vscode-sample-inlinecompletion
now lets go we setting up the lsp-server, you can follow the below structure
.
├── client // Language Client
│   ├── src
│   │   ├── test // End to End tests for Language Client / Server
│   │   └── extension.ts // Language Client entry point
├── package.json // The extension manifest.
└── server // Language Server
    └── src
        └── server.ts // Language Server entry point
for more information you take a look into as well lsp-sample
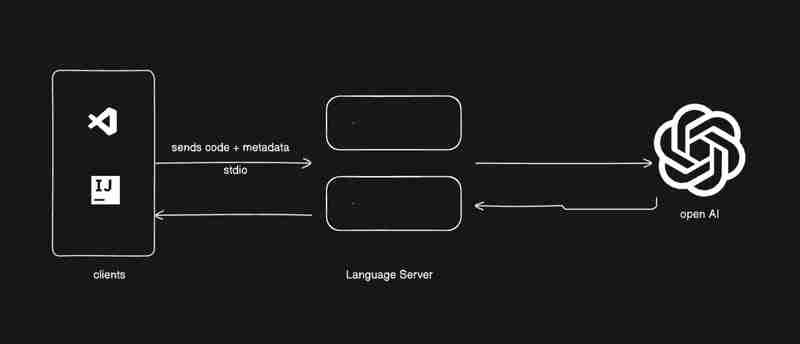
I would be giving you bit's of code, You have to stitch things together i want you guys to learn. The below image shows what we are going to build.
Lets go to client/src/extension.ts and remove everything from activate function
export function activate(context: ExtensionContext) {
}
lets start the setup
extension.ts
export function activate(context: ExtensionContext) {
    const serverModule = context.asAbsolutePath(
        path.join("server", "out", "server.js")
    );

    const debugOptions = { execArgv: ['--nolazy', '--
 inspect=6009'] };

  // communication with the server using Stdio
    const serverOptions: ServerOptions = {
        run: {
            module: serverModule,
            transport: TransportKind.stdio,
        },
        debug: {
            module: serverModule,
            transport: TransportKind.stdio,
            options: debugOptions
        }
    };

        const clientOptions: LanguageClientOptions = {
        documentSelector: [{ scheme: 'file' }],
        initializationOptions: serverConfiguration
    };


     client = new LanguageClient(
        'LSP Server Name',
        serverOptions,
        clientOptions
    );

  client.start();
}
Some bit for information
we have different types of protocol we can follow to communicate between server and client.
for more information you can go to microsoft-lsp-docs
Why stdio? Stdio is one of the most widely supported communication protocols between clients and servers. It allows the LSP server we’re building to work not only in VS Code but also in other editors like Vim and Sublime Text.
server.ts
const methodStore: Record<string, any> = {
  exit,
  initialize,
  shutdown,
};

process.stdin.on("data", async (bufferChuck) => {
    buffer += bufferChuck;

    while (true) {
        try {
            // Check for the Content-Length line
            const lengthMatch = buffer.match(/Content-Length: (\d+)\r\n/);
            if (!lengthMatch) break;

            const contentLength = parseInt(lengthMatch[1], 10);
            const messageStart = buffer.indexOf("\r\n\r\n") + 4;

            // Continue unless the full message is in the buffer
            if (buffer.length < messageStart + contentLength) break;

            const rawMessage = buffer.slice(messageStart, messageStart + contentLength);
            const message = JSON.parse(rawMessage);


            const method = methodStore[message.method];

            if (method) {
                const result = await method(message);

                if (result !== undefined) {
                    respond(message.id, result);
                }
            }
            buffer = buffer.slice(messageStart + contentLength);
        } catch (error: any) {

            const errorMessage = {
                jsonrpc: "2.0",
                method: "window/showMessage",
                params: {
                    type: 1, // Error type
                    message: `Error processing request: ${error.message}`
                }
            };

            const errorNotification = JSON.stringify(errorMessage);
            const errorNotificationLength = Buffer.byteLength(errorNotification, "utf-8");
            const errorHeader = `Content-Length: ${errorNotificationLength}\r\n\r\n`;

            process.stdout.write(errorHeader + errorNotification);
        }
    }
});
initialize.ts
export const initialize = (message: RequestMessage): InitializeResult => {

    return {
        capabilities: {
            completionProvider: {
                resolveProvider: true
            },
            textDocumentSync: TextDocumentSyncKind.Incremental,
            codeActionProvider: {
                resolveProvider: true
            }
        },
        serverInfo: {
            name: "LSP-Server",
            version: "1.0.0",
        },
    };
};
exit.ts
export const exit = () => {
    process.exit(0);
  };
shutdown.ts
export const shutdown = () => {
    return null;
  };
Once done with basic function, you can now run the vscode in debugging mode using F5 key on keyboard or follow debugging-guide
Now lets start with adding in-line provider and get the request and response according
Let's add a new method into the methodStore
server.ts
const methodStore: Record<string, any> = {
  exit,
  initialize,
  shutdown,
  "textDocument/generation": generation
};
generation.ts
export const generation = async (message: any) => {
    if(!message && message !== undefined) return {};

    const text = message.params.textDocument.text as string;

    if(!text) return {};

        const cursorText = getNewCursorText(text, message.params.position.line, message.params.position.character);

  const response = await getResponseFromOpenAI(cursorText, message.params.fsPath);

 return {
    generatedText: response,
  }

}

function getNewCursorText(text: string, line: number, character: number): string {
    const lines = text.split('\n');
    if (line < 0 || line >= lines.length) return text;

    const targetLine = lines[line];
    if (character < 0 || character > targetLine.length) return text;

    lines[line] = targetLine.slice(0, character) + '<CURSOR>' + targetLine.slice(character);
    return lines.join('\n');
}


const getResponseFromOpenAI = async (text: string, fsPath: stiring): Promise<string> => {
     const message = {
          "role": "user",
          "content": text
    };

   const systemMetaData: Paramaters = {
    max_token: 128,
    max_context: 1024,
    messages: [],
    fsPath: fsPath
   }

   const messages = [systemPrompt(systemMetaData), message]

   const chatCompletion: OpenAI.Chat.ChatCompletion | undefined = await this.open_ai_client?.chat.completions.create({
            messages: messages,
            model: "gpt-3.5-turbo",
            max_tokens: systemMetaData?.max_tokens ?? 128,
        });


        if (!chatCompletion) return "";

        const generatedResponse = chatCompletion.choices[0].message.content;

        if (!generatedResponse) return "";

        return generatedResponse;
}
template.ts
interface Parameters {
    max_tokens: number;
    max_context: number;
    messages: any[];
    fsPath: string;
}

 export const systemPrompt = (paramaters: Parameters | null) => {
    return {
        "role": "system",
        "content": `
        Instructions:
            - You are an AI programming assistant.
            - Given a piece of code with the cursor location marked by <CURSOR>, replace <CURSOR> with the correct code.
            - First, think step-by-step.
            - Describe your plan for what to build in pseudocode, written out in great detail.
            - Then output the code replacing the <CURSOR>.
            - Ensure that your completion fits within the language context of the provided code snippet.
            - Ensure, completion is what ever is needed, dont write beyond 1 or 2 line, unless the <CURSOR> is on start of a function, class or any control statment(if, switch, for, while).

            Rules:
            - Only respond with code.
            - Only replace <CURSOR>; do not include any previously written code.
            - Never include <CURSOR> in your response.
            - Handle ambiguous cases by providing the most contextually appropriate completion.
            - Be consistent with your responses.
            - You should only generate code in the language specified in the META_DATA.
            - Never mix text with code.
            - your code should have appropriate spacing.

            META_DATA:
            ${paramaters?.fsPath}`
    };
};
Let's now register the inline providers
extension.ts
import {languages} from "vscode";


function getConfiguration(configName: string) {
    if(Object.keys(workspace.getConfiguration(EXTENSION_ID).get(configName)).length > 0){
        return workspace.getConfiguration(EXTENSION_ID).get(configName);
    }
    return null;
}

const inLineCompletionConfig = getConfiguration("inlineCompletionConfiguration");

export function activate(context: ExtensionContext) {
 // OTHER CODE

  languages.registerInlineCompletionItemProvider(
        { pattern: "**" },
        {
            provideInlineCompletionItems: (document: TextDocument, position: Position) => {
                const mode = inLineCompletionConfig["mode"] || 'slow';
                return provideInlineCompletionItems(document, position, mode);
            },
        }

    );

}


let lastInlineCompletion = Date.now();
let lastPosition: Position | null = null;
let inlineCompletionRequestCounter = 0;

const provideInlineCompletionItems = async (document: TextDocument, position: Position, mode: 'fast' | 'slow') => {
    const params = {
        textDocument: {
            uri: document.uri.toString(),
            text: document.getText(),
        },
        position: position,
        fsPath: document.uri.fsPath.toString()
    };

    inlineCompletionRequestCounter += 1;
    const localInCompletionRequestCounter = inlineCompletionRequestCounter;
    const timeSinceLastCompletion = (Date.now() - lastInlineCompletion) / 1000;
    const minInterval = mode === 'fast' ? 0 : 1 / inLineCompletionConfig["maxCompletionsPerSecond"];

    if (timeSinceLastCompletion < minInterval) {
        await new Promise(r => setTimeout(r, (minInterval - timeSinceLastCompletion) * 1000));
    }

    if (inlineCompletionRequestCounter === localInCompletionRequestCounter) {
        lastInlineCompletion = Date.now();

        let cancelRequest = CancellationToken.None;
        if (lastPosition && position.isAfter(lastPosition)) {
            cancelRequest = CancellationToken.Cancelled;
        }
        lastPosition = position;

        try {
            const result = await client.sendRequest("textDocument/generation", params, cancelRequest);


            const snippetCode = new SnippetString(result["generatedText"]);
            return [new InlineCompletionItem(snippetCode)];
        } catch (error) {
            console.error("Error during inline completion request", error);
            client.sendNotification("window/showMessage", {
                type: 1, // Error type
                message: "An error occurred during inline completion: " + error.message
            });
            return [];
        }
    } else {
        return [];
    }
};
This blog provides the foundation you need to build your own code completion tool, but the journey doesn’t end here. I encourage you to experiment, research, and improve upon this code, exploring different features of LSP and AI to tailor the tool to your needs.
Whoever is trying to implement this i want them to learn, research and stitch things together.
Understanding LSP Servers: You’ve learned what an LSP server is, how it powers language-specific tools, and why it’s critical for cross-editor support.
Building VS Code Extensions: You’ve explored how to integrate code completions into VS Code using APIs.
AI-Driven Code Completion: By connecting to OpenAI’s GPT models, you’ve seen how machine learning can enhance developer productivity with intelligent suggestions.
If you reach here, i love to know what you have learned.
Please Hit a like if you learned something new today from my blog.
Connect with me- linked-In
The above is the detailed content of Building Your Own GitHub Copilot: A Step-by-Step Guide to Code Completion Tools. For more information, please follow other related articles on the PHP Chinese website!
 What plugin is composer?
 Can data between Hongmeng system and Android system be interoperable?
 How to open nrg file
 What does Matcha Exchange do?
 How to use the datediff function
 How to represent negative numbers in binary
 oncontextmenu incident
 What keys do arrows refer to in computers?
 WeChat Moments, two dashes and one dot


![[Web front-end] Node.js quick start](https://img.php.cn/upload/course/000/000/067/662b5d34ba7c0227.png)


