Goal
The goal of this miniproject/tutorial is to make a super simple HR monitor and scrolling ECG display with minimal components.
Requirements:
Quick Background
The muscles in the heart create electrical signals. Some of those signals are detectable on the surface of the skin.
We can pick those signals up using surface electrodes. The problem is, these aren't the only electrical signals on the skin. Thankfully, most of the signals we want to see are confined to around 1-40Hz.
Process
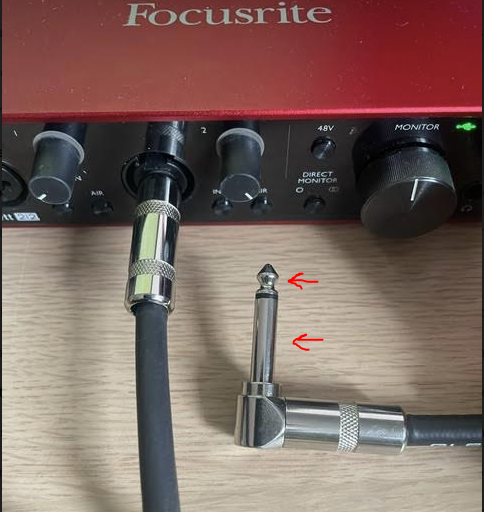
We are going to take our 1/4" cable, which will act as our electrode and poke it into our skin in the vicinity of the heart. Then we use the USB audio interface to amplify and convert the analogue signal to digital. Finally we filter and display in python.
Steps
Step 1: A 1/4" cable has two parts, the sleeve and the tip. Both parts need to make contact with your skin- just hold the sleeve with your hand and mash it against the left side of your chest/upper rib cage (some cables may have more channels, just make sure they all have contact to start). Adjust gain on audio interface (I turn mine all the way up).

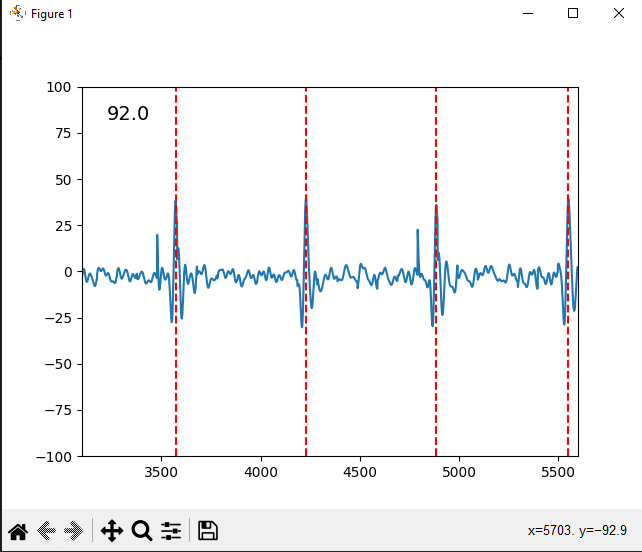
Step 2: Run the below code. Make sure to check that the input_device_index line is pointing to your audio interface. What we are doing is taking chunks of the incoming audio, converting to the frequency domain using fft, setting all unnecessary frequencies to 0, and then converting back to the time domain. Next we find the peaks to calculate the HR then graph in a way that scrolls.
import numpy as np
import pyaudio as pa
import struct
import matplotlib.pyplot as plt
from scipy.signal import decimate, find_peaks

CHUNK = 4410 #.1 second
FORMAT = pa.paInt16
CHANNELS = 1
RATE = 44100 # in Hz
fstep = RATE/CHUNK
p = pa.PyAudio()

values = []
dsf=44 #down sample factor
rds=RATE/dsf #down sampled rate

stream = p.open(
    format = FORMAT,
    channels = CHANNELS,
    rate = RATE,
    input_device_index=3, #adjust based on input
    input=True,
    frames_per_buffer=CHUNK
)

#set up graph
fig,ax = plt.subplots(1)
x = np.arange(0,2*CHUNK,2)
line, = ax.plot(x, np.random.rand(CHUNK))
ax.set_ylim(-100,100)
ax.set_xlim(0,2500)
text = ax.text(0.05, 0.95, str(0), transform=ax.transAxes, fontsize=14,
       verticalalignment='top')
fig.show()

def getFiltered(x,hp=1,lp=41): #this sets the unneeded freqs to 0

    fft=np.fft.fft(x)
    hptrim=len(fft)/RATE*hp
    lptrim=len(fft)/RATE*lp
    fft[int(lptrim):-int(lptrim)]=0
    fft[0:int(hptrim)]=0
    return np.real(np.fft.ifft(fft))

def getHR(x):

    pdis = int(0.6 * rds) #minimum distance between peaks. stops rapid triggering. also caps max hr, so adjust
    peaks, _ = find_peaks(x, distance=pdis, height=0.1)
    intervals = np.diff(peaks)/rds # in seconds
    hr = 60 / intervals # in BPM
    return peaks,round(np.mean(hr),0) #peaks,avg hr

while 1:
    data = stream.read(CHUNK)
    dataInt = struct.unpack(str(CHUNK) + 'h', data)

    filtered=getFiltered(dataInt) #filter (working with full chunk)
    dsed=decimate(filtered, 44) #down sample (turns chunk into ds chunk)
    values=np.concatenate((values,dsed)) #puts the chunks into an array
    peaks,hr = getHR(values*-1) # gets the peaks and determins avg HR.

    text.set_text(str(hr))
    line.set_xdata(np.arange(len(values)))
    line.set_ydata(values*-10) #the negative is bc it comes in upside down with my set up. the *10 is just for fun
    ax.set_xlim(max(0,len(values)-2500),len(values)) #keep the graph scrolling
    vlines = ax.vlines(peaks,ymin=-100,ymax=100,colors='red', linestyles='dashed') # pop some lines at the peaks

    fig.canvas.draw()
    fig.canvas.flush_events()
    vlines.remove()

    if len(values)>10000: #keeps the array managably sized, and graph scrolling pretty
        values=values[5000:] #5 seconds @ ~1000 sr.
Notes
Hold the cable still - you may need to wait a few seconds after movement to get an accurate heart rate. I checked it against my garmin watch, and it consistently returned similar values.
Output

Disclaimer
Keep in mind, you are technically making your body a part of the circuit. The cable is connected to the interface which is connected to the computer which is connected to the wall power outlet... Try this at your own risk. I am no expert- I just enjoy playing around with stuff, and wanted to share.
Next Steps
This method doesn't really work very well for cleanly seeing all of the different parts of an ECG signal. The electrode is super scuffed and I did a bare minimum of filtering.
It also doesn't do well in detecting smaller signals like for EMG.
From here you can dig deeper on the software side and play around with additional filters, or create an actual circuit and use real electrodes. A bag of electrodes for this type of thing is pretty cheap on amazon (heads up, the adhesive is annoying). For a circuit, I've tried a few different configurations- what I found simplest/worked the best for me was a simple instrumentation amplifier circuit using a JFET opamp (put together on a on a breadboard). 3 electrodes, just look up a diagram for where to put them. If you use the audio interface for the ADC, the code here should work with the 3 electrode breadboard set up (might have to adjust the gain)
Why
The inspiration for this miniproject came about while playing around with a EQ plug-in in a DAW while holding a guitar cable.
The above is the detailed content of Simple DIY HR Monitor ECG Display. For more information, please follow other related articles on the PHP Chinese website!
 How to turn two pages into one word document
 OuYi Exchange app download
 How to resume use of gas after payment
 WeChat steps
 How to deal with garbled Chinese characters in Linux
 How to modify the hosts file
 What are the methods for restarting applications in Android?
 Java-based audio processing methods and practices


