
 Backend Development
Python Tutorial
Create Your Own AI RAG Chatbot: A Python Guide with LangChain
Backend Development
Python Tutorial
Create Your Own AI RAG Chatbot: A Python Guide with LangChain
Create Your Own AI RAG Chatbot: A Python Guide with LangChain

Who wouldn’t want instant answers from their documents? That’s exactly what RAG chatbots do—combining retrieval with AI generation for quick, accurate responses!
In this guide, I’ll show you how to create a chatbot using Retrieval-Augmented Generation (RAG) with LangChain and Streamlit. This chatbot will pull relevant information from a knowledge base and use a language model to generate responses.
I’ll walk you through each step, providing multiple options for response generation, whether you use OpenAI, Gemini, or Fireworks—ensuring a flexible and cost-effective solution.
What is Retrieval-Augmented Generation (RAG)?
RAG is a method that combines retrieval and generation to deliver more accurate and context-aware chatbot responses. The retrieval process pulls relevant documents from a knowledge base, while the generation process uses a language model to create a coherent response based on the retrieved content. This ensures your chatbot can answer questions using the most recent data, even if the language model itself hasn’t been specifically trained on that information.
Imagine you have a personal assistant who doesn’t always know the answer to your questions. So, when you ask a question, they look through books and find relevant information (retrieval), then they summarize that information and tell it back to you in their own words (generation). This is essentially how RAG works, combining the best of both worlds.
In a Flowchart RAG process will somewhat look like this:
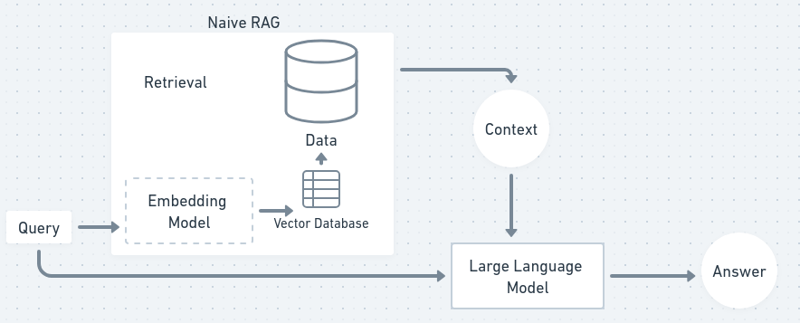
Now, let’s get started, and get our own chatbot!
Setting Up the Project Environment
We'll be using Python mostly in this TUTO, if you are JS head you can follow the explanations and go through the documentation of langchain js.
First, we need to set up our project environment. This includes creating a project directory, installing dependencies, and setting up API keys for different language models.
1. Create a Project Folder and Virtual Environment
Start by creating a project folder and a virtual environment:
mkdir rag-chatbot
cd rag-chatbot
python -m venv venv
source venv/bin/activate
2. Install Dependencies
Next, create a requirements.txt file to list all necessary dependencies:
langchain==0.0.329
streamlit==1.27.2
faiss-cpu==1.7.4
python-dotenv==1.0.0
tiktoken==0.5.1
openai==0.27.10
gemini==0.3.1
fireworks==0.4.0
sentence_transformers==2.2.2
Now, install these dependencies:
pip install -r requirements.txt
3. Setting Up API Keys
We’ll be using OpenAI, Gemini, or Fireworks for the chatbot’s response generation. You can choose any of these based on your preferences.
Don't worry if you are experimenting, Fireworks provide $1 worth of API keys for free, and gemini-1.5-flash model is also free to an extent!
Set up a .env file to store the API keys for your preferred model:
mkdir rag-chatbot
cd rag-chatbot
python -m venv venv
source venv/bin/activate
Make sure to sign up for these services and get your API keys. Both Gemini and Fireworks offer free tiers, while OpenAI charges based on usage.
Document Processing and Chunking
To give the chatbot context, we’ll need to process documents and split them into manageable chunks. This is important because large texts need to be broken down for embedding and indexing.
1. Create document_processor.py
Create a new Python script called document_processor.py to handle document processing:
langchain==0.0.329
streamlit==1.27.2
faiss-cpu==1.7.4
python-dotenv==1.0.0
tiktoken==0.5.1
openai==0.27.10
gemini==0.3.1
fireworks==0.4.0
sentence_transformers==2.2.2
This script loads a text file and splits it into smaller chunks of about 1000 characters with a small overlap to ensure that no context is lost between chunks. Once processed, the documents are ready to be embedded and indexed.
Creating Embeddings and Indexing
Now that we have our documents chunked, the next step is to convert them into embeddings (numerical representations of text) and index them for fast retrieval. (as machines understand numbers easier than words)
1. Create embedding_indexer.py
Create another script called embedding_indexer.py:
pip install -r requirements.txt
In this script, the embeddings are created using a Hugging Face model (all-MiniLM-L6-v2). We then store these embeddings in a FAISS vectorstore, which allows us to quickly retrieve similar text chunks based on a query.
Implementing Retrieval and Response Generation
Here comes the exciting part: combining retrieval with language generation! You’ll now create a RAG chain that fetches relevant chunks from the vectorstore and generates a response using a language model. (vectorstore is a database where we stored our data converted to numbers as vectors)
1. Create rag_chain.py
Let’s create the file rag_chain.py:
# Uncomment your API key
# OPENAI_API_KEY=your_openai_api_key_here
# GEMINI_API_KEY=your_gemini_api_key_here
# FIREWORKS_API_KEY=your_fireworks_api_key_here
Here, we give you the choice between OpenAI, Gemini, or Fireworks based on the API key you provide. The RAG chain will retrieve the top 3 most relevant documents and use the language model to generate a response.
You can switch between models depending on your budget or usage preferences—Gemini and Fireworks are free, while OpenAI charges based on usage.
Building the Chatbot Interface
Now, we’ll build a simple chatbot interface to take user input and generate responses using our RAG chain.
1. Create chatbot.py
Create a new file called chatbot.py:
mkdir rag-chatbot
cd rag-chatbot
python -m venv venv
source venv/bin/activate
This script creates a command-line chatbot interface that continuously listens for user input, processes it through the RAG chain, and returns the generated response.
Creating the Streamlit UI
It’s time to make your chatbot even more user-friendly by building a web interface using Streamlit. This will allow users to interact with your chatbot through a browser.
1. Create app.py
Create app.py:
langchain==0.0.329
streamlit==1.27.2
faiss-cpu==1.7.4
python-dotenv==1.0.0
tiktoken==0.5.1
openai==0.27.10
gemini==0.3.1
fireworks==0.4.0
sentence_transformers==2.2.2
2. Run the Streamlit App
To run your Streamlit app, simply use:
pip install -r requirements.txt
This will launch a web interface where you can upload a text file, ask questions, and receive answers from the chatbot.
Optimizing Performance
For better performance, you can experiment with chunk size and overlap when splitting the text. Larger chunks provide more context, but smaller chunks may make retrieval faster. You can also use Streamlit caching to avoid repeating expensive operations like generating embeddings.
If you want to optimize costs, you can switch between OpenAI, Gemini, or Fireworks depending on the query complexity—use OpenAI for complex questions and Gemini or Fireworks for simpler ones to reduce costs.
Wrapping Up
Congratulations! You've successfully created your own RAG-based chatbot. Now, the possibilities are endless:
- Create your own personalized study buddy.
- No more going through long documentations—just "RAG it out" for quick, accurate answers!
The journey starts here, and the potential is limitless!
You can follow my work on GitHub. Feel free to reach out—my DMs are always open on X and LinkedIn.
The above is the detailed content of Create Your Own AI RAG Chatbot: A Python Guide with LangChain. For more information, please follow other related articles on the PHP Chinese website!

Hot AI Tools

Undresser.AI Undress
AI-powered app for creating realistic nude photos

AI Clothes Remover
Online AI tool for removing clothes from photos.

Undress AI Tool
Undress images for free

Clothoff.io
AI clothes remover

Video Face Swap
Swap faces in any video effortlessly with our completely free AI face swap tool!

Hot Article
Hot Tools

Notepad++7.3.1
Easy-to-use and free code editor

SublimeText3 Chinese version
Chinese version, very easy to use

Zend Studio 13.0.1
Powerful PHP integrated development environment

Dreamweaver CS6
Visual web development tools

SublimeText3 Mac version
God-level code editing software (SublimeText3)
Hot Topics
 1664
1664
 14
1423
52
1317
25
1268
29
1242
24
14
1423
52
1317
25
1268
29
1242
24

 Python vs. C : Applications and Use Cases Compared
Apr 12, 2025 am 12:01 AM
Python vs. C : Applications and Use Cases Compared
Apr 12, 2025 am 12:01 AM
Python is suitable for data science, web development and automation tasks, while C is suitable for system programming, game development and embedded systems. Python is known for its simplicity and powerful ecosystem, while C is known for its high performance and underlying control capabilities.
 Python: Games, GUIs, and More
Apr 13, 2025 am 12:14 AM
Python: Games, GUIs, and More
Apr 13, 2025 am 12:14 AM
Python excels in gaming and GUI development. 1) Game development uses Pygame, providing drawing, audio and other functions, which are suitable for creating 2D games. 2) GUI development can choose Tkinter or PyQt. Tkinter is simple and easy to use, PyQt has rich functions and is suitable for professional development.
 The 2-Hour Python Plan: A Realistic Approach
Apr 11, 2025 am 12:04 AM
The 2-Hour Python Plan: A Realistic Approach
Apr 11, 2025 am 12:04 AM
You can learn basic programming concepts and skills of Python within 2 hours. 1. Learn variables and data types, 2. Master control flow (conditional statements and loops), 3. Understand the definition and use of functions, 4. Quickly get started with Python programming through simple examples and code snippets.
 Python vs. C : Learning Curves and Ease of Use
Apr 19, 2025 am 12:20 AM
Python vs. C : Learning Curves and Ease of Use
Apr 19, 2025 am 12:20 AM
Python is easier to learn and use, while C is more powerful but complex. 1. Python syntax is concise and suitable for beginners. Dynamic typing and automatic memory management make it easy to use, but may cause runtime errors. 2.C provides low-level control and advanced features, suitable for high-performance applications, but has a high learning threshold and requires manual memory and type safety management.
 How Much Python Can You Learn in 2 Hours?
Apr 09, 2025 pm 04:33 PM
How Much Python Can You Learn in 2 Hours?
Apr 09, 2025 pm 04:33 PM
You can learn the basics of Python within two hours. 1. Learn variables and data types, 2. Master control structures such as if statements and loops, 3. Understand the definition and use of functions. These will help you start writing simple Python programs.
 Python and Time: Making the Most of Your Study Time
Apr 14, 2025 am 12:02 AM
Python and Time: Making the Most of Your Study Time
Apr 14, 2025 am 12:02 AM
To maximize the efficiency of learning Python in a limited time, you can use Python's datetime, time, and schedule modules. 1. The datetime module is used to record and plan learning time. 2. The time module helps to set study and rest time. 3. The schedule module automatically arranges weekly learning tasks.
 Python: Automation, Scripting, and Task Management
Apr 16, 2025 am 12:14 AM
Python: Automation, Scripting, and Task Management
Apr 16, 2025 am 12:14 AM
Python excels in automation, scripting, and task management. 1) Automation: File backup is realized through standard libraries such as os and shutil. 2) Script writing: Use the psutil library to monitor system resources. 3) Task management: Use the schedule library to schedule tasks. Python's ease of use and rich library support makes it the preferred tool in these areas.
 Python: Exploring Its Primary Applications
Apr 10, 2025 am 09:41 AM
Python: Exploring Its Primary Applications
Apr 10, 2025 am 09:41 AM
Python is widely used in the fields of web development, data science, machine learning, automation and scripting. 1) In web development, Django and Flask frameworks simplify the development process. 2) In the fields of data science and machine learning, NumPy, Pandas, Scikit-learn and TensorFlow libraries provide strong support. 3) In terms of automation and scripting, Python is suitable for tasks such as automated testing and system management.
