

Build your No-Code AI Agent with VAKX

If you’ve been keeping up with the AI space, you already know that AI agents are becoming a game-changer in the world of automation and customer interaction. These assistants can handle everything from answering basic customer queries to performing complex, context-aware tasks. At VAKX, we’ve made it easier than ever for developers and businesses to build their own AI agents without deep AI expertise. Today, I want to share a personal look at how to go about building your own AI agent using the VAKX platform.
Before diving into the integration process, I recommend exploring VAKX and interacting with our AI chat to gain a comprehensive understanding:
VAKX
Step-by-Step Guide to Building Your Own AI Agent with VAKX
Step 1: Get Started
Log in to VAKStudio
Step 2: Create a Prompt Template
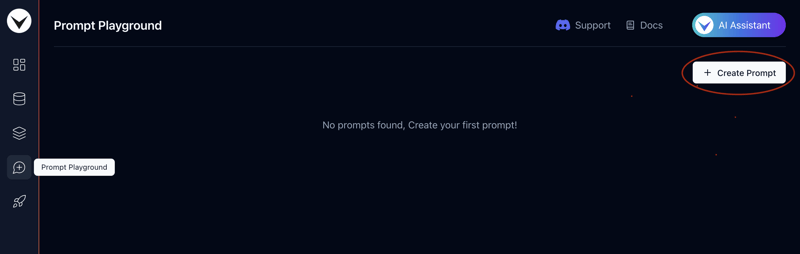
- Go to the “Prompt Playground” tab.
- Click the “Create Prompt” button in the top-right corner to create a new prompt.
- Name the prompt “FoodSprint RAG Prompt” and leave the Description field blank for now.
- Click “Create Prompt” to save it.
Step 3: Add a RAG Prompt
While there are multiple options in the prompt template, we’ll focus on adding RAG context to the prompt for this tutorial.
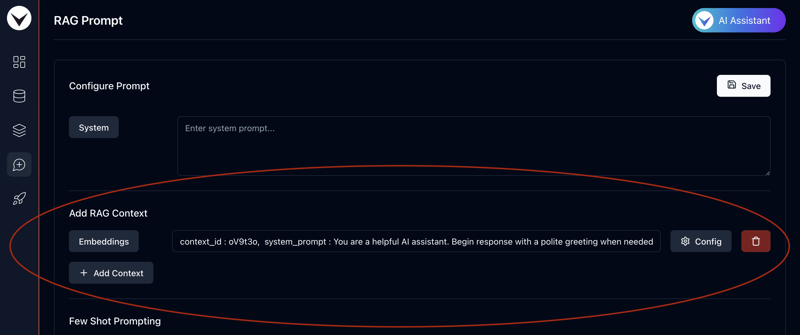
- Once you create a prompt, you will be automatically redirected to the newly created prompt page, where you can configure its settings.
- To do this, click the “Add Context” button under the “Add RAG Context” section. This will automatically load the preset embedding context prompt.
- If you’d like to modify or review the context prompt, click the “Config” button.
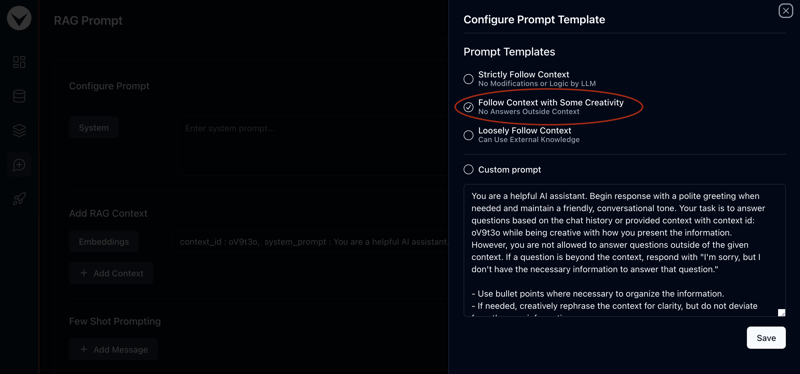
A side panel will open where you can toggle between pre-loaded prompt templates with context IDs or create a custom prompt for embedding context.
For this tutorial, we’ll proceed with the default prompt, “Follow Context With Some Creativity.”
Close the config panel and click “Save” in the top-right corner to apply your changes.
Step 4: Uploading Markdown & CSV files
- To generate embeddings for the prompt context, we’ll first need to upload a Markdown files with custom data to the datastore. For this tutorial, we’ll use a simple dataset to create an AI assistant for FoodSprint.
- Download the files by clicking the following links. We’ll use these Markdown & CSV files to create vector embeddings: Download — FoodSprint.md Download — FoodSprint_menu.md Download — FoodSprint_structured.csv
Next, head over to VAKStudio and navigate to the Datastore tab in the sidebar. Then, click on the “Markdown Files” tab at the top-left corner.
Click the “Create Folder” button, enter “FoodSprint Files” as the name, and then click “Create Folder” to confirm.
Next, click on the folder to open it.
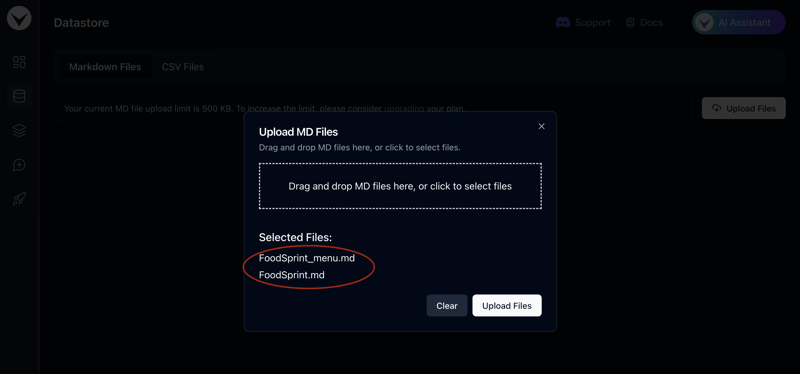
Once inside, click the “Upload Files” button at the top-right corner.
Drag and drop the FoodSprint.md and FoodSprint_menu.md files you just downloaded.
Finally, click “Upload Files” to complete the upload.
Follow these steps to upload your CSV file:
- Go to the Datastore tab in the sidebar.
- In the top-left corner, click on the “CSV Files” tab.
- Click the “Create Folder” button, enter “FoodSprint CSV” as the folder name, and then click “Create Folder” to confirm.
- Open the newly created folder by clicking on it.
- Inside the folder, click the “Upload Files” button located at the top-right corner.
- Drag and drop the FoodSprint_structured.csv file you just downloaded.
- Finally, click “Upload Files” to finish the upload.
Step 5: Creating Vector Embeddings
With the Markdown files uploaded, let’s proceed to create vector embeddings from it.
- Go to VAKStudio and open the Vector Database tab from the sidebar.
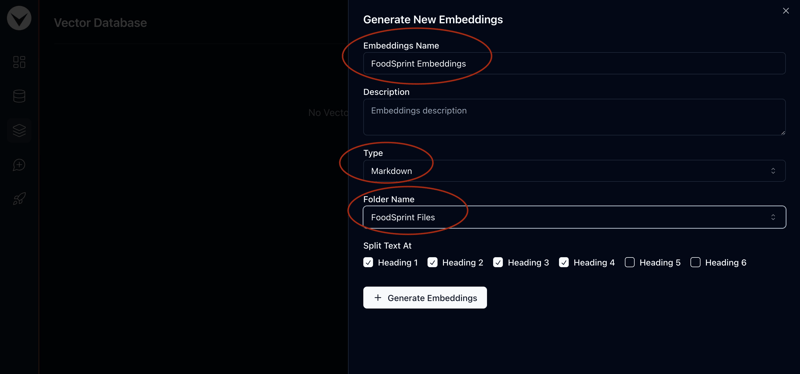
- To generate new vector embeddings, click the “New Embeddings” button in the top-right corner.
- Name it FoodSprint Embeddings and provide an appropriate description.
- Select Markdown as the type from the dropdown menu and choose FoodSprint Files as the Folder Name. Keep all other settings as default for this tutorial.
- Click “Generate Embeddings” to start the process. The creation may take a few seconds, so please wait while the embeddings are generated.
Now, to create structured vector embeddings, follow these steps:
- Go to VAKStudio and navigate to the Vector Database tab in the sidebar.
- Click the “New Embeddings” button located at the top-right corner.
- Name the embedding “FoodSprint Structured Embeddings” and add an appropriate description.
- From the dropdown menu, select CSV as the file type and choose FoodSprint CSV as the folder name.
- Leave the rest of the settings as default for this tutorial.
- Click “Generate Embeddings” to begin the process. Please wait a few moments while the embeddings are being generated.
Step 6: Creating a VAKFlow
With everything set, it’s time to create your VAKFlow.
- Go to the VAKFlow Playground from the sidebar.
- Click the “Create VAKFlow” button in the top-right corner to start a new flow.
- Name it “FoodSprint RAG VAKFlow” and add a suitable description.
- Click “Create VAKFlow” to complete the setup.
Step 7: Building a RAG Chatbot
Now that everything is ready, let’s create the RAG Chatbot.
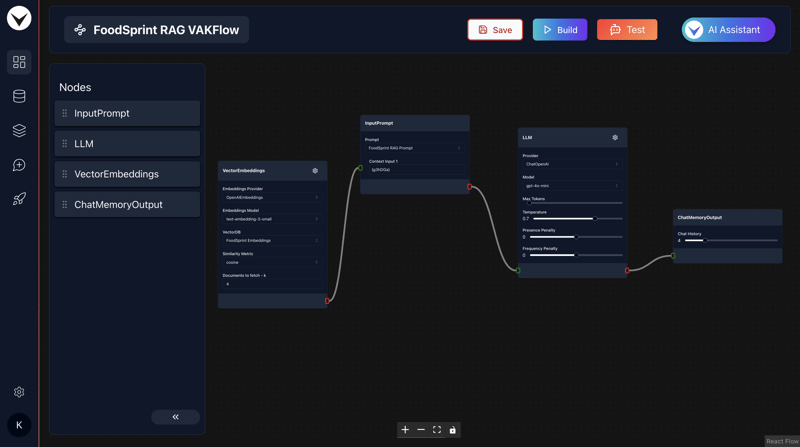
- Open the newly created VAKFlow by selecting “Create VAKFlow” from the list. This will take you to the drag-and-drop LLM orchestration playground.
- Drag and drop four nodes from left to right: VectorEmbeddings, InputPrompt, LLM, and ChatMemoryOutput.
- In the VectorEmbeddings node, select FoodSprint Embeddings from the VectorDB dropdown.
- In the InputPrompt node, choose the “FoodSprint RAG Prompt” template from the dropdown to use the prompt created in Step 3.
- Connect the output (red edge) of the VectorEmbeddings node to the Context input 1 (green edge) of the InputPrompt node.
- Connect the output (red edge) of the InputPrompt node to the input (green edge) of the LLM node.
- Then, connect the output (red edge) of the LLM node to the input (green edge) of the ChatMemoryOutput node.
- Finally, click “Save” in the top-right corner to save your VAKFlow.
Step 8: Adding VAKSearch For Rich Results
To enable rich results in your chatbot, follow these steps to add the VAKSearch node:
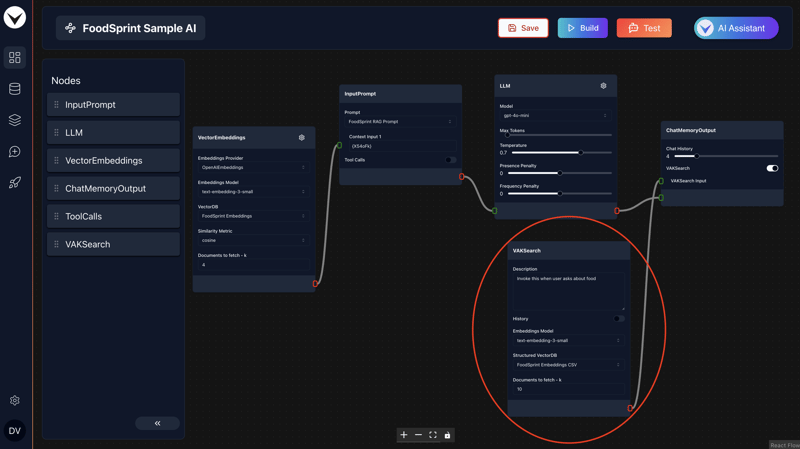
- Drag and drop the VAKSearch node into your workflow.
- Enable the VAKSearch toggle on the ChatMemoryOutput node, and connect the VAKSearch node to it.
- In the VAKSearch node, select FoodSprint Embeddings CSV from the Structured VectorDB dropdown.
- Add the following line to the Description field of the VAKSearch node:
- Invoke this when user asks about food and the message does not contain the phrase "Order Now".
Step 9: Transforming the Chatbot into an AI Agent
An AI agent is a software entity that autonomously performs tasks, makes decisions, and interacts with its environment using artificial intelligence. It processes inputs, applies reasoning, and takes action to meet specific objectives in dynamic settings.
Here’s how to build a simple AI agent by adding tool calls to your chatbot:
To add tool calls, enable the Tool Calls toggle in the InputPrompt node.
Drag and drop the ToolCalls node, and connect its red edge to the ToolCalls Input on the InputPrompt node.
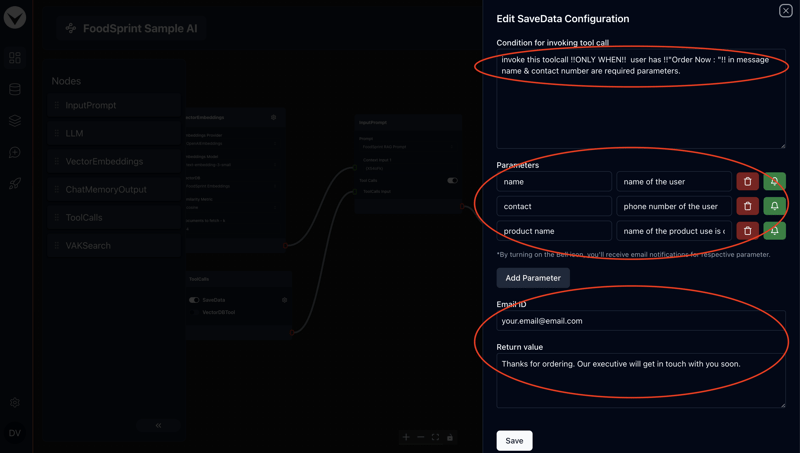
Enable the SaveData tool call, then click on the settings icon to configure it.
In the Condition for invoking tool call, enter:
invoke this toolcall !!ONLY WHEN!! user has !!"Order Now : "!! in message, name & contact number are required parameters.
Click Add Parameter three times to add three parameters:
- First parameter: set key as name and description as name of the user.
- Second parameter: set key as contact and description as phone number of the user.
- Third parameter: set key as product name and description as name of the product user is ordering. For each parameter, click the bell icon and add an email address in the field below to receive notifications when an order is placed. In the Return value field, enter: Thanks for ordering. Our executive will get in touch with you soon.
Finally, click Save to apply the changes.
Step 10: Build & Testing
Now let’s build the VAKFlow by clicking on “Build” button at the top-right corner, and you are ready to test the AI Chatbot.
To test the AI Chatbot, click on “Test” button at the top right of the screen. This will open up a chat popup to interact with AI Chatbot.
Try chatting with AI Chatbot. Few sample queries are :
- What are the starter options available?
- Give me Mexican dessert options
- How much time it will take to get delivery?
- I want refund

And that’s it! Your Chatbot is now ready to use!
What Next?
- Have fun playing & experimenting with it!
- Experiment with prompt templates to build unique & interesting LLM applications.
- Experiment with different tunable paramters of nodes.
- Deploying VAKFlows
To deploy a VAKFlow, follow these steps:
Go to the Deployment Dashboard.
Click on the New Deployment button at the top-right corner. This will open up a popup.
A list of VAKFlows ready for deployment will be displayed. Ensure the VAKFlow you want to deploy has already been built.
Select the VAKFlow from the list and click on the Deploy button.
You can configure the AI parameters like AI image, Name, Or allowed domains.
If you want to share this AI with your friends you can also enable the App and share the link (or QR code).
Integration Options
Vanilla Js
You can copy the vanilla js integration code directly from the vanillajs option from integration options. There you’ll have all the variables configured by default.
Otherwise following is the code snippet:
`
<script>
    window.initVAKChat({
        VAKFlowID: "Your_VAKFlowID",
        btnText: "AI Assistant",
        btnSize: "md",
        theme: "light",
        position: "relative",
        contentWidth: "lg",
        baseFontSize: "16px",
        btnType: "gradientbutton",
        btnWidth: "auto",
        btnTextColor: "#ffffff",
        introMessage: "Hello, How can I help you?",
    })
</script>`
Make sure to replace the VAKFlowID with your own VAKFlowID.
ReactJS
For react integration visit this link.
Make sure to replace the VAKFlowID with your own VAKFlowID.
About the Author:
Ganesh is the founder of VAKX, a platform designed to make building AI-powered assistants accessible to everyone. With a background in AI solutions, he’s passionate about helping businesses automate tasks and scale operations through intelligent assistants.
Reach me at ganesh@vakx.io
Thank you!
The above is the detailed content of Build your No-Code AI Agent with VAKX. For more information, please follow other related articles on the PHP Chinese website!

Hot AI Tools

Undresser.AI Undress
AI-powered app for creating realistic nude photos

AI Clothes Remover
Online AI tool for removing clothes from photos.

Undress AI Tool
Undress images for free

Clothoff.io
AI clothes remover

Video Face Swap
Swap faces in any video effortlessly with our completely free AI face swap tool!

Hot Article
Hot Tools

Notepad++7.3.1
Easy-to-use and free code editor

SublimeText3 Chinese version
Chinese version, very easy to use

Zend Studio 13.0.1
Powerful PHP integrated development environment

Dreamweaver CS6
Visual web development tools

SublimeText3 Mac version
God-level code editing software (SublimeText3)
Hot Topics
 1664
1664
 14
1422
52
1316
25
1266
29
1239
24
14
1422
52
1316
25
1266
29
1239
24

 Python vs. C : Applications and Use Cases Compared
Apr 12, 2025 am 12:01 AM
Python vs. C : Applications and Use Cases Compared
Apr 12, 2025 am 12:01 AM
Python is suitable for data science, web development and automation tasks, while C is suitable for system programming, game development and embedded systems. Python is known for its simplicity and powerful ecosystem, while C is known for its high performance and underlying control capabilities.
 The 2-Hour Python Plan: A Realistic Approach
Apr 11, 2025 am 12:04 AM
The 2-Hour Python Plan: A Realistic Approach
Apr 11, 2025 am 12:04 AM
You can learn basic programming concepts and skills of Python within 2 hours. 1. Learn variables and data types, 2. Master control flow (conditional statements and loops), 3. Understand the definition and use of functions, 4. Quickly get started with Python programming through simple examples and code snippets.
 Python: Games, GUIs, and More
Apr 13, 2025 am 12:14 AM
Python: Games, GUIs, and More
Apr 13, 2025 am 12:14 AM
Python excels in gaming and GUI development. 1) Game development uses Pygame, providing drawing, audio and other functions, which are suitable for creating 2D games. 2) GUI development can choose Tkinter or PyQt. Tkinter is simple and easy to use, PyQt has rich functions and is suitable for professional development.
 Python vs. C : Learning Curves and Ease of Use
Apr 19, 2025 am 12:20 AM
Python vs. C : Learning Curves and Ease of Use
Apr 19, 2025 am 12:20 AM
Python is easier to learn and use, while C is more powerful but complex. 1. Python syntax is concise and suitable for beginners. Dynamic typing and automatic memory management make it easy to use, but may cause runtime errors. 2.C provides low-level control and advanced features, suitable for high-performance applications, but has a high learning threshold and requires manual memory and type safety management.
 How Much Python Can You Learn in 2 Hours?
Apr 09, 2025 pm 04:33 PM
How Much Python Can You Learn in 2 Hours?
Apr 09, 2025 pm 04:33 PM
You can learn the basics of Python within two hours. 1. Learn variables and data types, 2. Master control structures such as if statements and loops, 3. Understand the definition and use of functions. These will help you start writing simple Python programs.
 Python and Time: Making the Most of Your Study Time
Apr 14, 2025 am 12:02 AM
Python and Time: Making the Most of Your Study Time
Apr 14, 2025 am 12:02 AM
To maximize the efficiency of learning Python in a limited time, you can use Python's datetime, time, and schedule modules. 1. The datetime module is used to record and plan learning time. 2. The time module helps to set study and rest time. 3. The schedule module automatically arranges weekly learning tasks.
 Python: Automation, Scripting, and Task Management
Apr 16, 2025 am 12:14 AM
Python: Automation, Scripting, and Task Management
Apr 16, 2025 am 12:14 AM
Python excels in automation, scripting, and task management. 1) Automation: File backup is realized through standard libraries such as os and shutil. 2) Script writing: Use the psutil library to monitor system resources. 3) Task management: Use the schedule library to schedule tasks. Python's ease of use and rich library support makes it the preferred tool in these areas.
 Python: Exploring Its Primary Applications
Apr 10, 2025 am 09:41 AM
Python: Exploring Its Primary Applications
Apr 10, 2025 am 09:41 AM
Python is widely used in the fields of web development, data science, machine learning, automation and scripting. 1) In web development, Django and Flask frameworks simplify the development process. 2) In the fields of data science and machine learning, NumPy, Pandas, Scikit-learn and TensorFlow libraries provide strong support. 3) In terms of automation and scripting, Python is suitable for tasks such as automated testing and system management.
