
 Backend Development
Python Tutorial
Creating a Coffee Shop Agent with Amazon Bedrock and Shopify
Backend Development
Python Tutorial
Creating a Coffee Shop Agent with Amazon Bedrock and Shopify
Creating a Coffee Shop Agent with Amazon Bedrock and Shopify

Today I will explain how to get to work with Bedrock safely and reliably and, at the same time, learn a little about coffee.
You will learn how to consume the Amazon Bedrock API of Text and Multimodal models using Python to generate names, logo and menu for your cafe and to create an agent that connects to a Shopify API to take orders.
Shopify is (in my opinion) the best eCommerce platform that exists.
And just like AWS, Shopify has an API for everything and a platform for developers
Finally you will create a frontend using Streamlit to provide a unique user experience and give life to your agent.
? Index
- Invoking the Bedrock API
- Creating an Amazon Bedrock agent that interacts with Shopify
? Invoking the Amazon Bedrock API to generate names, logo and menu for your coffee shop
The moment of opening a cafeteria or having creative ideas for any business is an excellent opportunity to rely on Generative AI (GenAI) and get the most out of it.
Through Amazon Bedrock you can use it, but... How is that service consumed?
Every service in AWS has an API, and Amazon Bedrock is no exception. Below I explain how to consume the Amazon Bedrock API through an example to generate names and a menu for a Cafeteria on the go.
And I also show you how to consume a multimodal model capable of analyzing images.
Instructions to program a Python script to run locally or in a Lambda function to invoke Amazon Bedrock:
First you must enable access to the models in Bedrock Instructions here
Requirements:
- An account on AWS, if you don't have an account, you can open one here
- AWS CLI Instructions here
- Python 3.11 or higher
Step 1) Create a virtual Python environment Instructions here
In the bedrock_examples folder of this repository you will find different examples used below to invoke the foundational model.
In the prompts folder you will find the example prompts, which you will be able to use to generate the name, the Menu and a prompt to pass to an image generation model that you can invoke both in the Amazon Bedrock playground and by invoking the API from Python.
Step 2) Install the requirements
1 |
|
Step 3) Configure Boto3 More info about boto3
Here I configure the AWS client telling it to use the genaiday profile installed on my computer and call the bedrock-runtime client that will allow me to invoke the foundational model.
1 2 3 |
|
Step 4) Example: Invoke text model
This function calls the method invoke_model and I pass the prompt indicated by the user and return the response
The most important part is the messages sent:
1 |
|
1 2 3 |
|
Example:
1 2 3 4 5 6 7 |
|
Step 5) Example: Invoke a multimodal model.
Here the process is similar, only you have to add the mime type of the sent file, for this there is a function that obtains the mimetype
based on the file name
1 2 3 4 5 6 7 8 9 10 11 12 13 14 15 16 17 18 19 20 21 22 23 24 25 26 |
|
Then to invoke the model, the messages must be the following:
1 2 |
|
The invocation of the model looks like this:
1 2 3 4 5 6 |
|
Example:
1 2 3 4 5 6 7 8 9 10 11 12 13 14 15 16 17 18 |
|
? Creating an Amazon Bedrock agent that interacts with Shopify
To create an Amazon Bedrock agent:
Make sure you have the Bedrock models you want to use with access enabled Instructions here, in this case we will use Claude 3 Haiku and Sonnet
Then create the Bedrock agent in the AWS console:
1) Go to Bedrock service
2) Agents
3) Create agent

4) Give the agent a name, in our case "Pause-Coffee-Agent
5) Description is optional.
6) One of the most important steps is to choose the foundational model that will make our agent work properly. If you want to know how to choose the best model that suits your use case, here is a guide on the Amazon Bedrock service. Model Evaluation .
7) The next step is the prompt that will guide your model, here you have to be as precise as possible and bring out your skills as a prompt engineer, if you don't know where to start, I recommend visiting this guide where you will find the best guidelines for the model you are using, and another very useful resource is the anthropic console.
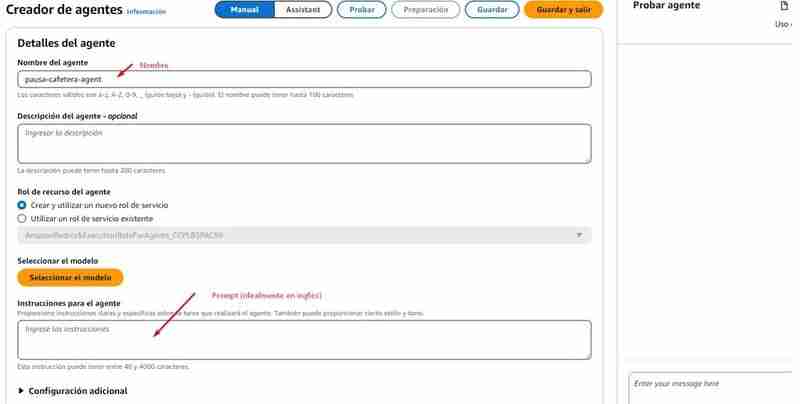
This is the prompt that I used for the example agent, I recommend writing the prompt in English since the models were trained in English and sometimes writing in the training source language helps avoid erroneous behavior.
1 2 3 4 5 6 7 8 9 10 11 12 13 14 15 16 17 18 19 20 21 22 23 24 25 26 27 28 29 30 31 32 33 34 35 |
|
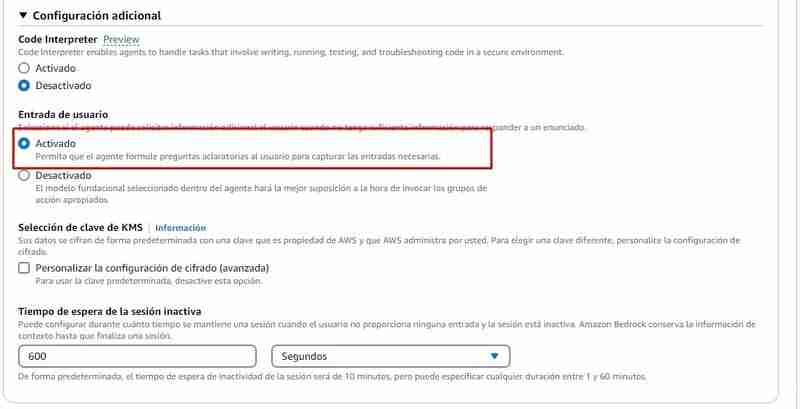
8) Additional configuration, you must allow the agent to capture input from the user, given that they will surely lack information to process the order, for example: They will need to ask for the products that the customer wants, the name, among other things.
9) Action Groups: An action group defines the actions in which the agent can help the user. For example, you can define an action group that says TakeOrder that can have the following actions
- List products
- Process Order
To create an action group you will need for each action:
- The name
- The parameters
Action groups to run usually invoke a Lambda function, from Bedrock you can:
- Create a lambda function from the Bedrock console (Select Quick creation of a lambda function)

- Choose a lambda function already created here the instructions of what the event is like and the expected response for each action group
If you choose to create the lambda function from the Bedrock console, a function will be created in python with a basic source code that you will then have to modify, in this repo in the file agents/action_group/lambda.py you have the modified example code to make it work with the agent.
These are the variables that will give you the necessary information:
- function: is the name of the action invoked, in the case of the example it can be: get_products (to list products), and place_order (to generate the order in Shopify)
- parameters: is a dictionary of parameters.
In the following example you can see that there are two actions:


- get_products that does not require any parameters
- place_order that has 3 parameters:
| Parametro | Descripcion | Tipo | Obligatorio |
|---|---|---|---|
| customerEmail | Email of the customer | string | False |
| customerName | Name of the customer | string | True |
| products | SKUs and quantities to add to the cart in the format [{ variantId: variantId, quantity: QUANTITY }] | array | True |
So for example when you call the get_products function in the lambda function it is handled like this:
There is a get_products function defined that will be responsible for querying the Shopify API (For educational purposes we return all the products)
If you want this to work in Shopify you must replace the following variables with those of your store:
1 |
|
1 2 3 |
|
Then in the handler of the lambda function, the name of the called function is verified and the response is returned in the format that the action_group needs:
1 2 3 4 5 6 7 |
|
The code snippets above are part of the lambda function found here
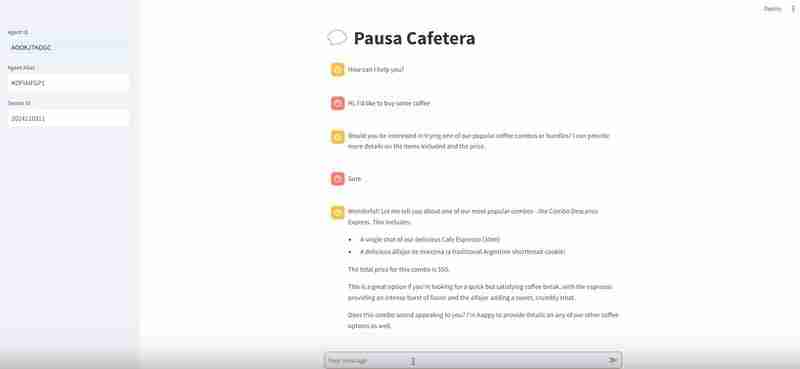
10) Press Save and Exit, and that's it! The agent is ready to be tested.
The Agent in action
The next thing is to test the agent and validate that it works, from Bedrock you can test the agent, and if during the conversation you click "See trace or Show Trace" it will show you the reasoning process, this is where you should Pay special attention and make the adjustments you think are necessary in the prompt or look for another model if you see that the one you chose does not work as you expected.
Once you are satisfied with the agent, you can create an Alias, an alias is an ID through which you will be able to invoke the agent from the Amazon Bedrock API, when you create the alias, it will create a version of the agent automatically, or you can point to an already existing version, having different aliases and different versions will help you control the agent deployment process, for example:
- You can have an alias "development" that will go to the latest Agent tests
- A "preprod" alias that would be the agent in pre-production mode
- An alias "prod" and this is the live agent.
Then all that remains is to write down the production alias corresponding to the version you want to be live.
How to invoke the agent
For this, in the agents/frontend folder I have left a file called agent.py.
This development uses Streamlit, a powerful framework to make sample machine learning applications
The part of the code that invokes the agent is the following:
1 2 3 4 5 6 7 8 9 10 11 12 13 14 15 16 17 18 19 20 21 22 23 24 25 26 |
|
We use boto3 to consume the AWS API, we call the bedrock-agent-runtime client to be able to invoke the agent.
The parameters we need to pass to it are:
- agentId
- agentAliasId
- inputText (the prompt)
- sessionId (the session, to identify the conversations)
In this example, I am defining the variables here:
1 2 |
|
Facility:
First you must enable access to the models in Bedrock Instructions here
Requirements:
- AWS CLI Instructions here
- Python 3.11 or higher
I recommend creating a virtual Python environment Instructions here
1 |
|
Execution
1 2 3 |
|
This will start running streamlit on port 8501 and you can visit the following URL: http://localhost:8501/ to see the frontend that will invoke the agent
Conclusion
If you have followed all the steps you have:
- Consumed the Amazon Bedrock API from the Bedrock Playground and from Python
- You have invoked foundational text and multimodal models
- You have created an agent from scratch that consumes a Shopify API
Some links for you to follow your path within GenerativeAI
Workshop AWS generative AI
Bedrock Knowledge Bases
Anthropic Console (To debug our prompts)
Community.aws (more articles generated by and for the community)
The above is the detailed content of Creating a Coffee Shop Agent with Amazon Bedrock and Shopify. For more information, please follow other related articles on the PHP Chinese website!

Hot AI Tools

Undresser.AI Undress
AI-powered app for creating realistic nude photos

AI Clothes Remover
Online AI tool for removing clothes from photos.

Undress AI Tool
Undress images for free

Clothoff.io
AI clothes remover

Video Face Swap
Swap faces in any video effortlessly with our completely free AI face swap tool!
Hot Article
Hot Tools

Notepad++7.3.1
Easy-to-use and free code editor

SublimeText3 Chinese version
Chinese version, very easy to use

Zend Studio 13.0.1
Powerful PHP integrated development environment

Dreamweaver CS6
Visual web development tools

SublimeText3 Mac version
God-level code editing software (SublimeText3)
Hot Topics
 1655
1655
 14
1414
52
1307
25
1254
29
1228
24
14
1414
52
1307
25
1254
29
1228
24

 Python vs. C : Applications and Use Cases Compared
Apr 12, 2025 am 12:01 AM
Python vs. C : Applications and Use Cases Compared
Apr 12, 2025 am 12:01 AM
Python is suitable for data science, web development and automation tasks, while C is suitable for system programming, game development and embedded systems. Python is known for its simplicity and powerful ecosystem, while C is known for its high performance and underlying control capabilities.
 How Much Python Can You Learn in 2 Hours?
Apr 09, 2025 pm 04:33 PM
How Much Python Can You Learn in 2 Hours?
Apr 09, 2025 pm 04:33 PM
You can learn the basics of Python within two hours. 1. Learn variables and data types, 2. Master control structures such as if statements and loops, 3. Understand the definition and use of functions. These will help you start writing simple Python programs.
 Python: Games, GUIs, and More
Apr 13, 2025 am 12:14 AM
Python: Games, GUIs, and More
Apr 13, 2025 am 12:14 AM
Python excels in gaming and GUI development. 1) Game development uses Pygame, providing drawing, audio and other functions, which are suitable for creating 2D games. 2) GUI development can choose Tkinter or PyQt. Tkinter is simple and easy to use, PyQt has rich functions and is suitable for professional development.
 The 2-Hour Python Plan: A Realistic Approach
Apr 11, 2025 am 12:04 AM
The 2-Hour Python Plan: A Realistic Approach
Apr 11, 2025 am 12:04 AM
You can learn basic programming concepts and skills of Python within 2 hours. 1. Learn variables and data types, 2. Master control flow (conditional statements and loops), 3. Understand the definition and use of functions, 4. Quickly get started with Python programming through simple examples and code snippets.
 Python vs. C : Learning Curves and Ease of Use
Apr 19, 2025 am 12:20 AM
Python vs. C : Learning Curves and Ease of Use
Apr 19, 2025 am 12:20 AM
Python is easier to learn and use, while C is more powerful but complex. 1. Python syntax is concise and suitable for beginners. Dynamic typing and automatic memory management make it easy to use, but may cause runtime errors. 2.C provides low-level control and advanced features, suitable for high-performance applications, but has a high learning threshold and requires manual memory and type safety management.
 Python and Time: Making the Most of Your Study Time
Apr 14, 2025 am 12:02 AM
Python and Time: Making the Most of Your Study Time
Apr 14, 2025 am 12:02 AM
To maximize the efficiency of learning Python in a limited time, you can use Python's datetime, time, and schedule modules. 1. The datetime module is used to record and plan learning time. 2. The time module helps to set study and rest time. 3. The schedule module automatically arranges weekly learning tasks.
 Python: Exploring Its Primary Applications
Apr 10, 2025 am 09:41 AM
Python: Exploring Its Primary Applications
Apr 10, 2025 am 09:41 AM
Python is widely used in the fields of web development, data science, machine learning, automation and scripting. 1) In web development, Django and Flask frameworks simplify the development process. 2) In the fields of data science and machine learning, NumPy, Pandas, Scikit-learn and TensorFlow libraries provide strong support. 3) In terms of automation and scripting, Python is suitable for tasks such as automated testing and system management.
 Python: Automation, Scripting, and Task Management
Apr 16, 2025 am 12:14 AM
Python: Automation, Scripting, and Task Management
Apr 16, 2025 am 12:14 AM
Python excels in automation, scripting, and task management. 1) Automation: File backup is realized through standard libraries such as os and shutil. 2) Script writing: Use the psutil library to monitor system resources. 3) Task management: Use the schedule library to schedule tasks. Python's ease of use and rich library support makes it the preferred tool in these areas.
