

Black Ops 6 Zombies Terminus easter eggs guide

Call of Duty: Black Ops 6 Zombies currently has two maps for players to defend themselves from waves of zombies on, and each map comes with its own main quest easter egg for adventurous folk to discover and complete. In Terminus’ case, the main quest is lengthy and gruelling, with multiple steps for you and your squad to complete.
The Terminus easter egg is arguably tougher to achieve than Liberty Falls main easter egg, with it having you sail across stormy seas with unruly tentacles, and take on an epic albeit tough boss at its conclusion. To help you out, here’s our guide on how to complete Terminus main quest in Black Ops 6 Zombies.
Black Ops 6 Zombies Terminus easter eggs guide
The Terminus map in Black Ops 6 Zombies has a couple of fun, small easter eggs for players to discover, as well as a lengthy main quest that will put you and your squad to the test.
On this page, we walk you through the Terminus main quest, including guides to a couple of the smaller objectives.
- Terminus Main Quest (detailed below)
- Terminus Pack-a-Punch
Black Ops 6 Zombies Terminus main quest guide
To kick off Terminus’ main quest in Black Ops 6 Zombies, you will first want to craft the Beamsmasher, which is a relatively lengthy process. You can also attempt to acquire it early from a Mystery Box, though this isn’t the most reliable way of getting your hands on the Wonder Weapon.
If you already have the Beamsmasher, continue this guide. If you are yet to get your hands on it, take a look at our guide on how to craft the Beamsmasher and then return here to continue the main quest once it’s in your possession.
When you finally have the Beamsmasher to hand, you want to pay a visit to the Bio Lab; this is where you will have powered the third AMP Generator at the beginning of the match.
In the Bio Lab, look for a vent where you can pay to place a Tentacle Trap. Do so, and then use the Beamsmasher to burn it. With some luck, it’ll drop a Hard Drive.

If it does not drop the item, you can wait for the trap to cool down and try again. Alternatively, there is a trap in the living quarters that you can also try.
Once you have your hands on the Hard Drive, give it to Peck by depositing it in the silver box in front of his station in the Guard Room.

Peck will advise that you speak with Nathan in the center of the Bio Lab. To actually do anything there, though, you will need a code first. This code is randomised every match, and is found by visiting three different areas across the map.
The first part of the code is found in the Interrogation Room. If you look inside the zombie spawn point in the corner of the room, there will be a clock. Wherever the hour hand points is the first number we need. In my instance, it was 7.

The second part of the code is found in the Mess Hall. In here, there is a corkboard with a playing card pinned to it. The number represented on the playing card is the second number in our code. In my instance, this was 8.

Last, but not least, we need to pay a visit to Engineering. On the wall in here, there is a poster that reads ‘Safety First: Days Since Last Accident’. The number depicted here is the third and final part of our code, and in my instance, this was 1.

Make your way to the center of the Bio Lab and interact with Nathan’s pod to input the code, but make sure you’re prepared for a tough boss fight before doing so. After inputting the code, valves around Nathan’s pod will have a green light above them; you and your squad will need to turn these at the same time.

A fight in the Bio Lab with Nathan then begins. He is an incredibly tough Amalgam who is capable of healing himself by eating surrounding zombies, so you ideally want to focus on damaging him where you can. The zombies here drop little to no essence anyway, so there isn’t much use in attacking them other than to thin out the waves.
Once Nathan has been defeated, he will drop a Key Card into the water in the Bio Lab. Swim around and look at the floor until you find it.

It’s now time for us to set sail once again. Head to the docks, purchase a boat, and make your way to the interior of the shipwreck. There is a hole in the side of the boat you can sail into, and a ladder for you to climb to reach the inside.
There will be two Node Connectors on a desk here. The moment you interact with one of them, you will be locked inside this tiny room and will need to defend yourself from zombies for a brief period of time.

Once the wave is over, you need to collect the Node Connectors and place one of them in the Sea Cave, and another on Crab Island. Each player can only carry one Node Connector at a time, so if you’re in a squad, it’s worth sending two players to each island to do this simultaneously. If you’re solo, however, you have your work cut out for you.

Once the two Node Connectors have been placed, return and speak to Peck in the Guard Room again. He will deposit a Hacking Device into the silver box in front of his station for you to collect.

You will need to use this Hacking Device to hack three buoys that are found among the islands. It’s worth starting this objective near Crab Island as we will have just been there.

Once you begin to hack the buoys, the objective becomes timed, giving you two minutes to hack all three buoys. Each buoy takes five seconds to hack, which isn’t a problem, but you will need to avoid the tentacle — and the toxic clouds it spews — while doing this.
In a squad, it’s worth having one designated hacker. Let them hop out to hack the buoy while you circle them on the boat, avoiding the tentacle’s attacks where possible. Once the buoy is hacked, pick up your hacker and keep moving.
A second buoy is found by the shipwreck, and the third buoy is found near Temple Island.
Once the three buoys have been hacked, you will need to speed on over to the Bio Lab again. There will be three bombs around the room preparing to detonate, and you must interact with all three of them to stop the detonation while fending off zombies.

If they detonate before you interact with all of them, the match will end and you will need to start again. If you happen to turn them all off in time, however, you are now able to begin the final encounter by interacting with one of the locked doors around the edge of the Bio Lab - it will have a small terminal beside it.
The final encounter on Terminus is no joke. You will be transported to a different part of the facility with a huge, Cthulhu-like sea creature — the one who’s tentacles you were avoiding earlier — known as Patient 13.
This boss has three phases. During the first, you’ll need to shoot his glowing tentacles. After transitioning to the second phase, you will need to shoot his mouth. Once that is done, the third phase will have you shooting his eyes while avoiding his gross, inexplicably long tongue.
Bear in mind this is all while endless zombies are spawning, and Patient 13 will be using his limbs and other body parts to send you flying. Make sure to avoid these as best you can, as they can very easily wipe out an entire squad that isn’t fully prepared for the fight.
For more on Call of Duty: Black Ops 6 Zombies, take a look at our Liberty Falls easter egg guide, which includes how to unlock the Liberty Falls bowling minigame, and how to turn into Aetherella.
The above is the detailed content of Black Ops 6 Zombies Terminus easter eggs guide. For more information, please follow other related articles on the PHP Chinese website!

Hot AI Tools

Undresser.AI Undress
AI-powered app for creating realistic nude photos

AI Clothes Remover
Online AI tool for removing clothes from photos.

Undress AI Tool
Undress images for free

Clothoff.io
AI clothes remover

AI Hentai Generator
Generate AI Hentai for free.

Hot Article
Hot Tools

Notepad++7.3.1
Easy-to-use and free code editor

SublimeText3 Chinese version
Chinese version, very easy to use

Zend Studio 13.0.1
Powerful PHP integrated development environment

Dreamweaver CS6
Visual web development tools

SublimeText3 Mac version
God-level code editing software (SublimeText3)
Hot Topics
 1379
1379
 52
52

 R.E.P.O. Energy Crystals Explained and What They Do (Yellow Crystal)
Mar 18, 2025 am 12:07 AM
R.E.P.O. Energy Crystals Explained and What They Do (Yellow Crystal)
Mar 18, 2025 am 12:07 AM
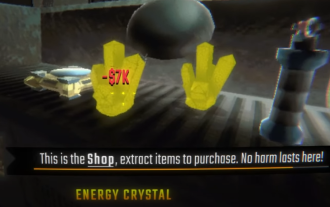
I bought expensive weapons or drones in R.E.P.O. but found that the energy was exhausted and became useless? Don't worry, you don't have to spend $50,000 on replacements, just charge your gear! That strange machine at the back of your truck is not a decoration. Here are how to get energy crystals and use them to keep your gear running continuously to avoid bankruptcy. More Reads: All R.E.P.O. Items How to get energy crystal You can buy energy crystals from the service store between levels. They usually cost between $7,000 and $9,000 — while expensive, they are far cheaper than repurchasing gear. In the first few levels, no purchase is required. You don't need them for the time being, so
 R.E.P.O. Best Graphic Settings
Mar 18, 2025 am 01:33 AM
R.E.P.O. Best Graphic Settings
Mar 18, 2025 am 01:33 AM
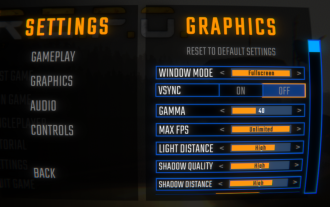
R.E.P.O. Game Screen Setting Guide: How to improve frame rate while ensuring picture quality? This article will guide you to optimize game settings and find the best balance point. Step 1: Full Screen Mode and Frame Rate Adjustment Before adjusting other settings, make sure the game is running in the best mode: Display Mode: Full Screen - Always use Full Screen Mode for optimal performance. Window mode will reduce the frame rate. Vertical Sync (V-Sync): Off - Unless a screen tear occurs, turn off vertical synchronization for a smoother gaming experience. Maximum FPS: Unlimited - If your computer is configured strongly, you can set it to Unlimited. Otherwise, it is recommended to limit it to 60 frames or match your monitor refresh rate. second
 Assassin's Creed Shadows: Seashell Riddle Solution
Mar 28, 2025 am 01:58 AM
Assassin's Creed Shadows: Seashell Riddle Solution
Mar 28, 2025 am 01:58 AM
Assassin's Creed: Shadows boasts a vast world brimming with activities beyond the main storyline. Side missions and various encounters significantly enrich the immersive experience of in-game Japan. One particularly memorable encounter is the Seashe
 R.E.P.O. How to Fix Audio if You Can't Hear Anyone
Mar 17, 2025 pm 06:10 PM
R.E.P.O. How to Fix Audio if You Can't Hear Anyone
Mar 17, 2025 pm 06:10 PM
Can't hear other players' voices in the R.E.P.O. game? Even if your microphone is working properly, it can be a problem caused by audio settings or device conflicts. Here are some effective solutions to help you restore your voice chat functionality. 1. Check the output device Open the audio settings of R.E.P.O. and check the output device settings. If set to "Default", manually select your headset or speaker. Restart the game and test voice chat again. 2. Adjust Windows sound settings If R.E.P.O. does not output the sound to the correct device, check the Windows Sound Settings: Right-click the speaker icon in the taskbar and select Sound Settings. Under "Output",
 R.E.P.O. Chat Commands and How to Use Them
Mar 17, 2025 pm 06:13 PM
R.E.P.O. Chat Commands and How to Use Them
Mar 17, 2025 pm 06:13 PM
R.E.P.O. provides some convenient chat instructions in the game to help you optimize the gaming experience. These instructions do not affect game balance, but are useful for taking clear screenshots or setting up visuals for content creation. How to use chat commands in R.E.P.O. To activate the command, please follow the steps below: Press the “T” key to open the chat window. Enter the “/” symbol, and then enter the command you want to use. Press Enter and the effect will take effect. To cancel the effect, enter the same command again or restart the game. Please note that these commands are only valid in multiplayer games and are not available in single player mode. Available chat commands /cinematic commands remove the game world
 Will R.E.P.O. Have Crossplay?
Mar 18, 2025 am 01:07 AM
Will R.E.P.O. Have Crossplay?
Mar 18, 2025 am 01:07 AM
At present, "R.E.P.O." does not support cross-platform games, and the official has not confirmed whether it will support it in the future. The game is currently only available on PC platforms (early experience through Steam), so console players are temporarily unable to play. Why does R.E.P.O. not support cross-platform games? Released on PC platforms only – The console version of the game has not been announced yet. Early Access Phase – Developers are still refining the game, and cross-platform gaming is not a current priority. Host porting is not confirmed – without a host version, cross-platform gaming is simply impossible. Will cross-platform games be supported in the future? There is no official news on whether R.E.P.O. will launch a console version and whether it will support cross-platform games. However,
 Where to find the Crane Control Keycard in Atomfall
Mar 28, 2025 am 02:17 AM
Where to find the Crane Control Keycard in Atomfall
Mar 28, 2025 am 02:17 AM
In Atomfall, discover hidden keys and passages, including multiple ways to access key locations. This guide focuses on using the Crane Control Keycard for easy, unguarded Entry to Skethermoor Prison, bypassing the need to cooperate with Captain Sims
 Saving in R.E.P.O. Explained (And Save Files)
Mar 19, 2025 am 12:22 AM
Saving in R.E.P.O. Explained (And Save Files)
Mar 19, 2025 am 12:22 AM
Want to save progress in R.E.P.O.? Good news: You can! Bad news: Only under very specific conditions…but this will change soon. Read more about the upcoming update that involves a new save menu and multiple save slots. Save mechanism Complete the game run once, then exit from the menu and do not start another game immediately. If you do it correctly, your progress will be saved to continue from where you last left. If everyone dies, your save will be deleted – no second chance. The game will simply erase your existence as if you never existed. Basically, if you complete a level and want to keep your progress, make sure to stop and exit before jumping into another task. This means
