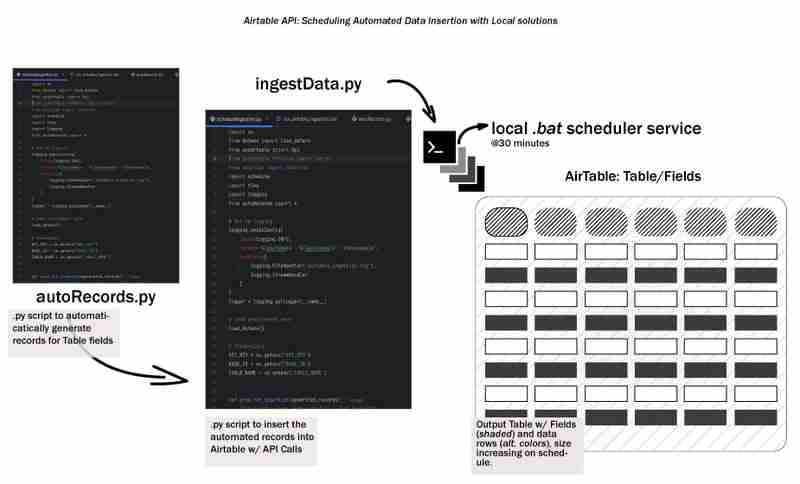

The overall data lifecycle starts with generating data and storing it in some way, somewhere. Let's call this the early-stage data lifecycle and we'll explore how to automate data ingestion into Airtable using a local workflow. We'll cover setting up a development environment, designing the ingestion process, creating a batch script, and scheduling the workflow - keeping things simple, local/reproducible and accessible.
First, let's talk about Airtable. Airtable is a powerful and flexible tool that blends the simplicity of a spreadsheet with the structure of a database. I find it perfect for organizing information, managing projects, tracking tasks, and it has a free tier!
We would be developing this project with python, so lunch your favorite IDE and create a virtual environment
# from your terminal
python -m venv <environment_name>
<environment_name>\Scripts\activate
To get started with Airtable, head over to Airtable's website. Once you've signed up for a free account, you'll need to create a new Workspace. Think of a Workspace as a container for all your related tables and data.
Next, create a new Table within your Workspace. A Table is essentially a spreadsheet where you'll store your data. Define the Fields (columns) in your Table to match the structure of your data.
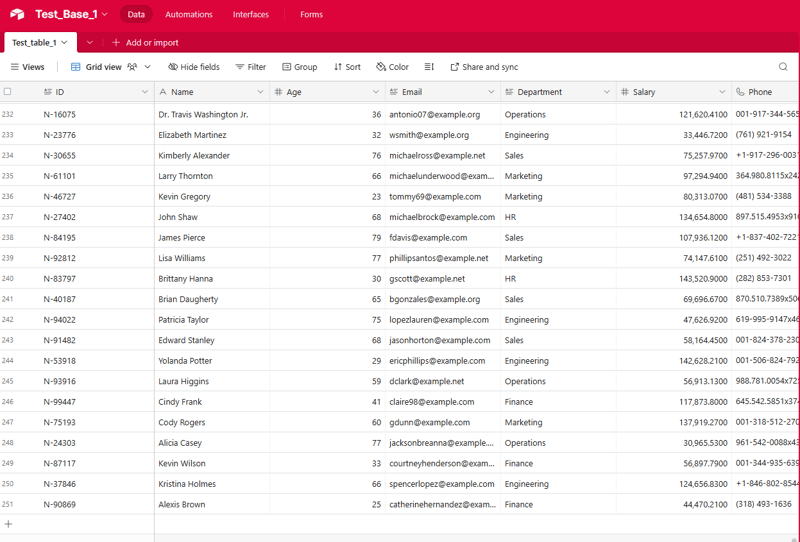
Here's a snippet of the fields used in the tutorial, it's a combination of Texts, Dates and Numbers:

To connect your script to Airtable, you'll need to generate an API Key or Personal Access Token. This key acts as a password, allowing your script to interact with your Airtable data. To generate a key, navigate to your Airtable account settings, find the API section, and follow the instructions to create a new key.
*Remember to keep your API key secure. Avoid sharing it publicly or committing it to public repositories. *
Next, touch requirements.txt. Inside this .txt file put the following packages:
pyairtable
schedule
faker
python-dotenv
now run pip install -r requirements.txt to install the required packages.
This step is where we create the scripts, .env is where we will store our credentials, autoRecords.py - to randomly generate data for the defined fields and the ingestData.py to insert the records to Airtable.

# from your terminal
python -m venv <environment_name>
<environment_name>\Scripts\activate
Sounds good, let's put together a focused subtopic content for your blog post on this employee data generator.
When working on projects that involve employee data, it's often helpful to have a reliable way to generate realistic sample data. Whether you're building an HR management system, an employee directory, or anything in between, having access to robust test data can streamline your development and make your application more resilient.
In this section, we'll explore a Python script that generates random employee records with a variety of relevant fields. This tool can be a valuable asset when you need to populate your application with realistic data quickly and easily.
The first step in our data generation process is to create unique identifiers for each employee record. This is an important consideration, as your application will likely need a way to uniquely reference each individual employee. Our script includes a simple function to generate these IDs:
pyairtable
schedule
faker
python-dotenv
This function generates a unique ID in the format "N-#####", where the number is a random 5-digit value. You can customize this format to suit your specific needs.
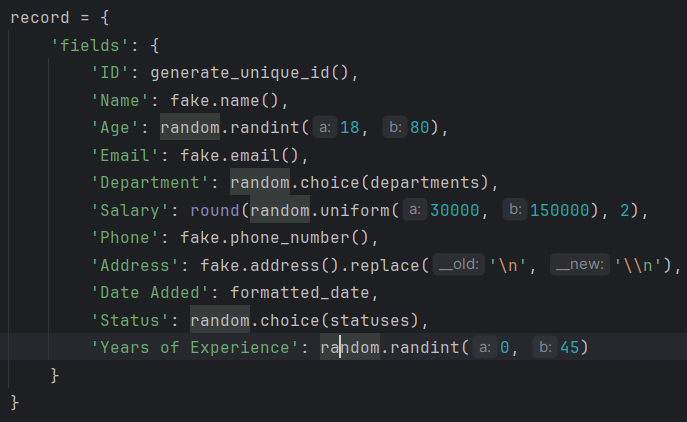
Next, let's look at the core function that generates the employee records themselves. The generate_random_records() function takes the number of records to create as input and returns a list of dictionaries, where each dictionary represents an employee with various fields:
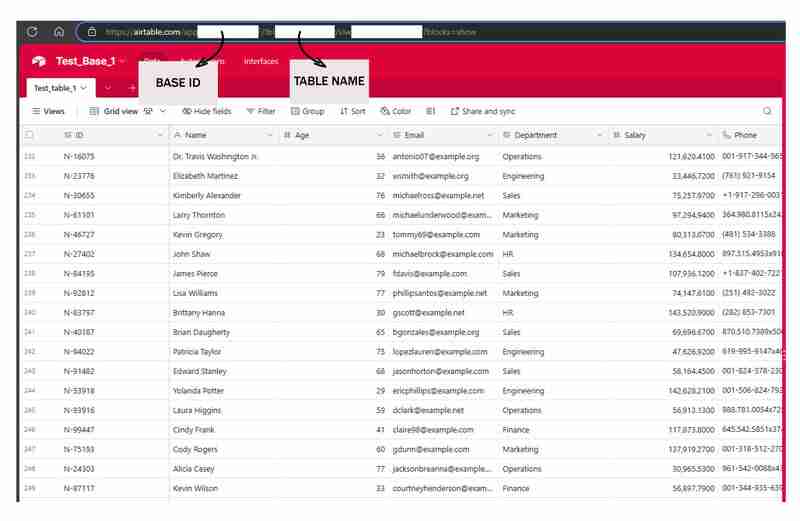
"https://airtable.com/app########/tbl######/viw####?blocks=show"
BASE_ID = 'app########'
TABLE_NAME = 'tbl######'
API_KEY = '#######'
This function uses the Faker library to generate realistic-looking data for various employee fields, such as name, email, phone number, and address. It also includes some basic constraints, such as limiting the age range and salary range to reasonable values.
The function returns a list of dictionaries, where each dictionary represents an employee record in a format that is compatible with Airtable.
Finally, let's look at the prepare_records_for_airtable() function, which takes the list of employee records and extracts the 'fields' portion of each record. This is the format that Airtable expects for importing data:
def generate_unique_id():
    """Generate a Unique ID in the format N-#####"""
    return f"N-{random.randint(10000, 99999)}"
This function simplifies the data structure, making it easier to work with when integrating the generated data with Airtable or other systems.
Putting It All Together
To use this data generation tool, we can call the generate_random_records() function with the desired number of records, and then pass the resulting list to the prepare_records_for_airtable() function:
# from your terminal
python -m venv <environment_name>
<environment_name>\Scripts\activate
This will generate 2 random employee records, print them in their original format, and then print the records in the flat format suitable for Airtable.
Run:
pyairtable
schedule
faker
python-dotenv
Output:
"https://airtable.com/app########/tbl######/viw####?blocks=show"
BASE_ID = 'app########'
TABLE_NAME = 'tbl######'
API_KEY = '#######'
In addition to generating realistic employee data, our script also provides functionality to seamlessly integrate that data with Airtable
Before we can start inserting our generated data into Airtable, we need to establish a connection to the platform. Our script uses the pyairtable library to interact with the Airtable API. We start by loading the necessary environment variables, including the Airtable API key and the Base ID and Table Name where we want to store the data:
def generate_unique_id():
    """Generate a Unique ID in the format N-#####"""
    return f"N-{random.randint(10000, 99999)}"
With these credentials, we can then initialize the Airtable API client and get a reference to the specific table we want to work with:
def generate_random_records(num_records=10):
    """
    Generate random records with reasonable constraints
    :param num_records: Number of records to generate
    :return: List of records formatted for Airtable
    """
    records = []

    # Constants
    departments = ['Sales', 'Engineering', 'Marketing', 'HR', 'Finance', 'Operations']
    statuses = ['Active', 'On Leave', 'Contract', 'Remote']

    for _ in range(num_records):
        # Generate date in the correct format
        random_date = datetime.now() - timedelta(days=random.randint(0, 365))
        formatted_date = random_date.strftime('%Y-%m-%dT%H:%M:%S.000Z')

        record = {
            'fields': {
                'ID': generate_unique_id(),
                'Name': fake.name(),
                'Age': random.randint(18, 80),
                'Email': fake.email(),
                'Department': random.choice(departments),
                'Salary': round(random.uniform(30000, 150000), 2),
                'Phone': fake.phone_number(),
                'Address': fake.address().replace('\n', '\n'),  # Escape newlines
                'Date Added': formatted_date,
                'Status': random.choice(statuses),
                'Years of Experience': random.randint(0, 45)
            }
        }
        records.append(record)

    return records
Now that we have the connection set up, we can use the generate_random_records() function from the previous section to create a batch of employee records, and then insert them into Airtable:
def prepare_records_for_airtable(records):
    """Convert records from nested format to flat format for Airtable"""
    return [record['fields'] for record in records]
The prep_for_insertion() function is responsible for converting the nested record format returned by generate_random_records() into the flat format expected by the Airtable API. Once the data is prepared, we use the table.batch_create() method to insert the records in a single bulk operation.
To ensure our integration process is robust and easy to debug, we've also included some basic error handling and logging functionality. If any errors occur during the data insertion process, the script will log the error message to help with troubleshooting:
if __name__ == "__main__":
    records = generate_random_records(2)
    print(records)
    prepared_records = prepare_records_for_airtable(records)
    print(prepared_records)
By combining the powerful data generation capabilities of our earlier script with the integration features shown here, you can quickly and reliably populate your Airtable-based applications with realistic employee data.
To make the data ingestion process fully automated, we can create a batch script (.bat file) that will run the Python script on a regular schedule. This allows you to set up the data ingestion to happen automatically without manual intervention.
Here's an example of a batch script that can be used to run the ingestData.py script:
python autoRecords.py
Let's break down the key parts of this script:
To schedule this batch script to run automatically, you can use the Windows Task Scheduler. Here's a brief overview of the steps:


Now, the Windows Task Scheduler will automatically run the batch script at the specified intervals, ensuring that your Airtable data is updated regularly without manual intervention.
This can be an invaluable tool for testing, development, and even demonstration purposes.
Throughout this guide, you've learnt how to set up the necessary development environment, designed an ingestion process, created a batch script to automate the task, and scheduled the workflow for unattended execution. Now, we have a solid understanding of how to leverage the power of local automation to streamline our data ingestion operations and unlock valuable insights from an Airtable - powered data ecosystem.
Now that you've set up the automated data ingestion process, there are many ways you can build upon this foundation and unlock even more value from your Airtable data. I encourage you to experiment with the code, explore new use cases, and share your experiences with the community.
Here are some ideas to get you started:
The possibilities are endless! I'm excited to see how you build upon this automated data ingestion process and unlock new insights and value from your Airtable data. Don't hesitate to experiment, collaborate, and share your progress. I'm here to support you along the way.
See the full code https://github.com/AkanimohOD19A/scheduling_airtable_insertion, full video tutorial is on the way.
The above is the detailed content of Local Workflow: Orchestrating Data Ingestion into Airtable. For more information, please follow other related articles on the PHP Chinese website!


