In our previous exercise, we built a browser extension using TypeScript. This involved a series of steps, including creating a Vite project and customizing it to meet the specific requirements of browser extensions. While the process wasn’t particularly lengthy or complex, we can simplify it further by automating it with a Node CLI (Command Line Interface). If you're new to CLIs, let me walk you through the one I've created!
Naturally, the first step is to initialize and set up our Node project. Use the following commands to create a folder for our code and generate a basic package.json file:
mkdir create-browser-extension-vite && cd create-browser-extension-vite
npm init --yes
Next, I decided to modify the generated package.json to include "type": "module". With this we’ll inform Node to interpret .js files in the project as ES modules rather than CommonJS modules. Here's the updated package.json after making some adjustments.
{
  "name": "create-browser-extension-vite",
  "version": "1.0.0",
  "scripts": {
    "test": "echo \"Error: no test specified\" && exit 1"
  },
  "publishConfig": {
    "access": "public"
  },
  "keywords": [
      "cli",
    "create-project"
  ],
  "author": "",
  "license": "ISC",
  "description": "A CLI tool to create browser extensions with Vite",
  "type": "module"
}
Let’s begin by creating a file called create-project in a new folder named bin:
#!/usr/bin/env node

console.log("hello world");
This file will act as the entry point for your command and to ensure it can be ran directly on your computer once the package is installed globally, add the following field to the package.json:
"bin": "bin/create-project"
Now it's time to test what we've built so far. First, we install the package locally by running:
npm link
create-browser-extension-vite // execute the CLI
Once linked, you’ll have a new CLI command called create-browser-extension-vite, which currently just prints “hello world” to the console.
And that’s all it takes to create a basic CLI! From here, you can leverage the full power of the Node ecosystem to build anything you can imagine.
Let’s take another step toward our goal! The aim of this CLI is to generate a fully functional TypeScript browser extension with a single command. To accomplish this, the CLI will accept several optional parameters.

The first step is to create a new file, src/cli.js, which will handle all the logic for collecting user preferences. This new module will be invoked from the current create-project file:
mkdir create-browser-extension-vite && cd create-browser-extension-vite
npm init --yes
To streamline the process of gathering user preferences, we’ll use two useful libraries:
{
  "name": "create-browser-extension-vite",
  "version": "1.0.0",
  "scripts": {
    "test": "echo \"Error: no test specified\" && exit 1"
  },
  "publishConfig": {
    "access": "public"
  },
  "keywords": [
      "cli",
    "create-project"
  ],
  "author": "",
  "license": "ISC",
  "description": "A CLI tool to create browser extensions with Vite",
  "type": "module"
}
#!/usr/bin/env node

console.log("hello world");
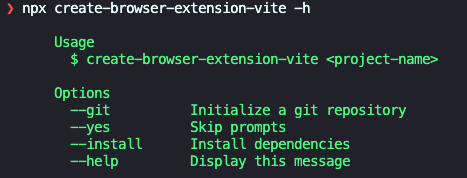
I’ll leave it to you to add an extra option for displaying a basic help message. This will involve introducing a new user preference controlled by the --help or -h parameter. If this parameter is provided, the CLI should display a simple manual explaining the command’s usage. You can refer to my solution in the repository linked below.
In this step, the project will be created based on the preferences selected in the previous stage. We'll begin by creating a folder named template and copying into it the files that will make up the generated project.
The folder structure should look like this, and you can find the content of these files in my GitHub repository. If you’re curious about how they were created, check out my previous post, where I discuss building a browser extension with TypeScript.

Our code will utilize the files in the template folder to generate the user's new browser extension and the following packages will be particularly useful in accomplishing this:
"bin": "bin/create-project"
We'll begin by creating a new file, src/main.js, to contain the code that generates the project by copying the files from the template folder.
npm link
create-browser-extension-vite // execute the CLI
#!/usr/bin/env node

import { cli } from "../src/cli.js";

cli(process.argv);
The code above utilizes Listr to execute the series of actions needed to generate the new project, from copying files with ncp to setting up the Git repository. Also note how we used promisify to convert the callback-based copy method of ncp into a promise-based function, making the code more readable and maintainable.
And that’s it! These are the steps I followed to create my new CLI tool, the one I’ll be using to streamline the creation of my new browser extensions. You can use it too! Because I’ve published it on npm for anyone to generate their own extensions.
https://github.com/ivaneffable/create-browser-extension-vite
How to build a CLI with Node.js
The above is the detailed content of Create a CLI to scaffold extensions. For more information, please follow other related articles on the PHP Chinese website!


