
 Mobile Game Tutorial
Mobile Game Guide
Stalker 2: Heart Of Chornobyl - Behind Seven Seals Walkthrough
Mobile Game Tutorial
Mobile Game Guide
Stalker 2: Heart Of Chornobyl - Behind Seven Seals Walkthrough
Stalker 2: Heart Of Chornobyl - Behind Seven Seals Walkthrough

Stalker 2: Heart of Chornobyl is finally in all our hands, allowing us to trudge through the wastelands while fighting off hoards of Mutants and people alike, making for some horrific moments and heartbreaking losses throughout your journey as you track down the person who stole your Scanner.

Speaking of who might be responsible for your Scanner, the Behind Seven Seals mission has you track down a man named Solder, who may be the one responsible for jacking your Scanner from you, having you break into the Sphere to confront him, leading to all sorts of bizarre situations that you'd expect from this series!
How To Start Behind The Seven Seals In Stalker 2: Heart Of Chornobyl

Before you can enter the Sphere and look for Solder, you must first gain information on him from either Captain Zotov or Gaffer in Zalissya. To do this, you will either have to obtain the Ward Sensors from Squint and return them to Captain Zotov or activate the ARMS Antenna for Gaffer to help him pinpoint where Squint is.
You can do both of these steps, but keep in mind that giving the Ward Sensors to either Captain Zotov or Richter will change the course of your playthrough drastically, so don't go diving into it if you don't want to join a specific faction. This mission will essentially be unimpacted, but the ones after will be substantially different.
Get Inside Of The Sphere

Getting information about Solder will have you learn that he's hiding inside the Sphere, a large military base nearby, which can be tricky to sneak into. Thankfully for us, there are several ways to get inside the base's gates, getting you closer to Solder than ever.
Follow the orange icon on your compass until you reach the outer wall of the Sphere that spans all around the enormous structure. Once you're here, begin moving around the right-hand side on the far outskirts to avoid being detected. You will eventually come across a long metal walkway that leads directly into the base.
Despite the walkway being destroyed in several areas, you can still use it to get inside the base. To do this, climb the stairs and then run and jump across the gaps until you are on the other side, allowing you to push closer to the Sphere. From here, walk through the first gate and then head left to find the main entrance. Hide behind the boxes nearby for the time being.
Entering The Sphere

There will be three guards standing outside of the main doors, allowing you to sneak behind the boxes nearby. Once in position, line up a headshot and instantly take down one of the guards, then quickly deal with the other two as they run toward you.
A lone guard will run up from behind you, deal with them as well, and then push inside the Sphere. There will be no more guards in this area, allowing you to explore the few rooms on this level before going down the stairs into the facility's basement, where you will eventually find Solder.
Where To Find Solder In The Sphere In Stalker 2: Heart Of Chornobyl

As you make your way into the basement of the Sphere, there will be two guards coming up the stairs. Make quick work of them when they get into your line of fire. After doing this, you will hear two more soldiers shouting from below, signaling that there are more of them at the foot of the steps.
Walk to the fall end of the walkway, jump onto the large pipe on your left, and drop into the gated-off area below, allowing you to get a clear shot of the remaining guards through the openings. After dealing with these guards, turn around to find a bag leaning up against a few boxes, and loot it for some ammunition, healing supplies, and food.
Push Further Into The Basement Of The Facility

Climb out of the gated-off area and head through the open doorway to discover another staircase that leads even further down into the Sphere, taking you down a few more levels. Once you arrive at the bottom, a guard will be in the hallway directly to your left. Take this guard out to have several more guards run out into your line of sight.
Mow these guards down as well, then push into the room they came out of to find a few more guards waiting for you, quickly dispatch them as well, and continue pushing forward. There will be a dark room straight ahead that leads to some supplies, so venture in there real quick, then open the metal door to trigger a cutscene with Solder.
Talk To Solder

Entering the room with Solder will have a cutscene play out where you will eventually be given the choice to either shoot and kill him or simply knock him out. We chose to knock him out as we're unsure if killing him would have any sort of negative repercussions later in the story, but the choice is ultimately yours here.
Upon making your choice, several guards will pour into Solder's room, having you fight them off, so be prepared. They will largely enter one by one, allowing you to pick them off as they walk in, so it's not overly challenging. Just be ready for them, as they can surprise you if you're not ready.
How To Escape The Sphere In Stalker 2: Heart Of Chornobyl

Exit Solder's room and head down the hallway to the right, then look to the right of the door to find an OZK Explorer's Suit resting on top of a cart. Pick this up and equip it, as it will likely be better than what you currently have equipped. More guards will come through the door you just walked by, so be prepared.
There will be around four guards total, so ensure everything is reloaded and you're topped off. As they come through the doorway, pick them off, and then push into the room they came out of to continue moving through the Sphere.
Push Further Into The Sphere's Basement

With the guards defeated, push into the room they just came out of to find a ladder and take it up to a long catwalk. A group of five to six Rats will ambush you here, so be prepared to deal with them. They die very easily, but they are extremely agile and can inflict Bleed on you with a single bite.
Create distance from the litter of Rats and eliminate them as they scurry toward you. After dealing with all the Rats, drop into the area below, crawl into the sewers, and follow it out to a ramp that leads into another room. You are close to the Sphere's exit, just a little further from here!
Exit The Sphere

From here, you will be in another room with even more Rats. Deal with them in a similar way you did with the ones from earlier, then drop down and enter the sewer again, following it out into a room with a ladder. Ascend the ladder and open the series of doors to find the pathway that leads out of the Sphere.
However, before leaving, look to your left to find a Stash behind the sewer grate. Use your Screw to activate the Poison Anomaly, then quickly run over it when it's deactivated and loot the Stash to obtain an Extended Magazine, lots of ammunition, and some consumables.
Use your Screw to proc the remaining Anomalies and safely get out of the belly of the Sphere and back out into the wild where you belong. The mission is nearly over now!
Exit The Lesser Zone

Emerging from the underbelly of the Sphere will allow you to leave the Lesser Zone and complete the Behind Seven Seals mission. If you gave the Ward Sensors to Richtor, you will follow the waypoint to the Northern Checkpoint and reach the Garbage Zone that way. If you gave them to Captain Zotov, then you will cross the Pontoon Bridge into Garbage.
As we detailed earlier, this is where your playthrough will really start to vary, which is what makes the decision of who to give the Sensors to so crucial. Once you reach Garbage, you will unlock a slew of new side missions to complete and will be able to continue trucking through the main story!

The above is the detailed content of Stalker 2: Heart Of Chornobyl - Behind Seven Seals Walkthrough. For more information, please follow other related articles on the PHP Chinese website!

Hot AI Tools

Undresser.AI Undress
AI-powered app for creating realistic nude photos

AI Clothes Remover
Online AI tool for removing clothes from photos.

Undress AI Tool
Undress images for free

Clothoff.io
AI clothes remover

AI Hentai Generator
Generate AI Hentai for free.

Hot Article
Hot Tools

Notepad++7.3.1
Easy-to-use and free code editor

SublimeText3 Chinese version
Chinese version, very easy to use

Zend Studio 13.0.1
Powerful PHP integrated development environment

Dreamweaver CS6
Visual web development tools

SublimeText3 Mac version
God-level code editing software (SublimeText3)
Hot Topics
 1384
1384
 52
52

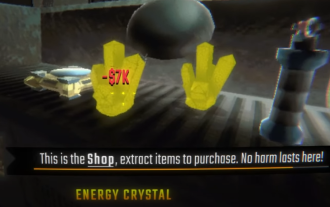 R.E.P.O. Energy Crystals Explained and What They Do (Yellow Crystal)
Mar 18, 2025 am 12:07 AM
R.E.P.O. Energy Crystals Explained and What They Do (Yellow Crystal)
Mar 18, 2025 am 12:07 AM
I bought expensive weapons or drones in R.E.P.O. but found that the energy was exhausted and became useless? Don't worry, you don't have to spend $50,000 on replacements, just charge your gear! That strange machine at the back of your truck is not a decoration. Here are how to get energy crystals and use them to keep your gear running continuously to avoid bankruptcy. More Reads: All R.E.P.O. Items How to get energy crystal You can buy energy crystals from the service store between levels. They usually cost between $7,000 and $9,000 — while expensive, they are far cheaper than repurchasing gear. In the first few levels, no purchase is required. You don't need them for the time being, so
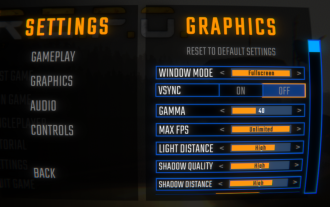 R.E.P.O. Best Graphic Settings
Mar 18, 2025 am 01:33 AM
R.E.P.O. Best Graphic Settings
Mar 18, 2025 am 01:33 AM
R.E.P.O. Game Screen Setting Guide: How to improve frame rate while ensuring picture quality? This article will guide you to optimize game settings and find the best balance point. Step 1: Full Screen Mode and Frame Rate Adjustment Before adjusting other settings, make sure the game is running in the best mode: Display Mode: Full Screen - Always use Full Screen Mode for optimal performance. Window mode will reduce the frame rate. Vertical Sync (V-Sync): Off - Unless a screen tear occurs, turn off vertical synchronization for a smoother gaming experience. Maximum FPS: Unlimited - If your computer is configured strongly, you can set it to Unlimited. Otherwise, it is recommended to limit it to 60 frames or match your monitor refresh rate. second
 Assassin's Creed Shadows: Seashell Riddle Solution
Mar 28, 2025 am 01:58 AM
Assassin's Creed Shadows: Seashell Riddle Solution
Mar 28, 2025 am 01:58 AM
Assassin's Creed: Shadows boasts a vast world brimming with activities beyond the main storyline. Side missions and various encounters significantly enrich the immersive experience of in-game Japan. One particularly memorable encounter is the Seashe
 Will R.E.P.O. Have Crossplay?
Mar 18, 2025 am 01:07 AM
Will R.E.P.O. Have Crossplay?
Mar 18, 2025 am 01:07 AM
At present, "R.E.P.O." does not support cross-platform games, and the official has not confirmed whether it will support it in the future. The game is currently only available on PC platforms (early experience through Steam), so console players are temporarily unable to play. Why does R.E.P.O. not support cross-platform games? Released on PC platforms only – The console version of the game has not been announced yet. Early Access Phase – Developers are still refining the game, and cross-platform gaming is not a current priority. Host porting is not confirmed – without a host version, cross-platform gaming is simply impossible. Will cross-platform games be supported in the future? There is no official news on whether R.E.P.O. will launch a console version and whether it will support cross-platform games. However,
 Where to find the Crane Control Keycard in Atomfall
Mar 28, 2025 am 02:17 AM
Where to find the Crane Control Keycard in Atomfall
Mar 28, 2025 am 02:17 AM
In Atomfall, discover hidden keys and passages, including multiple ways to access key locations. This guide focuses on using the Crane Control Keycard for easy, unguarded Entry to Skethermoor Prison, bypassing the need to cooperate with Captain Sims
 Saving in R.E.P.O. Explained (And Save Files)
Mar 19, 2025 am 12:22 AM
Saving in R.E.P.O. Explained (And Save Files)
Mar 19, 2025 am 12:22 AM
Want to save progress in R.E.P.O.? Good news: You can! Bad news: Only under very specific conditions…but this will change soon. Read more about the upcoming update that involves a new save menu and multiple save slots. Save mechanism Complete the game run once, then exit from the menu and do not start another game immediately. If you do it correctly, your progress will be saved to continue from where you last left. If everyone dies, your save will be deleted – no second chance. The game will simply erase your existence as if you never existed. Basically, if you complete a level and want to keep your progress, make sure to stop and exit before jumping into another task. This means
 How to Fix Mic Voice Chat Not Working in R.E.P.O.
Mar 18, 2025 am 12:53 AM
How to Fix Mic Voice Chat Not Working in R.E.P.O.
Mar 18, 2025 am 12:53 AM
In R.E.P.O. games, if teammates don't hear your voice or the microphone won't work, it's likely that it's a problem with the game's audio channel detection settings. Here are some solutions to voice chat problems: 1. Set the microphone to the left channel (for XLR microphone and sound card) R.E.P.O. does not seem to detect audio in the right channel. If you are using an XLR microphone with an audio interface, try the following: Insert the microphone into the left input of the sound card. If your microphone is connected to the right channel, move it to the left. 2. Restart the button to press the speaking function Some players have found that switching to press the speaking function switch can sometimes solve the problem. Disable the button in the audio settings of R.E.P.O.
 How to Recharge Your Drone in R.E.P.O
Mar 18, 2025 am 09:55 AM
How to Recharge Your Drone in R.E.P.O
Mar 18, 2025 am 09:55 AM
Drones in R.E.P.O. are convenient gadgets—until they run out of power and become expensive paper towns. If your drone is about to run out of power, here are some guides on how to quickly charge and resume operation. How to charge a drone Buy Energy Crystals – available at the service stations (shops) between levels. The price is about $7,000-9,000. Find the charging port for the truck – The energy crystal slot is located inside the R.E.P.O. truck. Insert the Energy Crystal – Left click to pick up and press “E” to install. Enjoy your charged drone – Now you can charge your device and your drone can get back to its best – whether it’s keeping you floating (zero gravity drone), saving you from disaster (indestructible drone)
