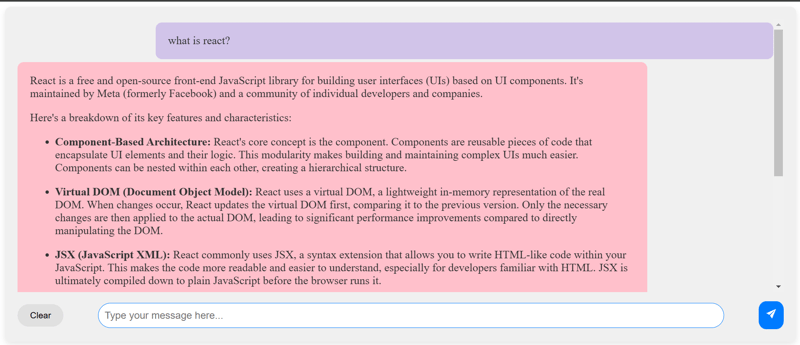
Since I won't dive deep into styling, refer to the GitHub repository for the stylesheet. You can also see the demo here.
Without further ado, let’s get started!
Before integrating the Gemini API into your React.js project, you need to obtain an API key. Follow these steps:
Visit Google AI Studio
Open your browser and navigate to the Google AI Studio page.
Access Developer Documentation
Once you’re on the Google AI Studio homepage, locate the sidebar. From the options, select “Developer Documentation.”
Request an API Key
Within the Developer Documentation page, look for a button labeled “Get a Gemini API Key.” Click on it.
Authenticate and Confirm
If you’re not already signed in, log in with your Google account. You may need to complete some authentication steps or agree to terms and conditions before proceeding.
Copy Your API Key
Once the key is generated, copy it. Keep it safe — this key will be required to authenticate your requests when using the Gemini API in your React.js project.
Tip: If you want to check your API key, there will be a curl command on the documentation page. Replace the YOUR_API_KEY placeholder with the API key you obtained from the Google AI Studio. Open Git Bash and paste the modified curl command. If the API key is valid and working, you should receive a response in JSON format.
Set up a project using CRA and install required libraries. Replace my-app with the name of your project.
npx create-react-app my-app
npm install @google/generative-ai
npm install react-markdown
npm install react-icons
Get rid of unnecessary files and make a components folder in the src folder.
Also, in the root directory, make an .env file to safely store the API key.
REACT_APP_GEMINI_API_KEY=YOUR_API_KEY_HERE
We will use this whenever we need our API Key:
process.env.REACT_APP_GEMINI_API_KEY
Make a Model.jsx file in the components folder. This will contain the code to define a setup to interact with the Gemini API using a generateContent function.
// components/Model.jsx
const { GoogleGenerativeAI } = require("@google/generative-ai");

const genAI = new GoogleGenerativeAI(process.env.REACT_APP_GEMINI_API_KEY);
const model = genAI.getGenerativeModel({ model: "gemini-1.5-flash" });

export const generateContent = async (prompt) => {
    const result = await model.generateContent(prompt);
    console.log(result.response.text());
    return result.response.text; // return the response
}
In the components folder, make Home.jsx. This file will define the logic for:
Here’s the code:
import React, { useState } from "react";
import { IoIosSend } from "react-icons/io";
import { generateContent } from './Model';
import ReactMarkdown from 'react-markdown'; // to render markdown responses
import './home.css'

export default function Home() {
  const [userInput, setUserInput] = useState('');
  const [response, setResponse] = useState([]);
  const [isLoading, setIsLoading] = useState(false);

  const handleUserInput = (e) => {
    setUserInput(e.target.value);
  };

  const handleClear = () => {
    setUserInput('');
    setResponse([]);
    setIsLoading(false);
  };

  const handleSubmit = async () => {
    if (!userInput.trim()) {
      setResponse([{ type: "system", message: "Please enter a prompt.." }]);
      return;
    }

    setIsLoading(true);
    try {
      const res = await generateContent(userInput);
      setResponse(prevResponse => [
        ...prevResponse,
        { type: "user", message: userInput },
        { type: "bot", message: res()},
      ]);
      setUserInput('');
    } catch (err) {
      console.error("Error generating response:", err);
      setResponse(prevResponse => [
        ...prevResponse,
        { type: "system", message: "Failed to generate response" },
      ]);
    } finally {
      setIsLoading(false);
    }
  };

  const handleKeyPress = (e) => {
    if (e.key === 'Enter') {
      e.preventDefault();
      handleSubmit();
    }
  };

  return (
    <div className="chat-container">
      {response.length === 0 ? (
        <h1>Got Questions? Chatty's Got Answers.</h1>
      ) : (
        <div className="chat-history">
          {response.map((msg, index) => (
            <p key={index} className={`message ${msg.type}`}>
              <ReactMarkdown>{msg.message}</ReactMarkdown>
            </p>
          ))}
          {isLoading && <p className="loading-text">Generating response...</p>}
        </div>
      )}

      <div className="input-container">
        <button onClick={handleClear} className="clear-btn">Clear</button>

        <input
          type="text"
          value={userInput}
          onChange={handleUserInput}
          onKeyDown={handleKeyPress}
          placeholder="Type your message here..."
          className="chat-input"
        />

        <button onClick={handleSubmit} className="send-btn">
          <IoIosSend />
        </button>
      </div>
    </div>
  );
}
This is what we will be seeing!

We use React Markdown because the Gemini API returns responses formatted in Markdown. This library helps render it correctly on the page, ensuring that any Markdown syntax, such as links or bold text, is displayed properly in the UI.

We created three local states: userInput, response, and isLoading.
In this tutorial, we’ve learned how to integrate the Gemini API into a React.js app. We covered setting up the project, handling user input, interacting with the API, and displaying responses using React’s state management and react-markdown.
To further enhance your project, you can add additional functionality such as user authentication, saving chat history for persistence even after a page refresh, and more.
Happy Coding! ?
The above is the detailed content of How to Integrate Gemini API with React.js: A Step-by-Step Guide.. For more information, please follow other related articles on the PHP Chinese website!


