Angular lifecycle hooks are methods that allow developers to tap into key moments of an Angular component’s life cycle, from its creation to its destruction which includes initialization, changes, and destruction. The most commonly used lifecycle hooks are:

Before dive in, lets create prerequisite project:
We will need parent and child component. We will have Input field in parent component and will pass that inputed value to the child and will show in child component.
parent.component.ts
import { Component, OnInit } from '@angular/core';

@Component({
  selector: 'app-parent',
  templateUrl: './parent.component.html',
  styleUrls: ['./parent.component.css']
})
export class ParentComponent implements OnInit {

  constructor() { }

  ngOnInit(): void {
  }

  value:string = '';
  SubmitValue(val: any) {
    this.value = val.value;
  }

}
parent.component.html
<h1>Lifecycle Hooks</h1>

<input type="text" placeholder="Input here..." #val>
<button (click)="SubmitValue(val)">Submit Value</button>

<br><br>
<app-child [inputValue]="value"></app-child>
child.component.ts
import { Component, Input, OnInit } from '@angular/core';

@Component({
  selector: 'app-child',
  templateUrl: './child.component.html',
  styleUrls: ['./child.component.css']
})
export class ChildComponent implements OnInit {

  constructor() { }

  @Input() inputValue: string = "LifeCycle Hooks";

  ngOnInit(): void {
  }

}
child.component.html
<div>
    Input Value: <strong>{{inputValue}}</strong>
</div>
We will have output like this:

1.Constructor
export class ChildComponent implements OnInit {

  constructor() {
    **console.log("Constructor Called");**
  }

  @Input() inputValue: string = "LifeCycle Hooks";

  ngOnInit(): void {}

}

2.ngOnChanges
import { Component, OnInit } from '@angular/core';

@Component({
  selector: 'app-parent',
  templateUrl: './parent.component.html',
  styleUrls: ['./parent.component.css']
})
export class ParentComponent implements OnInit {

  constructor() { }

  ngOnInit(): void {
  }

  value:string = '';
  SubmitValue(val: any) {
    this.value = val.value;
  }

}

Again I have inputed the value and again ngOnChanges called but constructor only called once.

Let's see what we have in changes argument:
<h1>Lifecycle Hooks</h1>

<input type="text" placeholder="Input here..." #val>
<button (click)="SubmitValue(val)">Submit Value</button>

<br><br>
<app-child [inputValue]="value"></app-child>

Let's put some value and see:

3.ngOnInit
import { Component, Input, OnInit } from '@angular/core';

@Component({
  selector: 'app-child',
  templateUrl: './child.component.html',
  styleUrls: ['./child.component.css']
})
export class ChildComponent implements OnInit {

  constructor() { }

  @Input() inputValue: string = "LifeCycle Hooks";

  ngOnInit(): void {
  }

}

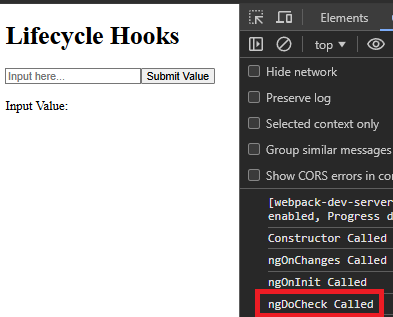
4.ngDoCheck
<div>
    Input Value: <strong>{{inputValue}}</strong>
</div>

5.ngAfterContentInit
child.component.html
export class ChildComponent implements OnInit {

  constructor() {
    **console.log("Constructor Called");**
  }

  @Input() inputValue: string = "LifeCycle Hooks";

  ngOnInit(): void {}

}
parent.component.html
export class ChildComponent implements OnInit, OnChanges {

  constructor() {
    console.log("Constructor Called");
  }

  ngOnChanges(changes: SimpleChanges): void {
    console.log("ngOnChanges Called");
  }

  @Input() inputValue: string = "LifeCycle Hooks";

  ngOnInit(): void {}

}
child.component.ts
 ngOnChanges(changes: SimpleChanges): void {
    console.log("ngOnChanges Called", changes);
  }

6.ngAfterContentChecked
export class ChildComponent implements OnInit, OnChanges {

  constructor() {
    console.log("Constructor Called");
  }
  ngOnChanges(changes: SimpleChanges): void {
    console.log("ngOnChanges Called");
  }

  @Input() inputValue: string = "LifeCycle Hooks";

  ngOnInit(): void {
    console.log("ngOnInit Called");
  }

}

let's play around this:
export class ChildComponent implements OnInit, OnChanges, DoCheck {

  constructor() {
    console.log("Constructor Called");
  }
  ngOnChanges(changes: SimpleChanges): void {
    console.log("ngOnChanges Called", changes);
  }

  @Input() inputValue: string = "LifeCycle Hooks";

  ngOnInit(): void {
    console.log("ngOnInit Called");
  }

  ngDoCheck() {
    console.log("ngDoCheck Called");
  }

}
When there is change in ng-content again ngAfterContentChecked called.

7.ngAfterViewInit

8.ngAfterViewChecked

9.ngOnDestroy
ngOnDestroy will only called when we destroy any component, so let's try to remove child component when we click Destroy component button.
Let's make arrangements:
parent.component.ts
import { Component, OnInit } from '@angular/core';

@Component({
  selector: 'app-parent',
  templateUrl: './parent.component.html',
  styleUrls: ['./parent.component.css']
})
export class ParentComponent implements OnInit {

  constructor() { }

  ngOnInit(): void {
  }

  value:string = '';
  SubmitValue(val: any) {
    this.value = val.value;
  }

}
parent.component.html
<h1>Lifecycle Hooks</h1>

<input type="text" placeholder="Input here..." #val>
<button (click)="SubmitValue(val)">Submit Value</button>

<br><br>
<app-child [inputValue]="value"></app-child>
Before we click the Destroy component button:

After we click the Destroy component button:

Lifecycle Hook Sequence:
By understanding and using these hooks effectively, you can manage the component's behavior at different stages of its lifecycle.
The above is the detailed content of Component Lifecycle in Angular. For more information, please follow other related articles on the PHP Chinese website!
 What are the java testing tools?
 How to open rar file
 How to use Find function
 What file is windows.old?
 What is the difference between golang and python
 What are artificial intelligence technologies?
 What should I do if I forget my broadband password?
 location.search
 The difference between vscode and vs


