Zenless Zone Zero: Complete Hollow Zero Lost Void Guide
One of the great things about gacha games like Zenless Zone Zero is their endgame is constantly evolving. With update 1.4, players everywhere can access the new Hollow Zero activity Lost Void, an expansion on the roguelite mechanics established by Withered Domain. Lost Void is much more complex, but understanding how it all works will help you consistently and efficiently complete runs for rewards.

The Lost Void mode is a massive update to the ZZZ endgame, but one you can access very early in the story and build into as you progress. We'll discuss everything you need to know here.
How Lost Void Works

You'll unlock access to Lost Void after completing the Soldier 11 Agent Story Mole in the Hole (I), which you'll reach a few hours into the story campaign after you've unlocked access to standard Hollow Zero.
An HSO investigator will visit you outside the Random Play store with an urgent mission: Ray, the lead Hollow Zero researcher, has gone missing, and they need your help to get her back. Head to Scott Outpost and enter the Story version of the Lost Void activity via the Hollow Zero laptop in the main tent.
The commission 'Ray, Vanished', will be the first on your list to complete, serving as a tutorial that introduces all the mechanics of this mode. After completing it, you'll unlock the Battlefront Purge mode, which has increasing difficulties and rewards.

Lost Void is, at its core, the Zenless Zone Zero version of Simulated Universe from Honkai: Star Rail. If you don't play HSR, the simplest way to think of the mode is as rogue-like, as you start with your chosen team, built the way they are for the rest of the game.
As you progress through the stages, you'll unlock Resonium, Gear, and Cards to augment your characters and create a unique build that increases your damage and survivability.
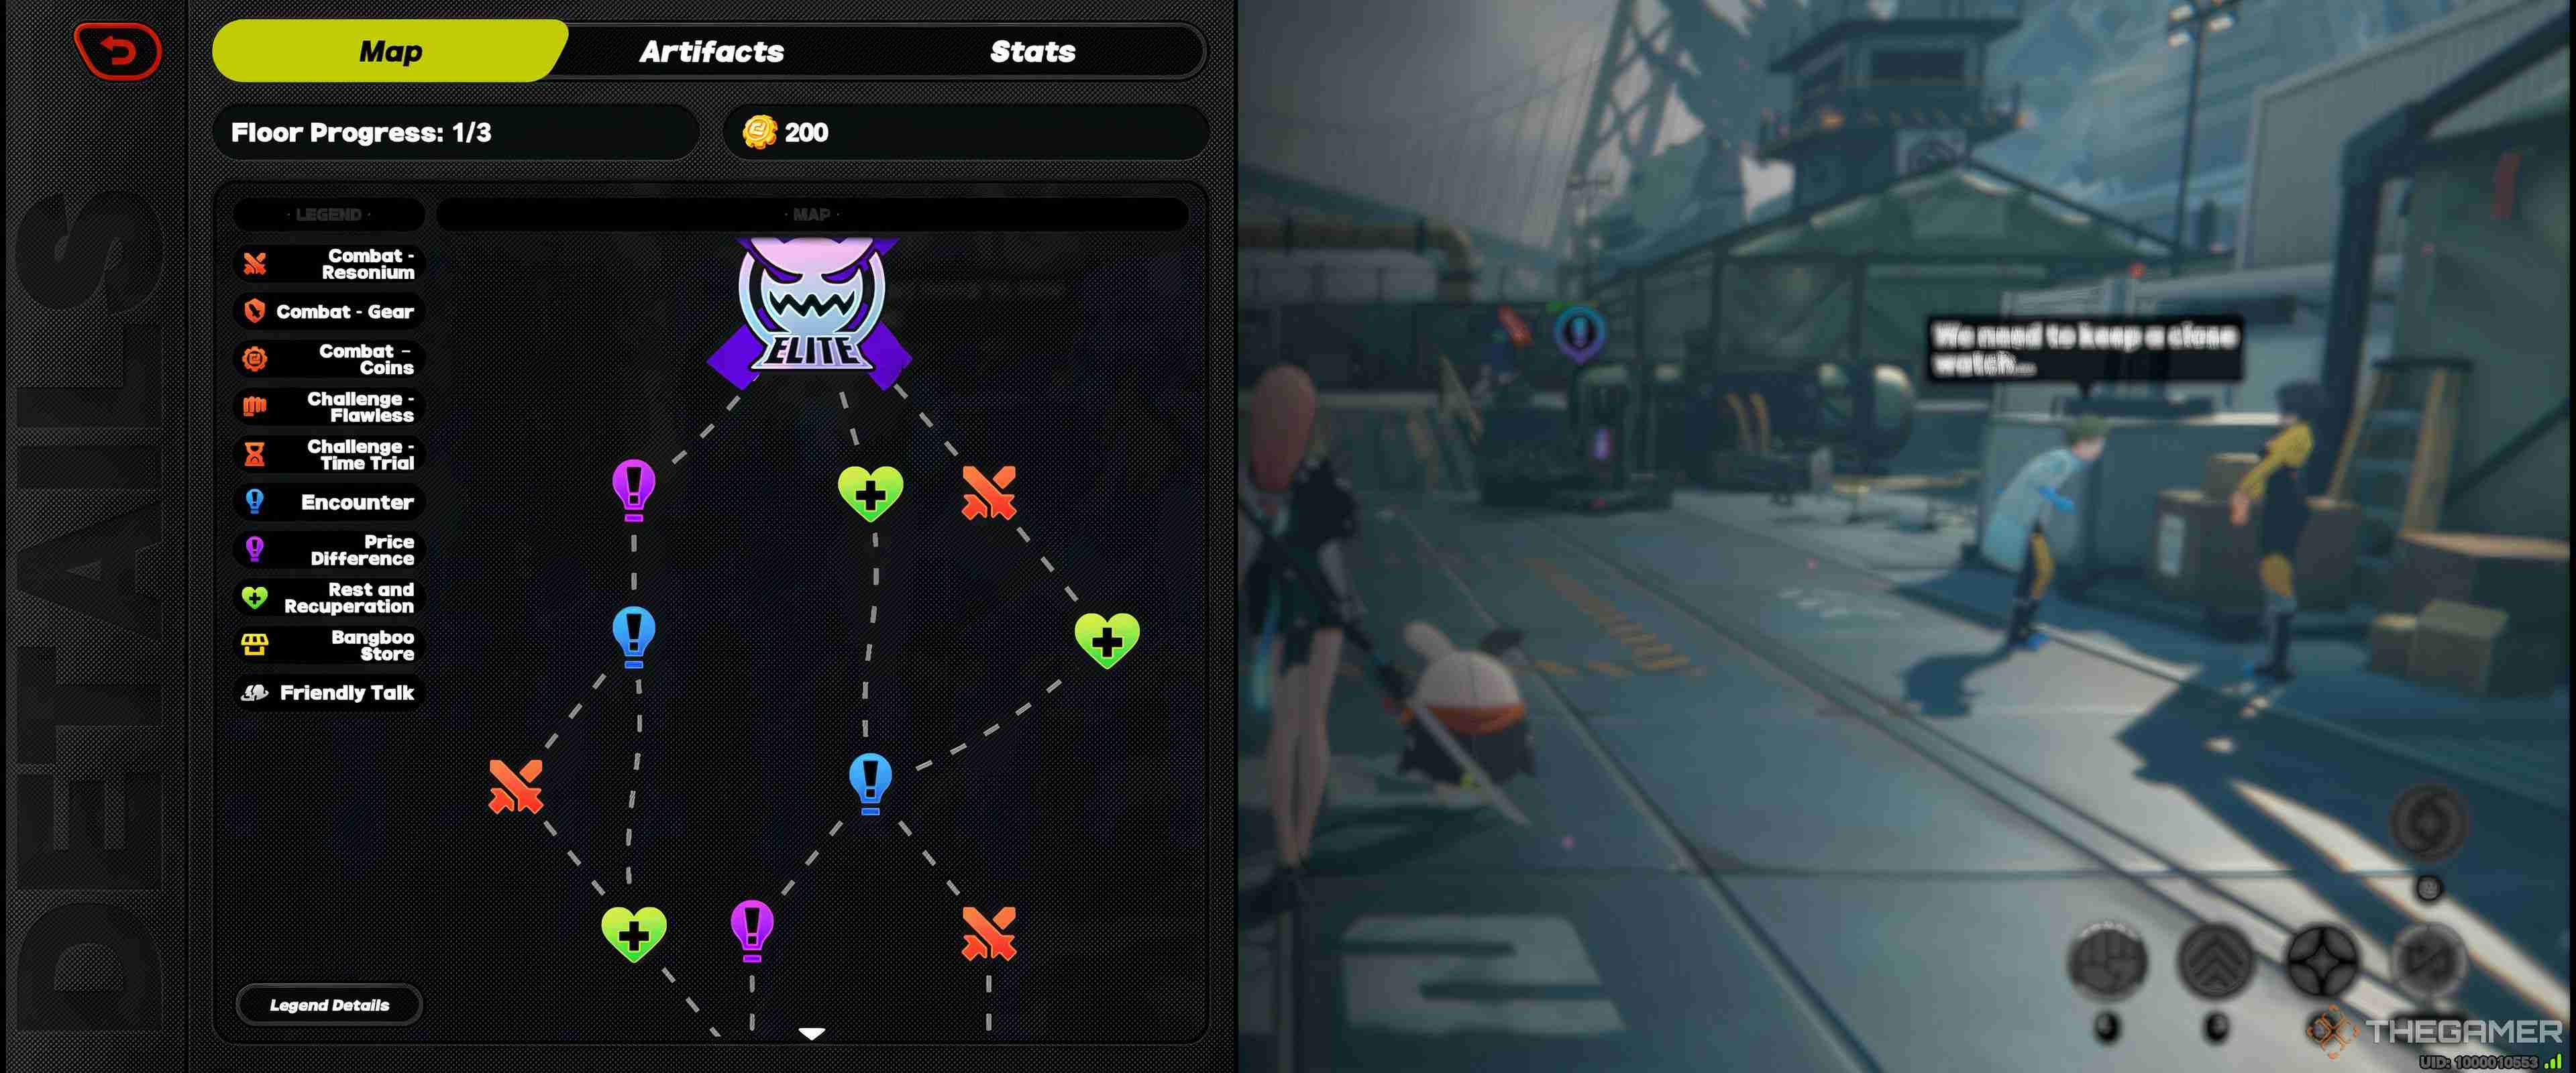
Each room in the Lost Void is a different kind of activity, and you can use the in-mode map to chart your course based on how much combat you want. Here's a breakdown of all the rooms available in a Lost Void run:
|
Room |
Challenge |
Rewards |
|---|---|---|
|
Combat - Resonium |
Defeat one enemy wave | Choose one of three Resonium |
|
Combat - Gear |
Defeat one enemy wave | Choose one piece of Gear |
|
Combat - Coins |
Defeat one enemy wave | Get a set amount of Gear Coins |
|
Challenge - Flawless |
Clear the enemy wave without taking damage, being knocked down, or interrupted | Choose multiple rewards based on performance, including Resonium, Gear, and Coins. |
|
Challenge - Time Trial |
Clear the enemy wave as fast as possible | Higher rewards for faster clear speeds, including Resonium, Gear, and Coins |
|
Encounter |
Speak to a random NPC. | Different rewards and buffs, sometimes with temporary debuffs that become buffs after certain conditions are met |
|
Price Difference |
A store tile with a random modifier. | Get a random Gear Coin-related buff. |
|
Rest and Recuperation |
A safe tile where you can talk to NPC allies, restore health, and other positive modifiers. | Heal, pick up character equipment from Ovelia, special buffs from your Agents, or buy from a store. |
|
Bangboo Store |
A safe tile with a Gear Coin store. | Spend Gear Coins for Resonium, Gear, and Cards. |
|
Friendly Talk |
A safe tile where you and your teammates can talk | Receive buffs from teammates and enjoy their company. |
|
Complex Area |
A tile with more than one encounter type. | Can receive Resonium, Gear, and Cards, plus health restoration, etc. |
Each floor of the Lost Void consists of four to seven levels, with two to three rooms per level. Each room connects to one or two rooms on the next level, with the seventh and final room being a boss fight.
You'll want to take time in the opening area of Lost Void to plan out your route based on how you want the run to go. It's entirely possible to get through an entire run of the mode without fighting almost any enemies save the boss by sticking to Encounters, Stores, and Price Differences, and that can be the fastest way to finish.

There are five difficulties to Battlefront Purge, starting at level 20 and progressing up to level 60. At first, you can only access up to the fourth difficulty, at level 50, earning the right to challenge difficulty five once number four is done with.
After completing level five once, you can add modifiers that buff the enemy units. You can equip three of these debuffs the first time you earn the right to apply them, then three more, and then a final group of three. You'll receive additional rewards for completing runs with more modifications, but only the first time you complete a modified run.
Even difficulty five Lost Void can feel easy with certain teams, making modifiers necessary for increased challenge. Just know that the only reward you'll get on top of higher runs after the first is a sense of pride and satisfaction.

Cards, Resonium, and Gear

Lost Void's three core buffing mechanics are Resonium, Cards, and Gear. You're probably familiar with Resonium from the Withered Garden. Gear and Cards are new to Lost Void.
- Resonium provides direct buffs to your characters and their abilities. That might be an increase to your Critical Damage, a buff to your Dodge ability, applying or improving your Shields, or some other combination of bonuses.
-
Gear equips you with a Bangboo you can summon similarly to an Ultimate, as they take up time on the field and away from your Agents but provide bonus damage and buffs to your team.
- Specific Agents also get unique, character-specific Gear during the current Season of Lost Void, and these Gear pieces provide massive buffs to their abilities.
- Cards not only buff Agents but can modify the activity or further augment your character with specific conditions, like gaining more damage output the less you take, and so on.
You'll earn Gear primarily in the safe zones by talking to Ovelia, but you earn both Cards and Resonium by completing combat challenges, purchasing them at Bangboo Stores, or picking them up from Encounters.
Best Combat Potential Buffs

The rogue-lite element to Lost Void is the Combat Potential board, where you can spend Shadow Crystals to purchase permanent buffs that affect your entire team on a Lost Void: Battlefront Purge run. You can get Shadow Crystals by completing runs, with higher difficulties awarding more Crystal.
There are 25 Combat Potential buffs, each with three levels of increasing bonuses, but the following six should be your priority to get to first:
|
Combat Potential Buff |
Location |
Effect |
|---|---|---|
|
Pacemaker |
Center | Up to a 30% HP revive for one character |
|
Follow-Up ATK Boost |
Left of Pacemaker | Up to 30% additional Stun window damage bonus |
|
Weakness Detection |
Second from the bottom, far left-hand side | Up to 30% additional Crit. Damage |
|
Rampant Decibels |
Far-left bottom corner | Up to 30% additional Ultimate damage |
|
Decibel Charge |
Bottom of the near-left column | Up to 20% additional Decibel generation |
|
Energy Supply |
Directly below Pacemaker | Up to 40 additional Energy when you enter a new room |
You unlock new nodes by purchasing at least one level of any node adjacent to them. So, by unlocking Pacemaker, you gain access to the nodes above, below, and to its left and right. Each upgrade costs more than the last, with level one being 100 Shadow Crystals, level two at 150, and level three at 250.
Eventually, you should have the whole board unlocked. There's one other mechanic to be aware of: Expertise Points. You get five of these points to spend how you wish, provided a node is at level three, and they offer an additional 10-20 percent increase to the nodes provided buff.
Investigation Strategy

The last pre-run buff collection to consider are the Investigation Strategies, all of which grant a different, powerful modifier to the run as a whole. There are 11 Strategies to choose from, each with its own benefits. Which you choose depends on your goals for the run, as the modifiers they grant can vary how a run will flow.
The following three are worth your time early on:
- Fully Armed Strategy lets you get more Gear, improving what you start a run with and helping you progress toward its Exploration Badge, which you can get by leveling a piece of General Gear to level three.
- Entrepreneur's Strategy starts you out with 1,500 additional gear coins, increases Bangboo store inventories by one item, and adds a 20 percent chance prices will be reduced by 40 percent. The Bangboo Store is the easiest and quickest way to get lots of additional Resonium and Cards.
- Resonium Passion Strategy provides a 40 percent chance for combat areas to automatically grant a Resonium when you enter. Friendly Talk areas will always have one additional General Resonium for you to pick up.
These Investigation Strategies will ensure you're stocked up on rogue-like bonuses without costing you anything in return, a handy thing for higher difficulties.

The above is the detailed content of Zenless Zone Zero: Complete Hollow Zero Lost Void Guide. For more information, please follow other related articles on the PHP Chinese website!

Hot AI Tools

Undresser.AI Undress
AI-powered app for creating realistic nude photos

AI Clothes Remover
Online AI tool for removing clothes from photos.

Undress AI Tool
Undress images for free

Clothoff.io
AI clothes remover

Video Face Swap
Swap faces in any video effortlessly with our completely free AI face swap tool!

Hot Article

Hot Tools

Notepad++7.3.1
Easy-to-use and free code editor

SublimeText3 Chinese version
Chinese version, very easy to use

Zend Studio 13.0.1
Powerful PHP integrated development environment

Dreamweaver CS6
Visual web development tools

SublimeText3 Mac version
God-level code editing software (SublimeText3)

Hot Topics
 1664
1664
 14
14
 1421
1421
 52
52
 1315
1315
 25
25
 1266
1266
 29
29
 1239
1239
 24
24
 Roblox: Grow A Garden - Complete Mutation Guide
Apr 18, 2025 am 01:10 AM
Maximize your profits in Roblox's Grow A Garden by understanding the lucrative world of crop mutations! These rare variations significantly boost your harvest's value. While you can't directly control mutations, knowing how they work provides a signi
 Roblox: Bubble Gum Simulator Infinity - How To Get And Use Royal Keys
Apr 16, 2025 am 11:05 AM
Royal Keys are some of the most valuable items you can find in Roblox's Bubble Gum Simulator Infinity. These rare tools allow you to open Royal Chests — limited-time loot containers packed with high-tier items, boosts, and even ultra-rare rewards. If
 Blue Prince: How To Get To The Basement
Apr 11, 2025 am 04:04 AM
Unlocking the Basement in Blue Prince: A Comprehensive Guide Finding the basement in Blue Prince is crucial for progressing to Room 46, but its location and access method aren't immediately obvious. This guide will walk you through accessing the base
 Mandragora: Whispers Of The Witch Tree - How To Unlock The Grappling Hook
Apr 18, 2025 am 12:53 AM
Mandragora's dungeons offer Metroidvania-style challenges, requiring players to revisit earlier areas with newly acquired tools. The grappling hook is a prime example, enabling rapid traversal of long distances. While this crucial tool is obtained r
 Nordhold: Fusion System, Explained
Apr 16, 2025 am 04:07 AM
Nordhold Tower Fusion Guide: Synergistic Tower Combinations for Enhanced Defense Mastering tower combinations in Nordhold is key to effective base defense. Certain towers synergize exceptionally well, creating powerful defensive strategies. This gui
 Rusty Rabbit: Where To Find Every Keycube
Apr 17, 2025 pm 10:02 PM
Many 2D platformers, including Rusty Rabbit, feature inaccessible areas requiring specific abilities or items. Rusty Rabbit is no exception, with multiple such areas in each region. Besides visually obvious blocked pathways, you'll encounter robots
 Sephiria: 8 Beginner Tips
Apr 10, 2025 pm 10:08 PM
Sephiria: Adventures in the Pixel World Sephiria attracts players with its cute pixel style and smooth operation, but the difficulty of its dungeon adventures gradually increases as they go deeper. From unpredictable bosses to a wide variety of enemies, the game is full of challenges. However, the game's extensive equipment and weapon systems allow players to choose unique combat styles to cope with these challenges. In addition, mastering some tips and strategies will help to better explore this mysterious world. Master sprint and blocking skills Sephiria's core combat mechanics are similar to many roguelike hacking and slashing games. This means that sprint (or dodge) and blocking will be the most effective combat skills in the game. Always pay attention to enemies when sprinting
 Blue Prince: Upgrade Disk Guide
Apr 12, 2025 am 11:34 AM
Upgrade Disks are some of the most powerful and valuable items you’ll find in Blue Prince. While they’re not needed to reach Room 46, they make your runs smoother, your puzzles easier, and your odds of survival higher. If you’re lucky enough to find


