

How to set up TypeScript with Node.js and Express

Creating a server with TypeScript using Node.js and Express is a good alternative to using JavaScript because it makes it easier to manage complex applications and helps when you need to collaborate with a distributed team of developers.
TypeScript offers benefits like:
- Improved code strength and clarity when static typing
- Enhanced collaboration and project scalability
- Advanced tooling
- IDE support
- Broad compatibility
All of these benefits make TypeScript a great choice for a smoother development experience, especially in evolving projects.
In this article, we’ll explore a beginner-friendly way to configure TypeScript in an Express app, as well as gain an understanding of the fundamental constraints that accompany it. To follow along, you should have:
- Node.js ≥ v18.x installed in your local development environment
- Access to a package manager like npm, pnpm, or Yarn
- Basic familiarity with Node.js and Express
Check out the GitHub repository for the source code; the main branch has the TypeScript project, and the JavaScript branch has the JavaScript version.
Creating a package.json file
Start by creating a new directory in your local development environment, and within it, use npm’s initializer command to create a package.json file. If you use a package manager other than npm, consider adhering to the init command provided by that specific package manager:
mkdir ts-node-expresscd ts-node-express/npm init -y
When initializing a package.json file in this manner, the --yes or -y flag utilizes the default settings configured by npm, bypassing the repeated questions asking for project details. The resulting package.json file might look similar to the one shown in the following image:
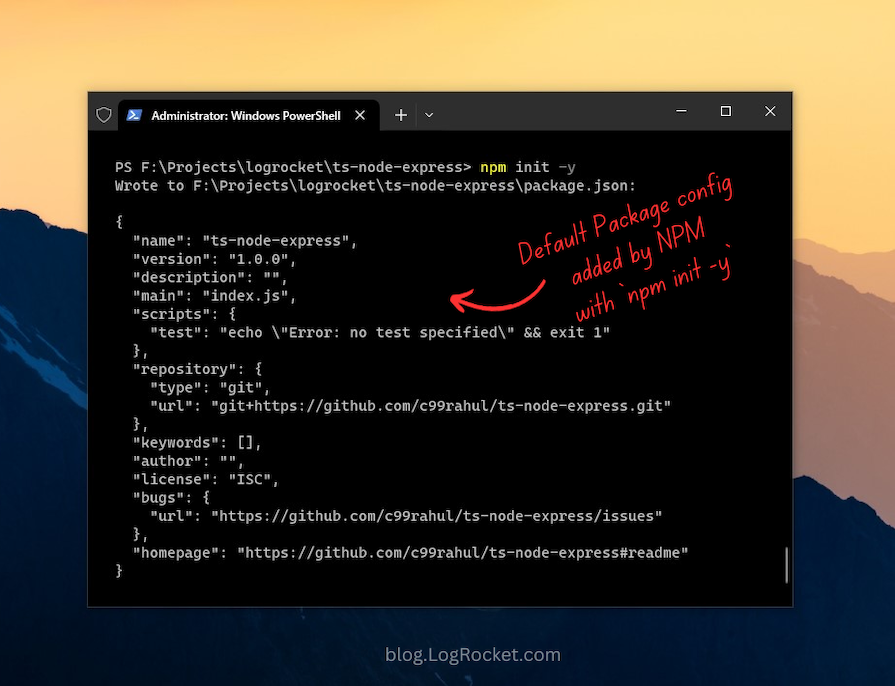
Because the entry point of our application will be src/index.js, which we will address in the upcoming sections, you should update the main field in the package.json file from index.js to src/index.js:
{
  "name": "ts-node-express",
  "version": "1.0.0",
  "description": "",
  "main": "src/index.js",
  "scripts": {
    "test": "echo "Error: no test specified" && exit 1"
  },
...}Creating a minimal server with Express
After initializing the package.json file, add the Express and DotEnv packages to the project. In the terminal window, run the following command, where npm i is an alias to npm install:
npm i express dotenv
The DotEnv package is used to read environment variables from a .env file. Instead of hardcoding environment-specific variables directly into the app, include them all in this file and utilize the DotEnv package to manage them.
For instance, to specify the port number for your server, create a file named .env in the root of the project directory. Inside this file, define an environment variable for PORT and set its value to 3000. Consider adding more environment-specific variables in this file in the future as needed:
# Add all of the environmental variables here instead of # embedding them directly in the app and utilize them # with the `DotEnv` package.PORT=3000
Then, create a directory called src at the project’s root to organize our application source files. Add a new file named index.js to it and populate it with the following code, including the previously defined environmental variable:
// src/index.jsconst express = require('express');const dotenv = require('dotenv');dotenv.config();const app = express();const port = process.env.PORT;app.get('/', (req, res) => {
  res.send('Express   TypeScript Server');});app.listen(port, () => {
console.log(`[server]: Server is running at http://localhost:${port}`);});The above code covers the essential steps for setting up a minimal Express server using plain JavaScript. For a more detailed explanation, refer to the documented version of this snippet.
To start the server, execute the command node src/index.js in the terminal. This will execute the code that we just added to the index.js file and should start a new server, as illustrated below:
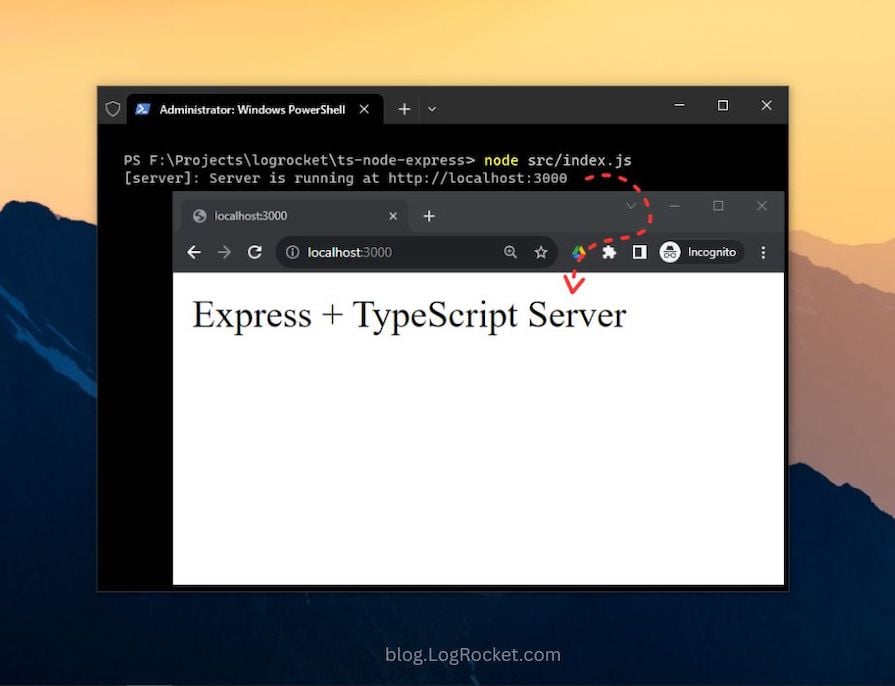
The Express server is now up and running, offering a foundational setup for development with Express on Node.js. Next, let’s enhance it by incorporating TypeScript in the next section.
Installing TypeScript
We will begin by installing TypeScript as a development dependency. Additionally, we’ll install the @types declaration packages for Express and Node.js, which offer type definitions in the form of declaration files.
Declaration files, typically denoted with the .d.ts extension, serve as predefined modules that outline the structure of JavaScript values or the types present for the TypeScript compiler. These declaration files are available for libraries originally written in JavaScript, not TypeScript.
The DefinitelyTyped GitHub repository maintains the TypeScript type definitions for direct use in Node.js and other JavaScript projects, sparing you the effort of defining these types from scratch. To incorporate types or declaration files for a specific library or module, seek packages starting with the @types namespace.
Launch the terminal and install the packages described above using the following command:
npm i -D typescript @types/express @types/node
The -D, or --dev, flag directs the package manager to install these libraries as development dependencies.
Installing these packages will add a new devDependencies object to the package.json file, featuring version details for each package, as shown below:
{
  ...
  "devDependencies": {
    "@types/express": "^5.0.0",
    "@types/node": "^22.7.4",
    "typescript": "^5.6.2"
  },
...}Generating the TypeScript configuration file: tsconfig.json
Every TypeScript project utilizes a configuration file to manage various project settings. The tsconfig.json file, which serves as the TypeScript configuration file, outlines these default options and offers the flexibility to modify or customize compiler settings to suit your needs.
The tsconfig.json file is usually placed at the project’s root. To generate this file, use the following tsc command, initiating the TypeScript Compiler:
npx tsc --init
Once you execute this command, you’ll notice the tsconfig.json file is created at the root of your project directory. This file contains the default compiler options, as depicted in the image below:
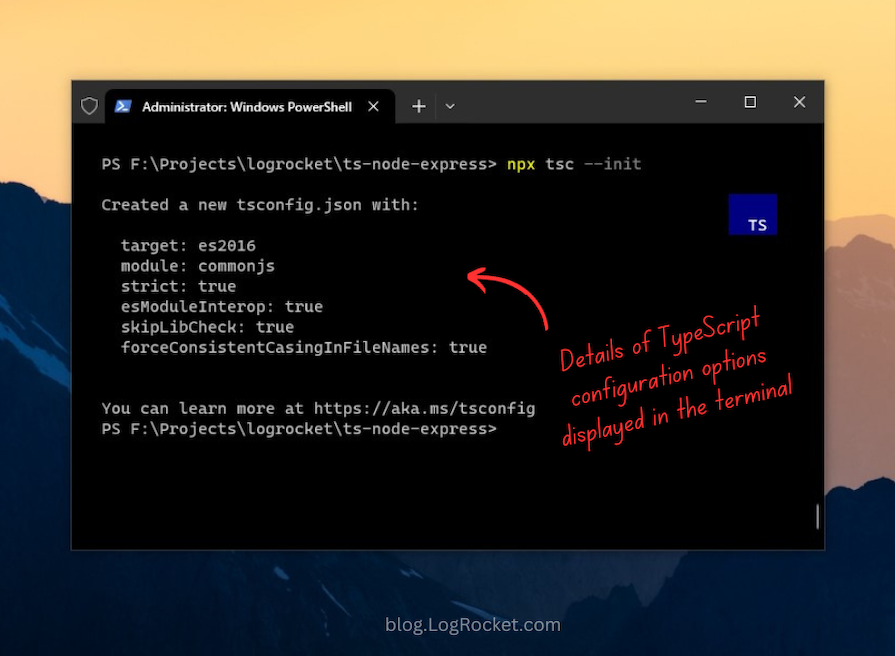
Upon opening the tsconfig.json file, you’ll notice several other commented-out compiler options. Among all of these options, compilerOptions is a mandatory field that must be specified. Here’s a summary of all the default options that belong inside the compilerOptions field:
- target: Enables the specification of the target JavaScript version that the compiler will output
- module: Facilitates the utilization of a module manager in the compiled JavaScript code. CommonJS is supported and is a standard in Node.js
- strict: Toggles strict type-checking protocols
- esModuleInterop: Enables the compilation of ES6 modules to CommonJS modules
- skipLibCheck: When set to true, bypasses the type checking of default library declaration files
- forceConsistentCasingInFileNames: When set to true, enforces case-sensitive file naming
One crucial option you will need to enable is outDir, which determines the destination directory for the compiled output. Locate this option in the tsconfig.json file and uncomment it.
By default, the value of this option is set to the project’s root. Change it to dist, as shown below:
{
  "compilerOptions": {
    ...
    "outDir": "./dist"
    ...
}}While there are probably other configuration options you can add to the TypeScript compiler, the options above are basic specifications that can help you get started.
You should now update the main field in the package.json file to dist/index.js because the TypeScript code will compile from the src directory to dist.
The above is the detailed content of How to set up TypeScript with Node.js and Express. For more information, please follow other related articles on the PHP Chinese website!

Hot AI Tools

Undresser.AI Undress
AI-powered app for creating realistic nude photos

AI Clothes Remover
Online AI tool for removing clothes from photos.

Undress AI Tool
Undress images for free

Clothoff.io
AI clothes remover

Video Face Swap
Swap faces in any video effortlessly with our completely free AI face swap tool!

Hot Article
Hot Tools

Notepad++7.3.1
Easy-to-use and free code editor

SublimeText3 Chinese version
Chinese version, very easy to use

Zend Studio 13.0.1
Powerful PHP integrated development environment

Dreamweaver CS6
Visual web development tools

SublimeText3 Mac version
God-level code editing software (SublimeText3)
Hot Topics


 How to use express to handle file upload in node project
Mar 28, 2023 pm 07:28 PM
How to use express to handle file upload in node project
Mar 28, 2023 pm 07:28 PM
How to handle file upload? The following article will introduce to you how to use express to handle file uploads in the node project. I hope it will be helpful to you!
 5 common JavaScript memory errors
Aug 25, 2022 am 10:27 AM
5 common JavaScript memory errors
Aug 25, 2022 am 10:27 AM
JavaScript does not provide any memory management operations. Instead, memory is managed by the JavaScript VM through a memory reclamation process called garbage collection.
 How does Vue3+TypeScript+Vite use require to dynamically introduce static resources such as images?
May 16, 2023 pm 08:40 PM
How does Vue3+TypeScript+Vite use require to dynamically introduce static resources such as images?
May 16, 2023 pm 08:40 PM
Question: How to use require to dynamically introduce static resources such as images in a Vue3+TypeScript+Vite project! Description: When developing a project today (the project framework is Vue3+TypeScript+Vite), it is necessary to dynamically introduce static resources, that is, the src attribute value of the img tag is dynamically obtained. According to the past practice, it can be directly introduced by require. The following code: Write After uploading the code, a wavy line error is reported, and the error message is: the name "require" cannot be found. Need to install type definitions for node? Try npmi --save-dev@types/node. ts(2580) after running npmi--save-d
 How to implement data type conversion function in TypeScript using MySQL
Jul 29, 2023 pm 02:17 PM
How to implement data type conversion function in TypeScript using MySQL
Jul 29, 2023 pm 02:17 PM
How to implement data type conversion function in TypeScript using MySQL Introduction: Data type conversion is a very common requirement when developing web applications. When processing data stored in a database, especially when using MySQL as the back-end database, we often need to convert the data in the query results to the type we require. This article will introduce how to use MySQL to implement data type conversion in TypeScript and provide code examples. 1. Preparation: Starting
 How to use TypeScript in Vue3
May 13, 2023 pm 11:46 PM
How to use TypeScript in Vue3
May 13, 2023 pm 11:46 PM
How to declare a type with field name enum? By design, the type field should be an enumeration value and should not be set arbitrarily by the caller. The following is the enumeration declaration of Type, with a total of 6 fields. enumType{primary="primary",success="success",warning="warning",warn="warn",//warningaliasdanger="danger",info="info",}TypeSc
 How to develop high-performance computing functions using Redis and TypeScript
Sep 20, 2023 am 11:21 AM
How to develop high-performance computing functions using Redis and TypeScript
Sep 20, 2023 am 11:21 AM
Overview of how to use Redis and TypeScript to develop high-performance computing functions: Redis is an open source in-memory data structure storage system with high performance and scalability. TypeScript is a superset of JavaScript that provides a type system and better development tool support. Combining Redis and TypeScript, we can develop efficient computing functions to process large data sets and make full use of Redis's memory storage and computing capabilities. This article will show you how to
 In-depth comparison of Express and Laravel: How to choose the best framework?
Mar 09, 2024 pm 01:33 PM
In-depth comparison of Express and Laravel: How to choose the best framework?
Mar 09, 2024 pm 01:33 PM
In-depth comparison of Express and Laravel: How to choose the best framework? When choosing a back-end framework suitable for your project, Express and Laravel are undoubtedly two popular choices among developers. Express is a lightweight framework based on Node.js, while Laravel is a popular framework based on PHP. This article will provide an in-depth comparison of the advantages and disadvantages of these two frameworks and provide specific code examples to help developers choose the framework that best suits their needs. Performance and scalabilityExpr
 Develop scalable front-end applications using Redis and TypeScript
Aug 01, 2023 pm 09:21 PM
Develop scalable front-end applications using Redis and TypeScript
Aug 01, 2023 pm 09:21 PM
Title: Developing Scalable Front-End Applications Using Redis and TypeScript Introduction: In today’s Internet age, scalability is one of the key elements of any application. Front-end applications are no exception. In order to meet the growing needs of users, we need to use efficient and reliable technology to build scalable front-end applications. In this article, we will introduce how to use Redis and TypeScript to develop scalable front-end applications and demonstrate its application through code examples. Introduction to Redis
