

How to fix Windows update error 0x80240001?

The 0x80240001 Windows Update error is a common problem that stops the installation of critical updates on a computer. The error usually results from update service problems, damaged system files, or conflicts triggered by installed programs. Users often experience the problem when trying to update their systems, resulting in either a failure in the update process or total freezing.
Among the most frequent causes for this error is the existence of damaged or absent system files. These files are required for normal update operation, and if damaged, it is impossible to finalize the update. Another cause can be problems with the Windows Update service itself. If this service is not functioning properly, the update process cannot continue normally. Other applications operating on the computer, like antivirus software, may also disrupt update installation.
There are several users who have written about their experience with this issue, showing that even though they tried various solutions like scanning the system or resetting the update service, the issue never goes away. Many found it difficult and time-consuming to manually solve the problem.
To correct this error with ease, it is advisable to utilize an automatic repair tool. The FortectMac Washing Machine X9 repair tool can identify and correct issues with Windows updates. The software has been created to save you time and minimize the frustration of manually correcting issues. Utilizing the software is a fast method of ensuring your system receives the latest updates and remains secure.
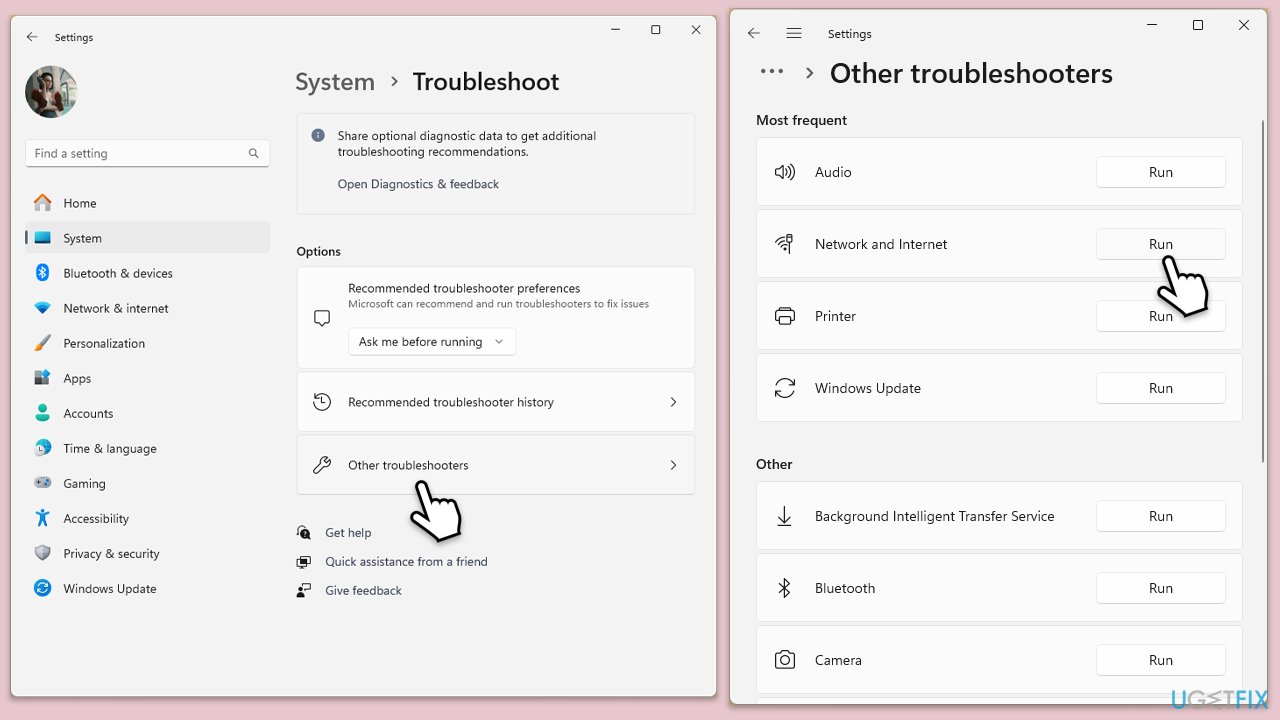
Fix 1. Run the troubleshooter
If you haven't tried this yet, give a Windows update troubleshooter a try:
- Type Troubleshoot in Windows search and press Enter.
- Select Additional troubleshooters/Other troubleshooters.
- Find Windows Update from the list.
- Click it and select Run the troubleshooter/Run.
- Restart your computer when the update process is finished.
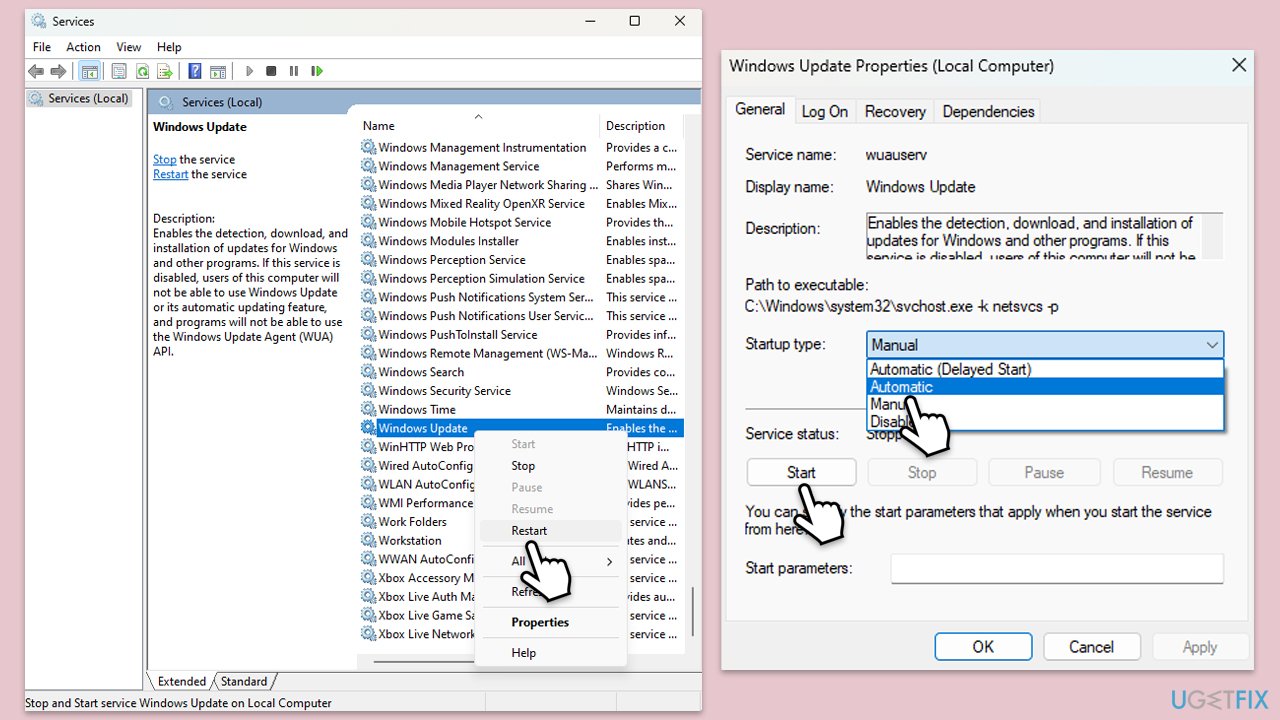
Fix 2. Check relevant services
- Type in Services in Windows search and hit Enter.
- Scroll down a bit to find Windows Update.
- If it is already running, right-click and select Restart.
- If the service is not running, double-click it, pick Automatic under the Startup type drop-down menu.
- Click Start, Apply, and OK.
- Repeat this process for Background Intelligent Transfer Service (BITS) and Cryptographic services.
Fix 3. Run the troubleshooter
- Type Troubleshoot in Windows search and press Enter.
- Select Additional troubleshooters/Other troubleshooters.
- Find Windows Update from the list.
- Click it and select Run the troubleshooter/Run.
- Restart your computer when the update process finishes.
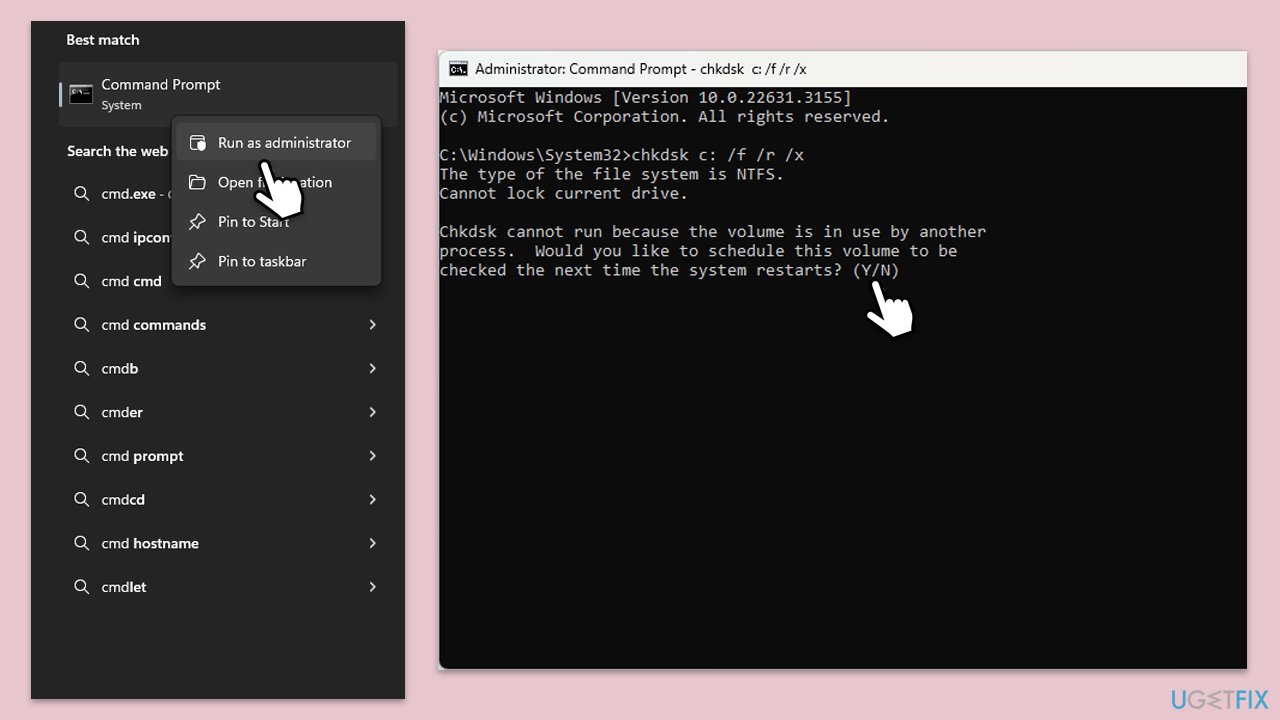
Fix 4. Perform Check Disk
- Type cmd in Windows search.
- Right-click on Command Prompt and select Run as administrator.
- When User Account Control shows up, click Yes.
- In the new window, type in the following command and press Enter after:
chkdsk c: /f
(Note: use chkdsk c: /f /r /x command if you are using SSD as your primary partition) - If you receive an error, type in Y, close down Command Prompt and restart your device.
- Wait until the scan is finished – you can find the results in the Event Viewer.
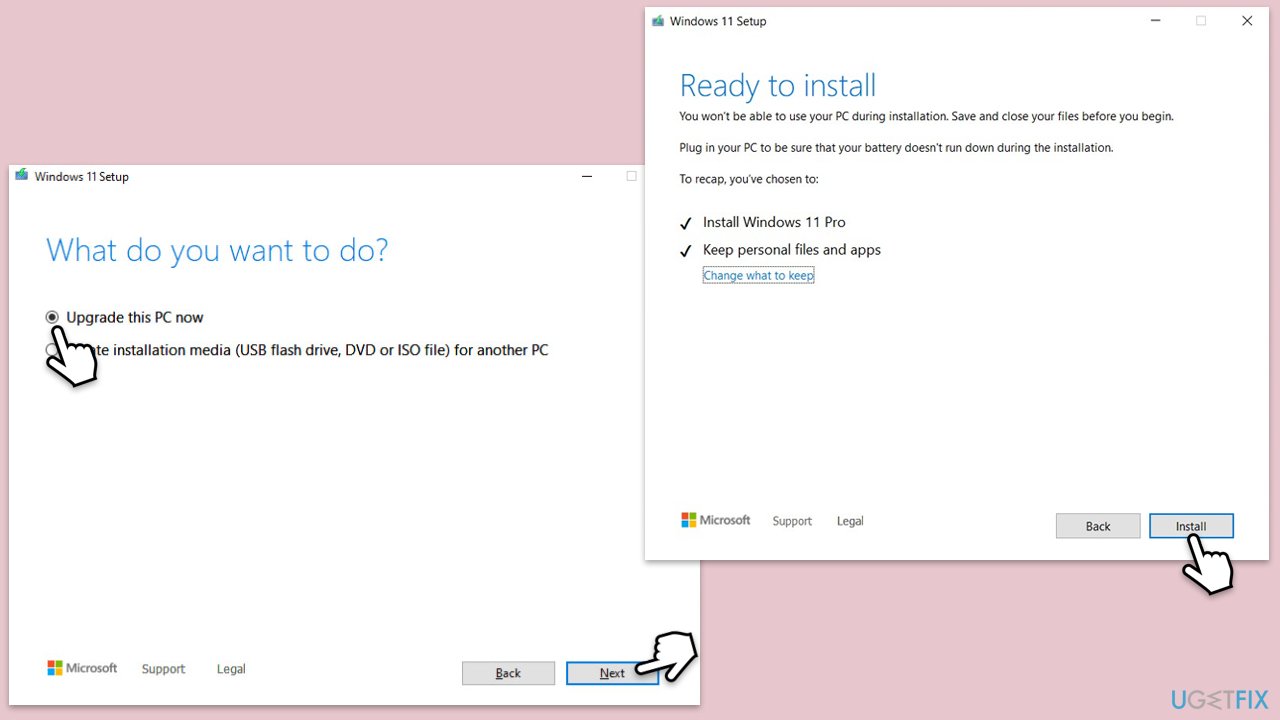
Fix 5. Use Media Creation Tool
The Media Creation Tool can update your system to the latest version of Windows, resolving persistent update problems by refreshing the Windows installation.
- Visit the official Microsoft website and download Windows 10 installation media (Windows 11 version).
- Double-click the installer and select Yes when UAC shows up.
- Agree to terms.
- Select Upgrade this PC now and click Next.
- Windows will start downloading the needed files.
- Agree to the terms once again and click Next.
- Before installing, make sure that you are happy with your choices (otherwise, you can click Change what to keep option).
- Finally, click Install to begin the upgrade process.
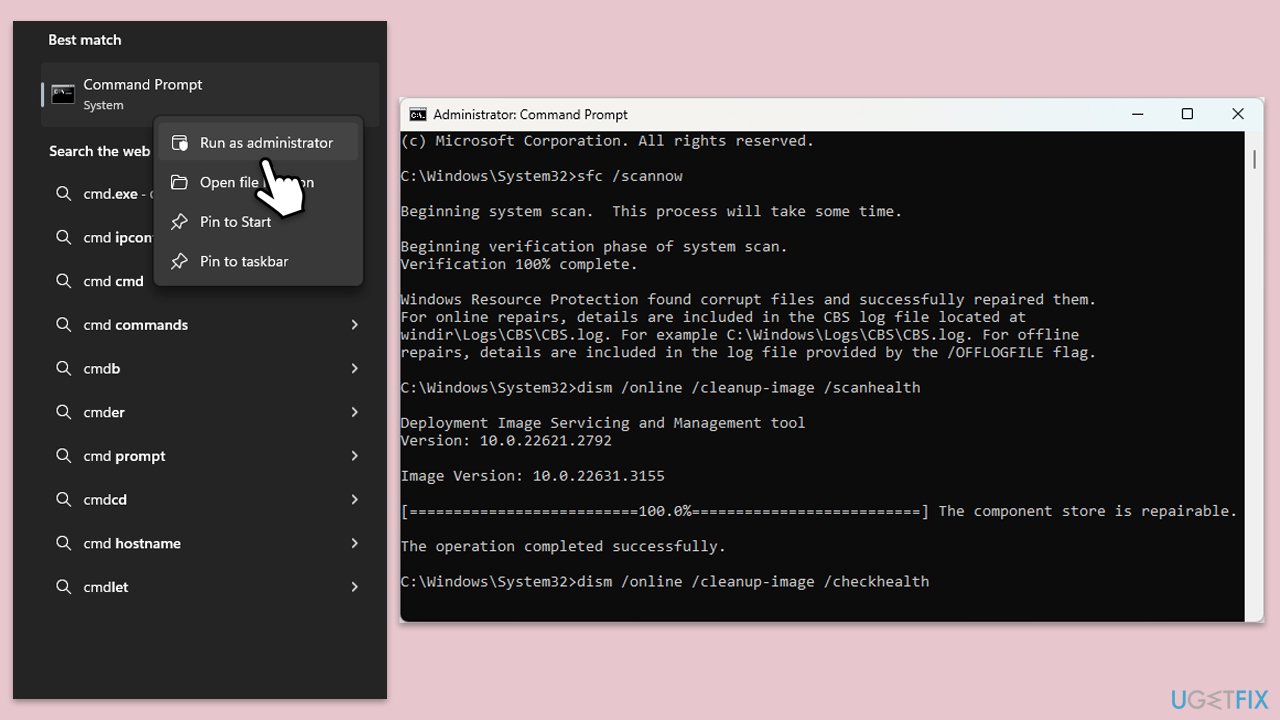
Fix 6. Repair corrupted files
- Type cmd in Windows search.
- Right-click on Command Prompt and pick Run as administrator.
- User Account Control (UAC) will ask whether you want to allow changes – click Yes.
- Use the following command and press Enter:
sfc /scannow
- Once the scan is complete, you should also run the following commands to repair Windows image files if needed:
DISM /Online /Cleanup-Image /CheckHealth
DISM /Online /Cleanup-Image /ScanHealth
DISM /Online /Cleanup-Image /RestoreHealth
- Restart your computer.
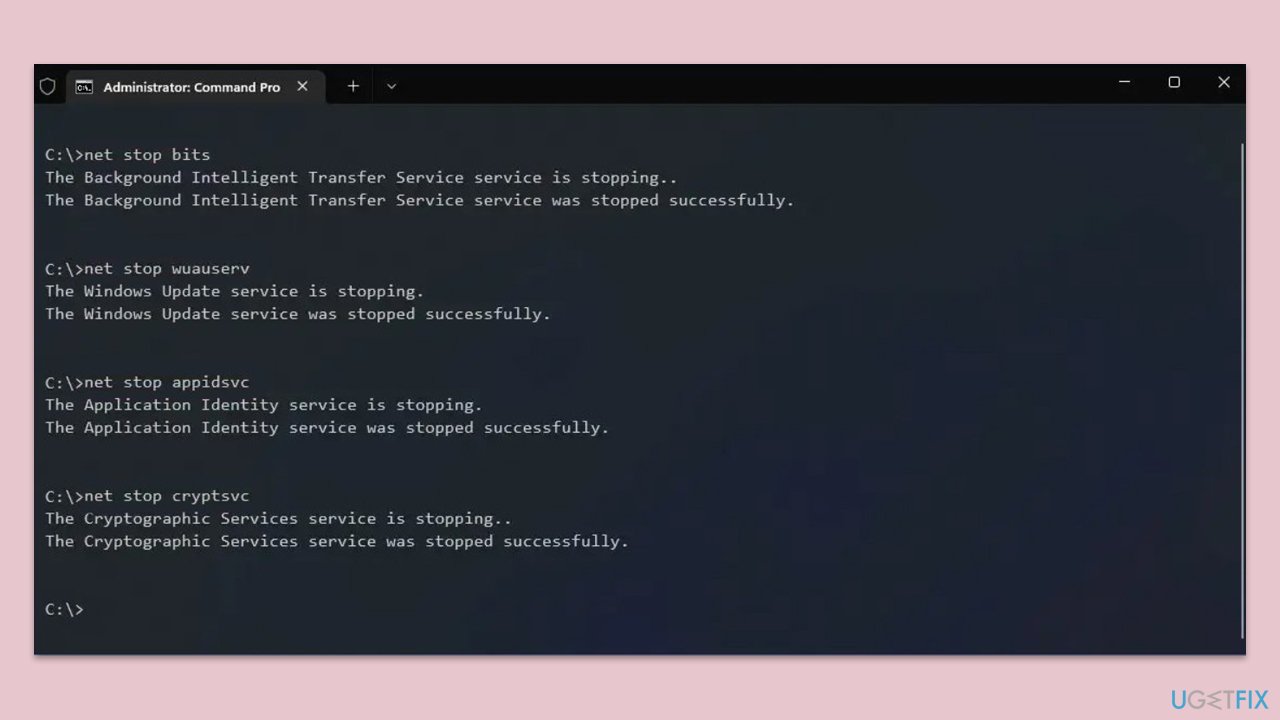
Fix 7. Reset Windows update components
- Open Command Prompt as administrator.
- Type the following commands one by one in Command Prompt and press Enter after each:
net stop wuauserv
net stop cryptSvc
net stop bits
net stop msiserver
Ren C:WindowsSoftwareDistribution SoftwareDistribution.old
Ren C:WindowsSystem32catroot2 Catroot2.old - When these commands are executed, the last thing to do is to re-enable relevant services:
net start wuauserv
net start cryptSvc
net start bits
net start msiserver - Reboot your computer.
The above is the detailed content of How to fix Windows update error 0x80240001?. For more information, please follow other related articles on the PHP Chinese website!

Hot AI Tools

Undresser.AI Undress
AI-powered app for creating realistic nude photos

AI Clothes Remover
Online AI tool for removing clothes from photos.

Undress AI Tool
Undress images for free

Clothoff.io
AI clothes remover

Video Face Swap
Swap faces in any video effortlessly with our completely free AI face swap tool!

Hot Article
Hot Tools

Notepad++7.3.1
Easy-to-use and free code editor

SublimeText3 Chinese version
Chinese version, very easy to use

Zend Studio 13.0.1
Powerful PHP integrated development environment

Dreamweaver CS6
Visual web development tools

SublimeText3 Mac version
God-level code editing software (SublimeText3)
Hot Topics
 1663
1663
 14
1420
52
1315
25
1266
29
1239
24
14
1420
52
1315
25
1266
29
1239
24

 How to fix KB5055523 fails to install in Windows 11?
Apr 10, 2025 pm 12:02 PM
How to fix KB5055523 fails to install in Windows 11?
Apr 10, 2025 pm 12:02 PM
KB5055523 update is a cumulative update for Windows 11 version 24H2, released by Microsoft on April 8, 2025, as part of the monthly Patch Tuesday cycle, to offe
 How to fix KB5055518 fails to install in Windows 10?
Apr 10, 2025 pm 12:01 PM
How to fix KB5055518 fails to install in Windows 10?
Apr 10, 2025 pm 12:01 PM
Windows update failures are not uncommon, and most users have to struggle with them, most often becoming frustrated when systems fail to install critical patche
 How to fix KB5055612 fails to install in Windows 10?
Apr 15, 2025 pm 10:00 PM
How to fix KB5055612 fails to install in Windows 10?
Apr 15, 2025 pm 10:00 PM
Windows updates are a critical part of keeping the operating system stable, secure, and compatible with new software or hardware. They are issued on a regular b
 Worked! Fix The Elder Scrolls IV: Oblivion Remastered Crashing
Apr 24, 2025 pm 08:06 PM
Worked! Fix The Elder Scrolls IV: Oblivion Remastered Crashing
Apr 24, 2025 pm 08:06 PM
Troubleshooting The Elder Scrolls IV: Oblivion Remastered Launch and Performance Issues Experiencing crashes, black screens, or loading problems with The Elder Scrolls IV: Oblivion Remastered? This guide provides solutions to common technical issues.
 How to fix KB5055528 fails to install in Windows 11?
Apr 10, 2025 pm 12:00 PM
How to fix KB5055528 fails to install in Windows 11?
Apr 10, 2025 pm 12:00 PM
Windows updates are essential to keep your system up to date, secure, and efficient, adding security patches, bug fixes, and new functionality for Windows 11 us
 Clair Obscur Expedition 33 Controller Not Working on PC: Fixed
Apr 25, 2025 pm 06:01 PM
Clair Obscur Expedition 33 Controller Not Working on PC: Fixed
Apr 25, 2025 pm 06:01 PM
Solve the problem of failure of the PC version of "Clair Obscur: Expedition 33" Have you also encountered the problem that the PC version of the "Clair Obscur: Expedition 33" controller does not work properly? Don't worry, you are not alone! This article will provide you with a variety of effective solutions. "Clair Obscur: Expedition 33" has been launched on PlayStation 5, Windows and Xbox Series X/S platforms. This game is an engaging turn-based RPG that emphasizes precise timing. Its uniqueness is the perfect blend of strategic and rapid response. Smooth operation
 Clair Obscur: Expedition 33 UE-Sandfall Game Crash? 3 Ways!
Apr 25, 2025 pm 08:02 PM
Clair Obscur: Expedition 33 UE-Sandfall Game Crash? 3 Ways!
Apr 25, 2025 pm 08:02 PM
Solve the UE-Sandfall game crash problem in "Clair Obscur: Expedition 33" "Clair Obscur: Expedition 33" has been widely expected by players after its release, but many players encountered the error of UE-Sandfall crashing and closing when starting the game. This article provides three solutions to help you smooth the game. Method 1: Change the startup options Change the Steam startup options to adjust game performance and graphics settings. Try setting the startup option to "-dx11". Step 1: Open the Steam library, find the game, and right-click to select "Properties". Step 2: Under the General tab, find the Startup Options section.
 Windows 11 KB5055528: What's New & What if It Fails to Install
Apr 16, 2025 pm 08:09 PM
Windows 11 KB5055528: What's New & What if It Fails to Install
Apr 16, 2025 pm 08:09 PM
Windows 11 KB5055528 (released on April 8, 2025) Update detailed explanation and troubleshooting For Windows 11 23H2 users, Microsoft released the KB5055528 update on April 8, 2025. This article describes the improvements to this update and provides a solution to the installation failure. KB5055528 update content: This update brings many improvements and new features to Windows 11 23H2 users: File Explorer: Improved text scaling and improved accessibility to the file opening/save dialog and copy dialog. Settings page: Added "Top Card" function to quickly view processor, memory, storage and G
