

Build Your Own Subscription Blog with Shopify


This tutorial demonstrates building a subscription-based blog on Shopify using HTML, CSS, and Liquid. While Shopify's built-in blogging tools are basic, and dedicated blogging platforms like Ghost exist, Shopify offers significant advantages for monetizing content.
Why Shopify for a Content Blog?
Shopify's strength lies in its robust ecommerce capabilities. It excels at selling diverse products and services, including subscriptions, digital downloads, and physical goods. Compared to Ghost, which primarily focuses on subscription-based content, Shopify provides unmatched flexibility in business models. Both Shopify Basic and Ghost Pro Basic cost $29/month, but Shopify's adaptability makes it a superior choice for long-term scalability and diversification. Shopify's blogging features might be considered a weakness, but its powerful Liquid templating engine allows for extensive customization. Consider Shopify a CMS with ecommerce roots, not just an ecommerce platform.
Getting Started: Prerequisites
This tutorial requires familiarity with HTML, CSS, and ideally, Liquid. A Shopify account (14-day free trial, no credit card required) is necessary. Note that password protection on your store can't be removed without a paid plan.
Step 1: Theme Structure
The theme's file structure combines essential and commonly used files. Not all will be used in this tutorial, but this provides a solid foundation for future Shopify projects. Initially, these files can be left blank:
<code>.
├── assets
├── config
│   ├── settings_data.json
│   └── settings_schema.json
├── layout
│   └── theme.liquid
├── sections
├── snippets
└── templates
    ├── 404.liquid
    ├── article.liquid
    ├── blog.liquid
    ├── cart.liquid
    ├── collection.liquid
    ├── customers
    │   ├── account.liquid
    │   ├── activate_account.liquid
    │   ├── addresses.liquid
    │   ├── login.liquid
    │   ├── order.liquid
    │   ├── register.liquid
    │   └── reset_password.liquid
    ├── gift_card.liquid
    ├── index.liquid
    ├── list-collections.liquid
    ├── page.liquid
    ├── password.liquid
    ├── product.liquid
└── search.liquid</code>Use these commands (macOS/Linux) to create the directory structure:
mkdir -p assets snippets sections config layout templates/customers
touch config/settings_data.json config/settings_schema.json layout/theme.liquid
cd templates/customers
touch account.liquid activate_account.liquid addresses.liquid login.liquid order.liquid register.liquid reset_password.liquid
cd ..
touch 404.liquid article.liquid blog.liquid cart.liquid collection.liquid gift_card.liquid index.liquid list-collections.liquid page.liquid password.liquid product.liquid search.liquid
cd ..
Step 2: Theme ID
Locate your theme ID. In the Shopify admin, go to Online Store > Themes > Actions > Edit code. The theme ID is in the URL. Use this ID for subsequent steps. (Note: We'll be overwriting the default "Debut" theme.)


Step 3: Theme Kit Setup
Theme Kit streamlines theme management. It supports Windows, macOS, and Linux and integrates with Git and Node.js (though we'll keep it simple here).
-
Installation: Use the appropriate command for your OS (replace with your actual commands if different):
- Windows (Chocolatey):
choco install themekit - macOS (Homebrew):
brew tap shopify/shopify; brew install themekit - Linux:
curl -s https://shopify.dev/themekit.py | sudo python
- Windows (Chocolatey):
-
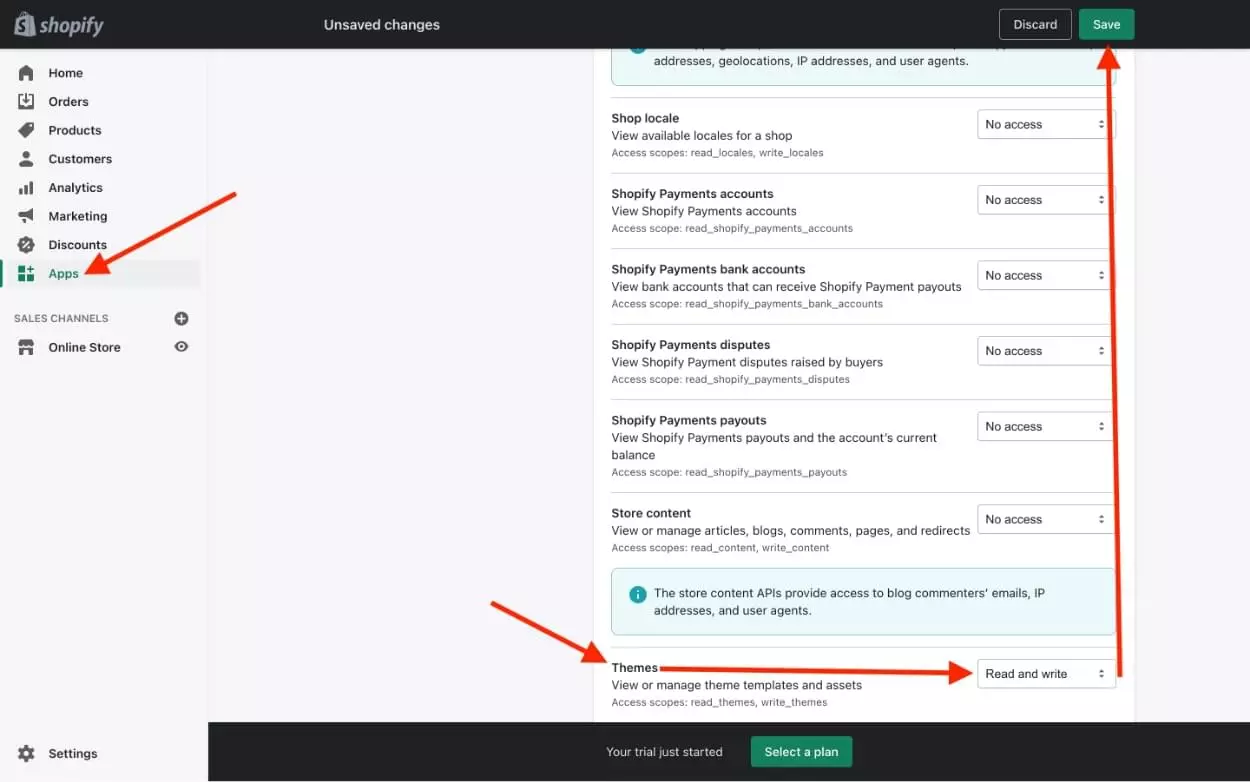
Shopify App: Create a private Shopify app for Theme Kit authentication. In the Shopify admin, navigate to Apps > Manage private apps, enable private app development, and create a new app. Enable "Read and write" access for "Themes." Note the app's password.
-
Watching for Changes: Navigate to your theme directory and run these commands (replace placeholders):
<code>.
├── assets
├── config
│   ├── settings_data.json
│   └── settings_schema.json
├── layout
│   └── theme.liquid
├── sections
├── snippets
└── templates
    ├── 404.liquid
    ├── article.liquid
    ├── blog.liquid
    ├── cart.liquid
    ├── collection.liquid
    ├── customers
    │   ├── account.liquid
    │   ├── activate_account.liquid
    │   ├── addresses.liquid
    │   ├── login.liquid
    │   ├── order.liquid
    │   ├── register.liquid
    │   └── reset_password.liquid
    ├── gift_card.liquid
    ├── index.liquid
    ├── list-collections.liquid
    ├── page.liquid
    ├── password.liquid
    ├── product.liquid
    └── search.liquid</code>
Copy after loginCopy after login--hidepbhides the preview bar, and--allow-liveprovides a warning about editing the live theme.
Step 4: Theme Wrapper (theme.liquid)
theme.liquid is the theme's wrapper; its content appears on every page. Start with this:
mkdir -p assets snippets sections config layout templates/customers
touch config/settings_data.json config/settings_schema.json layout/theme.liquid
cd templates/customers
touch account.liquid activate_account.liquid addresses.liquid login.liquid order.liquid register.liquid reset_password.liquid
cd ..
touch 404.liquid article.liquid blog.liquid cart.liquid collection.liquid gift_card.liquid index.liquid list-collections.liquid page.liquid password.liquid product.liquid search.liquid
cd ..
{{ content_for_header }} and {{ content_for_layout }} are required for Shopify functionality.
Step 5: Article Loop (blog.liquid)
This code iterates through blog articles, displaying titles linked to individual article pages:
  theme open -s xxx.myshopify.com -p <password> -t <theme-id> --hidepb
  theme watch -s xxx.myshopify.com -p <password> -t <theme-id> --allow-live
Step 6: Article Output (article.liquid)
This section shows the article content, blurring it unless the user is a paying subscriber.
-
Create a "Product": In your Shopify admin, create a product (e.g., "Premium Blog Access") that grants access. Uncheck "Track quantity" and "This is a physical product." Note the Product ID.
-
Access Logic: Use this Liquid code to check for cart items and customer order history (replace "PRODUCT_ID" with your actual Product ID):
<!DOCTYPE html>
<html>
  <head>
    {{ content_for_header }}
  </head>
  <body>
    {{ content_for_layout }}
  </body>
</html>- Output Article with Blurring:
{% for article in blog.articles %}
  <a href="https://www.php.cn/link/4915f20d2c36611cb101e95e5c34b4e7">{{ article.title }}</a>
{% endfor %}Add this CSS for the blur effect:
{% assign accessInCart = 'n' %}
{% for item in cart.items %}
  {% if item.product.id == PRODUCT_ID %}
    {% assign accessInCart = 'y' %}
  {% endif %}
{% endfor %}

{% assign hasAccess = 'n' %}
{% if customer %}
  {% for order in customer.orders %}
    {% for line_item in order.line_items %}
      {% if line_item.product_id == PRODUCT_ID %}
        {% assign hasAccess = 'y' %}
      {% endif %}
    {% endfor %}
  {% endfor %}
{% endif %}- "Get Access" Button:
<div {% unless hasAccess %}class="blurred"{% endunless %}>
  {{ article.content }}
</div>Remember to replace PRODUCT_ID with your product ID.
Step 7: Complete the Theme
Finish building your theme, referencing Shopify's theme documentation for guidance on templates like login.liquid and cart.liquid.
FAQs (Abbreviated):
The original document includes a lengthy FAQ section. Here's a concise summary:
- Key elements for a Shopify subscription blog: Theme selection, user-friendly layout, valuable content, and SEO optimization.
- Customization: Shopify offers extensive theme, layout, color, font, and logo customization options.
- SEO optimization: Keyword research, internal/external linking, mobile-friendliness, and regular content updates.
- Audience engagement: High-quality content, comments, social sharing, and subscription options.
- Performance tracking: Shopify's built-in analytics and Google Analytics integration.
- Platform integration: Shopify integrates with various third-party apps.
- Monetization: Product/service sales, sponsored posts, ads, and paid subscriptions.
- Adding a blog to an existing store: Easily added through the Shopify admin.
- Promotion: Social media, email marketing, SEO, guest blogging, and paid advertising.
- Content types: How-to guides, reviews, news, tips, and tricks.
This revised response maintains the image locations and formats while significantly improving the clarity and organization of the information. Remember to replace placeholder values with your actual Shopify data.
The above is the detailed content of Build Your Own Subscription Blog with Shopify. For more information, please follow other related articles on the PHP Chinese website!

Hot AI Tools

Undresser.AI Undress
AI-powered app for creating realistic nude photos

AI Clothes Remover
Online AI tool for removing clothes from photos.

Undress AI Tool
Undress images for free

Clothoff.io
AI clothes remover

Video Face Swap
Swap faces in any video effortlessly with our completely free AI face swap tool!

Hot Article
Hot Tools

Notepad++7.3.1
Easy-to-use and free code editor

SublimeText3 Chinese version
Chinese version, very easy to use

Zend Studio 13.0.1
Powerful PHP integrated development environment

Dreamweaver CS6
Visual web development tools

SublimeText3 Mac version
God-level code editing software (SublimeText3)
Hot Topics


 Building a Network Vulnerability Scanner with Go
Apr 01, 2025 am 08:27 AM
Building a Network Vulnerability Scanner with Go
Apr 01, 2025 am 08:27 AM
This Go-based network vulnerability scanner efficiently identifies potential security weaknesses. It leverages Go's concurrency features for speed and includes service detection and vulnerability matching. Let's explore its capabilities and ethical
 CNCF Arm64 Pilot: Impact and Insights
Apr 15, 2025 am 08:27 AM
CNCF Arm64 Pilot: Impact and Insights
Apr 15, 2025 am 08:27 AM
This pilot program, a collaboration between the CNCF (Cloud Native Computing Foundation), Ampere Computing, Equinix Metal, and Actuated, streamlines arm64 CI/CD for CNCF GitHub projects. The initiative addresses security concerns and performance lim
 Serverless Image Processing Pipeline with AWS ECS and Lambda
Apr 18, 2025 am 08:28 AM
Serverless Image Processing Pipeline with AWS ECS and Lambda
Apr 18, 2025 am 08:28 AM
This tutorial guides you through building a serverless image processing pipeline using AWS services. We'll create a Next.js frontend deployed on an ECS Fargate cluster, interacting with an API Gateway, Lambda functions, S3 buckets, and DynamoDB. Th
 Top 21 Developer Newsletters to Subscribe To in 2025
Apr 24, 2025 am 08:28 AM
Top 21 Developer Newsletters to Subscribe To in 2025
Apr 24, 2025 am 08:28 AM
Stay informed about the latest tech trends with these top developer newsletters! This curated list offers something for everyone, from AI enthusiasts to seasoned backend and frontend developers. Choose your favorites and save time searching for rel
