

Your Own Custom Annotations - More than Just Comments!

PHP Custom Annotations: Enhanced Code Flexibility and Scalability
This article discusses how to create and use custom annotations in Symfony 3 applications. Annotations are the document block metadata/configuration we see above classes, methods and properties. They are often used to declare controller routing (@Route()), Doctrine ORM mapping (@ORM()), or control various classes in packages such as Rauth. and access to methods. This article will explain how to customize annotations and read class or method information without loading the class.
Key points:
- PHP custom annotations can be used to add metadata to the code, affecting the behavior of the code, making it more flexible and easier to adapt. They can be used to define routing information, specify verification rules, or configure dependency injection.
- Creating a PHP custom annotation requires defining a new class to represent the annotation. This class should have properties corresponding to the value you want to set in the annotation.
- Doctrine supports custom annotations. You can define your own annotations and use them in Doctrine entities. Doctrine's annotation reader parses these annotations and can then use them to affect the behavior of an entity.
- One limitation of using PHP custom annotations is that they are not natively supported by the language itself. This means you need to use libraries or tools that provide annotation support, such as Doctrine or PHP-DI.
- PHP custom annotations have a variety of uses, including defining routing information in a web application, specifying verification rules for form input, or configuring dependency injection. They can also be used to add documentation to your code.
Disclaimer: Annotation has nothing to do with Symfony, it is a concept developed as part of the Doctrine project to solve the problem of mapping ORM information to class methods.
This article will build a small reusable bundle called WorkerBundle (for demonstration purposes only, not really packable). We will develop a small concept that allows you to define various Worker types that "run" at different speeds, which can then be used by anyone in the application. The actual worker operations are beyond the scope of this article, because we are concerned with setting up the system that manages them (and discovering them through annotations).
You can view this repository and set up the bundle in your local Symfony application as described in it.
Worker
Worker will implement an interface that requires a method: ::work(). In the new WorkerBundle, let's create a Workers/ directory to keep it tidy and add an interface to it:
<?php
namespace WorkerBundle\Workers;

interface WorkerInterface
{
    /**
     * 执行工作
     *
     * @return NULL
     */
    public function work();
}Annotations
Each worker must implement the above interface. Very clear. But beyond that, we also need them to have an annotation above the class in order to find them and read some metadata about them.
Doctrine maps document block annotations to a class whose properties represent keys inside the annotation itself. Let's create our own annotations and do it.
Each WorkerInterface instance will have the following annotation in its document block:
<?php
namespace WorkerBundle\Workers;

interface WorkerInterface
{
    /**
     * 执行工作
     *
     * @return NULL
     */
    public function work();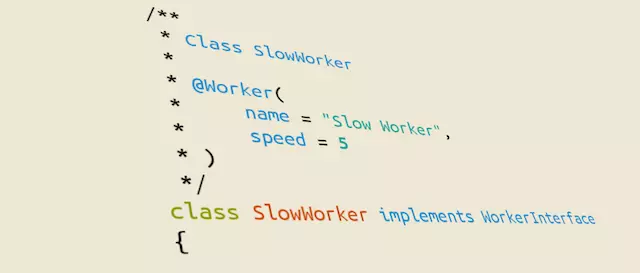
}We will keep it simple, with only two properties: unique name (string) and worker speed (integral). In order for Doctrine's annotation library to recognize this annotation, we must create a matching class, which, as expected, has some annotations on its own.
We put this class in the Annotation folder of the bundle namespace and simply named it Worker:
/**
 * @Worker(
 *     name = "唯一的Worker名称",
 *     speed = 10
 * )
 */
As you can see, we have two properties and some simple getter methods. More importantly, we have two annotations at the top: @Annotation (tell Doctrine such a class to represent an annotation) and @Target("CLASS") (tell it should be used above the entire class rather than above the method or property). That's it, the WorkerInterface class can now use this annotation by ensuring that the corresponding class is imported using the use statement at the top of the file:
<?php
namespace WorkerBundle\Annotation;

use Doctrine\Common\Annotations\Annotation;

/**
 * @Annotation
 * @Target("CLASS")
 */
class Worker
{
    /**
     * @Required
     *
     * @var string
     */
    public $name;

    /**
     * @Required
     *
     * @var int
     */
    public $speed;

    /**
     * @return string
     */
    public function getName()
    {
        return $this->name;
    }

    /**
     * @return int
     */
    public function getSpeed()
    {
        return $this->speed;
    }
}Manager
Next, we need a manager that our application can use to get a list of all available workers and create them. In the same namespace as WorkerInterface, we can use this simple manager class:
use WorkerBundle\Annotation\Worker;
Discoverer
The key part of our annotation demonstration is actually part of the discovery process. Why? Because we use Worker annotations to determine whether the corresponding class should be treated as a Worker. In this process, we use metadata before actually instantiating the object. Let's take a look at our WorkerDiscovery class:
<?php
namespace WorkerBundle\Workers;

class WorkerManager
{
    // ... (代码与原文相同) ...
}Connect
Now that we have the main components, it's time to connect everything. First, we need the service definition, so in the Resource/config folder of the bundle, we can have this services.yml file:
<?php
namespace WorkerBundle\Workers;

// ... (代码与原文相同) ...
}
In order for our service definition to be picked up centrally by the container, we need to write a small extension class. So, in the DependencyInjection folder of the bundle, create a class called WorkerExtension. Location and name are important for Symfony to automatically pick it up.
services:
    worker_manager:
        class: WorkerBundle\Workers\WorkerManager
        arguments: ["@worker_discovery"]
    worker_discovery:
        class: WorkerBundle\Workers\WorkerDiscovery
arguments: ["%worker_namespace%", "%worker_directory%", "%kernel.root_dir%", "@annotation_reader"]Finally, we need to register our bundle. In our AppKernel:
<?php
namespace WorkerBundle\DependencyInjection;

// ... (代码与原文相同) ...
}
That's it.
Let us work!
Now we are ready to work. Let's configure where our worker will be found in the central parameters.yml file:
public function registerBundles()
{
    return array(
        // ...
        new WorkerBundle\WorkerBundle(),
        // ...
    );
}These parameters are passed from the container to the WorkerDiscovery class, as described above.
Location is up to you, but now let's put our worker in the main AppBundle bundle of the app. Our first worker might look like this:
<?php
namespace WorkerBundle\Workers;

interface WorkerInterface
{
    /**
     * 执行工作
     *
     * @return NULL
     */
    public function work();
}Our annotation is there, the use statement is in place, so nothing can prevent some business logic from finding it and instantiating it. Let's assume that inside a Controller method:
/**
 * @Worker(
 *     name = "唯一的Worker名称",
 *     speed = 10
 * )
 */
or
<?php
namespace WorkerBundle\Annotation;

use Doctrine\Common\Annotations\Annotation;

/**
 * @Annotation
 * @Target("CLASS")
 */
class Worker
{
    /**
     * @Required
     *
     * @var string
     */
    public $name;

    /**
     * @Required
     *
     * @var int
     */
    public $speed;

    /**
     * @return string
     */
    public function getName()
    {
        return $this->name;
    }

    /**
     * @return int
     */
    public function getSpeed()
    {
        return $this->speed;
    }
}Conclusion
We can now use annotations to express metadata about classes (or methods and properties). In this tutorial, we build a small package that enables applications (or other external bundles) to declare a worker capable of performing some work by defining some metadata about them. This metadata not only makes them easy to discover, but also provides information on whether they should be actually used.
 Do you use custom annotations in your projects? If so, how did you implement them? Maybe there is a third method? Let us know!
(Interested in learning more about Symfony, Doctrine, annotations and various enterprise-level PHP content? Join us for a three-day hands-on workshop, WebSummerCamp—the only fully manual conference, And will also take care of anyone you want to bring! )
(The FAQ part of the original text has been omitted because its content is highly duplicated with translated and rewritten content.)
The above is the detailed content of Your Own Custom Annotations - More than Just Comments!. For more information, please follow other related articles on the PHP Chinese website!

Hot AI Tools

Undresser.AI Undress
AI-powered app for creating realistic nude photos

AI Clothes Remover
Online AI tool for removing clothes from photos.

Undress AI Tool
Undress images for free

Clothoff.io
AI clothes remover

Video Face Swap
Swap faces in any video effortlessly with our completely free AI face swap tool!

Hot Article
Hot Tools

Notepad++7.3.1
Easy-to-use and free code editor

SublimeText3 Chinese version
Chinese version, very easy to use

Zend Studio 13.0.1
Powerful PHP integrated development environment

Dreamweaver CS6
Visual web development tools

SublimeText3 Mac version
God-level code editing software (SublimeText3)
Hot Topics


 Alipay PHP SDK transfer error: How to solve the problem of 'Cannot declare class SignData'?
Apr 01, 2025 am 07:21 AM
Alipay PHP SDK transfer error: How to solve the problem of 'Cannot declare class SignData'?
Apr 01, 2025 am 07:21 AM
Alipay PHP...
 How does session hijacking work and how can you mitigate it in PHP?
Apr 06, 2025 am 12:02 AM
How does session hijacking work and how can you mitigate it in PHP?
Apr 06, 2025 am 12:02 AM
Session hijacking can be achieved through the following steps: 1. Obtain the session ID, 2. Use the session ID, 3. Keep the session active. The methods to prevent session hijacking in PHP include: 1. Use the session_regenerate_id() function to regenerate the session ID, 2. Store session data through the database, 3. Ensure that all session data is transmitted through HTTPS.
 Explain JSON Web Tokens (JWT) and their use case in PHP APIs.
Apr 05, 2025 am 12:04 AM
Explain JSON Web Tokens (JWT) and their use case in PHP APIs.
Apr 05, 2025 am 12:04 AM
JWT is an open standard based on JSON, used to securely transmit information between parties, mainly for identity authentication and information exchange. 1. JWT consists of three parts: Header, Payload and Signature. 2. The working principle of JWT includes three steps: generating JWT, verifying JWT and parsing Payload. 3. When using JWT for authentication in PHP, JWT can be generated and verified, and user role and permission information can be included in advanced usage. 4. Common errors include signature verification failure, token expiration, and payload oversized. Debugging skills include using debugging tools and logging. 5. Performance optimization and best practices include using appropriate signature algorithms, setting validity periods reasonably,
 Describe the SOLID principles and how they apply to PHP development.
Apr 03, 2025 am 12:04 AM
Describe the SOLID principles and how they apply to PHP development.
Apr 03, 2025 am 12:04 AM
The application of SOLID principle in PHP development includes: 1. Single responsibility principle (SRP): Each class is responsible for only one function. 2. Open and close principle (OCP): Changes are achieved through extension rather than modification. 3. Lisch's Substitution Principle (LSP): Subclasses can replace base classes without affecting program accuracy. 4. Interface isolation principle (ISP): Use fine-grained interfaces to avoid dependencies and unused methods. 5. Dependency inversion principle (DIP): High and low-level modules rely on abstraction and are implemented through dependency injection.
 How to debug CLI mode in PHPStorm?
Apr 01, 2025 pm 02:57 PM
How to debug CLI mode in PHPStorm?
Apr 01, 2025 pm 02:57 PM
How to debug CLI mode in PHPStorm? When developing with PHPStorm, sometimes we need to debug PHP in command line interface (CLI) mode...
 How to automatically set permissions of unixsocket after system restart?
Mar 31, 2025 pm 11:54 PM
How to automatically set permissions of unixsocket after system restart?
Mar 31, 2025 pm 11:54 PM
How to automatically set the permissions of unixsocket after the system restarts. Every time the system restarts, we need to execute the following command to modify the permissions of unixsocket: sudo...
 Explain late static binding in PHP (static::).
Apr 03, 2025 am 12:04 AM
Explain late static binding in PHP (static::).
Apr 03, 2025 am 12:04 AM
Static binding (static::) implements late static binding (LSB) in PHP, allowing calling classes to be referenced in static contexts rather than defining classes. 1) The parsing process is performed at runtime, 2) Look up the call class in the inheritance relationship, 3) It may bring performance overhead.
 How to send a POST request containing JSON data using PHP's cURL library?
Apr 01, 2025 pm 03:12 PM
How to send a POST request containing JSON data using PHP's cURL library?
Apr 01, 2025 pm 03:12 PM
Sending JSON data using PHP's cURL library In PHP development, it is often necessary to interact with external APIs. One of the common ways is to use cURL library to send POST�...
