


This article was originally published on OKTA Developer Blog. Thank you for supporting the partners who make SitePoint possible.
Angular (formerly called Angular 2.0) is quickly becoming one of the most powerful ways to build a modern single-page app. A core strength is Angular’s focus on building reusable components, which help you decouple the various concerns in your application. Take authentication, for example: it can be painful to build, but once you wrap it in a component, the authentication logic can be reused throughout your application.
The Angular CLI makes it easy to scaffold new components, and even entire projects. If you haven’t used the Angular CLI to quickly generate Angular code, you’re in for a treat!
In this example, you’ll build a simple web application with Angular CLI, a tool for Angular development. You’ll create an application with search and edit features, then add authentication.
TIP: If you’d like to skip building the Angular application and get right to adding authentication, you can clone my ng-demo project, then skip to the Create an OpenID Connect App in Okta section.
<span>git clone https://github.com/mraible/ng-demo.git
</span>
Create a new project using the ng new command:
ng new ng-demo
This will create a ng-demo project and run npm install in it. It should take about a minute to complete, but that could vary depending on your connection speed.
<span>[mraible:~/dev] $ ng new ng-demo
</span>installing ng
  create .editorconfig
  create README.md
  create src/app/app.component.css
  create src/app/app.component.html
  create src/app/app.component.spec.ts
  create src/app/app.component.ts
  create src/app/app.module.ts
  create src/assets/.gitkeep
  create src/environments/environment.prod.ts
  create src/environments/environment.ts
  create src/favicon.ico
  create src/index.html
  create src/main.ts
  create src/polyfills.ts
  create src/styles.css
  create src/test.ts
  create src/tsconfig.app.json
  create src/tsconfig.spec.json
  create src/typings.d.ts
  create .angular-cli.json
  create e2e/app.e2e-spec.ts
  create e2e/app.po.ts
  create e2e/tsconfig.e2e.json
  create .gitignore
  create karma.conf.js
  create package.json
  create protractor.conf.js
  create tsconfig.json
  create tslint.json
Successfully initialized git.
Installing packages <span>for tooling via npm.
</span>Installed packages <span>for tooling via npm.
</span>You can <span><span>`ng set --global packageManager=yarn`</span>.
</span>Project <span>'ng-demo' successfully created.
</span><span>[mraible:~] 46s $
</span>
You can see the what version of Angular CLI you’re using with ng --version.
$ ng <span>--version
</span>    _                      _                 ____ _     ___
   / <span>\   _ __   __ _ _   _| | __ _ _ __     / ___| |   |_ _|
</span>  / △ <span>\ | '_ \ / _` | | | | |/ _` | '__|   | |   | |    | |
</span> / ___ <span>\| | | | (_| | |_| | | (_| | |      | |___| |___ | |
</span>/_/   <span>\_\_| |_|\__, |\__,_|_|\__,_|_|       \____|_____|___|
</span>               <span>|___/
</span>@angular/cli: <span>1.3.2
</span>node: <span>8.4.0
</span>os: darwin x64
The project is configured with webpack dev server. To start it, make sure you’re in the ng-demo directory, then run:
<span>git clone https://github.com/mraible/ng-demo.git
</span>
You should see a screen like the one below at http://localhost:4200.

You can make sure your new project’s tests pass, run ng test:
ng new ng-demo
To add a search feature, open the project in an IDE or your favorite text editor. For IntelliJ IDEA, use File > New Project > Static Web and point to the ng-demo directory.
In a terminal window, cd into your project’s directory and run the following command. This will create a search component.
<span>[mraible:~/dev] $ ng new ng-demo
</span>installing ng
  create .editorconfig
  create README.md
  create src/app/app.component.css
  create src/app/app.component.html
  create src/app/app.component.spec.ts
  create src/app/app.component.ts
  create src/app/app.module.ts
  create src/assets/.gitkeep
  create src/environments/environment.prod.ts
  create src/environments/environment.ts
  create src/favicon.ico
  create src/index.html
  create src/main.ts
  create src/polyfills.ts
  create src/styles.css
  create src/test.ts
  create src/tsconfig.app.json
  create src/tsconfig.spec.json
  create src/typings.d.ts
  create .angular-cli.json
  create e2e/app.e2e-spec.ts
  create e2e/app.po.ts
  create e2e/tsconfig.e2e.json
  create .gitignore
  create karma.conf.js
  create package.json
  create protractor.conf.js
  create tsconfig.json
  create tslint.json
Successfully initialized git.
Installing packages <span>for tooling via npm.
</span>Installed packages <span>for tooling via npm.
</span>You can <span><span>`ng set --global packageManager=yarn`</span>.
</span>Project <span>'ng-demo' successfully created.
</span><span>[mraible:~] 46s $
</span>
Open src/app/search/search.component.html and replace its default HTML with the following:
$ ng <span>--version
</span>    _                      _                 ____ _     ___
   / <span>\   _ __   __ _ _   _| | __ _ _ __     / ___| |   |_ _|
</span>  / △ <span>\ | '_ \ / _` | | | | |/ _` | '__|   | |   | |    | |
</span> / ___ <span>\| | | | (_| | |_| | | (_| | |      | |___| |___ | |
</span>/_/   <span>\_\_| |_|\__, |\__,_|_|\__,_|_|       \____|_____|___|
</span>               <span>|___/
</span>@angular/cli: <span>1.3.2
</span>node: <span>8.4.0
</span>os: darwin x64
The Router documentation for Angular provides the information you need to setup a route to the SearchComponent you just generated. Here’s a quick summary:
In src/app/app.module.ts, add an appRoutes constant and import it in @NgModule:
ng serve
In src/app/app.component.html, adjust the placeholder content and add a
$ ng <span>test
</span><span>...
</span>Chrome <span>60.0.3112 (Mac OS X 10.12.6): Executed 3 of 3 SUCCESS (0.239 secs / 0.213 secs)
</span>
Now that you have routing setup, you can continue writing the search feature.
If you still have ng serve running, your browser should refresh automatically. If not, navigate to http://localhost:4200. You will likely see a blank screen. Open your JavaScript console and you’ll see the problem.
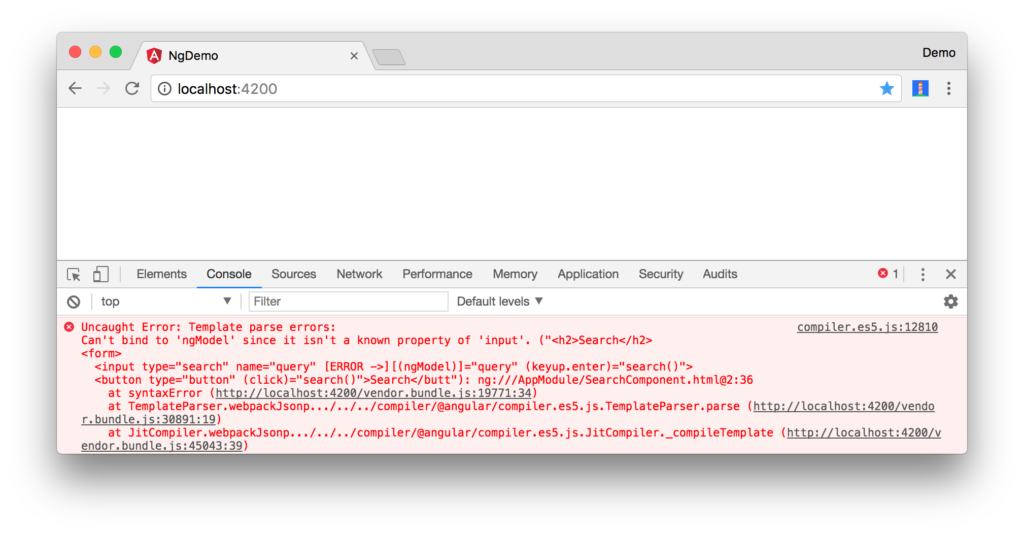
To solve this, open src/app/app.module.ts and add FormsModule as an import in @NgModule:
$ ng g component search
installing component
  create src/app/search/search.component.css
  create src/app/search/search.component.html
  create src/app/search/search.component.spec.ts
  create src/app/search/search.component.ts
  update src/app/app.module.ts
Now you should see the search form.

If you want to add CSS for this components, open src/app/search/search.component.css and add some CSS. For example:
<span><span><span><h2</span>></span>Search<span><span></h2</span>></span>
</span><span><span><span><form</span>></span>
</span>  <span><span><span><input</span> type<span>="search"</span> name<span>="query"</span> [(ngModel)]<span>="query"</span> (keyup.enter)<span>="search()"</span>></span>
</span>  <span><span><span><button</span> type<span>="button"</span> (click)<span>="search()"</span>></span>Search<span><span></button</span>></span>
</span><span><span><span></form</span>></span>
</span><span><span><span><pre</span>></span>{{searchResults | json}}<span><span></pre</span>></span>
</span>This section has shown you how to generate a new component to a basic Angular application with Angular CLI. The next section will show you how to create and use a JSON file and localStorage to create a fake API.
To get search results, create a SearchService that makes HTTP requests to a JSON file. Start by generating a new service.
<span>import { Routes, RouterModule } from '@angular/router';
</span>
<span>const appRoutes: Routes = [
</span>  <span>{path: 'search', component: SearchComponent},
</span>  <span>{path: '', redirectTo: '/search', pathMatch: 'full'}
</span><span>];
</span>
<span><span>@NgModule</span>({
</span>  <span>...
</span>  imports<span>: [
</span>    <span>...
</span>    RouterModule<span>.forRoot(appRoutes)
</span>  <span>]
</span>  <span>...
</span><span>})
</span><span>export class AppModule { }
</span>Move the generated search.service.ts and its test to app/shared/search. You’ll need to create this directory.
<span><span><span><h1</span>></span>Welcome to {{title}}!<span><span></h1</span>></span>
</span><span><!-- Routed views go here -->
</span><span><span><span><router-outlet</span>></span><span><span></router-outlet</span>></span>
</span>Create src/assets/data/people.json to hold your data.
<span>import { FormsModule } from '@angular/forms';
</span>
<span><span>@NgModule</span>({
</span>  <span>...
</span>  imports<span>: [
</span>    <span>...
</span>    FormsModule
  <span>]
</span>  <span>...
</span><span>})
</span><span>export class AppModule { }
</span>Modify src/app/shared/search/search.service.ts and provide Http as a dependency in its constructor. In this same file, create a getAll() method to gather all the people. Also, define the Address and Person classes that JSON will be marshalled to.
<span><span>:host</span> {
</span>  <span>display: block;
</span>  <span>padding: 0 20px;
</span><span>}
</span>To make these classes available for consumption by your components, edit src/app/shared/index.ts and add the following:
<span>git clone https://github.com/mraible/ng-demo.git
</span>
The reason for creating this file is so you can import multiple classes on a single line rather than having to import each individual class on separate lines.
In src/app/search/search.component.ts, add imports for these classes.
ng new ng-demo
You can now add query and searchResults variables. While you’re there, modify the constructor to inject the SearchService.
<span>[mraible:~/dev] $ ng new ng-demo
</span>installing ng
  create .editorconfig
  create README.md
  create src/app/app.component.css
  create src/app/app.component.html
  create src/app/app.component.spec.ts
  create src/app/app.component.ts
  create src/app/app.module.ts
  create src/assets/.gitkeep
  create src/environments/environment.prod.ts
  create src/environments/environment.ts
  create src/favicon.ico
  create src/index.html
  create src/main.ts
  create src/polyfills.ts
  create src/styles.css
  create src/test.ts
  create src/tsconfig.app.json
  create src/tsconfig.spec.json
  create src/typings.d.ts
  create .angular-cli.json
  create e2e/app.e2e-spec.ts
  create e2e/app.po.ts
  create e2e/tsconfig.e2e.json
  create .gitignore
  create karma.conf.js
  create package.json
  create protractor.conf.js
  create tsconfig.json
  create tslint.json
Successfully initialized git.
Installing packages <span>for tooling via npm.
</span>Installed packages <span>for tooling via npm.
</span>You can <span><span>`ng set --global packageManager=yarn`</span>.
</span>Project <span>'ng-demo' successfully created.
</span><span>[mraible:~] 46s $
</span>
Then implement a search() method to call the service’s getAll() method.
$ ng <span>--version
</span>    _                      _                 ____ _     ___
   / <span>\   _ __   __ _ _   _| | __ _ _ __     / ___| |   |_ _|
</span>  / △ <span>\ | '_ \ / _` | | | | |/ _` | '__|   | |   | |    | |
</span> / ___ <span>\| | | | (_| | |_| | | (_| | |      | |___| |___ | |
</span>/_/   <span>\_\_| |_|\__, |\__,_|_|\__,_|_|       \____|_____|___|
</span>               <span>|___/
</span>@angular/cli: <span>1.3.2
</span>node: <span>8.4.0
</span>os: darwin x64
At this point, you’ll likely see the following message in your browser’s console.
ng serve
To fix the “No provider” error from above, update app.module.ts to import the SearchService and add the service to the list of providers. Because SearchService depends on Http, you’ll need to import HttpModule as well.
$ ng <span>test
</span><span>...
</span>Chrome <span>60.0.3112 (Mac OS X 10.12.6): Executed 3 of 3 SUCCESS (0.239 secs / 0.213 secs)
</span>
Now clicking the search button should work. To make the results look better, remove the
tag and replace it with a
The above is the detailed content of Setup angular authentication using OpenID Connect and Okta in your app. For more information, please follow other related articles on the PHP Chinese website!
 Bitcoin exchange
 c language const usage
 The most promising coin in 2024
 High-level language programming
 java basic data types
 what is adobe flash player
 The latest prices of the top ten virtual currencies
 How to recover files emptied from Recycle Bin
 What's going on when the ip address is unavailable?


![[Web front-end] Node.js quick start](https://img.php.cn/upload/course/000/000/067/662b5d34ba7c0227.png)


