

Seven ways to layout web elements using CSS Grid

(This article was updated on March 23, 2017. Specific content: Browser support for CSS Grid layout)
This article will introduce seven ways to place elements in web pages using the Grid Layout module.
SitePoint has previously published "Introduction to CSS Grid Layout". Recently, I also wrote "The Current Situation of the Draft Work of CSS Grid Layout".
Here, the focus will be entirely on the specific way to layout elements on a web page using CSS Grid. Now, let's introduce them one by one.
Key Points
grid-row and grid-column, grid-area, span keywords, named lines, with common names and spanName line and named grid area for keywords. grid-area attribute allows specifying the upper left and lower right corners of an element, while the span keyword can be used to set the number of columns or rows the element will span. span keyword. Browser support for CSS Grid layout
At present, Grid Layout does not have consistent browser support. However, as of March 2017, the latest versions of Chrome and Firefox browsers have supported CSS Grid Layout by default. IE still supports old implementations, Opera needs to enable experimental web platform flags, while Safari does not support them at all. To use all the examples in this article correctly, it is recommended that you use Chrome or Firefox. For readers who have found problems with these browsers for some reason, I have added screenshots to show the end result of each technique.
Method 1: Use a single attribute to specify all content
 This is the version we have used to place elements in our previous articles. This method is lengthy but easy to understand. Basically, use the
 grid-column-start/grid-column-end and grid-row-start/grid-row-end properties to specify the left and upper and lower boundaries of the element. If the element spans only one row or column, you can omit the -end attribute so you need to write less CSS.
In the following demonstration, element A has been placed in the second row and second column using the following CSS:
.a {
  grid-column-start: 2;
  grid-column-end: 3;
  grid-row-start: 2;
  grid-row-end: 3;
}The same effect can be achieved using the following methods:
.a {
  grid-column-start: 2;
  grid-column-end: 3;
  grid-row-start: 2;
  grid-row-end: 3;
}Method 2: Use grid-row and grid-column
Although the CSS in our first example is readable and easy to understand, we have to use four different properties to place a single element. We can only use two properties ( and
and grid-column) instead of four properties. Both properties will take two values separated by slashes, where the first value will determine the starting line of the element and the second value will determine the end line of the element. grid-row
.a {
  grid-column-start: 2;
  grid-row-start: 2;
}
.selector {
  grid-row: row-start / row-end;
  grid-column: col-start / col-end;
}Method 3: Use grid-area
Technically, the projects we are laying out occupy a specific area of the web page. The boundary of this item is determined by the values we provide for the grid lines. All of these values can be provided at once using the  attribute.
 grid-area
.c {
  grid-row: 2 / 4;
  grid-column: 2 / 4;
} - row-start) corner and then specify the lower right corner (col-start - row-end) corner of the element . col-end
.selector {
  grid-area: row-start / col-start / row-end / col-end;
}Method 4: Use the keyword span
When laying out elements, in addition to specifying the end line, you can also use the  keyword to set the number of columns or rows that a specific element will span.
 span
keyword: span
.c {
  grid-area: 2 / 2 / 4 / 4;
} keyword and its value. span
.selector {
  grid-row: row-start / span row-span-value;
  grid-column: col-start / span col-span-value;
}Method 5: Use the named line
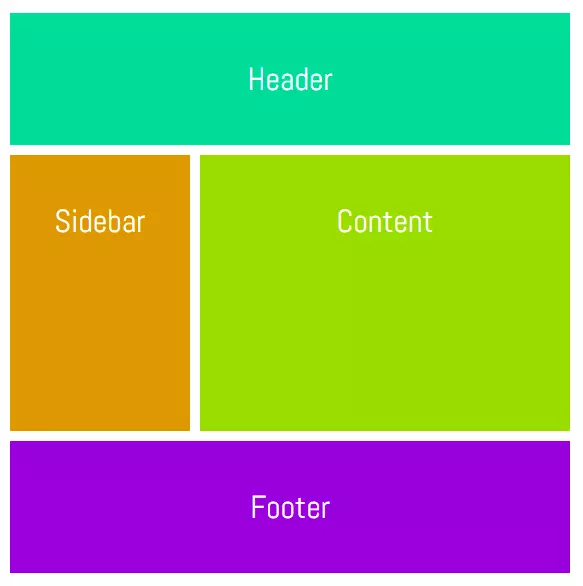 So far we have been using raw numbers to specify grid lines, which is easy to use when we deal with simple layouts. However, it can be a little messy when you have to place multiple elements. In most cases, elements on the page will fall into a specific category. For example, the header may be from column line c1 to column line c2 and from row line r1 to row line r2. It would be much easier to name all lines correctly and then place elements with those names instead of numbers.
Let's create a very basic layout to make the concept clearer. First, we have to modify the CSS applied to the grid container:
.a {
  grid-column-start: 2;
  grid-column-end: 3;
  grid-row-start: 2;
  grid-row-end: 3;
}What I did above is assign names to all lines based on the type of content they will contain. The idea here is to use names that will let us know the location of different elements. In this particular example, our header element spans all columns. Therefore, assigning the names "head-col-start" and "head-col-end" to the first and last column lines, respectively, will clearly indicate that these lines represent the left and right ends of the header. All other lines can be named in a similar way. After all the lines are named, we can use the following CSS to place all elements.
.a {
  grid-column-start: 2;
  grid-row-start: 2;
}Although we have to write more CSS than usual, now we can understand the location of the elements by just looking at the CSS.
Method 6: Use a naming line with a common name and span keyword
 In the previous method, all lines have different names, marking the starting point, midpoint or end point of the element. For example, "content-col-start" and "content-col-mid" mark the starting point and midpoint of the content part of our web page. If the content partially covers more rows, we will have to come up with other row names such as "content-col-mid-one", "content-col-mid-two", etc.
In this case, we can use only one common name for all grid lines in the content part, such as "content", and then use the span keyword to specify the number of these lines that the element spans. We can also just mention a number next to the row name to set the number of rows or columns the element will span.
Using this method, CSS will look like this:
.selector {
  grid-row: row-start / row-end;
  grid-column: col-start / col-end;
}As with the last method, this method also requires you to modify the CSS of the grid container.
.c {
  grid-row: 2 / 4;
  grid-column: 2 / 4;
}Each named column line has the same name, denoting their width (in pixels), and each named row line represents the rows covered by a specific web page section. In this demo, I introduced an ad section below the sidebar. This is CSS:
.selector {
  grid-area: row-start / col-start / row-end / col-end;
}Method 7: Use named grid area
 We can place elements by assigning names to different regions instead of using lines. Again, we have to make some changes to the CSS of the grid container.
The CSS of the grid container should now look like this:
.a {
  grid-column-start: 2;
  grid-column-end: 3;
  grid-row-start: 2;
  grid-row-end: 3;
}Single dots (.) or series of dots will create an empty cell without anything. All strings must have the same number of columns. That's why we have to add points instead of leaving them blank entirely. Currently, the named mesh area can only be rectangular. However, this may change in future versions of the specification. Let's take a look at the CSS for all elements.
.a {
  grid-column-start: 2;
  grid-row-start: 2;
}After defining all grid areas, it is very simple to assign them to various elements. Remember that you cannot use any special characters when assigning names to regions. Doing so will invalidate the declaration.
Conclusion
That's it! We have covered seven different ways to use CSS mesh layout to layout elements. Do you want to share any tips about this article with other readers? Which method do you prefer to use in your own project? Please let us know in the comments.
CSS Grid Layout FAQ
CSS Grid layout and Flexbox are both powerful layout systems in CSS. Although they look similar, they are designed for different types of layout tasks. Flexbox is a one-dimensional layout model designed to layout on one dimension at a time, either a row or a column. CSS Grid layout, on the other hand, is a two-dimensional system, which means it can handle both columns and rows, making it an ideal choice for designing complex web layouts.
CSS Grid makes creating responsive layouts very simple. You can use the "fr" unit, which represents a portion of the available space in the grid container. By using this unit, you can create flexible grid tracks that are resized according to the viewport size. Additionally, you can use media queries to change the grid layout at different viewport sizes for better control of responsive designs.
Yes, CSS Grid and Flexbox can be used together for layouts. They complement each other well. For example, you can use CSS Grid to layout the entire page structure and then use Flexbox to layout individual components or parts within a grid area.
CSS Grid provides some properties for aligning items, including "justify-items", "align-items", "justify-self", and "align-self". These properties control how grid items align along row and column axes. You can align items to the start, end, center, or stretch them to fill the grid area.
In CSS Grid layout, grid lines are dividers that make up the grid structure. They can be horizontal or vertical and numbered starting from 1. You can place grid items between any two lines, which gives you a lot of flexibility in layout design.
CSS Grid provides the "gap" property (formerly "grid-gap") which you can use to create spaces between grid items. This property can take one or two values, specifying the size of the gap between rows and columns.
The "grid-template-areas" property in CSS Grid allows you to create grid layouts by referencing named grid areas. You can define these areas using the "grid-area" property on the grid project, and then visually arrange them in your CSS code using the "grid-template-areas" property.
In CSS Grid, you can easily overlap grid items by placing grid items in the same grid cell or by specifying a grid area covering multiple cells. This can be done with the "grid-column" and "grid-row" properties on the grid project.
The "fr" unit in the CSS Grid stands for "fraction". It represents a portion of the available space in the grid container. This unit allows you to create flexible grid tracks that are resized to the available space, making it easier to create responsive layouts.
Yes, CSS Grid is widely supported in all modern browsers, including Chrome, Firefox, Safari, and Edge. However, it is not supported in Internet Explorer. If you need to support IE, you may want to use an alternate layout method such as Flexbox or floating-based layout.
Note that I have kept the image format to .webp and retained its original link. Since I can't access CodePen directly, I replaced the CodePen link with a placeholder. You need to replace these placeholders with the actual CodePen link yourself.
The above is the detailed content of Seven Ways You Can Place Elements Using CSS Grid Layout. For more information, please follow other related articles on the PHP Chinese website!


![[Web front-end] Node.js quick start](https://img.php.cn/upload/course/000/000/067/662b5d34ba7c0227.png)


