


The days are moving fast, and modern people will choose an online schedule app rather than a bunch of sticky notes to organize their life. Online apps can be used on a smart-phone or laptop. And there’s no need to synchronize data between devices. If you want to create your own calendar or scheduler but don’t know where to start, have no fear. This article’s aim is to help you with your decision.
Why create your own scheduler instead of using the existing ones? Well, here are some use cases:
We’ll take a look at three different types of JavaScript calendars:
Before getting started, let’s define what characteristics are valuable for us:
Well, let’s start now.
You should get the full library package to use this scheduler. Alternatively, custom download allows you to choose the modules you want, but you need to have a commercial license to use it. To get the 30-day trial, you need to register by filling a web form or via your social network account. By the way, there’s also a free open-source version of Kendo UI available. It is called Kendo UI Core, and you can check the details on this GitHub page. But, unfortunately, the scheduler is not one of its parts.
After you extract the library, you can create a basic scheduler. First, include the required files:
<link rel="stylesheet" href="styles/kendo.common.min.css" />
<link rel="stylesheet" href="styles/kendo.default.min.css" />
<script src="js/jquery.min.js"></script>
<script src="js/kendo.all.min.js"></script>
Notice that you should include jQuery before the Kendo UI JavaScript files.
The next step is to define the styles. Besides the styling the and
tags, you should define the proper style for the scheduler’s container to make it look good in full-screen mode.<span>html<span>, body</span>{
</span> <span>margin:0;
</span> <span>padding:0;
</span> <span>height: 100%;
</span><span>}
</span><span><span>#scheduler</span> {
</span> <span>border-width: 0;
</span> <span>height: 100%;
</span><span>}
</span>Now you can use the constructor to initialize the scheduler:
<div ></div>
<span>$("#scheduler").kendoScheduler({
</span> <span>// The current date of the scheduler
</span> <span>date: new Date(),
</span> <span>views: [
</span> <span>"day",
</span> <span>{ type: "week", selected: true },
</span> <span>"month"
</span> <span>]
</span><span>});
</span>The views property allows you to enable the Day, Week and Month views and choose the initially selected one.
This code will create a basic scheduler that is shown below:

A double-click will open the new event creation window.

Created events are draggable, so you can rearrange them if you need. Another handy feature is a mini calendar that is helpful for navigation through the schedule.
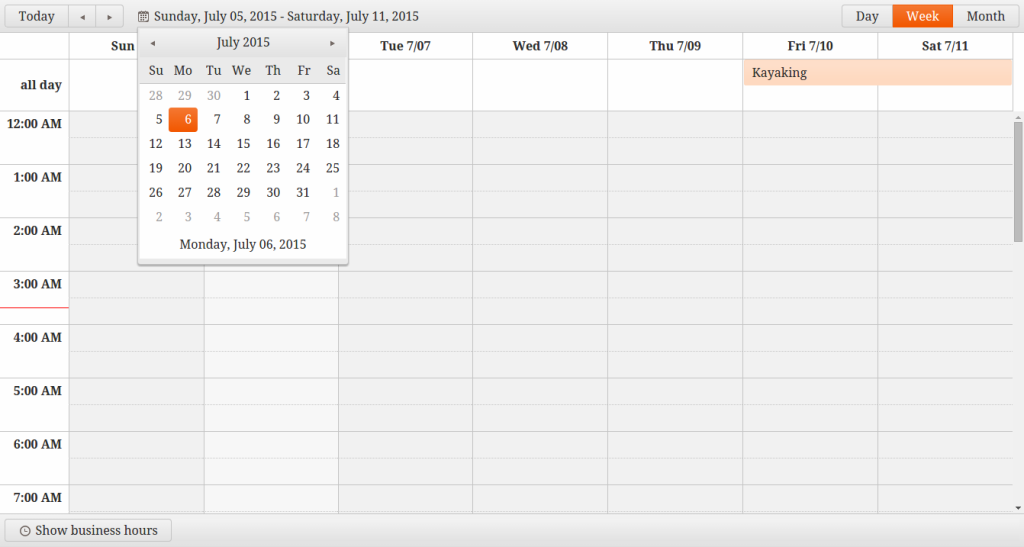
The Show business hours/Show full day toggle button will help to filter your work time events from the regular ones. You can find it at the bottom of the scheduler:

The scheduler is intuitive and has all the basic functions you may need. You can create an event and move it through the calendar grid. Additional features such as Mini calendar and Show business hours button are rather handy.
That’s all that we can get by default, so let’s move along.
This calendar is released under the MIT License, so there’s almost no restrictions on how you can use it. There are different ways you can install this calendar: you can use Bower, add the required files to your page via CDNJS, or download the package with JavaScript and CSS files. Check the download page for more details.
One more thing before moving forward. Since FullCalendar is a jQuery plugin, don’t forget to add it to your page. Another dependency is Moment.js, a JavaScript library for working with dates. Here’s how you might include the files in your page in case you use a CDN:
<link rel="stylesheet" href="styles/kendo.common.min.css" /> <link rel="stylesheet" href="styles/kendo.default.min.css" /> <script src="js/jquery.min.js"></script> <script src="js/kendo.all.min.js"></script>
After that, you can define a DIV container that will hold the calendar, define CSS rules if needed and, finally, initialize the calendar. For example, we have a container:
<span>html<span>, body</span>{
</span>  <span>margin:0;
</span>  <span>padding:0;
</span>  <span>height: 100%;
</span><span>}
</span><span><span>#scheduler</span> {
</span>  <span>border-width: 0;
</span>  <span>height: 100%;
</span><span>}
</span>Here’s what the initialization process looks like:
<div ></div>
As you can see, there’s not much code you need to make this calendar work. And, by default, there are not so many features you can use.
Here you can see how the default scheduler looks:
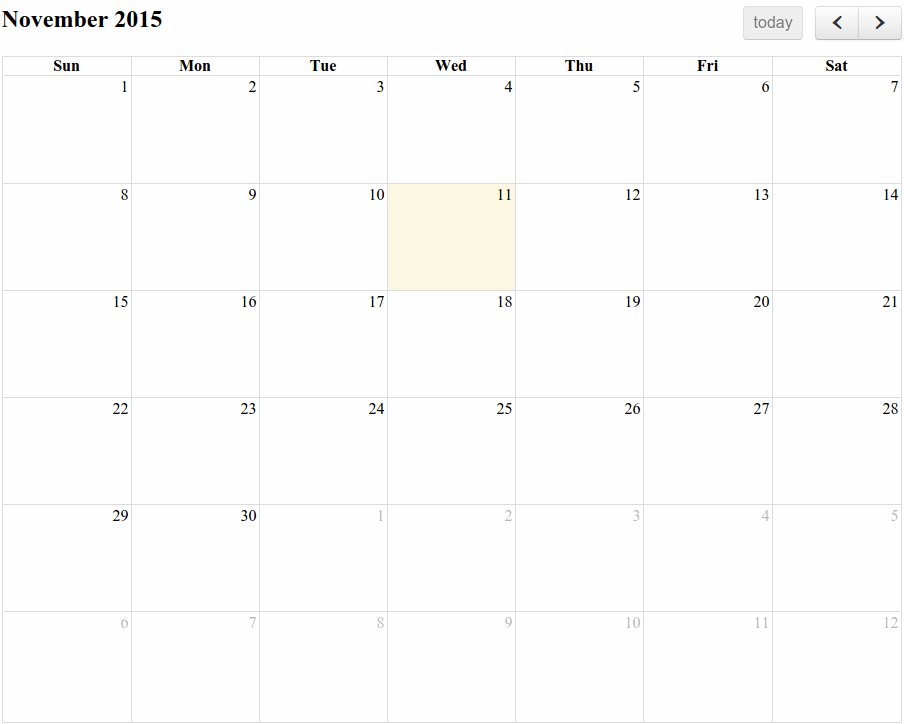
This is the month view with the current date highlighted, the possibility to change the displayed month, and a Today button. That’s all. You see, FullCalendar is some kind of DIY-tool. There’s a lot of handy features you can use, but the default calendar is very basic. It’s a good choice if you want to create minimalistic applications that have only the required minimum of features.
Let’s write some code to make our app look and work better:
<span>$("#scheduler").kendoScheduler({
</span>  <span>// The current date of the scheduler
</span>  <span>date: new Date(),
</span>  <span>views: [
</span>    <span>"day",
</span>    <span>{ type: "week", selected: true },
</span>    <span>"month"
</span>  <span>]
</span><span>});
</span>Since we want to use a custom theme, we should add the required CSS file:
<link rel='stylesheet' href='https://cdnjs.cloudflare.com/ajax/libs/fullcalendar/2.6.0/fullcalendar.css' /> <script src='https://code.jquery.com/jquery-1.11.3.min.js'></script> <script src='https://cdnjs.cloudflare.com/ajax/libs/moment.js/2.11.1/moment.min.js'></script> <script src='https://cdnjs.cloudflare.com/ajax/libs/fullcalendar/2.6.0/fullcalendar.min.js'></script>
Almost done! The final step is to define some events to render. There are different ways you can define events: as an array, as a JSON feed, and even as a function.
Here’s an example:
<div id='calendar'></div>
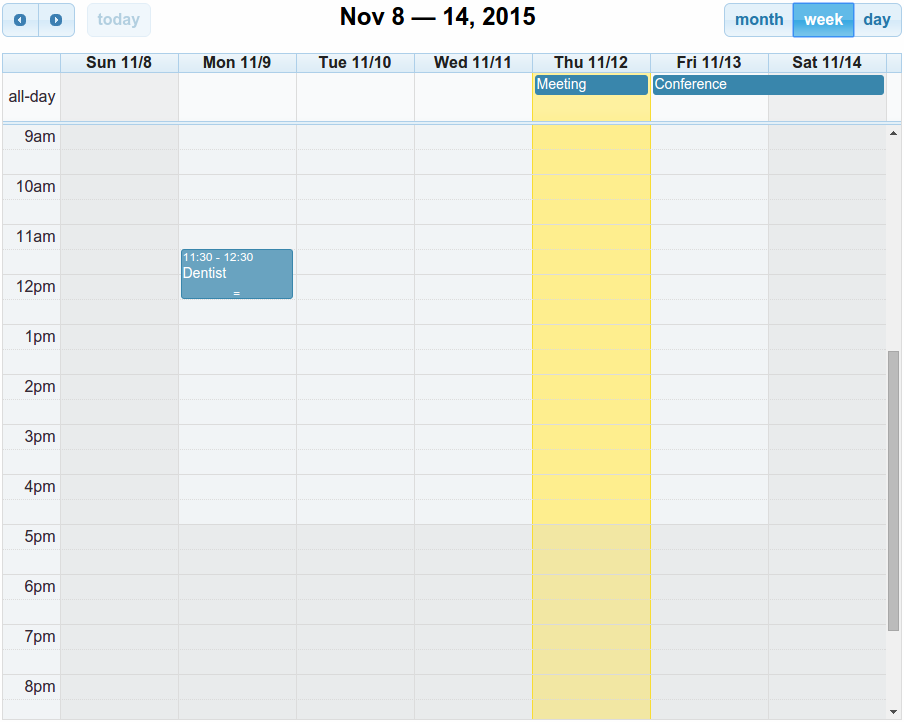
Now, let’s check the result:

Much better this time! Now, you can change the view, drag and resize the existing events, business hours are emphasized, and the week and day views filter all day events from the other ones:
Here’s the overall impression of FullCalendar. It was designed as a lightweight tool that gives you full control over your app. You can create a low-functional basic application and then add the features you want one by one. And there are plenty of them: coloring, events, existing view customization, etc. Check this documentation page for the full list.
If you check the download page, you will notice that there is a free Standard Edition available. Moreover, there are two special editions available: the Mobile Version and Windows 8 version. You can buy a PRO Edition if you want to get extended functionality.
To create a basic chart you should include some files from the codebase folder to your HTML file:
<link rel="stylesheet" href="styles/kendo.common.min.css" />
<link rel="stylesheet" href="styles/kendo.default.min.css" />
<script src="js/jquery.min.js"></script>
<script src="js/kendo.all.min.js"></script>
Now we can define the necessary
sections:<span>html<span>, body</span>{
</span> <span>margin:0;
</span> <span>padding:0;
</span> <span>height: 100%;
</span><span>}
</span><span><span>#scheduler</span> {
</span> <span>border-width: 0;
</span> <span>height: 100%;
</span><span>}
</span>And finally, we can initialize our scheduler:
<div ></div>
<span>$("#scheduler").kendoScheduler({
</span>  <span>// The current date of the scheduler
</span>  <span>date: new Date(),
</span>  <span>views: [
</span>    <span>"day",
</span>    <span>{ type: "week", selected: true },
</span>    <span>"month"
</span>  <span>]
</span><span>});
</span>The init() method initializes a dhtmlxScheduler object. In this case, the scheduler will be initialized within the previously defined scheduler_here container. new Date() will set the current date as the scheduler initial date value. The "week" parameter sets the initial view. Its possible values are "day", "week" and "month".
Everything is ready, and we can see how the default scheduler looks:

By default, there is a possibility to switch between the Day, Week and Month view. Today’s date is highlighted, but if you lose yourself within the schedule, use the Today button.
You can create a new event by double-clicking on the proper calendar area. Resizing an event will change its duration. Drag-and-drop event reordering is available as well.

To create a long-term event you should use the Details button at the event’s left side.

To change its place in your schedule, you should select the Month view.

Kendo UI is big and advanced JavaScript framework. It contains tons of widgets and tools. Maybe it’s not a good idea to use its Scheduler Widget if you’re not interested in other components. The Kendo UI documentation is well written, and you can check a bunch of Scheduler demos supplemented with code examples. Regarding the coding, it won’t take much time to build a basic scheduler and add some features to it. The default view is little bit plain, but it’s easy to change that.
This is a good choice for those who know what they want. There are no detailed step-by-step guides that describe what to do to get the goal. Only a brief Getting Started Guide and Documentation Page. Lightweight.
This is quite a good choice if a scheduler is all that you want. There is an example of integration with Google maps, so you can extend the basic functionality if you need. The documentation page contains a set of guides that may be useful for the beginners. The bunch of
When choosing a JavaScript calendar or scheduler, there are several key features to consider. Firstly, look for a tool that offers a variety of views, such as day, week, month, and agenda views. This will allow you to display your events in the most suitable format. Secondly, consider whether the tool supports drag-and-drop functionality, which can make it easier for users to manage their events. Thirdly, check whether the tool offers customizable templates, so you can tailor the look and feel of your calendar or scheduler to match your website or application. Lastly, consider whether the tool supports integration with other systems, such as Google Calendar or Outlook.
Most JavaScript calendars and schedulers offer customizable templates, which allow you to change the look and feel of your tool. This might involve changing the color scheme, font, or layout of the calendar or scheduler. Some tools also allow you to add custom fields to your events, so you can display additional information to your users. To customize your tool, you’ll typically need to modify the CSS or HTML code. Be sure to check the documentation provided by the tool for specific instructions.
Yes, many JavaScript calendars and schedulers support integration with other systems. This can be particularly useful if you want to sync your tool with an external calendar, such as Google Calendar or Outlook. Some tools also support integration with databases, allowing you to store and retrieve your events from a central location. To integrate your tool with another system, you’ll typically need to use an API or a plugin provided by the tool.
Most modern JavaScript calendars and schedulers are designed to be responsive, meaning they can adapt to different screen sizes and work well on both desktop and mobile devices. Some tools also offer touch support, making it easier for users to interact with the calendar or scheduler on a touchscreen device. However, the level of mobile support can vary between tools, so it’s worth checking the documentation or testing the tool on a mobile device before making a decision.
Adding events to a JavaScript calendar or scheduler typically involves creating an event object and adding it to the tool’s data source. The event object will usually include properties such as the event’s start and end times, title, and description. Some tools also allow you to add custom fields to your events, so you can display additional information to your users. Once you’ve created your event object, you can add it to the tool’s data source using a method provided by the tool. Be sure to check the documentation for specific instructions.
Some JavaScript calendars and schedulers are available for free, while others require a license or subscription. Free tools can be a good option for small projects or for getting started with JavaScript calendars and schedulers. However, they may have limitations or lack certain features compared to paid tools. Be sure to check the terms and conditions of the tool before using it.
Many JavaScript calendars and schedulers support multiple languages, allowing you to display your tool in the language of your users. This can be particularly useful if your website or application is used by people from different countries or regions. To display your tool in a different language, you’ll typically need to include a language file or set a language option in the tool’s configuration. Be sure to check the documentation for specific instructions.
Yes, many JavaScript calendars and schedulers can be used with a content management system (CMS) such as WordPress or Joomla. This can be particularly useful if you want to display your calendar or scheduler on a CMS-based website. To use a tool with a CMS, you’ll typically need to install a plugin or module provided by the tool. Be sure to check the documentation for specific instructions.
Handling time zones can be a challenge when working with JavaScript calendars and schedulers. However, many tools offer features to help with this, such as support for UTC time or automatic adjustment of event times based on the user’s time zone. To handle time zones in your tool, you’ll typically need to set a time zone option in the tool’s configuration or use a method provided by the tool. Be sure to check the documentation for specific instructions.
Yes, many JavaScript calendars and schedulers are suitable for project management. They can help you to schedule tasks, track progress, and manage resources. Some tools offer features specifically designed for project management, such as Gantt charts or resource views. To use a tool for project management, you’ll typically need to configure it to display your tasks as events and to use the appropriate views. Be sure to check the documentation for specific instructions.
The above is the detailed content of A Comparison of JavaScript Calendars and Schedulers. For more information, please follow other related articles on the PHP Chinese website!


![[Web front-end] Node.js quick start](https://img.php.cn/upload/course/000/000/067/662b5d34ba7c0227.png)


