

Jump Start Git: Branching in Git
Feb 18, 2025 am 10:12 AMGit branch: a tool for efficient collaboration
This article is excerpted from the book "Jump Start Git", which is available for free to SitePoint Premium members. Physical books are available in major bookstores around the world, and you can also order them here. Hope you like and benefit from it!
In Chapter 1, I talked about my initial fear of trying new things in my project. What if you try some ambitious features but break the part that was previously functioning? Git's branching feature perfectly solves this problem.
Summary of key points
- Git branch allows creating a copy of the project to be experimented without affecting the original project. If the experiment is successful, it is easy to merge experimental elements into the main branch.
- Branches allow multiple tasks to be processed simultaneously without interfering with each other. This is very useful when waiting for approval of one feature while requiring processing another feature. Branching can also make the code easier to understand by separating different ideas.
- Create a branch in Git using the command
git branch [分支名称]. Switch to this branch to usegit checkout [分支名称]. Deleting branches usesgit branch -D [分支名称], but it is recommended not to delete branches unless necessary. - Merging branches in Git is a simple process. After making sure that the required branch is active, use the command
git merge [分支名称]. However, this can create loops in project history, which can be difficult to navigate in large teams. The next chapter will explore a merge method that does not create loops.
What is a branch?
Creating a new branch in the project essentially means creating a copy of the project. You can use this copy to experiment without affecting the original project. So if the experiment fails, you can give it up and return to the original project - the main branch.
But if the experiment is successful, Git can easily merge experimental elements into the main branch. And, later, if you change your mind, you can easily restore to the state of the project before the merge.
Therefore, branches in Git are independent development paths. You can create new commits in a branch without affecting other branches. The ease of use of branches is one of Git's best features. (While other version control options (such as CVS) also have branch options, the experience of merging branches on CVS is very tedious. If you have experience using branches in other version control systems, rest assured that using branches in Git is completely different . )
In Git, you are in the main branch by default. The name "master" does not mean that it is superior in any way. This is just a conventional saying.
Note: Branch agreement
While you are free to use different branches as the base branches in Git, people usually expect to find the latest code for a specific project in the main branch.
You might argue that no branch is needed because of the ability to return to any commit. But imagine that you need to show your work to your supervisor while also developing a new feature that is not part of the work you have done. Since the branch is used to separate different ideas, it makes the code in the repository easy to understand. Additionally, branches enable you to retain important commits only in the master or master branch.
Another use ofbranches is that they allow you to handle multiple things at the same time without interfering with each other. Suppose you submitted feature 1 for review, but it will take some time for your supervisor to review it. At the same time, you need to handle function 2. In this case, the branch comes in handy. If you are working on your new idea on a new branch, you can switch back to your previous branch at any time to restore the repository to its previous state, which does not contain any code related to your idea.
Now let's start using branches in Git. To view the branch list and the current branch you are using, run the following command:
<code>git branch</code>
If you have cloned your repository or set up a remote repository, you can also see the remote branch. Just add -a:
after the above command<code>git branch -a</code>

As shown above, the red branches indicate that they are located in the remote repository. In our example, we can see the various branches that exist in the origin remote repository.
Create branch
There are several ways to create branches in Git. To create a new branch and keep it in the current branch, run the following command:
<code>git branch test_branch</code>
Here, test_branch is the name of the branch that was created. However, after running <code>git branch</code>, it seems that the active branch is still the main branch. To change the active branch, we can run the checkout command (as shown below):
<code>git checkout test_branch</code>

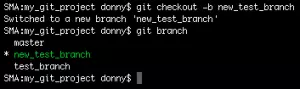
You can also combine the above two commands to create and check out a new branch in one command by adding -b after the checkout command:
<code>git checkout -b new_test_branch</code>
The branch we just created is based on the latest commit of the currently active branch (in this case the primary branch). If you want to create a branch (e.g. cafb55d) based on a commit (e.g. old_commit_branch), you can run the following command:
<code>git checkout -b old_commit_branch cafb55d</code>

To rename the current branch to renamed_branch, run the following command:
<code>git branch -m renamed_branch</code>
Delete branch
To delete a branch, run the following command:
<code>git branch</code>

Note: Do not delete branches unless necessary
Since there are actually no drawbacks to keeping branches, I recommend not deleting them unless the number of branches in the repository becomes too large to manage.
The -D option used above will delete the branch even if the branch is not synchronized with the remote branch. This means that if you have a commit that has not been pushed in your current branch, -D will still delete your branch without any warning. To ensure you do not lose data, you can use -d as an alternative to -D. -d Delete branches only if they have been synchronized with the remote branches. Since our branches are not synchronized yet, let's see what happens if we use -d, as shown below:

As you can see, Git will warn you and abort the operation because the data has not been merged with the branch.
Branches and HEAD
Now that we have the opportunity to try out the basics of branching, let’s take a moment to discuss how branches work in Git and introduce an important concept: HEAD.
As mentioned above, branches are just links between different commits, or through the path of the commit. It should be noted that when using a branch, the branch's HEAD points to the latest commit in the branch. I will mention HEAD several times in the following chapters. In Git, HEAD points to the latest commit in the branch. In other words, it refers to the top of the branch.
The branch is essentially a pointer to a commit that has a parent commit, a grandparent commit, and so on. This commit chain forms the path I mentioned above. So, how to link branches and HEAD? Well, the top of HEAD and the current branch point to the same commit. Let's look at a chart to illustrate this idea:

As shown above, branch_A is initially an active branch, and HEAD points to commit C. Commit A is the base commit, without any parent commits, so the commits in branch_A are arranged in reverse order in time (which also constitutes the path I mentioned above) are C → B → A. The commit in branch_B is E → D → B → A. HEAD points to the latest commit of the active branch branch_A, that is, commit C. When we add a commit, it will be added to the active branch. After committing, branch_A points to F, and the branch follows F → C → B → A, while branch_B remains the same. HEAD now points to commit F. Again, when we add another commit, the changes are demonstrated in the figure.
Advanced Branch: Merge Branch
As mentioned earlier, one of Git's biggest advantages is that it is particularly easy to merge branches. Now let's see how it is done.
We will create two new branches - new_feature and another_feature - and add some virtual commits. Checking the history of each branch shows us that the another_feature branch is leading one commit as follows:

This situation can be shown in the figure below. Each circle represents a commit, and the branch name points to its HEAD (top of the branch).

To merge new_feature with the main branch, run the following command (first make sure the main branch is active):
<code>git branch</code>
The results can be shown in the figure below:

To merge another_feature with new_feature, just run the following command (make sure the new_feature branch is active):
<code>git branch -a</code>
The results can be shown in the figure below:

Important tip: Pay attention to the cycle
The above image shows that this merge creates a loop across two commits in your project history where the workflow diverges and converges respectively. Such loops may not be a problem when working alone or in small teams. However, in a larger team — there may be a lot of commits since you deviated from the main branch — this large loop makes it difficult to navigate history and understand changes. We will explore ways to merge branches using the rebase command without creating loops in Chapter 6.

There is no "conflict" in this merge. The reason is simple, no new commits are added to the another_feature branch compared to the new_feature branch. Conflicts in Git occur when the same part of the same file is modified in non-public commits in both branches. Git throws conflicts to ensure you don't lose any data.
We will discuss conflict in detail in the next chapter. As I mentioned earlier, branches can be visualized with simple commit paths. When we merge branches and there are no conflicts, as above, only the branch path changes and the branch's HEAD is updated. This is called a fast forward type merge.
Another way to merge branches is non-fast forward merge, by adding --no-ff after the merge command. In this way, a new commit is created on the underlying branch with changes from another branch. You also need to specify the submission message:
<code>git branch</code>
In the example above, the former (merge new_feature with the main branch) is a fast forward merge, while the latter is a non-fast forward merge with a merge commit.
While fast forward style merges are default, it is usually best to use a non-fast forward method for merges merged to the main branch. In the long run, identifying new commits that merge new features may be beneficial because it logically separates the code portion responsible for the new features into a single commit.
Conclusion
What have you learned?
In this chapter, we discuss what branches are and how to manage them in Git. We looked at creating, modifying, deleting, and merging branches.
What's next?
I have already talked about how Git is good for developers working with teams. This is explored in more detail in the next chapter, as well as the specific Git operations and commands that are often used in distributed teams.
FAQs about Git branch
- What is the main purpose of the Git branch?
Git branch is a powerful feature that allows developers to create separate development lines. This is especially useful when dealing with new features or fixes, as it allows you to isolate your work from the main project. After the feature or fix is completed and tested, it can be merged back to the main project. This ensures that the main project remains stable and allows multiple developers to handle different functions simultaneously without interfering with each other.
- How to create a new branch in Git?
Creating a new branch in Git is simple. You can use the <code>git branch</code> command followed by the name of the new branch. For example, git branch new_feature will create a new branch called "new_feature". To switch to this branch, you can use the git checkout command as follows: git checkout new_feature.
- How to merge branches in Git?
Merge branches in Git using the git merge command. Before merging, you need to be on the branch you want to merge to. For example, if you want to merge a branch named "new_feature" into a "master" branch, you first need to switch to the main branch using git checkout master and then use the git merge new_feature command.
- What is a Git branch pointer and how does it work?
Git branch pointer is a file containing the commit SHA1 hash it points to. When you create a new branch, Git creates a new pointer and moves it along with each new commit you make. This allows Git to track the history of the project.
- How to delete a branch in Git?
Delete a branch in Git using the git branch -d command followed by the branch's name. For example, git branch -d old_feature will delete a branch named "old_feature". However, if a branch has a commit that has not been merged into another branch, Git will prevent you from deleting the branch. To force deletion, you can use the -D option.
- What is the difference between a fast forward merger and a tripartite merger in Git?
Fast forward merge in Git is possible when there is a linear path from the tip of the current branch to the target branch. Instead of creating a new commit, Git moves the current branch pointer up to the target branch. On the other hand, when there is no linear path, a tripartite merge is used. Git will create a new commit with two parents, effectively connecting the two branches.
- How to view all branches in a Git repository?
You can view all branches in the Git repository using the <code>git branch</code> command without parameters. This will list all local branches. If you also want to view remote branches, you can use the -a option as follows: <code>git branch -a</code>.
- How to rename a branch in Git?
Rename a branch in Git using the git branch -m command followed by the old and new names. For example, git branch -m old_name new_name will rename the branch "old_name" to "new_name".
- What is Separation HEAD in Git and how to avoid it?
Disased HEAD in Git occurs when you check out a commit instead of a branch. This can be dangerous because when you check out to another branch, any changes you make will be lost. To avoid this, be sure to always check out the branch instead of committing.
- How to resolve conflicts when merging branches in Git?
When merging branches in Git, conflicts may occur if the same part of the same file is modified in both branches. Git will mark the file as "Unmerged", you need to resolve the conflict manually. You can do this by opening the file in a text editor, finding the conflict mark (<<<<<<<), and deciding which changes to keep. After all conflicts are resolved, you can add the file using git add and submit it using git commit.
The above is the detailed content of Jump Start Git: Branching in Git. For more information, please follow other related articles on the PHP Chinese website!

Hot Article

Hot tools Tags

Hot Article

Hot Article Tags

Notepad++7.3.1
Easy-to-use and free code editor

SublimeText3 Chinese version
Chinese version, very easy to use

Zend Studio 13.0.1
Powerful PHP integrated development environment

Dreamweaver CS6
Visual web development tools

SublimeText3 Mac version
God-level code editing software (SublimeText3)
Hot Topics


 Behind the first Android access to DeepSeek: Seeing the power of women
Mar 12, 2025 pm 12:27 PM
Behind the first Android access to DeepSeek: Seeing the power of women
Mar 12, 2025 pm 12:27 PM
Behind the first Android access to DeepSeek: Seeing the power of women
 DeepSeek's 'amazing' profit: the theoretical profit margin is as high as 545%!
Mar 12, 2025 pm 12:21 PM
DeepSeek's 'amazing' profit: the theoretical profit margin is as high as 545%!
Mar 12, 2025 pm 12:21 PM
DeepSeek's 'amazing' profit: the theoretical profit margin is as high as 545%!
 Another national product from Baidu is connected to DeepSeek. Is it open or follow the trend?
Mar 12, 2025 pm 01:48 PM
Another national product from Baidu is connected to DeepSeek. Is it open or follow the trend?
Mar 12, 2025 pm 01:48 PM
Another national product from Baidu is connected to DeepSeek. Is it open or follow the trend?
 Midea launches its first DeepSeek air conditioner: AI voice interaction can achieve 400,000 commands!
Mar 12, 2025 pm 12:18 PM
Midea launches its first DeepSeek air conditioner: AI voice interaction can achieve 400,000 commands!
Mar 12, 2025 pm 12:18 PM
Midea launches its first DeepSeek air conditioner: AI voice interaction can achieve 400,000 commands!
 Top 10 Best Free Backlink Checker Tools in 2025
Mar 21, 2025 am 08:28 AM
Top 10 Best Free Backlink Checker Tools in 2025
Mar 21, 2025 am 08:28 AM
Top 10 Best Free Backlink Checker Tools in 2025
 Prompt Engineering for Web Development
Mar 09, 2025 am 08:27 AM
Prompt Engineering for Web Development
Mar 09, 2025 am 08:27 AM
Prompt Engineering for Web Development
