

Build a Tabbed WordPress Login and Registration Widget


Key Takeaways
- The article provides a detailed guide on how to build a custom tabbed WordPress login and registration widget, which can better reflect the design and branding of a client or web developer compared to the default WordPress pages.
- The widget is built using the QuickFlip jQuery library to create a flipping effect between the login and registration tabs. The registration form includes a username, password, and email field, while the login form does not have a CAPTCHA.
- The author walks through the process of creating the widget, including turning on output buffering, extending the standard WP_Widget class, creating a child-class, and registering the widget. The article also explains how to create HTML code for the login and registration forms, handle new user registration, sign in users, and create the back-end widget settings form.
- The article also answers several frequently asked questions about building a tabbed WordPress login and registration widget, including how to customize the widget, add it without coding, resolve issues with accessing the WordPress admin, add a login form to the WordPress sidebar, change the default WordPress login URL, ensure the widget’s security, add a registration form to the sidebar, resolve issues with the widget not working properly, and add social login options.
In the last few years, there has been an increasing demand for a customised registration widget for WordPress. There exists a healthy disrespect for the WordPress default login and registration pages, solely because they are not intuitive as they may not reflect the design and branding of a client or a web developer.
To solve this problem, a couple of developers have released several kinds of login and registration pages, but the good ones come with a price and they don’t come cheap.
However, if you have been on the fence or overall disappointed with what’s available for free on the WordPress plugin repository, you can have your spirit lifted because you can learn how to create a tabbed WordPress login and registration widget for free! You only need to sacrifice a short period of your time to get a grasp of the entire process. Once you acquire the knowledge which is pretty simple; you should have a feature rich registration page on your WordPress powered sites.
In this article, we will build a simple tabbed login and registration form widget with a flipping effect made possible by the QuickFlip jQuery library.
If you want to jump ahead of the tutorial, you can view a demo of the login and registration widget and download the widget plugin.
To keep things simple, the registration form will consist of a username, password and email field. The login form will contain no CAPTCHA.
Without further fussing, let’s get started with the widget development.
Widget Development
First off, include the plugin header.
<span><span><?php
</span></span><span><span>/*
</span></span><span><span>Plugin Name: Tabbed Login Registration Widget
</span></span><span><span>Plugin URI: https://www.sitepoint.com
</span></span><span><span>Description: A tabbed login and registration widget for WordPress
</span></span><span><span>Version: 1.0
</span></span><span><span>Author: Agbonghama Collins
</span></span><span><span>Author URI: http://w3guy.com
</span></span><span><span>License: GPL2
</span></span><span><span>*/</span></span>
Before we enter into the widget development properly, we need to turn on output buffering to prevent any Warning: Cannot modify header information – headers already sent error.
<span>// Turn on output buffering
</span><span>ob_start();</span>
To create a WordPress widget, extend the standard WP_Widget class, include the necessary methods and finally, register the widget.
Create a child-class extending the WP_Widget class.
<span>class Tab_Login_Registration extends WP_Widget {</span>The static property $login_registration_status will save the registration and login form generated error messages.
<span>static private $login_registration_status;</span>
Give the widget a name and description using the __construct() magic method.
<span>/**
</span><span>	 * Register widget with WordPress.
</span><span>	 */
</span>	<span>function __construct() {
</span>		<span><span>parent::</span>__construct(
</span>			<span>'tab_login_registration', // Base ID
</span>			<span>__( 'Tabbed Login Registration Widget', 'text_domain' ), // Name
</span>			<span>array( 'description' => __( 'A tabbed login and registration widget for WordPress', 'text_domain' ), ) // Args
</span>		<span>);
</span> <span>}</span>Two methods – login_form() and registration_form() – that returns the HTML code for the login and registration form will be created for reuse later.
<span>/**
</span><span>	 * Returns the HTML for the login form
</span><span>	 * <span>@return <span>string</span>
</span></span><span>	 */
</span>	<span>static function login_form() {
</span>		<span>$html = '<form method="post" action="' . esc_url( $_SERVER['REQUEST_URI'] ) . '">';
</span>		<span>$html .= '<input type="text" name="login_username" placeholder="Username" /><br/>';
</span>		<span>$html .= '<input type="password" name="login_password" placeholder="Password" /><br/>';
</span>		<span>$html .= '<input type="checkbox" name="remember_login" value="true" checked="checked"/> Remember Me<br/>';
</span>		<span>$html .= '<input type="submit" name="login_submit" value="Login" /><br/>';
</span>		<span>$html .= '</form>';
</span>
		<span>return $html;
</span>
<span>}</span><span>/**
</span><span> * Returns the HTML code for the registration form
</span><span> * <span>@return <span>string</span>
</span></span><span> */
</span> <span>static function registration_form() {
</span> <span>$html = '<form method="post" action="' . esc_url( $_SERVER['REQUEST_URI'] ) . '">';
</span> <span>$html .= '<input type="text" name="registration_username" placeholder="Username" /><br/>';
</span> <span>$html .= '<input type="password" name="registration_password" placeholder="Password" /><br/>';
</span> <span>$html .= '<input type="email" name="registration_email" placeholder="Email" /><br/>';
</span> <span>$html .= '<input type="submit" name="reg_submit" value="Sign Up" /><br/>';
</span> <span>$html .= '</form>';
</span>
<span>return $html;
</span> <span>}</span>The register_user() below handles the registration of a new user.
<span>/**
</span><span>	 * Register new users
</span><span>	 */
</span>	<span>function register_user() {
</span>
		<span>if ( isset( $_POST['reg_submit'] ) ) {
</span>
			<span>$username = esc_attr( $_POST['registration_username'] );
</span>			<span>$password = esc_attr( $_POST['registration_password'] );
</span>			<span>$email    = esc_attr( $_POST['registration_email'] );
</span>
			<span>$register_user = wp_create_user( $username, $password, $email );
</span>
			<span>if ( $register_user && ! is_wp_error( $register_user ) ) {
</span>
				<span><span>self::</span>$login_registration_status = 'Registration completed.';
</span>			<span>} elseif ( is_wp_error( $register_user ) ) {
</span>				<span><span>self::</span>$login_registration_status = $register_user->get_error_message();
</span>			<span>}
</span>
		<span>}
</span> <span>}</span>Here’s how the method registers a new user.
First, we make sure the user is actually registering an account. This is done by detecting that the ‘Sign Up’ button was clicked i.e. $_POST['reg_submit'] has been set.
The form data are then escaped for HTML attributes using the esc_attr function.
The username, password and email entered by the user are then passed to wp_create_user() function to insert the new user into the WordPress database.
If all goes well, the property $login_registration_status will be set to the text Registration completed otherwise the error returned by wp_create_user() will be it value.
When the login form is submitted, the login_user() function below sign in the user.
<span>/**
</span><span>	 * Login registered users
</span><span>	 */
</span>	<span>function login_user() {
</span>		<span>if ( isset( $_POST['login_submit'] ) ) {
</span>
			<span>$creds                  = array();
</span>			<span>$creds['user_login']    = esc_attr( $_POST['login_username'] );
</span>			<span>$creds['user_password'] = esc_attr( $_POST['login_password'] );
</span>			<span>$creds['remember']      = esc_attr( $_POST['remember_login'] );
</span>
			<span>$login_user = wp_signon( $creds, false );
</span>
			<span>if ( ! is_wp_error( $login_user ) ) {
</span>				<span>wp_redirect( home_url( 'wp-admin' ) );
</span>			<span>} elseif ( is_wp_error( $login_user ) ) {
</span>				<span><span>self::</span>$login_registration_status = $login_user->get_error_message();
</span>			<span>}
</span>		<span>}
</span> <span>}</span>Allow me to explain how login_user() sign in users to WordPress.
Similar to the aforementioned register_user(), first we ensure the user is trying to log in by checking if $_POST['login_submit'] has been set.
An associated array $creds of the login credentials entered by the user is created.
The associative array is then passed to wp_signon for authentication.
If the credential is deemed valid and by wp_signon, the user will be redirected to the WordPress dashboard by wp_redirect otherwise property $login_registration_status is set to the login generated error.
The back-end widget settings form is created by the form() method that will consist of a field that will contain the title of the widget.
public function form( $instance ) {
		if ( isset( $instance['title'] ) ) {
			$title = $instance['title'];
		} else {
			$title = __( 'Login / Registration', 'text_domain' );
		}
		?>
		<span><span><span><p</span>></span>
</span>			<span><span><span><label</span> for<span>="<span><?php echo $this->get_field_id( 'title' ); ?></span>"</span>></span><span><?php _e( 'Title:' ); ?></span><span><span></label</span>></span>
</span>			<span><span><span><input</span> class<span>="widefat"</span> id<span>="<span><?php echo $this->get_field_id( 'title' ); ?></span>"</span>
</span></span><span>			       <span>name<span>="<span><?php echo $this->get_field_name( 'title' ); ?></span>"</span> type<span>="text"</span>
</span></span><span>			       <span>value<span>="<span><?php echo esc_attr( $title ); ?></span>"</span>></span>
</span>		<span><span><span></p</span>></span>
</span>	<span><span><?php
</span></span><span>	<span>}</span></span>
When the widget title is entered into the form field, the update() method sanitizes and saves the data to the database for reuse.
<span>public function update( $new_instance, $old_instance ) {
</span>		<span>$instance          = array();
</span>		<span>$instance['title'] = ( ! empty( $new_instance['title'] ) ) ? strip_tags( $new_instance['title'] ) : '';
</span>
		<span>return $instance;
</span> <span>}</span>The widget() method displays the tabbed login and registration form at the front-end of WordPress.
<span><span><?php
</span></span><span><span>/*
</span></span><span><span>Plugin Name: Tabbed Login Registration Widget
</span></span><span><span>Plugin URI: https://www.sitepoint.com
</span></span><span><span>Description: A tabbed login and registration widget for WordPress
</span></span><span><span>Version: 1.0
</span></span><span><span>Author: Agbonghama Collins
</span></span><span><span>Author URI: http://w3guy.com
</span></span><span><span>License: GPL2
</span></span><span><span>*/</span></span>
Code explanation: The JavaScript code add the tabbing and flipping effect to the widget.
The login_user() and register_user() are included to respectively sign in a registered user or register a new user.
The login_form() and registration_form() static methods are called to display the login and registration form.
Finally, we close the widget class.
<span>// Turn on output buffering
</span><span>ob_start();</span>
The widget class Tab_Login_Registration needs to be registered using the widgets_init hook so it is recognized by WordPress internals.
<span>class Tab_Login_Registration extends WP_Widget {</span>We still need to include jQuery, the widget CSS and QuickFlip library to get the tab and flipping effect in the widget working.
The jQuery, and Quickflip javascript as well as the CSS are included/enqueue to the header of WordPress by wp_enqueue_style and wp_enqueue_script.
<span>static private $login_registration_status;</span>
We are done coding the login and registration widget.
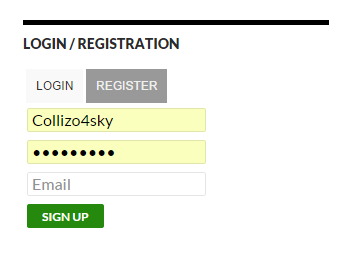
Below is a screenshot of the widget.
View a demo of the widget.
Wrap Up
To further understand how the widget was built and how to implement it on your WordPress site, download the widget plugin, which includes the jQuery, Quickflip, and the widget stylesheet files.
If you have any questions or suggestions for code improvement, let me know in the comments.
Frequently Asked Questions about Building a Tabbed WordPress Login and Registration Widget
How can I customize the look of my WordPress login and registration widget?
Customizing the look of your WordPress login and registration widget can be done through CSS. You can add your own CSS in the WordPress Customizer or in your theme’s style.css file. You can change the colors, fonts, sizes, and more to match your website’s design. Remember to always backup your site before making any changes to the code.
Can I add a login and registration widget to my WordPress site without coding?
Yes, you can add a login and registration widget to your WordPress site without coding. There are several plugins available that allow you to do this. Some popular options include Login Sidebar Widget and User Registration & User Profile. These plugins offer easy-to-use interfaces and customization options.
What should I do if I can’t access my WordPress admin after adding a login and registration widget?
If you can’t access your WordPress admin after adding a login and registration widget, you may need to disable the plugin causing the issue. You can do this by accessing your site’s files via FTP and renaming the plugin’s folder. Once you’ve done this, try logging in again. If you’re still having trouble, you may need to contact your hosting provider or seek help from a WordPress expert.
How can I add a login form to my WordPress sidebar?
Adding a login form to your WordPress sidebar can be done using a widget. Go to Appearance > Widgets in your WordPress dashboard, and drag the Meta widget to your sidebar. The Meta widget includes a login link that will display a login form when clicked.
Can I change my default WordPress login URL?
Yes, you can change your default WordPress login URL for security reasons. This can be done using a plugin like WPS Hide Login or manually by editing your site’s .htaccess file. Remember to note down your new login URL and keep it safe.
Are there any other plugins I can use to add a login widget to my WordPress site?
Yes, there are many plugins available that allow you to add a login widget to your WordPress site. Some popular options include Custom Login Page Customizer, Login Designer, and Theme My Login. These plugins offer a variety of features and customization options.
How can I ensure the security of my WordPress login and registration widget?
To ensure the security of your WordPress login and registration widget, make sure to use a strong, unique password and keep your WordPress site and plugins up-to-date. You can also use security plugins like Wordfence or Sucuri to add an extra layer of protection.
Can I add a registration form to my WordPress sidebar?
Yes, you can add a registration form to your WordPress sidebar using a widget. There are several plugins available that allow you to do this, such as User Registration & User Profile. These plugins offer easy-to-use interfaces and customization options.
What should I do if my login and registration widget is not working properly?
If your login and registration widget is not working properly, try deactivating and reactivating the plugin. If this doesn’t solve the issue, it may be a conflict with another plugin or your theme. Try deactivating other plugins one by one to see if the issue is resolved. If not, you may need to contact the plugin’s support or seek help from a WordPress expert.
Can I add social login options to my WordPress login and registration widget?
Yes, you can add social login options to your WordPress login and registration widget. There are several plugins available that allow you to do this, such as Nextend Social Login and WP Social Login. These plugins allow users to register and login using their social media accounts, making the process quicker and easier.
The above is the detailed content of Build a Tabbed WordPress Login and Registration Widget. For more information, please follow other related articles on the PHP Chinese website!

Hot AI Tools

Undresser.AI Undress
AI-powered app for creating realistic nude photos

AI Clothes Remover
Online AI tool for removing clothes from photos.

Undress AI Tool
Undress images for free

Clothoff.io
AI clothes remover

Video Face Swap
Swap faces in any video effortlessly with our completely free AI face swap tool!

Hot Article
Hot Tools

Notepad++7.3.1
Easy-to-use and free code editor

SublimeText3 Chinese version
Chinese version, very easy to use

Zend Studio 13.0.1
Powerful PHP integrated development environment

Dreamweaver CS6
Visual web development tools

SublimeText3 Mac version
God-level code editing software (SublimeText3)
Hot Topics
 1664
1664
 14
1422
52
1316
25
1268
29
1241
24
14
1422
52
1316
25
1268
29
1241
24

 How to adjust the wordpress article list
Apr 20, 2025 am 10:48 AM
How to adjust the wordpress article list
Apr 20, 2025 am 10:48 AM
There are four ways to adjust the WordPress article list: use theme options, use plugins (such as Post Types Order, WP Post List, Boxy Stuff), use code (add settings in the functions.php file), or modify the WordPress database directly.
 How To Begin A WordPress Blog: A Step-By-Step Guide For Beginners
Apr 17, 2025 am 08:25 AM
How To Begin A WordPress Blog: A Step-By-Step Guide For Beginners
Apr 17, 2025 am 08:25 AM
Blogs are the ideal platform for people to express their opinions, opinions and opinions online. Many newbies are eager to build their own website but are hesitant to worry about technical barriers or cost issues. However, as the platform continues to evolve to meet the capabilities and needs of beginners, it is now starting to become easier than ever. This article will guide you step by step how to build a WordPress blog, from theme selection to using plugins to improve security and performance, helping you create your own website easily. Choose a blog topic and direction Before purchasing a domain name or registering a host, it is best to identify the topics you plan to cover. Personal websites can revolve around travel, cooking, product reviews, music or any hobby that sparks your interests. Focusing on areas you are truly interested in can encourage continuous writing
 How to get logged in user information in WordPress for personalized results
Apr 19, 2025 pm 11:57 PM
How to get logged in user information in WordPress for personalized results
Apr 19, 2025 pm 11:57 PM
Recently, we showed you how to create a personalized experience for users by allowing users to save their favorite posts in a personalized library. You can take personalized results to another level by using their names in some places (i.e., welcome screens). Fortunately, WordPress makes it very easy to get information about logged in users. In this article, we will show you how to retrieve information related to the currently logged in user. We will use the get_currentuserinfo(); function. This can be used anywhere in the theme (header, footer, sidebar, page template, etc.). In order for it to work, the user must be logged in. So we need to use
 How to display child categories on archive page of parent categories
Apr 19, 2025 pm 11:54 PM
How to display child categories on archive page of parent categories
Apr 19, 2025 pm 11:54 PM
Do you want to know how to display child categories on the parent category archive page? When you customize a classification archive page, you may need to do this to make it more useful to your visitors. In this article, we will show you how to easily display child categories on the parent category archive page. Why do subcategories appear on parent category archive page? By displaying all child categories on the parent category archive page, you can make them less generic and more useful to visitors. For example, if you run a WordPress blog about books and have a taxonomy called "Theme", you can add sub-taxonomy such as "novel", "non-fiction" so that your readers can
 How to sort posts by post expiration date in WordPress
Apr 19, 2025 pm 11:48 PM
How to sort posts by post expiration date in WordPress
Apr 19, 2025 pm 11:48 PM
In the past, we have shared how to use the PostExpirator plugin to expire posts in WordPress. Well, when creating the activity list website, we found this plugin to be very useful. We can easily delete expired activity lists. Secondly, thanks to this plugin, it is also very easy to sort posts by post expiration date. In this article, we will show you how to sort posts by post expiration date in WordPress. Updated code to reflect changes in the plugin to change the custom field name. Thanks Tajim for letting us know in the comments. In our specific project, we use events as custom post types. Now
 How to build a website for wordpress host
Apr 20, 2025 am 11:12 AM
How to build a website for wordpress host
Apr 20, 2025 am 11:12 AM
To build a website using WordPress hosting, you need to: select a reliable hosting provider. Buy a domain name. Set up a WordPress hosting account. Select a topic. Add pages and articles. Install the plug-in. Customize your website. Publish your website.
 How to Automate WordPress and Social Media with IFTTT (and more)
Apr 18, 2025 am 11:27 AM
How to Automate WordPress and Social Media with IFTTT (and more)
Apr 18, 2025 am 11:27 AM
Are you looking for ways to automate your WordPress website and social media accounts? With automation, you will be able to automatically share your WordPress blog posts or updates on Facebook, Twitter, LinkedIn, Instagram and more. In this article, we will show you how to easily automate WordPress and social media using IFTTT, Zapier, and Uncanny Automator. Why Automate WordPress and Social Media? Automate your WordPre
 How to display query count and page loading time in WordPress
Apr 19, 2025 pm 11:51 PM
How to display query count and page loading time in WordPress
Apr 19, 2025 pm 11:51 PM
One of our users asked other websites how to display the number of queries and page loading time in the footer. You often see this in the footer of your website, and it may display something like: "64 queries in 1.248 seconds". In this article, we will show you how to display the number of queries and page loading time in WordPress. Just paste the following code anywhere you like in the theme file (e.g. footer.php). queriesin
