

How to Create a Laravel CSS-Minify Command

In this article you’ll learn how to use Laravel’s Artisan command line tool, and how to create a customized command. Note that you need to be familiar with the Laravel framework to get the most of this article.
Key Takeaways
- Leverage Laravel Artisan: Utilize Laravel’s Artisan command-line tool to create custom commands for CSS minification, enhancing workflow efficiency in web development projects.
- Custom Command Creation: Easily create a custom command using `php artisan command:make` with options for naming, storing, and namespacing, allowing for tailored functionality in your Laravel application.
- Minification Options: Implement options in your command to handle CSS file concatenation and comment preservation, providing flexibility based on different development needs.
- Command Registration: Ensure to register your new command within Laravel’s Artisan system to make it executable, either through the `artisan.php` file or a service provider for package development.
- Execution and Output: Use the command to minify CSS files, with optional flags for concatenation and comment preservation, and improve command feedback with informative messages during the execution process.
What are we building
In this tutorial we’re going to build a command to minify our css assets, which will be used like this:
<span>cssmin 'output_path' 'file1'...'fileN' --comments --concat</span>
- output_path: (required) path to save the minified files, (style.css -> style.min.css).
- file1 ... fileN: (required) list of files to minify.
- --comments: (optional) add this option to keep comments.
- --concat: (optional) concatenate the minified files into one file called all.min.css.
What is a Laravel Command
Artisan is the name of the command line utility in Laravel. It comes with a set of predefined commands, which you can list with php artisan list. If you want to show the help for a specific command, you can use php artisan help command.
Creating the Css Minifier Command
To create an artisan command, you can use the command:make command. This command accepts one argument:
- name: the class name for the command.
and three options:
- --command: the name that should be typed to run the command.
- --path: by default the commands are stored within the app/commands folder, however, you can change that with this option.
- --namespace: you can use this option to namespace your set of commands, e.g. in the command command:make, the make command is under the command namespace.
Now, to create our command we will use php artisan command:make CssMinCommand --command=cssminwhich will create a CssMinCommand.php file within our app/commands directory.
<span>cssmin 'output_path' 'file1'...'fileN' --comments --concat</span>
Our CssMinCommand class extends the IlluminateConsoleCommand and overrides two methods ( getArguments, getOptions ).
- getArguments: this function returns an array of arguments that should be passed to the command, (ex: the list of files that we pass to the cssmin command).
- getOptions: returns a list of options or switches that you may pass to the command. (e.g. --comments).
Note: options may or may not have values, --comments is only a flag that returns true if it’s passed to the command, whereas --ouptput='public/assets' will return a value.
When your command is executed, the fire method is called, so this is where we need to put our command logic.
Registering the Command
if you try to run our command php artisan cssmin 'args' you’ll get a Command "cssmin" is not defined.
To register a command you need to add it to the artisan.php file:
<span>use Illuminate<span>\Console\Command</span>;
</span><span>use Symfony<span>\Component\Console\Input\InputOption</span>;
</span><span>use Symfony<span>\Component\Console\Input\InputArgument</span>;
</span>
<span>class CssminCommand extends Command{
</span>    <span>protected $name = 'cssmin';
</span>    <span>protected $description = 'Command description.';
</span>
    <span>public function __construct(){
</span>		<span><span>parent::</span>__construct();
</span>	<span>}
</span>
    <span>public function fire(){
</span>		<span>//
</span>	<span>}
</span>
	<span>protected function getArguments(){
</span>		<span>return array(
</span>			<span>array('example', InputArgument<span>::</span>REQUIRED, 'An example argument.'),
</span>		<span>);
</span>	<span>}
</span>
	<span>protected function getOptions(){
</span>		<span>return array(
</span>			<span>array('example', null, InputOption<span>::</span>VALUE_OPTIONAL, 'An example option.', null),
</span>		<span>);
</span>	<span>}
</span><span>}</span>If you don’t want to put your commands in the artisan.php file, you can create a separate file and include it, or if you’re creating a package you can register them in your Service Provider.
Arguments
In our getArguments method we will define our output and files.
To define an argument, we need to pass an array of values:
<span>Artisan<span>::</span>add( new CssMinCommand );
</span>
<span>//or through the container
</span><span>Artisan<span>::</span>add( App<span>::</span>make("CssMinCommand") );</span>- name: key name to be used when retrieving arguments.
-
mode: can have one of the three options:
- InputArgument::REQUIRED: argument is required.
- InputArgument::OPTIONAL: argument is optional.
- InputArgument::IS_ARRAY: argument accepts multiple values ( ex: file1...fileN).
However, you can combine them like InputArgument::IS_ARRAY | InputArgument::REQUIRED (argument is required and must be an array).
- description: useful when printing the command help.
- defaultValue: if argument was not provided.
So our getArguments method will be:
<span>array( 'name', 'mode', 'description', 'defaultValue' )</span>
Note: when using the IS_ARRAY argument it should be the last one on the returned arguments array. (obviously).
Options
Our cssmin command will only have two options. To define an option we pass an array:
<span>protected function getArguments(){
</span>        <span>return array(
</span>            <span>array(
</span>                <span>'output',
</span>                <span>InputArgument<span>::</span>REQUIRED,
</span>                <span>'Path to output directory'
</span>            <span>),
</span>            <span>array(
</span>                <span>'files',
</span>                <span>InputArgument<span>::</span>IS_ARRAY | InputArgument<span>::</span>OPTIONAL ,
</span>                <span>"List of css files to minify"
</span>            <span>),
</span>        <span>);
</span> <span>}</span>- name: the name of your option (ex: comments).
- shortcut: a shorter version of your option (ex: --verbose and -v).
-
mode: can be one of the four options (InputOption::VALUE_IS_ARRAY, InputOption::VALUE_OPTIONAL, InputOption::VALUE_REQUIRED, InputOption::VALUE_NONE), the first three values are similar to the arguments.
- VALUE_NONE: indicates that the option is a boolean flag ( ex: --verbose ).
description: useful when printing the command help.
- defaultValue: if option value was not provided.
So our getOptions method will be:
<span>cssmin 'output_path' 'file1'...'fileN' --comments --concat</span>
Running the Command
When our fire method is called we need to gather our arguments and options. We can make a separate function to do that for us:
<span>use Illuminate<span>\Console\Command</span>;
</span><span>use Symfony<span>\Component\Console\Input\InputOption</span>;
</span><span>use Symfony<span>\Component\Console\Input\InputArgument</span>;
</span>
<span>class CssminCommand extends Command{
</span>    <span>protected $name = 'cssmin';
</span>    <span>protected $description = 'Command description.';
</span>
    <span>public function __construct(){
</span>		<span><span>parent::</span>__construct();
</span>	<span>}
</span>
    <span>public function fire(){
</span>		<span>//
</span>	<span>}
</span>
	<span>protected function getArguments(){
</span>		<span>return array(
</span>			<span>array('example', InputArgument<span>::</span>REQUIRED, 'An example argument.'),
</span>		<span>);
</span>	<span>}
</span>
	<span>protected function getOptions(){
</span>		<span>return array(
</span>			<span>array('example', null, InputOption<span>::</span>VALUE_OPTIONAL, 'An example option.', null),
</span>		<span>);
</span>	<span>}
</span><span>}</span>The argument and option methods take a key as an argument and return the appropriate value.
To keep our example clean and simple we will use this simple function with a small modification for the minification process.
<span>Artisan<span>::</span>add( new CssMinCommand );
</span>
<span>//or through the container
</span><span>Artisan<span>::</span>add( App<span>::</span>make("CssMinCommand") );</span>Now to process our arguments (files) we’re going to make a separate method to do the job.
<span>array( 'name', 'mode', 'description', 'defaultValue' )</span>
Finally, our fire method will only call the two methods:
<span>protected function getArguments(){
</span>        <span>return array(
</span>            <span>array(
</span>                <span>'output',
</span>                <span>InputArgument<span>::</span>REQUIRED,
</span>                <span>'Path to output directory'
</span>            <span>),
</span>            <span>array(
</span>                <span>'files',
</span>                <span>InputArgument<span>::</span>IS_ARRAY | InputArgument<span>::</span>OPTIONAL ,
</span>                <span>"List of css files to minify"
</span>            <span>),
</span>        <span>);
</span> <span>}</span>Tip: You can also run an external command using the call method.
<span>array('name', 'shortcut', 'mode', 'description', 'defaultValue')</span>To test our command, we’re going to copy some css files into our public/css directory, and then run the command.
<span>protected function getOptions(){
</span>        <span>return array(
</span>            <span>array('comments', 'c', InputOption<span>::</span>VALUE_NONE, 'Don\'t strip comments' , null),
</span>            <span>array('concat', null, InputOption<span>::</span>VALUE_NONE, 'Concat the minified result to one file' , null),
</span>        <span>);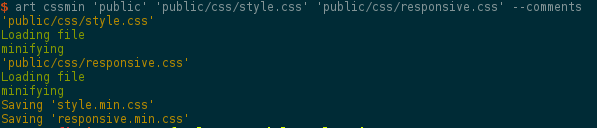
</span> <span>}</span>The first command will create two files (style.min.css, responsive.min.css) on the public/css directory.
Because we used the --comments and --concat flags, we’re going to get a file called all.min.css containing the two files with comments left.
Our command is not very descriptive and doesn’t give any messages or notifications!
Improving the Command
Before we continue, on the final GitHub repository I will create a new tag for our command so you can switch and test each one.
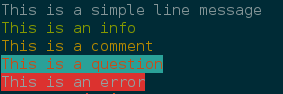
To make the command a little verbose, Laravel provides us with some output functions:
<span>private function init(){
</span>    <span>// retrun an array
</span>    <span>$this->files = $this->argument('files');
</span>    <span>// return a string
</span>    <span>$this->output_path = $this->argument('output');
</span>    <span>// return true if passed, otherwise false
</span>    <span>$this->comments = $this->option('comments');
</span>    <span>// return true if passed, otherwise false
</span>    <span>$this->concat = $this->option('concat');
</span><span>}</span>This will output:
Beside just displaying messages, you can ask the user for information, ex:
<span>private function minify( $css, $comments ){
</span>        <span>// Normalize whitespace
</span>        <span>$css = preg_replace( '/\s+/', ' ', $css );
</span>
        <span>// Remove comment blocks, everything between /* and */, unless preserved with /*! ... */
</span>        <span>if( !$comments ){
</span>            <span>$css = preg_replace( '/\/\*[^\!](.*?)\*\//', '', $css );
</span>        <span>}//if
</span>
        <span>// Remove ; before }
</span>        <span>$css = preg_replace( '/;(?=\s*})/', '', $css );
</span>
        <span>// Remove space after , : ; { } */ >
</span>        <span>$css = preg_replace( '/(,|:|;|\{|}|\*\/|>) /', '', $css );
</span>
        <span>// Remove space before , ; { } ( ) >
</span>        <span>$css = preg_replace( '/ (,|;|\{|}|\(|\)|>)/', '', $css );
</span>
        <span>// Strips leading 0 on decimal values (converts 0.5px into .5px)
</span>        <span>$css = preg_replace( '/(:| )0\.([0-9]+)(%|em|ex|px|in|cm|mm|pt|pc)/i', '.', $css );
</span>
        <span>// Strips units if value is 0 (converts 0px to 0)
</span>        <span>$css = preg_replace( '/(:| )(\.?)0(%|em|ex|px|in|cm|mm|pt|pc)/i', '0', $css );
</span>
        <span>// Converts all zeros value into short-hand
</span>        <span>$css = preg_replace( '/0 0 0 0/', '0', $css );
</span>
        <span>// Shortern 6-character hex color codes to 3-character where possible
</span>        <span>$css = preg_replace( '/#([a-f0-9])\1([a-f0-9])\2([a-f0-9])\3/i', '#', $css );
</span>
        <span>return trim( $css );
</span> <span>}//minify</span>The confirm method takes two arguments, a question message and a default value if the user type something different than y/n.
The ask method will ask the user for an input instead of just y/n, and if it’s left empty, the default value is returned.
The choice method will give the user a numbered list to choose from, and if it’s left empty, the default value is returned.
The secret method will prompt the user with a question and hide the typing, but the user input will be returned.
In fact, Laravel is just making Symfony’s Console API simpler and more verbose, and there is so much more if you want dig in.
Let’s make our command more verbose and keep the user updated about the performed tasks.
<span>private function processFiles(){
</span>        <span>// array of minified css
</span>        <span>$css_result = [];
</span>
        <span>foreach ( $this->files as $file ) {
</span>            <span>//read file content
</span>            <span>$file_content = file_get_contents( $file );
</span>            <span>//minify CSS and add it to the result array
</span>            <span>$css_result[] = $this->minify( $file_content, $this->comments );
</span>        <span>}//foreach
</span>
        <span>// if the concat flag is true
</span>        <span>if( $this->concat ){
</span>            <span>// join the array of minified css
</span>            <span>$css_concat = implode( PHP_EOL, $css_result );
</span>            <span>// save to file
</span>            <span>file_put_contents($this->output_path . '/all.min.css', $css_concat);
</span>        <span>}//if
</span>        <span>else{
</span>            <span>foreach ($css_result as $key => $css) {
</span>                <span>//remove '.css' to add '.min.css'
</span>                <span>$filename = basename( $this->files[$key], '.css' ) . '.min.css';
</span>                <span>// save to file
</span>                <span>file_put_contents($this->output_path . '/' . $filename, $css);
</span>            <span>}//for
</span>        <span>}//else
</span>
<span>}//processFiles</span>Our function now prints some useful messages to keep track of what’s going on.
Note: This will be tagged as v2 of our command on the GitHub repository.
When creating an application, we are used to dumping the list of available routes (php artisan routes).

Symfony provides a function that lets you print a such table easily. Check the documentation for an example. We’ll see next how we can use some Symfony Console Helpers.
Using the Symfony Console Helpers
To illustrate the use of some Symfony Helpers we will use the Progress Helper to keep the user updated about the job progress.
At the end of our init method we will require a progress from the HelperSet, then start our progress bar.
<span>cssmin 'output_path' 'file1'...'fileN' --comments --concat</span>
The start method accepts two arguments, $this->output is a ConsoleOuput instance from the Symfony Console. The second argument is the maximum number of steps.
Every time we process a file in our processFiles method we will advance the progress bar by one step, and when the job is done we will end the progress bar and print a notification message.
<span>use Illuminate<span>\Console\Command</span>;
</span><span>use Symfony<span>\Component\Console\Input\InputOption</span>;
</span><span>use Symfony<span>\Component\Console\Input\InputArgument</span>;
</span>
<span>class CssminCommand extends Command{
</span>    <span>protected $name = 'cssmin';
</span>    <span>protected $description = 'Command description.';
</span>
    <span>public function __construct(){
</span>		<span><span>parent::</span>__construct();
</span>	<span>}
</span>
    <span>public function fire(){
</span>		<span>//
</span>	<span>}
</span>
	<span>protected function getArguments(){
</span>		<span>return array(
</span>			<span>array('example', InputArgument<span>::</span>REQUIRED, 'An example argument.'),
</span>		<span>);
</span>	<span>}
</span>
	<span>protected function getOptions(){
</span>		<span>return array(
</span>			<span>array('example', null, InputOption<span>::</span>VALUE_OPTIONAL, 'An example option.', null),
</span>		<span>);
</span>	<span>}
</span><span>}</span>You can try the command with multiple files or uncomment the sleep function line to see a live effect.

Note: This version will be tagged as v3 on the final repository.
Conclusion
In this article we’ve learned how create and extend Laravel commands. Laravel has a lot of built-in commands that you can explore, and you can also check our final repository on GitHub to test the final result. Questions? Comments? Would you like to see more Artisan Command tutorials? Let us know!
Frequently Asked Questions (FAQs) on Laravel CSS Minify Command
What is the purpose of minifying CSS in Laravel?
Minifying CSS in Laravel is a crucial step in optimizing your website or application. It involves the process of removing unnecessary characters such as spaces, comments, and line breaks from the CSS files. This process reduces the size of the CSS files, which in turn reduces the amount of data that needs to be transferred to the client. This can significantly improve the load time of your website or application, providing a better user experience.
How does Laravel Mix help in CSS minification?
Laravel Mix is a powerful tool that provides a fluent API for defining Webpack build steps for your Laravel application. It supports several common CSS and JavaScript pre-processors, including minification. By using Laravel Mix, you can easily minify your CSS files with a single command, without having to manually remove unnecessary characters. This not only saves time but also ensures that your CSS files are as optimized as possible.
Can I minify CSS files without using Laravel Mix?
Yes, you can minify CSS files without using Laravel Mix. There are several online tools and npm packages available that can help you minify your CSS files. However, using Laravel Mix is recommended as it integrates seamlessly with Laravel and provides a simple and convenient way to manage and optimize your CSS files.
What are the potential issues I might face while minifying CSS in Laravel?
While minifying CSS in Laravel is generally a straightforward process, you might encounter issues if your CSS files contain syntax errors. These errors can cause the minification process to fail, resulting in unoptimized CSS files. Therefore, it’s important to ensure that your CSS files are error-free before attempting to minify them.
How can I debug issues during CSS minification in Laravel?
If you encounter issues during CSS minification in Laravel, you can use Laravel Mix’s source maps feature to debug them. Source maps are files that map the minified CSS files back to the original source files, allowing you to easily trace and fix any issues.
Can I automate the process of CSS minification in Laravel?
Yes, you can automate the process of CSS minification in Laravel by using Laravel Mix’s versioning feature. This feature automatically minifies your CSS files whenever you run the production build command. This ensures that your CSS files are always optimized, without having to manually minify them each time.
How does CSS minification affect the performance of my Laravel application?
CSS minification can significantly improve the performance of your Laravel application. By reducing the size of your CSS files, you can reduce the amount of data that needs to be transferred to the client. This can result in faster load times, providing a better user experience.
Can I use Laravel Mix to minify other types of files?
Yes, besides CSS files, Laravel Mix can also be used to minify JavaScript files. This can further optimize your Laravel application, reducing the amount of data that needs to be transferred to the client.
What is the difference between minifying and concatenating CSS files?
Minifying CSS files involves removing unnecessary characters to reduce their size, while concatenating CSS files involves combining multiple CSS files into a single file. Both processes can help optimize your Laravel application, but they serve different purposes. Minifying reduces the size of each individual CSS file, while concatenating reduces the number of HTTP requests by combining multiple files into one.
How can I ensure that my minified CSS files are served correctly?
To ensure that your minified CSS files are served correctly, you can use Laravel Mix’s versioning feature. This feature appends a unique hash to the filenames of your minified CSS files, ensuring that the client always receives the latest version of your CSS files.
The above is the detailed content of How to Create a Laravel CSS-Minify Command. For more information, please follow other related articles on the PHP Chinese website!

Hot AI Tools

Undresser.AI Undress
AI-powered app for creating realistic nude photos

AI Clothes Remover
Online AI tool for removing clothes from photos.

Undress AI Tool
Undress images for free

Clothoff.io
AI clothes remover

AI Hentai Generator
Generate AI Hentai for free.

Hot Article
Hot Tools

Notepad++7.3.1
Easy-to-use and free code editor

SublimeText3 Chinese version
Chinese version, very easy to use

Zend Studio 13.0.1
Powerful PHP integrated development environment

Dreamweaver CS6
Visual web development tools

SublimeText3 Mac version
God-level code editing software (SublimeText3)
Hot Topics
 1376
1376
 52
52

 Working with Flash Session Data in Laravel
Mar 12, 2025 pm 05:08 PM
Working with Flash Session Data in Laravel
Mar 12, 2025 pm 05:08 PM
Laravel simplifies handling temporary session data using its intuitive flash methods. This is perfect for displaying brief messages, alerts, or notifications within your application. Data persists only for the subsequent request by default: $request-
 cURL in PHP: How to Use the PHP cURL Extension in REST APIs
Mar 14, 2025 am 11:42 AM
cURL in PHP: How to Use the PHP cURL Extension in REST APIs
Mar 14, 2025 am 11:42 AM
The PHP Client URL (cURL) extension is a powerful tool for developers, enabling seamless interaction with remote servers and REST APIs. By leveraging libcurl, a well-respected multi-protocol file transfer library, PHP cURL facilitates efficient execution of various network protocols, including HTTP, HTTPS, and FTP. This extension offers granular control over HTTP requests, supports multiple concurrent operations, and provides built-in security features.
 Alipay PHP SDK transfer error: How to solve the problem of 'Cannot declare class SignData'?
Apr 01, 2025 am 07:21 AM
Alipay PHP SDK transfer error: How to solve the problem of 'Cannot declare class SignData'?
Apr 01, 2025 am 07:21 AM
Alipay PHP...
 Simplified HTTP Response Mocking in Laravel Tests
Mar 12, 2025 pm 05:09 PM
Simplified HTTP Response Mocking in Laravel Tests
Mar 12, 2025 pm 05:09 PM
Laravel provides concise HTTP response simulation syntax, simplifying HTTP interaction testing. This approach significantly reduces code redundancy while making your test simulation more intuitive. The basic implementation provides a variety of response type shortcuts: use Illuminate\Support\Facades\Http; Http::fake([ 'google.com' => 'Hello World', 'github.com' => ['foo' => 'bar'], 'forge.laravel.com' =>
 12 Best PHP Chat Scripts on CodeCanyon
Mar 13, 2025 pm 12:08 PM
12 Best PHP Chat Scripts on CodeCanyon
Mar 13, 2025 pm 12:08 PM
Do you want to provide real-time, instant solutions to your customers' most pressing problems? Live chat lets you have real-time conversations with customers and resolve their problems instantly. It allows you to provide faster service to your custom
 Explain the concept of late static binding in PHP.
Mar 21, 2025 pm 01:33 PM
Explain the concept of late static binding in PHP.
Mar 21, 2025 pm 01:33 PM
Article discusses late static binding (LSB) in PHP, introduced in PHP 5.3, allowing runtime resolution of static method calls for more flexible inheritance.Main issue: LSB vs. traditional polymorphism; LSB's practical applications and potential perfo
 Customizing/Extending Frameworks: How to add custom functionality.
Mar 28, 2025 pm 05:12 PM
Customizing/Extending Frameworks: How to add custom functionality.
Mar 28, 2025 pm 05:12 PM
The article discusses adding custom functionality to frameworks, focusing on understanding architecture, identifying extension points, and best practices for integration and debugging.
 How to send a POST request containing JSON data using PHP's cURL library?
Apr 01, 2025 pm 03:12 PM
How to send a POST request containing JSON data using PHP's cURL library?
Apr 01, 2025 pm 03:12 PM
Sending JSON data using PHP's cURL library In PHP development, it is often necessary to interact with external APIs. One of the common ways is to use cURL library to send POST�...
