

Today, we are going to be building a newsletter system using PHP with a MySQL database. The tutorial will cover building a system that allows for multiple newsletter lists and the sending of messages to specific lists.
We are going to build a pretty complex newsletter system, so let's get started! You are going to need two resources for the project:
Firstly, let's have a look at the overall project directory structure.
Go ahead and create a main project directory in the first place. Next, create a folder named admin within your project folder. Moving further, within the admin folder, include two sub-directories named media and swift. Additionally, create a new folder named images inside the media directory. It is recommended to position the Swift lib folder within the previously created swift folder. Moreover, make sure to copy the set of six silk icons that we will be using.
For the rest of the tutorial, we'll be mostly developing CRUD functionalities (create, read, update, and Build a Newsletter System With PHP and MySQL).
To easily manage application configuration throughout the PHP code, let's create a global configuration file, which defines constants that can be used throughout the application. We'll name it admin/config.php.
<?php <br>session_start(); <br>require_once 'database.php';<br><br>$mini = false;<br>$nonav = false;<br><br>error_reporting(0);<br><br>define('DB_SERVER', 'localhost');<br>define('DB_USER', 'root');<br>define('DB_PASSWORD', ''); <br>define('DB_NAME', 'tutsplus_ns_demo');<br>define('FROM_EMAIL', 'no_reply@ohyeahemail.com');<br>define('FROM_NAME', 'oh yeah email!');<br><br>$db = new Database(DB_SERVER, DB_USER, DB_PASSWORD, DB_NAME);<br>As you can see, we've defined constants related to the database settings and email configuration. Make sure you change the above settings as per your environment. So that's it for creating the global configuration file. We've also included the database class file, which we'll implement in a moment.
In this section, we'll implement the __construct method, we are creating a $db_server, $db_password, and validateUser method handles user authentication. It takes a username and password as parameters and calls the true; otherwise, it returns loggedIn method checks if a user is logged in by checking the true if the user is logged in and query method executes the SQL query provided in the first argument. It prepares the query and executes it. Then, it retrieves the result metadata, binds the result to variables, fetches the results, and returns an array containing the fetched data. The updateQuery, and countQuery method executes an SQL query, which returns a single result, such as a count.
The head, POST request and if it includes both a username and password. In that case, we call the Database class. Subsequently, we've assigned the session errors to the users table, which we'll need in our database for the user management system.
<?php <br>session_start(); <br>require_once 'database.php';<br><br>$mini = false;<br>$nonav = false;<br><br>error_reporting(0);<br><br>define('DB_SERVER', 'localhost');<br>define('DB_USER', 'root');<br>define('DB_PASSWORD', ''); <br>define('DB_NAME', 'tutsplus_ns_demo');<br>define('FROM_EMAIL', 'no_reply@ohyeahemail.com');<br>define('FROM_NAME', 'oh yeah email!');<br><br>$db = new Database(DB_SERVER, DB_USER, DB_PASSWORD, DB_NAME);<br>In our application, users should be allowed to add as many newsletters as they want. In that case, we need to create the newsletters table in place, we are going to implement different pages for the newsletter management.
Go ahead and create the admin/newsletters.php file, as shown in the following snippet.
CREATE TABLE `users` ( <br> `id` int(10) AUTO_INCREMENT, <br> `username` varchar(50), <br> `password` varchar(32), <br> PRIMARY KEY (`id`) <br>) ENGINE=MyISAM DEFAULT CHARSET utf8; <br><br><br>INSERT INTO `users` (`id`, `username`, `password`) VALUES ('1', 'admin', '5ebe2294ecd0e0f08eab7690d2a6ee69');<br>Firstly, it checks if the user is logged in by calling the Database class. If the user is not logged in, it redirects the user to the login.php page.
Next, it retrieves the list of newsletters from the database using the Database class. It selects all records from the id column in ascending order.
Finally, we iterate over the newsletter records and build an HTML table list, and include the layout.php file to display the newsletter listing.
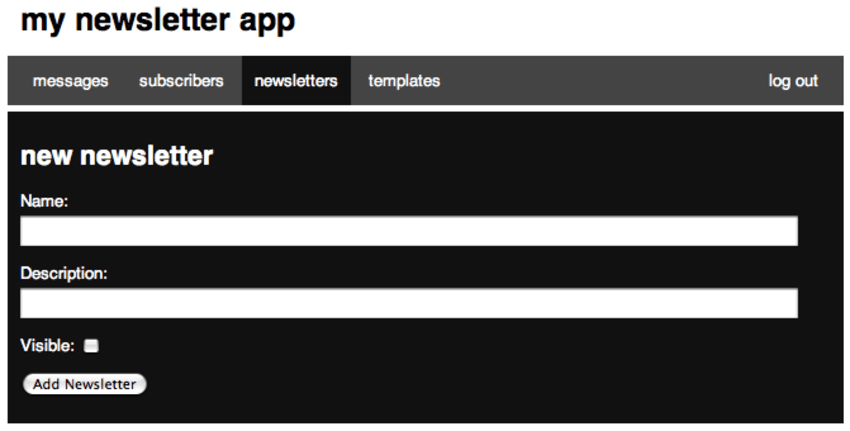
With a few records already in the insertQuery method of the $_POST['name'] and newsletters table in the database. Finally, it redirects the user to the newsletters.php page.
The form should look like this.
Let's create the admin/newsletters_edit.php file, which allows users to edit existing newsletters.
<?php <br>require_once 'config.php'; <br><br>$response = $db->loginRequired();<br>if (!$response) {<br>    header('Location: login.php');<br>    exit;<br>}<br>$title = "Newsletters"; <br>$newsletters = $db->query("SELECT * FROM newsletters ORDER BY id ASC");<br><br>$tab = 'nl'; <br>$table = ""; <br><br>foreach($newsletters as $row) {<br>    $dlink = '<a href="newsletters_Build%20a%20Newsletter%20System%20With%20PHP%20and%20MySQL.php?id='.%24row%5B'id'%5D.'" onclick="return confirm(\'Are you sure you want to Build a Newsletter System With PHP and MySQL this newsletter?\');" title="Build a Newsletter System With PHP and MySQL"><img src="/static/imghw/default1.png" data-src="media/images/page_edit.png" class="lazy" alt="Build a Newsletter System With PHP and MySQL"></a>';<br>    $elink = '<a href="newsletters_edit.php?id='.%24row%5B'id'%5D.'" title="edit"><img src="/static/imghw/default1.png" data-src="media/images/page_edit.png" class="lazy" alt="edit"></a>';<br>    if($row['visible'] == "1") {<br>        $visible = '<img  src="/static/imghw/default1.png" data-src="media/images/bullet_green.png" class="lazy" alt="Build a Newsletter System With PHP and MySQL" >';} else {$visible = '<img  src="/static/imghw/default1.png" data-src="media/images/bullet_red.png" class="lazy" alt="Build a Newsletter System With PHP and MySQL" >';<br>    }<br>    $table .= "<tr>
<td>".$row['id']."</td>
<td>".$row['name']."</td>
<td>".$row['description']."</td>
<td>$visible</td>
<td>".$dlink." ".$elink."</td>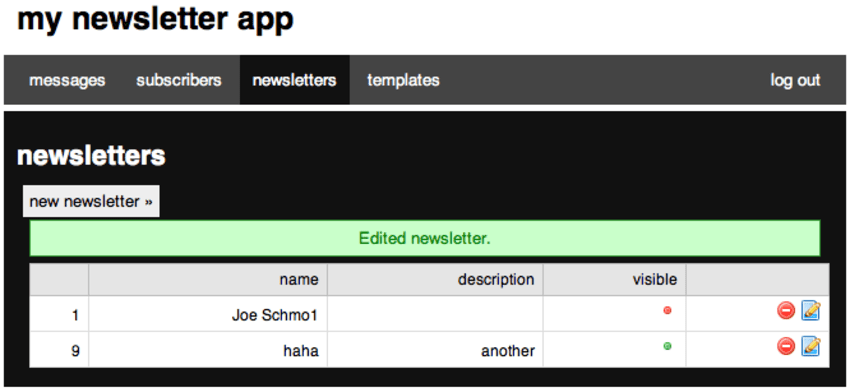
</tr>\n";<br>} <br><br>$message = $db->errorMessages();<br>$content = '';<br>$content .= '<a href="newsletters_new.php">Add New Newsletter »</a> ';<br>$content .= $message;<br>$content .= '| name | description | visible |
|---|
Overall, it's responsible for displaying a form to edit an existing newsletter. When it's submitted, it updates the corresponding record in the database and redirects the user to the appropriate page based on the outcome.
The edit form looks like this.

Go ahead and create the admin/newsletters_Build a Newsletter System With PHP and MySQL.php file, which allows users to Build a Newsletter System With PHP and MySQL an existing newsletter.
<?php <br>session_start(); <br>require_once 'database.php';<br><br>$mini = false;<br>$nonav = false;<br><br>error_reporting(0);<br><br>define('DB_SERVER', 'localhost');<br>define('DB_USER', 'root');<br>define('DB_PASSWORD', ''); <br>define('DB_NAME', 'tutsplus_ns_demo');<br>define('FROM_EMAIL', 'no_reply@ohyeahemail.com');<br>define('FROM_NAME', 'oh yeah email!');<br><br>$db = new Database(DB_SERVER, DB_USER, DB_PASSWORD, DB_NAME);<br>Our application also supports newsletter template management. So we need to build the CRUD in the same way we just built it for the newsletters entity. Since it's pretty similar, I'll quickly go through it by providing the code.
Let's create the subscribers table as shown in the following snippet.
CREATE TABLE `users` ( <br> `id` int(10) AUTO_INCREMENT, <br> `username` varchar(50), <br> `password` varchar(32), <br> PRIMARY KEY (`id`) <br>) ENGINE=MyISAM DEFAULT CHARSET utf8; <br><br><br>INSERT INTO `users` (`id`, `username`, `password`) VALUES ('1', 'admin', '5ebe2294ecd0e0f08eab7690d2a6ee69');<br>Similarly, let's create the subscribers table. Next, we'll either create or Build a Newsletter System With PHP and MySQL the subscription record in the messages table with this SQL.
<?php <br>require_once 'config.php'; <br><br>$response = $db->loginRequired();<br>if (!$response) {<br>    header('Location: login.php');<br>    exit;<br>}<br>$title = "Newsletters"; <br>$newsletters = $db->query("SELECT * FROM newsletters ORDER BY id ASC");<br><br>$tab = 'nl'; <br>$table = ""; <br><br>foreach($newsletters as $row) {<br>    $dlink = '<a href="newsletters_Build%20a%20Newsletter%20System%20With%20PHP%20and%20MySQL.php?id='.%24row%5B'id'%5D.'" onclick="return confirm(\'Are you sure you want to Build a Newsletter System With PHP and MySQL this newsletter?\');" title="Build a Newsletter System With PHP and MySQL"><img src="/static/imghw/default1.png" data-src="media/images/page_edit.png" class="lazy" alt="Build a Newsletter System With PHP and MySQL"></a>';<br>    $elink = '<a href="newsletters_edit.php?id='.%24row%5B'id'%5D.'" title="edit"><img src="/static/imghw/default1.png" data-src="media/images/page_edit.png" class="lazy" alt="edit"></a>';<br>    if($row['visible'] == "1") {<br>        $visible = '<img  src="/static/imghw/default1.png" data-src="media/images/bullet_green.png" class="lazy" alt="Build a Newsletter System With PHP and MySQL" >';} else {$visible = '<img  src="/static/imghw/default1.png" data-src="media/images/bullet_red.png" class="lazy" alt="Build a Newsletter System With PHP and MySQL" >';<br>    }<br>    $table .= "<tr>
<td>".$row['id']."</td>
<td>".$row['name']."</td>
<td>".$row['description']."</td>
<td>$visible</td>
<td>".$dlink." ".$elink."</td>
</tr>\n";<br>} <br><br>$message = $db->errorMessages();<br>$content = '';<br>$content .= '<a href="newsletters_new.php">Add New Newsletter »</a> ';<br>$content .= $message;<br>$content .= '| name | description | visible |
|---|
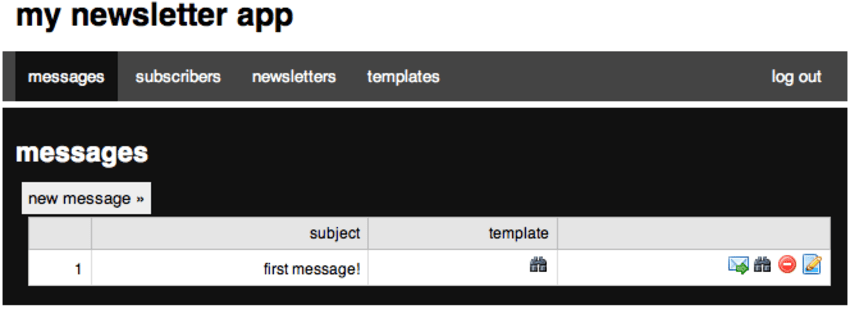
Go ahead and create the admin/messages.php file as shown in the following snippet.
<?php <br>require_once 'config.php'; <br><br>$response = $db->loginRequired();<br>if (!$response) {<br> header('Location: login.php');<br> exit;<br>}<br><br>$tab = 'nl';<br><br>if(isset($_POST['submitted'])) { <br> if(isset($_POST['visible'])) {$visible = 1;}else{$visible = 0;}<br> $data = array('name'=>$_POST['name'],'description'=>$_POST['description'], 'visible'=>$visible);<br> $db->updateQuery($data, $_POST['id'], 'newsletters');<br> $_SESSION['success'] = "Updated newsletter.";<br> header('Location: newsletters.php');<br> exit;<br>} <br><br>$title = "Edit newsletter";<br>$id = (int) $_GET['id'];<br><br>$results = $db->query("SELECT * FROM newsletters WHERE id='".$id."' LIMIT 1");<br>$name = $results[0]['name'];<br>$description = $results[0]['description'];<br>$visible = ($results[0]['visible'] == "1") ? 'checked="checked"' : '';<br><br>$content = 'It's a listing page with a few additional links for different operations. Your page should look like this:
Now, we are going to start working on our new pages.
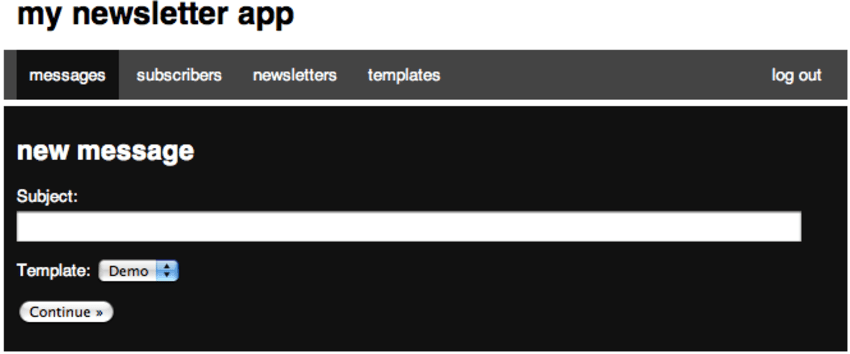
On the first page, we'll collect the subject and template-related information, and then on the next page, we'll collect the actual message.
Create the admin/messages_new.php file with the following contents.
<?php <br>require_once 'config.php'; <br><br>$response = $db->loginRequired();<br>if (!$response) {<br> header('Location: login.php');<br> exit;<br>}<br><br>$id = (int) $_GET['id']; <br>$stmt = $db->Build a Newsletter System With PHP and MySQLQuery($id);<br>$_SESSION['success'] = "Newsletter Build a Newsletter System With PHP and MySQLd."; <br><br>header('Location: newsletters.php');<br>?><br>This page is very similar to the other new pages, but there is a minor addition. Right after we create a new message entry, we find the most recent insert id.
The page looks like this:
Next, we redirect the user to step two. Let's create the admin/messages_new_step2.php file with the following contents.
CREATE TABLE `subscribers` ( <br> `id` tinyint(10) AUTO_INCREMENT, <br> `name` varchar(50), <br> `email` varchar(50), <br> PRIMARY KEY (`id`) <br>) ENGINE=MyISAM DEFAULT CHARSET utf8;<br>
Firstly, we find the message we are working with, and then we find all the templates and construct a dropdown menu. Next, we have our subscribers table in the first place. Next, for every selected newsletter, we create an entry in the subscriptions<code>subscriptions table.

Next, let's create the preferences.php page.
CREATE TABLE `messages` ( <br> `id` tinyint(10) AUTO_INCREMENT, <br> `subject` varchar(255), <br> `leftcol` text, <br> `rightcol` text, <br> `template_id` tinyint(10), <br> PRIMARY KEY (`id`) <br>) ENGINE=MyISAM DEFAULT CHARSET utf8;<br>
It's used to allow users to save their newsletter preferences.
Firstly, when the form loads, it looks like this.

When you click on the Find button, it takes the user to the next page.

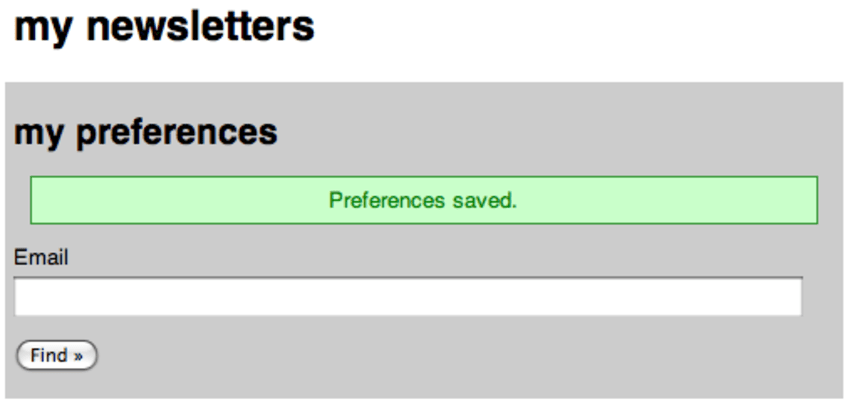
Finally, once a user clicks on the Save my preferences button, it displays the page shown in the following image.
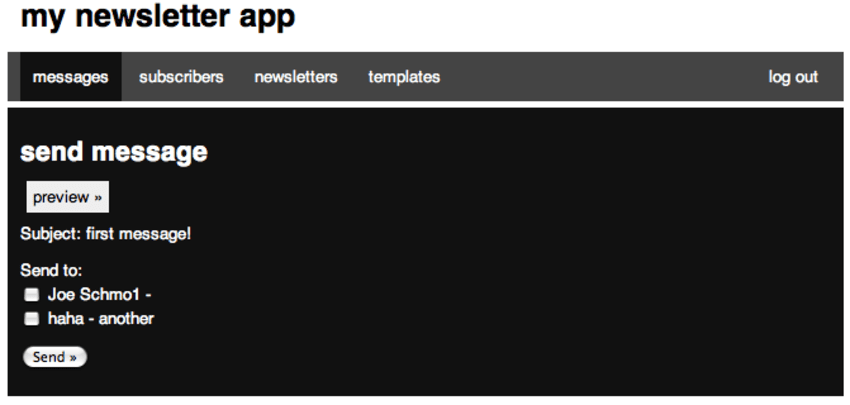
In this section, we'll build the last page, which allows us to send messages.
Let's create the admin/messages_send.php file as shown in the following snippet.
<?php <br>session_start(); <br>require_once 'database.php';<br><br>$mini = false;<br>$nonav = false;<br><br>error_reporting(0);<br><br>define('DB_SERVER', 'localhost');<br>define('DB_USER', 'root');<br>define('DB_PASSWORD', ''); <br>define('DB_NAME', 'tutsplus_ns_demo');<br>define('FROM_EMAIL', 'no_reply@ohyeahemail.com');<br>define('FROM_NAME', 'oh yeah email!');<br><br>$db = new Database(DB_SERVER, DB_USER, DB_PASSWORD, DB_NAME);<br>It's used to build the form, which lists the newsletters in the first place. When an admin selects newsletters and submits the form, we retrieve the subscribers that are subscribed to these selected newsletters. And finally, we send an email to them.
It's also important to note that I've used the Symfony Mailer library to send emails. You can install it with Composer as shown in the following snippet. You need to adjust the settings as per your environment. To check more on this topic, you can visit this article, which provides an in-depth guide to the Symfony Mailer library.
CREATE TABLE `users` ( <br> `id` int(10) AUTO_INCREMENT, <br> `username` varchar(50), <br> `password` varchar(32), <br> PRIMARY KEY (`id`) <br>) ENGINE=MyISAM DEFAULT CHARSET utf8; <br><br><br>INSERT INTO `users` (`id`, `username`, `password`) VALUES ('1', 'admin', '5ebe2294ecd0e0f08eab7690d2a6ee69');<br>The form looks like this:
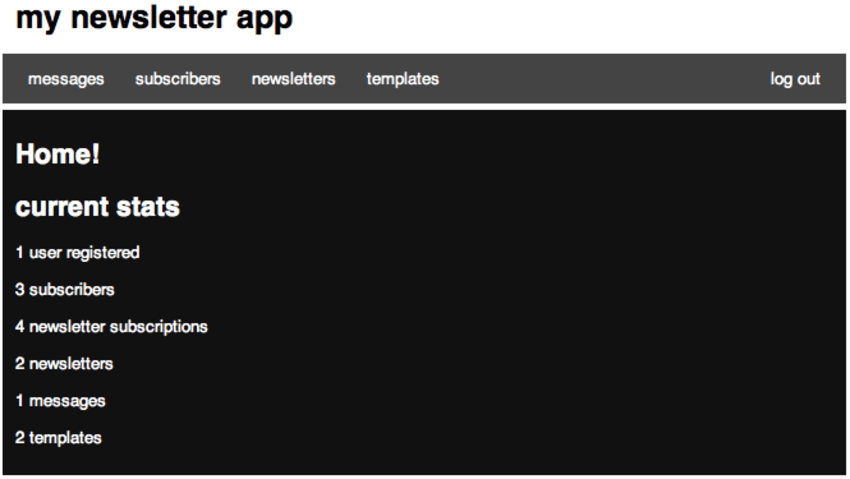
Now, let's build the admin home page, which displays overall statistics for our application.
Let's create the admin/index.php file with the following contents.
<?php <br>require_once 'config.php'; <br><br>$response = $db->loginRequired();<br>if (!$response) {<br>    header('Location: login.php');<br>    exit;<br>}<br>$title = "Newsletters"; <br>$newsletters = $db->query("SELECT * FROM newsletters ORDER BY id ASC");<br><br>$tab = 'nl'; <br>$table = ""; <br><br>foreach($newsletters as $row) {<br>    $dlink = '<a href="newsletters_Build%20a%20Newsletter%20System%20With%20PHP%20and%20MySQL.php?id='.%24row%5B'id'%5D.'" onclick="return confirm(\'Are you sure you want to Build a Newsletter System With PHP and MySQL this newsletter?\');" title="Build a Newsletter System With PHP and MySQL"><img src="/static/imghw/default1.png" data-src="media/images/page_edit.png" class="lazy" alt="Build a Newsletter System With PHP and MySQL"></a>';<br>    $elink = '<a href="newsletters_edit.php?id='.%24row%5B'id'%5D.'" title="edit"><img src="/static/imghw/default1.png" data-src="media/images/page_edit.png" class="lazy" alt="edit"></a>';<br>    if($row['visible'] == "1") {<br>        $visible = '<img  src="/static/imghw/default1.png" data-src="media/images/bullet_green.png" class="lazy" alt="Build a Newsletter System With PHP and MySQL" >';} else {$visible = '<img  src="/static/imghw/default1.png" data-src="media/images/bullet_red.png" class="lazy" alt="Build a Newsletter System With PHP and MySQL" >';<br>    }<br>    $table .= "<tr>
<td>".$row['id']."</td>
<td>".$row['name']."</td>
<td>".$row['description']."</td>
<td>$visible</td>
<td>".$dlink." ".$elink."</td>
</tr>\n";<br>} <br><br>$message = $db->errorMessages();<br>$content = '';<br>$content .= '<a href="newsletters_new.php">Add New Newsletter »</a> ';<br>$content .= $message;<br>$content .= '| name | description | visible |
|---|
And it looks like this:
And with that, we've reached the end of this article as well. We covered a lot of ground in the tutorial, creating a newsletter app completely from scratch!
The above is the detailed content of Build a Newsletter System With PHP and MySQL. For more information, please follow other related articles on the PHP Chinese website!


![[Web front-end] Node.js quick start](https://img.php.cn/upload/course/000/000/067/662b5d34ba7c0227.png)


