
 System Tutorial
MAC
Install Ventura on Unsupported Mac: What Are the Ways to Get & Use This MacOS?
System Tutorial
MAC
Install Ventura on Unsupported Mac: What Are the Ways to Get & Use This MacOS?
Install Ventura on Unsupported Mac: What Are the Ways to Get & Use This MacOS?

In October 2022, Apple launched macOS Ventura, introducing new features to its computers, including new apps, the ability to edit messages in iMessage, the new iCloud Shared Photo Library, and the highlight feature, the Stage Manager for multitasking. While many users benefited from these new features, some were unable to access them.
Usually, when a new macOS version is released, some computers become ineligible for future software updates from Apple. This may lead you to think that your computer has become obsolete or vulnerable to security risks. However, there are methods to install the latest version of macOS on unsupported Macs, and we’ll share them with you in our article.
Keep reading to learn how to install macOS Ventura on an unsupported Mac safely.
What is an unsupported Mac
Electronic devices have two life cycles. The first one is the obvious physical lifespan until the device stops working. The other life cycle refers to the software that runs the device. When a manufacturer stops providing updates for a specific model, it becomes an unsupported device.
This also applies to Macs and other Apple products. An unsupported Mac can no longer install the latest macOS version. Although Apple provides several years of updates for Macs, older models eventually stop supporting the latest software, mainly due to their hardware limitations.
What Macs don’t support macOS Ventura
Here’s a complete list of all the Macs that can’t install macOS Ventura:
- MacBook models from 2016 or before
- MacBook Air models from 2017 or before
- MacBook Pro models from 2016 or before
- Mac mini models from 2014 or before
- iMac models from 2015 or before
- iBook, PowerBook, eMac, Power Mac, Xserve, and other obsolete models
Can you install macOS Ventura on unsupported Mac
If you’re reading this post, it’s likely because you want to know if installing macOS Ventura on a Mac that isn’t compatible with this software version is possible. Fortunately, as we’ll describe later, there are several methods to do so.
Before proceeding, you should know that Apple has discontinued support for its latest macOS versions on older Macs for valid reasons. Therefore, consider if it’s worth the risk to your computer’s integrity. It may be time for you to purchase a new Mac.
On a side note, you may also be interested in how to downgrade from Big Sur to Catalina, both earlier versions than Ventura.
Is it safe to install Ventura on an unsupported Mac
Apple doesn’t recommend installing macOS Ventura on unsupported Macs due to potential issues such as slowdowns, crashes, or reduced battery life.
Is it legal to install Ventura on an unsupported Mac
There’s currently no law against installing macOS Ventura (or other Apple software) on unsupported Macs. You can rest easy knowing that you’re not doing anything illegal. In fact, this process isn’t mentioned directly or indirectly in Apple’s License Agreement. The License Agreement only states that you’re not allowed to install it on non-Apple computers, so the company doesn’t explicitly prohibit it either.
However, it’s also true that if you follow one of the processes described in our blog piece, you won’t be obtaining macOS Ventura directly from Apple, which is always the preferred way of getting software. In this context, it could be argued that there’s a loophole. In any case, nothing we mention here should have any legal repercussions for you.
Prepare your unsupported Mac before installing the macOS Ventura
Before you start installing macOS Ventura on your Mac, there are some important things to consider for ensuring a smooth process.
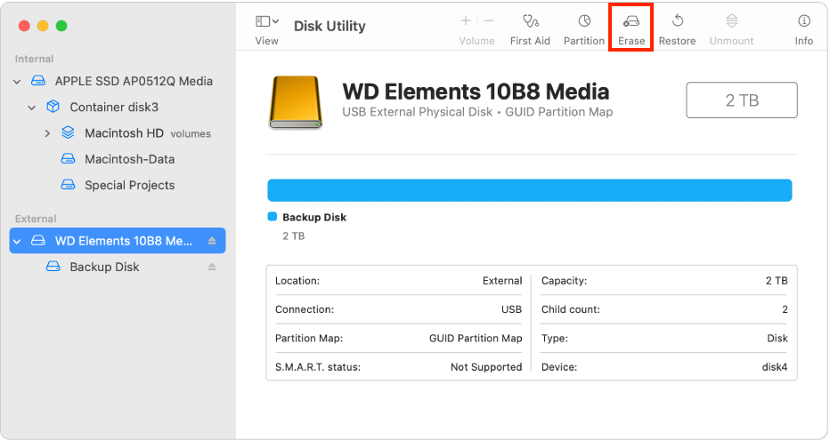
1. Back up your Mac
Here’s how to back up your Mac via Time Machine:
- Go to System Preferences on your Mac.
- Select Time Machine.
- Click the Select Backup Disk button.
- Select your backup disk, then click Use Disk.
- Wait until the backup is complete.


2. Other considerations
In addition to creating a Time Machine backup, you should think about the following:
- Think carefully about whether you really need the features of macOS Ventura. Maybe you can use an earlier version that works with your Mac, or you might want to wait for a later version, like macOS Sonoma.
- Consider if you need to learn how to delete old macOS updates.
- Carefully compare the different installation methods.
- Install cybersecurity software to protect your Mac before downloading macOS installers and any unofficial Apple software.
How to get macOS Ventura on an unsupported MacBook
There are a few methods to install macOS Ventura on an unsupported MacBook. One way is to use software that provides official patching to run this version. Another option is to use a virtual machine to emulate Apple’s OS or to create a “Hackintosh.”
1. Via OpenCore Legacy Patcher
The first method we’ll discuss involves installing the OpenCore Legacy Patcher, or OCLP, on your unsupported Mac. This software allows you to experience a near-native macOS Ventura (and other more recent OS) without direct support from Apple.


1.2 Download and install OCLP
Next, install the OpenCore Legacy Patcher on your Mac:
- Go to the OpenCore Legacy Patcher page on Github.
- Scroll down to find the latest version of OCLP available.
- Download the OCLP zip file from the page.
- Once the download is complete, double-click and extract the zip file.
- Follow the on-screen steps to install the OCLP on your unsupported Mac.


1.3 Download macOS Ventura
After the OCLP is installed, download the macOS Ventura installer:
- Launch the OCLP app.
- Select Create macOS Installer from the menu.
- Choose Download macOS Installer from the new window.
- Once the download is complete, click on macOS 13.5 (22C74 - 11.9 GB).
- Wait until the installation of the macOS Ventura file is finished.


1.4 Create a bootable macOS Ventura USB drive
Follow these steps to create a bootable macOS Ventura USB drive to install the OS:
- Once the download is complete, the OCLP will start validating the macOS Installer.
- When prompted, type in your username and password.
- You’ll be asked if you want to create a macOS Installer. Click Yes to confirm.
- To select a local macOS Installer, click Install macOS Ventura: 13.5 (22G73).


1.5 Configure OpenCore Legacy Patcher settings
Then, you’ll need to adjust the OCLP settings as needed:
- Go to the main OCLP interface.
- Click Settings.
- Make sure the Verbose and Show Boot Picker options are unchecked.

1.6 Start the macOS Ventura installation process
Now, it’s time to start the macOS Ventura installation process:
- Select the local disk where you want to install macOS Ventura, and confirm.
- Type in your user name and password again.
- Click the Apple icon in the menu bar, then select Restart.
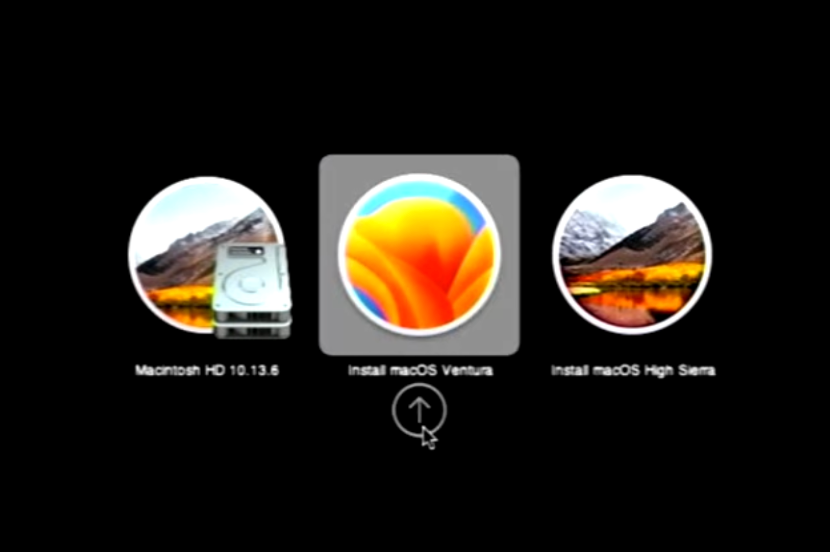
- Once the Mac is restarting, hold the Option key until you see the EFI Boot option.
- Click on the EFI Boot icon.
- Click Install macOS Ventura.
- Now, click Install macOS Ventura, then click Continue.
- Follow the on-screen instructions to finish the macOS Ventura installation.


1.7 Adjust settings after macOS Ventura installation
Finally, you can modify your Mac settings (which are now called System Settings, rather than System Preferences) to make the most of macOS Ventura.
In this respect, you can adjust the following settings:
- Set up the Mail app to schedule or cancel sending emails.
- Use the feature to edit or cancel recent iMessage messages in the Messages app.
- Connect your iPhone to your Mac to use your phone’s cameras as a webcam.
- Bookmark your favorite artists in Apple Music.
- Try out new accessibility features like playing ambient background sounds.
2. Use Virtual Machines
Several virtual machine options are available in the market, including Parallels Desktop, VMware Fusion, CrossOver, Whisky, UTM Virtual Machines, and VirtualBox. This type of software allows you to install and run other operating systems virtually. While it’s commonly used to run Windows on a Mac (or vice versa), it’s also a viable option for running macOS Ventura on an unsupported Mac.


So, should you run Ventura on an unsupported Mac?
We want to be clear, running macOS Ventura on a Mac that isn’t officially supported is generally considered safe, but you should know that you’ll be doing so at your own risk. Apple clearly doesn’t endorse or support this practice, and you should carefully consider the potential for performance issues on your computer.
In this regard, consider installing a tool like MacKeeper’s Safe Cleanup to improve your Mac’s speed. Here’s how to clean your Mac with our dedicated cleaning tool:
- Open the MacKeeper app on your Mac or MacBook.
- Choose the Safe Cleanup option under the Cleaning section in the left sidebar.
- Hit the Start Scan button.
- When the scan is done, choose the folders you want to clean (Logs, Caches, Trash, Languages, and Mail Attachments).
- Hit the Clean Junk Files button.
- Choose Empty Trash to make your cleaning fully complete.


Now, enjoy the cluttered-free experience of your Apple device and don’t forget to run these cleaning scan with some regularity in mind.
The above is the detailed content of Install Ventura on Unsupported Mac: What Are the Ways to Get & Use This MacOS?. For more information, please follow other related articles on the PHP Chinese website!

Hot AI Tools

Undresser.AI Undress
AI-powered app for creating realistic nude photos

AI Clothes Remover
Online AI tool for removing clothes from photos.

Undress AI Tool
Undress images for free

Clothoff.io
AI clothes remover

Video Face Swap
Swap faces in any video effortlessly with our completely free AI face swap tool!

Hot Article
Hot Tools

Notepad++7.3.1
Easy-to-use and free code editor

SublimeText3 Chinese version
Chinese version, very easy to use

Zend Studio 13.0.1
Powerful PHP integrated development environment

Dreamweaver CS6
Visual web development tools

SublimeText3 Mac version
God-level code editing software (SublimeText3)
Hot Topics
 1393
1393
 52
1206
24
52
1206
24

 The full list of all macOS versions until 2025
Mar 23, 2025 am 10:08 AM
The full list of all macOS versions until 2025
Mar 23, 2025 am 10:08 AM
macOS version history macOS 15 Sequoia, September 16, 2024macOS 14 Sonoma,September 26, 2023 macOS 13 Ventura,October 25, 2022
 Floating screen recording: how to capture a specific app window on a Mac
Mar 28, 2025 am 09:16 AM
Floating screen recording: how to capture a specific app window on a Mac
Mar 28, 2025 am 09:16 AM
Mac Screen Recording: Easily capture windows, areas and drop-down menus The screenshot tool (Command Shift 5) that comes with Mac systems can record full screen or selected areas, but cannot record specific application windows separately. At this time, more powerful tools are needed to complete the task. This article will introduce several ways to help you record your Mac windows as easily as a professional. Record the application window separately Record a single window to avoid cluttered desktop backgrounds and create more professional and prominent images and videos. Here are some excellent screen recording applications: Function comparison Gifox CleanShot X Dropshare Record a specific window ✓ ✓ ✓

 Spotify on Apple Watch: How to use it in 2025
Apr 04, 2025 am 09:55 AM
Spotify on Apple Watch: How to use it in 2025
Apr 04, 2025 am 09:55 AM
With the support of Apple devices' interconnected ecosystem, managing and synchronizing your Apple devices has become a breeze. Unlock Mac with Apple Watch? Simple! (If you haven't set this unlocking method yet, you should really try it, it's very time-saving). Can you pay with Apple Watch without using iPhone? Apple can handle it easily! Today we will focus on how to download the Spotify playlist to an Apple Watch and play without an iPhone. Spoiler: This is possible. How to use Spotify on Apple Watch: A quick overview Let's dive into the key issues and their solutions directly. If this form helps you, that would be great! If you
 Top 9 AI writing assistants for Mac, iOS, and the web
Mar 23, 2025 am 10:44 AM
Top 9 AI writing assistants for Mac, iOS, and the web
Mar 23, 2025 am 10:44 AM
The market for AI-powered writing assistants is expected to grow rapidly, reaching approximately $6.5 billion by 2030. Since AI writing assistants are here to stay, it's important to learn about the best tools in the industry. In this article, w
 Email is not syncing? How to refresh the Mail app on Mac
Apr 04, 2025 am 09:45 AM
Email is not syncing? How to refresh the Mail app on Mac
Apr 04, 2025 am 09:45 AM
Mac mail synchronization failed? Quick solution! Many Mac users rely on the included Mail app because it is simple and convenient. But even reliable software can have problems. One of the most common problems is that Mail cannot be synced, resulting in recent emails not being displayed. This article will guide you through email synchronization issues and provide some practical tips to prevent such issues. How to refresh the Mail app on your Mac Operation steps Click the envelope icon Open the Mail app > View > Show Tab Bar > Click the Envelope icon to refresh. Use shortcut keys or menu options Press Shift Command N. Or open the Mail app

 How to get rid of 'Your screen is being observed' error
Apr 05, 2025 am 10:19 AM
How to get rid of 'Your screen is being observed' error
Apr 05, 2025 am 10:19 AM
When you see the message "Your screen is being monitored", the first thing you think of is someone hacking into your computer. But that's not always the case. Let's try to find out if there are any issues that need you to worry about. Protect your Mac With Setapp, you don't need to worry about choosing a tool to protect your computer. You can quickly form your own suite of privacy and security software on Setapp. Free Trial Security Test What does "Your screen is being monitored" mean? There are many reasons why there is a Mac lock screen message that appears with “Your screen is being monitored”. You are sharing the screen with others You are recording the screen You are using AirPlay You are using some apps that try to access your screen Your computer is infected with evil
