
 System Tutorial
MAC
Time Machine Backup: How to Use It & Set Up Destination? How to Create Data Copy? [Restore Your MacBook]
System Tutorial
MAC
Time Machine Backup: How to Use It & Set Up Destination? How to Create Data Copy? [Restore Your MacBook]
Time Machine Backup: How to Use It & Set Up Destination? How to Create Data Copy? [Restore Your MacBook]

Time Machine: Your macOS Backup Solution
Regular backups are crucial, but they can be tedious. Apple's Time Machine simplifies this by automating the process. This guide explains how to use Time Machine for backups and select a backup location.
What is Time Machine?
Time Machine is macOS's built-in backup utility, introduced in Mac OS X 10.5 (Leopard). It provides a user-friendly way to save and restore files on Macs and MacBooks. It copies all data (excluding the original macOS installation) – files, folders, and settings – allowing for automatic or manual backups and restoration of individual files or your entire system. An external drive is required for backups, but Time Machine also creates temporary snapshots on your main drive for quick file restoration.
Why Use Time Machine?
Time Machine is the ideal backup solution for Macs, beneficial in various situations:
- Restoring older file or folder versions.
- Recovering accidentally deleted files or folders.
- Restoring your Mac to a previous state (e.g., after a malware attack).
- Protecting against data loss from hardware failures or security threats.
- Backing up and saving iPhone backups to your Mac.
Choosing a Backup Destination
Time Machine creates a copy of your startup disk for accessibility even if your Mac malfunctions. Several options exist:
-
Another Mac:
a. On the backup Mac, enable File Sharing in System Settings > General > Sharing. Enable SMB sharing. b. Create a shared Time Machine folder. c. On your main Mac, connect to the shared folder via Finder > Network. d. In System Settings > General > Time Machine, add the backup location.
![Time Machine Backup: How to Use It & Set Up Destination? How to Create Data Copy? [Restore Your MacBook]](/static/imghw/default1.png)
-
External USB Drive: Simply plug in your formatted drive and select it in Time Machine settings.
-
Network-Attached Storage (NAS): Create a shared folder on your NAS, connect to it on your Mac, and select it in Time Machine settings.
-
AirPort Time Capsule (Discontinued): If you own one, ensure it's connected and select it in Time Machine settings.
![Time Machine Backup: How to Use It & Set Up Destination? How to Create Data Copy? [Restore Your MacBook]](https://img.php.cn/upload/article/000/000/000/174062545816963.jpg)
![Time Machine Backup: How to Use It & Set Up Destination? How to Create Data Copy? [Restore Your MacBook]](https://img.php.cn/upload/article/000/000/000/174062545969369.jpg)
![Time Machine Backup: How to Use It & Set Up Destination? How to Create Data Copy? [Restore Your MacBook]](https://img.php.cn/upload/article/000/000/000/174062546171046.jpg)
![Time Machine Backup: How to Use It & Set Up Destination? How to Create Data Copy? [Restore Your MacBook]](https://img.php.cn/upload/article/000/000/000/174062546293256.jpg)
![Time Machine Backup: How to Use It & Set Up Destination? How to Create Data Copy? [Restore Your MacBook]](https://img.php.cn/upload/article/000/000/000/174062546372487.jpg)
![Time Machine Backup: How to Use It & Set Up Destination? How to Create Data Copy? [Restore Your MacBook]](https://img.php.cn/upload/article/000/000/000/174062546597865.jpg)
![Time Machine Backup: How to Use It & Set Up Destination? How to Create Data Copy? [Restore Your MacBook]](https://img.php.cn/upload/article/000/000/000/174062546653045.jpg)
![Time Machine Backup: How to Use It & Set Up Destination? How to Create Data Copy? [Restore Your MacBook]](https://img.php.cn/upload/article/000/000/000/174062546892409.jpg)
![Time Machine Backup: How to Use It & Set Up Destination? How to Create Data Copy? [Restore Your MacBook]](https://img.php.cn/upload/article/000/000/000/174062546937042.jpg)
![Time Machine Backup: How to Use It & Set Up Destination? How to Create Data Copy? [Restore Your MacBook]](https://img.php.cn/upload/article/000/000/000/174062547023335.jpg)
![Time Machine Backup: How to Use It & Set Up Destination? How to Create Data Copy? [Restore Your MacBook]](https://img.php.cn/upload/article/000/000/000/174062547223730.jpg)
Manual Backups
While Time Machine defaults to hourly automatic backups, you can initiate a manual backup anytime via System Settings > Time Machine or the menu bar icon.
![Time Machine Backup: How to Use It & Set Up Destination? How to Create Data Copy? [Restore Your MacBook]](https://img.php.cn/upload/article/000/000/000/174062547312331.jpg)
![Time Machine Backup: How to Use It & Set Up Destination? How to Create Data Copy? [Restore Your MacBook]](https://img.php.cn/upload/article/000/000/000/174062547429167.jpg)
Excluding Files and Folders
To reduce backup size and time, exclude unnecessary files and folders in System Settings > Time Machine > Options.
![Time Machine Backup: How to Use It & Set Up Destination? How to Create Data Copy? [Restore Your MacBook]](https://img.php.cn/upload/article/000/000/000/174062547681942.jpg)
![Time Machine Backup: How to Use It & Set Up Destination? How to Create Data Copy? [Restore Your MacBook]](https://img.php.cn/upload/article/000/000/000/174062547755920.jpg)
Automatic Backup Settings
Adjust backup frequency (hourly, daily, weekly, or manual) in System Settings > General > Time Machine > Options.
Restoring Your Startup Disk
To restore your entire system after a malfunction, reinstall macOS and use Migration Assistant to restore from your Time Machine backup.
![Time Machine Backup: How to Use It & Set Up Destination? How to Create Data Copy? [Restore Your MacBook]](https://img.php.cn/upload/article/000/000/000/174062547826164.jpg)
![Time Machine Backup: How to Use It & Set Up Destination? How to Create Data Copy? [Restore Your MacBook]](https://img.php.cn/upload/article/000/000/000/174062547927263.jpg)
![Time Machine Backup: How to Use It & Set Up Destination? How to Create Data Copy? [Restore Your MacBook]](https://img.php.cn/upload/article/000/000/000/174062548154394.jpg)
Restoring Individual Files and Folders
Restore individual items by clicking the Time Machine menu bar icon, selecting "Browse Time Machine Backups," and selecting the desired files/folders.
Maximizing Backup Effectiveness
Time Machine provides robust protection, but consider removing unnecessary files to optimize backup size and speed. Tools like MacKeeper's Duplicates Finder can help. Supplementing Time Machine with iCloud or other cloud services adds an extra layer of security.
FAQ
- Backup Space: Aim for a backup destination at least twice the size of your startup disk.
- Backup Completion: Monitor progress in Time Machine preferences.
- Backup Time: Varies depending on data size and backup location.
- Backup Storage Location: Main backups are stored in your chosen external location; snapshots are on your main drive.
- Backup Frequency: Customizable (hourly, daily, weekly, or manual).
- Backup Scope: Backs up everything except the default macOS installation; customization via exclusions is possible.
The above is the detailed content of Time Machine Backup: How to Use It & Set Up Destination? How to Create Data Copy? [Restore Your MacBook]. For more information, please follow other related articles on the PHP Chinese website!

Hot AI Tools

Undresser.AI Undress
AI-powered app for creating realistic nude photos

AI Clothes Remover
Online AI tool for removing clothes from photos.

Undress AI Tool
Undress images for free

Clothoff.io
AI clothes remover

Video Face Swap
Swap faces in any video effortlessly with our completely free AI face swap tool!

Hot Article
Hot Tools

Notepad++7.3.1
Easy-to-use and free code editor

SublimeText3 Chinese version
Chinese version, very easy to use

Zend Studio 13.0.1
Powerful PHP integrated development environment

Dreamweaver CS6
Visual web development tools

SublimeText3 Mac version
God-level code editing software (SublimeText3)
Hot Topics
 1658
1658
 14
1415
52
1309
25
1257
29
1231
24
14
1415
52
1309
25
1257
29
1231
24

 Fix your Mac running slow after update to Sequoia
Apr 14, 2025 am 09:30 AM
Fix your Mac running slow after update to Sequoia
Apr 14, 2025 am 09:30 AM
After upgrading to the latest macOS, does the Mac run slower? Don't worry, you are not alone! This article will share my experience in solving slow Mac running problems after upgrading to macOS Sequoia. After the upgrade, I can’t wait to experience new features such as recording and transcription of voice notes and improved trail map planning capabilities. But after installation, my Mac started running slowly. Causes and solutions for slow Mac running after macOS update Here is my summary of my experience, I hope it can help you solve the problem of slow Mac running after macOS Sequoia update: Cause of the problem Solution Performance issues Using Novabe
 How to reduce WindowServer Mac CPU usage
Apr 16, 2025 pm 12:07 PM
How to reduce WindowServer Mac CPU usage
Apr 16, 2025 pm 12:07 PM
macOS WindowServer: Understanding High CPU Usage and Solutions Have you noticed WindowServer consuming significant CPU resources on your Mac? This process is crucial for your Mac's graphical interface, rendering everything you see on screen. High C
 How to make a video into a live photo on Mac and iPhone: Detailed steps
Apr 11, 2025 am 10:59 AM
How to make a video into a live photo on Mac and iPhone: Detailed steps
Apr 11, 2025 am 10:59 AM
This guide explains how to convert between Live Photos, videos, and GIFs on iPhones and Macs. Modern iPhones excel at image processing, but managing different media formats can be tricky. This tutorial provides solutions for various conversions, al
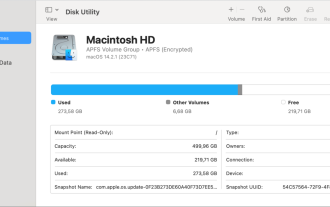 Mac Disk Utility: How to Repair Disk with First Aid? How to Recover It?
Apr 13, 2025 am 11:49 AM
Mac Disk Utility: How to Repair Disk with First Aid? How to Recover It?
Apr 13, 2025 am 11:49 AM
You might need to repair your Mac disk if your computer won’t start up, apps keep freezing, you can’t open certain documents, or the performance has slowed to a halt. Luckily, Apple includes a handy tool you can use to
 How to delete files on Mac
Apr 15, 2025 am 10:22 AM
How to delete files on Mac
Apr 15, 2025 am 10:22 AM
Managing Mac storage: A comprehensive guide to deleting files Daily Mac usage involves installing apps, creating files, and downloading data. However, even high-end Macs have limited storage. This guide provides various methods for deleting unneces
 Is Google Chrome Not Working on Mac? Why Are Websites Not Loading?
Apr 12, 2025 am 11:36 AM
Is Google Chrome Not Working on Mac? Why Are Websites Not Loading?
Apr 12, 2025 am 11:36 AM
With a market share of over 65.7%, Google Chrome is the biggest web browser in the world. You can use it if you use other operating systems like Windows and Android, but many Mac users also prefer Chrome over Safari. Mo
 How to show only active apps in Dock on Mac
Apr 09, 2025 am 11:44 AM
How to show only active apps in Dock on Mac
Apr 09, 2025 am 11:44 AM
Mac Dockbar Optimization Guide: Show only running applications The dock bar of your Mac is the core of the system, from which you can launch Finder, Trash, recently used apps, active apps, and bookmark apps, and even add folders such as Document and Downloads. By default, the Mac dock bar will display more than a dozen Apple-owned applications. Most users will add more applications, but rarely delete any applications, resulting in the dock bar being cluttered and difficult to use effectively. This article will introduce several ways to help you organize and clean up your Mac dock bar in just a few minutes. Method 1: Manually organize the dock bar You can manually remove unused applications and keep only commonly used applications. Remove the application: Right-click on the application
 How to connect bluetooth headphones to Mac?
Apr 12, 2025 pm 12:38 PM
How to connect bluetooth headphones to Mac?
Apr 12, 2025 pm 12:38 PM
From the dawn of time to just about a few years ago, all of us sported a pair of wired headphones and were convinced that this is simply how it will be done forever. After all, they are the easiest technology around: just plug them in, put them
