

Pi Node Teaching: What is a Pi Node? How to install and set up Pi Node?

Detailed explanation of Pi Network nodes and installation guide
This article will introduce in detail the Pi node, a key role in the Pi Network ecosystem, and provide complete steps for installation and configuration. After the launch of the Pi Network blockchain test network, Pi nodes have become an important part of many pioneers actively participating in the testing, preparing for the upcoming main network release. If you don’t know Pi Network yet, please refer to What is Pi Coin? What is the price for listing? Pi usage, mining and security analysis.

What is Pi Network?
The Pi Network project started in 2019 and owns its exclusive cryptocurrency, Pi Co. The project aims to create a cryptocurrency network that everyone can participate in, users can participate in mining at low cost through mobile apps, and all Pi coins are mined by users. The Pi Network team’s goal is to build a P2P network that surpasses Bitcoin and make the value of Pi coins exceed Bitcoin. By the end of 2024, Pi Network has had 18 million pioneer users who have completed KYC verification, of which 8 million have been moved to a closed main network. The Pi Network open mainnet is expected to be launched in the first quarter of 2025 after reaching the goal of 10 million users moving to a closed mainnet. The launch of the open mainnet will provide more pioneer users with the opportunity to use Pi coins and improve the participation and stability of the ecosystem.
What is a Pi node?
Unlike centralized servers that manage transaction records, blockchain technology brings together the servers of everyone participating in the transaction to jointly maintain and manage the network, and each server participant is a node. According to the Pi Network white paper, the Pi node software runs the core SCP algorithm and takes into account the trust graph information provided by contributors. In a blockchain system, at least half of the nodes need to agree to create a new block. Even if some nodes are attacked and corrupted or tampered with the data, the data remains on multiple nodes to ensure data integrity. The deployment of Pi Network node system is an important step for Pi coins to move towards a true blockchain.
It should be noted that the Pi node is not mandatory to be installed and is in the testing stage and will not generate rewards. However, after the official release in the future, users participating in node testing are likely to receive rewards.

Pi node update
The latest announcement from Pi Network shows that Pi nodes have been updated to version 0.5.0, which is an important update to prepare nodes for the upcoming mainnet blockchain. This update migrates Pi nodes to the Testnet2 blockchain for a smooth transition once the mainnet is available. Testnet2 provides a more compatible mainnet environment. The existing test network will continue to run without additional user operations. This update facilitates future resets Testnet2, affecting only nodes, and not existing users and applications.
How to install and configure Pi nodes?
The following steps will guide you to install and configure Pi nodes:
1. Install Pi network program
Step 1: Visit the Pi Network official website and download programs suitable for your operating system.
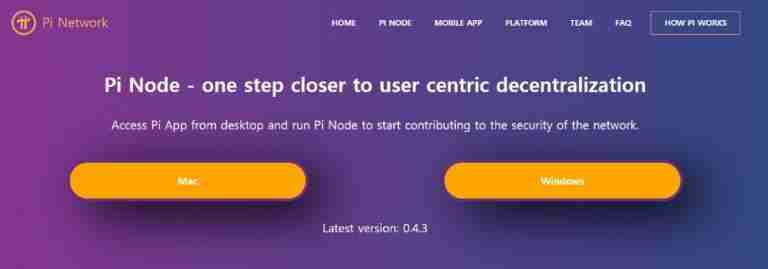
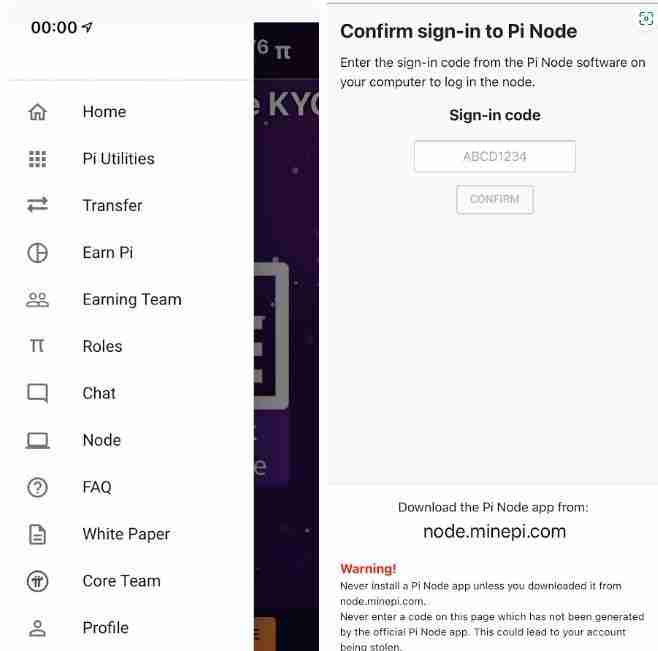
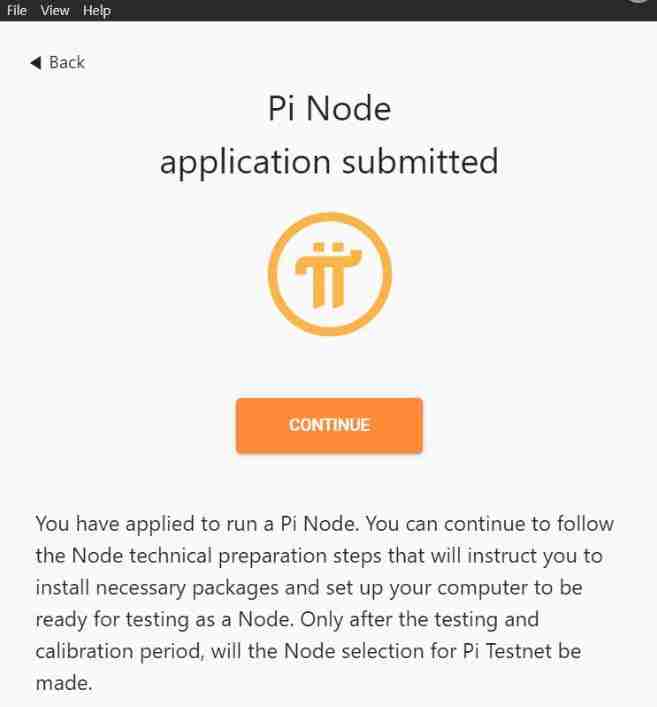
Step 2: Run the program, log in, select "Node" in the Pi menu, enter the verification code, click "Configuration" to complete the node activation.
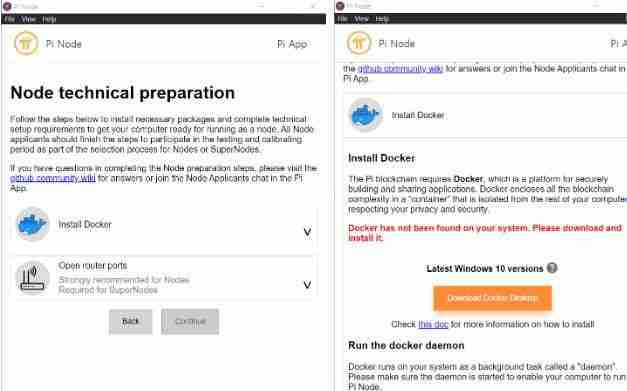
2. Install Docker
Mobile terminal:
Step 1: Click the "Node" icon in the Pi application and click Connect.
Step 2: On the Docker installation page, select "Install Docker" and follow the prompts to download and install.
Step 3: After the installation is completed, restart the program.
Computer:
Step 1: Click "install DOCKER" to download and install Docker Desktop (hub.docker.com/editions/community/docker-ce-desktop-windows/).
Step 2: Follow the installation wizard to complete the installation, including setting up your Docker account and password, and configuring Docker on WSL2.
Step 3: Enter wsl -l -v into PowerShell to check the installation to ensure that Docker-Desktop-Data and Docker-Desktop are running normally. If you have any questions, please refer to Mods FAQ.
Step 4: The computer node detects that Docker is installed and starts automatically, showing a green checkmark.
3. Start node port testing and run
Click "open router ports", click "Check now", and wait for the three check marks to turn green. If it cannot be enabled, refer to the Mods FAQ troubleshooting.
FAQ
Q: What is the role of nodes in the Pi network?
A: The node is the backbone of the Pi Network blockchain infrastructure, verifying transactions and maintaining network security.
Q: What are the benefits of running Pi nodes?
A: Contributes to the decentralization, security and scalability of Pi networks.
Q: What is the function of running Pi nodes?
A: Verify transactions and maintain a decentralized ledger.
Q: Will Pi nodes increase mining rate?
A: The more you contribute to the network, the higher the mining rate.
Q: Is the Pi node safe?
A: Pi Network uses KYC verification, machine learning and user trust circles to maintain security.
Through the above steps, you can successfully install and configure Pi nodes, contributing to the development of Pi Network.
The above is the detailed content of Pi Node Teaching: What is a Pi Node? How to install and set up Pi Node?. For more information, please follow other related articles on the PHP Chinese website!

Hot AI Tools

Undresser.AI Undress
AI-powered app for creating realistic nude photos

AI Clothes Remover
Online AI tool for removing clothes from photos.

Undress AI Tool
Undress images for free

Clothoff.io
AI clothes remover

AI Hentai Generator
Generate AI Hentai for free.

Hot Article
Hot Tools

Notepad++7.3.1
Easy-to-use and free code editor

SublimeText3 Chinese version
Chinese version, very easy to use

Zend Studio 13.0.1
Powerful PHP integrated development environment

Dreamweaver CS6
Visual web development tools

SublimeText3 Mac version
God-level code editing software (SublimeText3)
Hot Topics
 1371
1371
 52
52

 What is the reason why PS keeps showing loading?
Apr 06, 2025 pm 06:39 PM
What is the reason why PS keeps showing loading?
Apr 06, 2025 pm 06:39 PM
PS "Loading" problems are caused by resource access or processing problems: hard disk reading speed is slow or bad: Use CrystalDiskInfo to check the hard disk health and replace the problematic hard disk. Insufficient memory: Upgrade memory to meet PS's needs for high-resolution images and complex layer processing. Graphics card drivers are outdated or corrupted: Update the drivers to optimize communication between the PS and the graphics card. File paths are too long or file names have special characters: use short paths and avoid special characters. PS's own problem: Reinstall or repair the PS installer.
 How to speed up the loading speed of PS?
Apr 06, 2025 pm 06:27 PM
How to speed up the loading speed of PS?
Apr 06, 2025 pm 06:27 PM
Solving the problem of slow Photoshop startup requires a multi-pronged approach, including: upgrading hardware (memory, solid-state drive, CPU); uninstalling outdated or incompatible plug-ins; cleaning up system garbage and excessive background programs regularly; closing irrelevant programs with caution; avoiding opening a large number of files during startup.
 How to solve the problem of loading when PS is started?
Apr 06, 2025 pm 06:36 PM
How to solve the problem of loading when PS is started?
Apr 06, 2025 pm 06:36 PM
A PS stuck on "Loading" when booting can be caused by various reasons: Disable corrupt or conflicting plugins. Delete or rename a corrupted configuration file. Close unnecessary programs or upgrade memory to avoid insufficient memory. Upgrade to a solid-state drive to speed up hard drive reading. Reinstalling PS to repair corrupt system files or installation package issues. View error information during the startup process of error log analysis.
 Is slow PS loading related to computer configuration?
Apr 06, 2025 pm 06:24 PM
Is slow PS loading related to computer configuration?
Apr 06, 2025 pm 06:24 PM
The reason for slow PS loading is the combined impact of hardware (CPU, memory, hard disk, graphics card) and software (system, background program). Solutions include: upgrading hardware (especially replacing solid-state drives), optimizing software (cleaning up system garbage, updating drivers, checking PS settings), and processing PS files. Regular computer maintenance can also help improve PS running speed.
 How to solve the problem of loading when PS is always showing that it is loading?
Apr 06, 2025 pm 06:30 PM
How to solve the problem of loading when PS is always showing that it is loading?
Apr 06, 2025 pm 06:30 PM
PS card is "Loading"? Solutions include: checking the computer configuration (memory, hard disk, processor), cleaning hard disk fragmentation, updating the graphics card driver, adjusting PS settings, reinstalling PS, and developing good programming habits.
 How to solve the problem of loading when the PS opens the file?
Apr 06, 2025 pm 06:33 PM
How to solve the problem of loading when the PS opens the file?
Apr 06, 2025 pm 06:33 PM
"Loading" stuttering occurs when opening a file on PS. The reasons may include: too large or corrupted file, insufficient memory, slow hard disk speed, graphics card driver problems, PS version or plug-in conflicts. The solutions are: check file size and integrity, increase memory, upgrade hard disk, update graphics card driver, uninstall or disable suspicious plug-ins, and reinstall PS. This problem can be effectively solved by gradually checking and making good use of PS performance settings and developing good file management habits.
 What should I do if the PS card is in the loading interface?
Apr 06, 2025 pm 06:54 PM
What should I do if the PS card is in the loading interface?
Apr 06, 2025 pm 06:54 PM
The loading interface of PS card may be caused by the software itself (file corruption or plug-in conflict), system environment (due driver or system files corruption), or hardware (hard disk corruption or memory stick failure). First check whether the computer resources are sufficient, close the background program and release memory and CPU resources. Fix PS installation or check for compatibility issues for plug-ins. Update or fallback to the PS version. Check the graphics card driver and update it, and run the system file check. If you troubleshoot the above problems, you can try hard disk detection and memory testing.
 Is PS slow loading related to the size of the opened file?
Apr 06, 2025 pm 06:06 PM
Is PS slow loading related to the size of the opened file?
Apr 06, 2025 pm 06:06 PM
There are many reasons for slow loading of PS: File size and format: RAW files are huge and time-consuming, while JPEG is smaller and faster; Image compression, color mode: low compression rate and high color digits will slow down loading; PS configuration: insufficient memory or improper cache settings will affect the speed; Hard disk speed: SSD is faster than mechanical hard disk; File management: A large number of files accumulated in a folder will slow down.