Don’t know much about Bitcoin or its price fluctuations but want to make investment decisions to make profits? This machine learning model has your back. It can predict the prices way better than an astrologer. In this article, we will build an ML model for forecasting and predicting Bitcoin price, using ZenML and MLflow. So let’s start our journey to understand how anyone can use ML and MLOps tools to predict the future.
Learning Objectives
- Learn to fetch live data using API efficiently.
- Understand what ZenML is, why we use MLflow, and how you can integrate it with ZenML.
- Explore the deployment process for machine learning models, from idea to production.
- Discover how to create a user-friendly Streamlit app for interactive machine-learning model predictions.
This article was published as a part of theData Science Blogathon.
Table of Contents
- Problem Statement
- Project Implementation
- Step 1: Accessing the API
- Step 2: Connecting to Database Using MongoDB
- Step 3: Integration of MLflow with ZenML
- Step 4: Data Ingestion
- Step 5: Data Cleaning
- Step 6: Feature Engineering
- Step 7: Data Splitting
- Step 8: Model Training
- Step 9: Model Evaluation
- Step 10: Model Deployment
- Step 11: Building the Streamlit App
- Frequently Asked Questions
Problem Statement
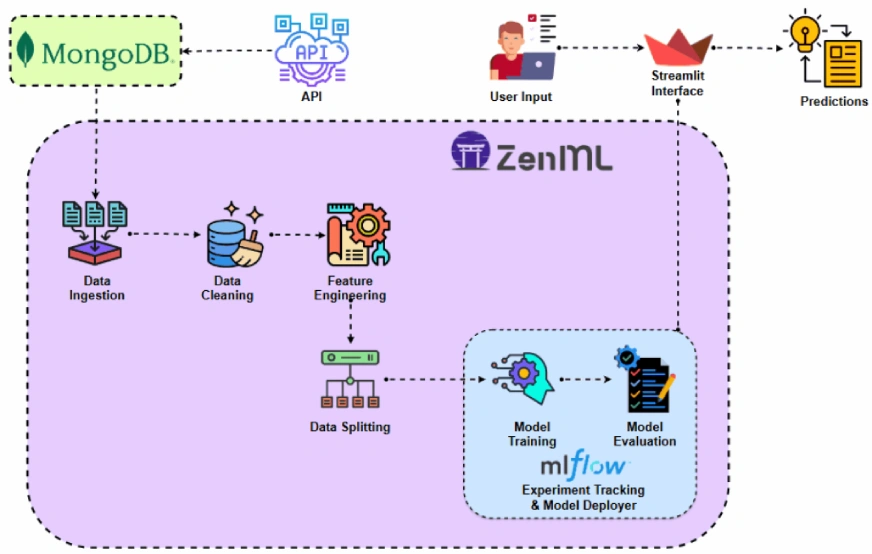
Bitcoin prices are highly volatile, and making predictions is next to impossible. In our project, we are usingMLOps’ best practicesto build an LSTM model to forecast Bitcoinprices and trends.
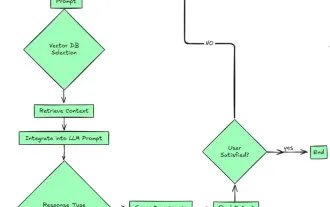
Before implementing the project let’s look at the project architecture.

Project Implementation
Let’s begin by accessing the API.
Why are we doing this? You can get historical Bitcoin price data from different datasets, but with an API, we can have access to live market data.
Step 1: Accessing the API
-
Sign up for API Access:
Once you sign up on theCCData API page. You can get the free API key from this pagehttps://developers.cryptocompare.com/documentation/data-api/index_cc_v1_historical_days
-
Fetch Bitcoin Price Data:
With the code below, you can fetch Bitcoin price data from the CCData API and convert it into a pandas DataFrame. Also, keep the API key in the .env file.
1 2 3 4 5 6 7 8 9 10 11 12 13 14 15 16 17 18 19 20 21 22 23 24 25 26 27 28 29 30 31 32 33 34 35 36 | import requests
import pandas as pd
from dotenv import load_dotenv
import os
# Load the .env file
load_dotenv()
def fetch_crypto_data(api_uri):
response = requests.get(
api_uri,
params={
"market": "cadli",
"instrument": "BTC-USD",
"limit": 5000,
"aggregate": 1,
"fill": "true",
"apply_mapping": "true",
"response_format": "JSON"
},
headers={"Content-type": "application/json; charset=UTF-8"}
)
if response.status_code == 200:
print('API Connection Successful! \nFetching the data...')
data = response.json()
data_list = data.get('Data', [])
df = pd.DataFrame(data_list)
df['DATE'] = pd.to_datetime(df['TIMESTAMP'], unit='s')
return df # Return the DataFrame
else:
raise Exception(f"API Error: {response.status_code} - {response.text}")
|
Copy after login
Copy after login
Copy after login
Copy after login
Step 2: Connecting to Database Using MongoDB
MongoDB is a NoSQL database known for its adaptability, expandability, and ability to store unstructured data in a JSON-like format.
1 2 3 4 5 6 7 8 9 10 11 12 13 14 15 16 17 18 19 20 21 22 23 24 25 26 27 28 29 30 31 32 33 34 35 36 | import requests
import pandas as pd
from dotenv import load_dotenv
import os
# Load the .env file
load_dotenv()
def fetch_crypto_data(api_uri):
response = requests.get(
api_uri,
params={
"market": "cadli",
"instrument": "BTC-USD",
"limit": 5000,
"aggregate": 1,
"fill": "true",
"apply_mapping": "true",
"response_format": "JSON"
},
headers={"Content-type": "application/json; charset=UTF-8"}
)
if response.status_code == 200:
print('API Connection Successful! \nFetching the data...')
data = response.json()
data_list = data.get('Data', [])
df = pd.DataFrame(data_list)
df['DATE'] = pd.to_datetime(df['TIMESTAMP'], unit='s')
return df # Return the DataFrame
else:
raise Exception(f"API Error: {response.status_code} - {response.text}")
|
Copy after login
Copy after login
Copy after login
Copy after login
This code connects to MongoDB, retrieves Bitcoin price data through an API, and updates the database with all new entries after the latest logged date.
Introducing ZenML
ZenMLis an open-source platform tailored for machine learning operations, supporting the creation of flexible and production-ready pipelines. Additionally, ZenML integrates with multiple machine learning tools likeMLflow, BentoML, etc., to create seamless ML pipelines.
⚠️ If you are a Windows user, try to install wsl on your system. Zenml does not support Windows.
In this project, we will implement a traditional pipeline, which uses ZenML, and we will be integrating MLflow with ZenML, for experiment tracking.
Pre-requisites and Basic ZenML Commands
-
Python 3.12 or higher: You can get it from here:https://www.python.org/downloads/
- Activate your Virtual Environment:
1 2 3 4 5 6 7 8 9 10 11 12 13 14 15 16 17 18 19 20 21 22 23 24 25 26 27 28 29 30 31 32 33 34 35 36 | import os
from pymongo import MongoClient
from dotenv import load_dotenv
from data.management.api import fetch_crypto_data # Import the API function
import pandas as pd
load_dotenv()
MONGO_URI = os.getenv("MONGO_URI")
API_URI = os.getenv("API_URI")
client = MongoClient(MONGO_URI, ssl=True, ssl_certfile=None, ssl_ca_certs=None)
db = client['crypto_data']
collection = db['historical_data']
try:
latest_entry = collection.find_one(sort=[("DATE", -1)]) # Find the latest date
if latest_entry:
last_date = pd.to_datetime(latest_entry['DATE']).strftime('%Y-%m-%d')
else:
last_date = '2011-03-27' # Default start date if MongoDB is empty
print(f"Fetching data starting from {last_date}...")
new_data_df = fetch_crypto_data(API_URI)
if latest_entry:
new_data_df = new_data_df[new_data_df['DATE'] > last_date]
if not new_data_df.empty:
data_to_insert = new_data_df.to_dict(orient='records')
result = collection.insert_many(data_to_insert)
print(f"Inserted {len(result.inserted_ids)} new records into MongoDB.")
else:
print("No new data to insert.")
except Exception as e:
print(f"An error occurred: {e}")
|
Copy after login
Copy after login
Copy after login
- ZenML Commands:
All the core ZenML Commands along with their functionalities are provided below:
1 2 3 4 5 | #create a virtual environment
python3 -m venv venv
#Activate your virtual environmnent in your project folder
source venv/bin/activate
|
Copy after login
Copy after login
Copy after login
Step 3: Integration of MLflow with ZenML
We are using MLflow for experiment tracking, to track our model, artifacts, metrics, and hyperparameter values. We are registering MLflow for experiment tracking and model deployer here:
1 2 3 4 5 6 7 8 9 10 11 12 13 14 15 16 17 18 19 20 | #Install zenml
pip install zenml
#To Launch zenml server and dashboard locally
pip install "zenml[server]"
#To check the zenml Version:
zenml version
#To initiate a new repository
zenml init
#To run the dashboard locally:
zenml login --local
#To know the status of our zenml Pipelines
zenml show
#To shutdown the zenml server
zenml clean
|
Copy after login
Copy after login
Copy after login
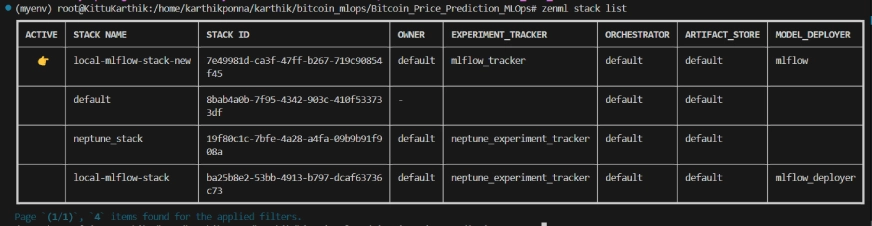
ZenML Stack List
Project Structure
Here, you can see the layout of the project. Now let’s discuss it one by one in great detail.
1 2 3 4 5 6 7 8 9 10 11 12 13 14 | #Integrating mlflow with ZenML
zenml integration install mlflow -y
#Register the experiment tracker
zenml experiment-tracker register mlflow_tracker --flavor=mlflow
#Registering the model deployer
zenml model-deployer register mlflow --flavor=mlflow
#Registering the stack
zenml stack register local-mlflow-stack-new -a default -o default -d mlflow -e mlflow_tracker --set
#To view the stack list
zenml stack --list
|
Copy after login
Copy after login
Copy after login
Step 4: Data Ingestion
We first ingest data from API to MongoDB and convert it into pandas DataFrame.
1 2 3 4 5 6 7 8 9 10 11 12 13 14 15 16 17 18 19 20 21 22 23 24 25 26 27 28 29 30 31 32 33 34 35 36 37 38 39 40 41 42 43 | bitcoin_price_prediction_mlops/ # Project directory
├── data/
│ └── management/
│ ├── api_to_mongodb.py # Code to fetch data and save it to MongoDB
│ └── api.py # API-related utility functions
│
├── pipelines/
│ ├── deployment_pipeline.py # Deployment pipeline
│ └── training_pipeline.py # Training pipeline
│
├── saved_models/ # Directory for storing trained models
├── saved_scalers/ # Directory for storing scalers used in data preprocessing
│
├── src/ # Source code
│ ├── data_cleaning.py # Data cleaning and preprocessing
│ ├── data_ingestion.py # Data ingestion
│ ├── data_splitter.py # Data splitting
│ ├── feature_engineering.py # Feature engineering
│ ├── model_evaluation.py # Model evaluation
│ └── model_training.py # Model training
│
├── steps/ # ZenML steps
│ ├── clean_data.py # ZenML step for cleaning data
│ ├── data_splitter.py # ZenML step for data splitting
│ ├── dynamic_importer.py # ZenML step for importing dynamic data
│ ├── feature_engineering.py # ZenML step for feature engineering
│ ├── ingest_data.py # ZenML step for data ingestion
│ ├── model_evaluation.py # ZenML step for model evaluation
│ ├── model_training.py # ZenML step for training the model
│ ├── prediction_service_loader.py # ZenML step for loading prediction services
│ ├── predictor.py # ZenML step for prediction
│ └── utils.py # Utility functions for steps
│
├── .env # Environment variables file
├── .gitignore # Git ignore file
│
├── app.py # Streamlit user interface app
│
├── README.md # Project documentation
├── requirements.txt # List of required packages
├── run_deployment.py # Code for running deployment and prediction pipeline
├── run_pipeline.py # Code for running training pipeline
└── .zen/ # ZenML directory (created automatically after ZenML initialization)
|
Copy after login
Copy after login
Copy after login
we add @step as a decorator to the ingest_data() function to declare it as a step of our training pipeline. In the same way, we will write code for each step in the project architecture and create the pipeline.
To view how I have used the @step decorator, check out the GitHub link below (steps folder) to go through the code for other steps of the pipeline i.e. data cleaning, feature engineering, data splitting, model training, and model evaluation.
Step 5: Data Cleaning
In this step, we will create different strategies for cleaning the ingested data. We will drop the unwanted columns and missing values in the data.
1 2 3 4 5 6 7 8 9 10 11 12 13 14 15 16 17 18 19 20 21 22 23 24 25 26 27 28 29 30 31 32 33 34 35 36 | import requests
import pandas as pd
from dotenv import load_dotenv
import os
# Load the .env file
load_dotenv()
def fetch_crypto_data(api_uri):
response = requests.get(
api_uri,
params={
"market": "cadli",
"instrument": "BTC-USD",
"limit": 5000,
"aggregate": 1,
"fill": "true",
"apply_mapping": "true",
"response_format": "JSON"
},
headers={"Content-type": "application/json; charset=UTF-8"}
)
if response.status_code == 200:
print('API Connection Successful! \nFetching the data...')
data = response.json()
data_list = data.get('Data', [])
df = pd.DataFrame(data_list)
df['DATE'] = pd.to_datetime(df['TIMESTAMP'], unit='s')
return df # Return the DataFrame
else:
raise Exception(f"API Error: {response.status_code} - {response.text}")
|
Copy after login
Copy after login
Copy after login
Copy after login
Step 6: Feature Engineering
This step takes the cleaned data from the earlier data_cleaning step. We are creating new features like Simple Moving Average (SMA), Exponential Moving Average (EMA), and lagged and rolling statistics to capture trends, reduce noise, and make more reliable predictions from time-series data. Additionally, we scale the features and target variables using Minmax scaling.
1 2 3 4 5 6 7 8 9 10 11 12 13 14 15 16 17 18 19 20 21 22 23 24 25 26 27 28 29 30 31 32 33 34 35 36 | import os
from pymongo import MongoClient
from dotenv import load_dotenv
from data.management.api import fetch_crypto_data # Import the API function
import pandas as pd
load_dotenv()
MONGO_URI = os.getenv("MONGO_URI")
API_URI = os.getenv("API_URI")
client = MongoClient(MONGO_URI, ssl=True, ssl_certfile=None, ssl_ca_certs=None)
db = client['crypto_data']
collection = db['historical_data']
try:
latest_entry = collection.find_one(sort=[("DATE", -1)]) # Find the latest date
if latest_entry:
last_date = pd.to_datetime(latest_entry['DATE']).strftime('%Y-%m-%d')
else:
last_date = '2011-03-27' # Default start date if MongoDB is empty
print(f"Fetching data starting from {last_date}...")
new_data_df = fetch_crypto_data(API_URI)
if latest_entry:
new_data_df = new_data_df[new_data_df['DATE'] > last_date]
if not new_data_df.empty:
data_to_insert = new_data_df.to_dict(orient='records')
result = collection.insert_many(data_to_insert)
print(f"Inserted {len(result.inserted_ids)} new records into MongoDB.")
else:
print("No new data to insert.")
except Exception as e:
print(f"An error occurred: {e}")
|
Copy after login
Copy after login
Copy after login
Step 7: Data Splitting
Now, we split the processed data into training and testing datasets in the ratio of 80:20.
1 2 3 4 5 | #create a virtual environment
python3 -m venv venv
#Activate your virtual environmnent in your project folder
source venv/bin/activate
|
Copy after login
Copy after login
Copy after login
Step 8: Model Training
In this step, we train theLSTM model with early stopping to prevent overfitting, and by using MLflow’s automated logging to track our model and experiments and save the trained model as lstm_model.keras.
1 2 3 4 5 6 7 8 9 10 11 12 13 14 15 16 17 18 19 20 | #Install zenml
pip install zenml
#To Launch zenml server and dashboard locally
pip install "zenml[server]"
#To check the zenml Version:
zenml version
#To initiate a new repository
zenml init
#To run the dashboard locally:
zenml login --local
#To know the status of our zenml Pipelines
zenml show
#To shutdown the zenml server
zenml clean
|
Copy after login
Copy after login
Copy after login
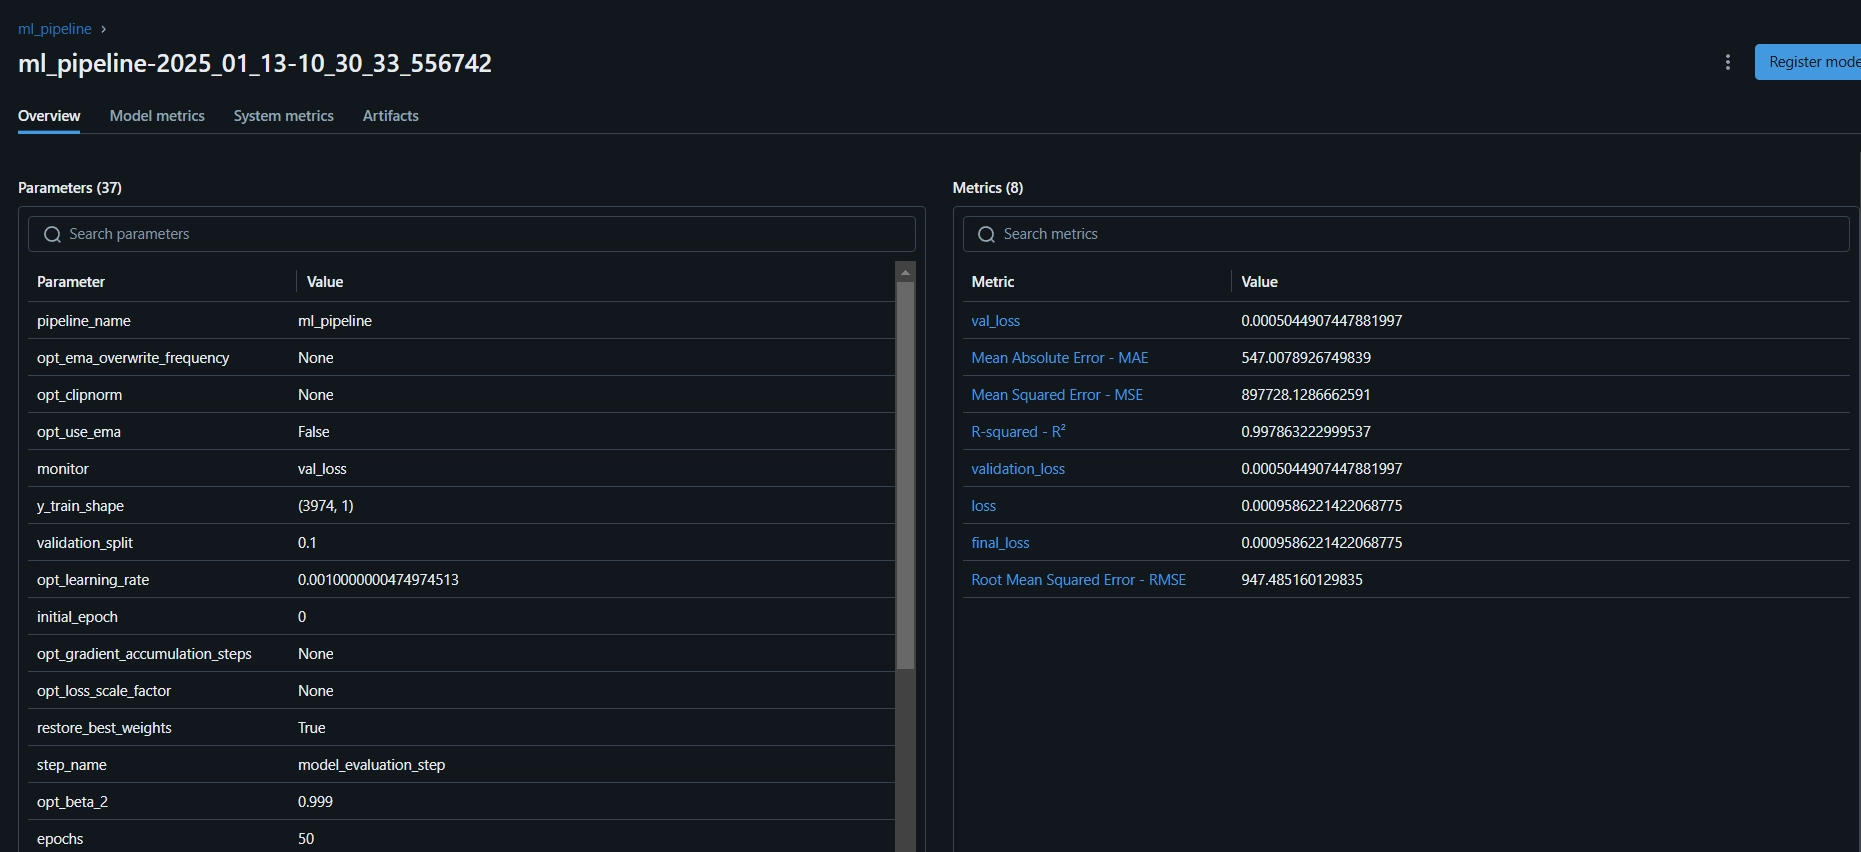
Step 9: Model Evaluation
As this is a regression problem, we are using evaluation metrics like Mean Squared Error (MSE), Root Mean Squared Error (MSE), Mean Absolute Error (MAE), and R-squared.
1 2 3 4 5 6 7 8 9 10 11 12 13 14 | #Integrating mlflow with ZenML
zenml integration install mlflow -y
#Register the experiment tracker
zenml experiment-tracker register mlflow_tracker --flavor=mlflow
#Registering the model deployer
zenml model-deployer register mlflow --flavor=mlflow
#Registering the stack
zenml stack register local-mlflow-stack-new -a default -o default -d mlflow -e mlflow_tracker --set
#To view the stack list
zenml stack --list
|
Copy after login
Copy after login
Copy after login
Now we shall organize all the above steps into a pipeline. Let’s create a new file training_pipeline.py.
1 2 3 4 5 6 7 8 9 10 11 12 13 14 15 16 17 18 19 20 21 22 23 24 25 26 27 28 29 30 31 32 33 34 35 36 37 38 39 40 41 42 43 | bitcoin_price_prediction_mlops/ # Project directory
├── data/
│ └── management/
│ ├── api_to_mongodb.py # Code to fetch data and save it to MongoDB
│ └── api.py # API-related utility functions
│
├── pipelines/
│ ├── deployment_pipeline.py # Deployment pipeline
│ └── training_pipeline.py # Training pipeline
│
├── saved_models/ # Directory for storing trained models
├── saved_scalers/ # Directory for storing scalers used in data preprocessing
│
├── src/ # Source code
│ ├── data_cleaning.py # Data cleaning and preprocessing
│ ├── data_ingestion.py # Data ingestion
│ ├── data_splitter.py # Data splitting
│ ├── feature_engineering.py # Feature engineering
│ ├── model_evaluation.py # Model evaluation
│ └── model_training.py # Model training
│
├── steps/ # ZenML steps
│ ├── clean_data.py # ZenML step for cleaning data
│ ├── data_splitter.py # ZenML step for data splitting
│ ├── dynamic_importer.py # ZenML step for importing dynamic data
│ ├── feature_engineering.py # ZenML step for feature engineering
│ ├── ingest_data.py # ZenML step for data ingestion
│ ├── model_evaluation.py # ZenML step for model evaluation
│ ├── model_training.py # ZenML step for training the model
│ ├── prediction_service_loader.py # ZenML step for loading prediction services
│ ├── predictor.py # ZenML step for prediction
│ └── utils.py # Utility functions for steps
│
├── .env # Environment variables file
├── .gitignore # Git ignore file
│
├── app.py # Streamlit user interface app
│
├── README.md # Project documentation
├── requirements.txt # List of required packages
├── run_deployment.py # Code for running deployment and prediction pipeline
├── run_pipeline.py # Code for running training pipeline
└── .zen/ # ZenML directory (created automatically after ZenML initialization)
|
Copy after login
Copy after login
Copy after login
Here,@pipelinedecorator is used to define the functionml_pipeline() as a pipeline in ZenML.
To view the dashboard for the training pipeline, simply run the run_pipeline.py script. Let’s create a run_pipeline.py file.
1 2 3 4 5 6 7 8 9 10 11 12 13 14 15 16 17 18 19 20 21 22 23 24 25 26 27 28 29 30 31 32 33 34 35 36 37 38 39 40 41 42 43 44 45 46 47 48 49 50 51 52 53 54 55 56 57 58 59 60 61 62 63 64 65 66 67 68 69 70 71 72 | import os
import logging
from pymongo import MongoClient
from dotenv import load_dotenv
from zenml import step
import pandas as pd
# Load the .env file
load_dotenv()
# Get MongoDB URI from environment variables
MONGO_URI = os.getenv("MONGO_URI")
def fetch_data_from_mongodb(collection_name:str, database_name:str):
"""
Fetches data from MongoDB and converts it into a pandas DataFrame.
collection_name:
Name of the MongoDB collection to fetch data.
database_name:
Name of the MongoDB database.
return:
A pandas DataFrame containing the data
"""
# Connect to the MongoDB client
client = MongoClient(MONGO_URI)
db = client[database_name] # Select the database
collection = db[collection_name] # Select the collection
# Fetch all documents from the collection
try:
logging.info(f"Fetching data from MongoDB collection: {collection_name}...")
data = list(collection.find()) # Convert cursor to a list of dictionaries
if not data:
logging.info("No data found in the MongoDB collection.")
# Convert the list of dictionaries into a pandas DataFrame
df = pd.DataFrame(data)
# Drop the MongoDB ObjectId field if it exists (optional)
if '_id' in df.columns:
df = df.drop(columns=['_id'])
logging.info("Data successfully fetched and converted to a DataFrame!")
return df
except Exception as e:
logging.error(f"An error occurred while fetching data: {e}")
raise e
@step(enable_cache=False)
def ingest_data(collection_name: str = "historical_data", database_name: str = "crypto_data") -> pd.DataFrame:
logging.info("Started data ingestion process from MongoDB.")
try:
# Use the fetch_data_from_mongodb function to fetch data
df = fetch_data_from_mongodb(collection_name=collection_name, database_name=database_name)
if df.empty:
logging.warning("No data was loaded. Check the collection name or the database content.")
else:
logging.info(f"Data ingestion completed. Number of records loaded: {len(df)}.")
return df
except Exception as e:
logging.error(f"Error while reading data from {collection_name} in {database_name}: {e}")
raise e
|
Copy after login
Copy after login
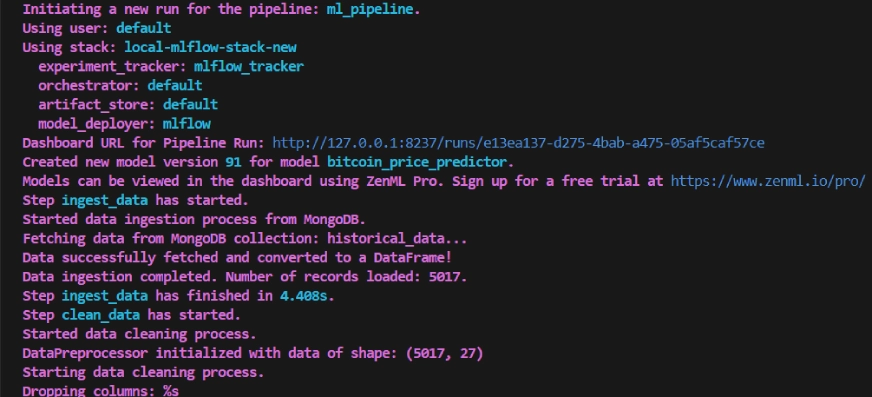
Now we have completed creating the pipeline. Run the command below to view the pipeline dashboard.
1 2 3 4 5 6 7 8 9 10 11 12 13 14 15 16 17 18 19 20 21 22 23 24 25 26 27 28 29 30 31 32 33 34 35 36 37 38 39 40 41 42 43 44 45 46 47 48 49 50 51 52 53 54 55 56 57 58 59 60 61 62 63 | class DataPreprocessor:
def __init__(self, data: pd.DataFrame):
self.data = data
logging.info("DataPreprocessor initialized with data of shape: %s", data.shape)
def clean_data(self) -> pd.DataFrame:
"""
Performs data cleaning by removing unnecessary columns, dropping columns with missing values,
and returning the cleaned DataFrame.
Returns:
pd.DataFrame: The cleaned DataFrame with unnecessary and missing-value columns removed.
"""
logging.info("Starting data cleaning process.")
# Drop unnecessary columns, including '_id' if it exists
columns_to_drop = [
'UNIT', 'TYPE', 'MARKET', 'INSTRUMENT',
'FIRST_MESSAGE_TIMESTAMP', 'LAST_MESSAGE_TIMESTAMP',
'FIRST_MESSAGE_VALUE', 'HIGH_MESSAGE_VALUE', 'HIGH_MESSAGE_TIMESTAMP',
'LOW_MESSAGE_VALUE', 'LOW_MESSAGE_TIMESTAMP', 'LAST_MESSAGE_VALUE',
'TOTAL_INDEX_UPDATES', 'VOLUME_TOP_TIER', 'QUOTE_VOLUME_TOP_TIER',
'VOLUME_DIRECT', 'QUOTE_VOLUME_DIRECT', 'VOLUME_TOP_TIER_DIRECT',
'QUOTE_VOLUME_TOP_TIER_DIRECT', '_id' # Adding '_id' to the list
]
logging.info("Dropping columns: %s")
self.data = self.drop_columns(self.data, columns_to_drop)
# Drop columns where the number of missing values is greater than 0
logging.info("Dropping columns with missing values.")
self.data = self.drop_columns_with_missing_values(self.data)
logging.info("Data cleaning completed. Data shape after cleaning: %s", self.data.shape)
return self.data
def drop_columns(self, data: pd.DataFrame, columns: list) -> pd.DataFrame:
"""
Drops specified columns from the DataFrame.
Returns:
pd.DataFrame: The DataFrame with the specified columns removed.
"""
logging.info("Dropping columns: %s", columns)
return data.drop(columns=columns, errors='ignore')
def drop_columns_with_missing_values(self, data: pd.DataFrame) -> pd.DataFrame:
"""
Drops columns with any missing values from the DataFrame.
Parameters:
data: pd.DataFrame
The DataFrame from which columns with missing values will be removed.
Returns:
pd.DataFrame: The DataFrame with columns containing missing values removed.
"""
missing_columns = data.columns[data.isnull().sum() > 0]
if not missing_columns.empty:
logging.info("Columns with missing values: %s", missing_columns.tolist())
else:
logging.info("No columns with missing values found.")
return data.loc[:, data.isnull().sum() == 0]
|
Copy after login
Copy after login
After running the above command it will return the tracking dashboard URL, which looks like this.
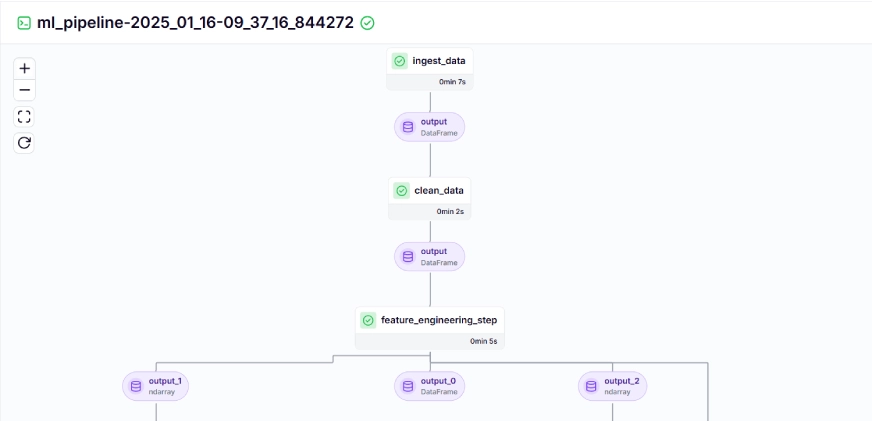
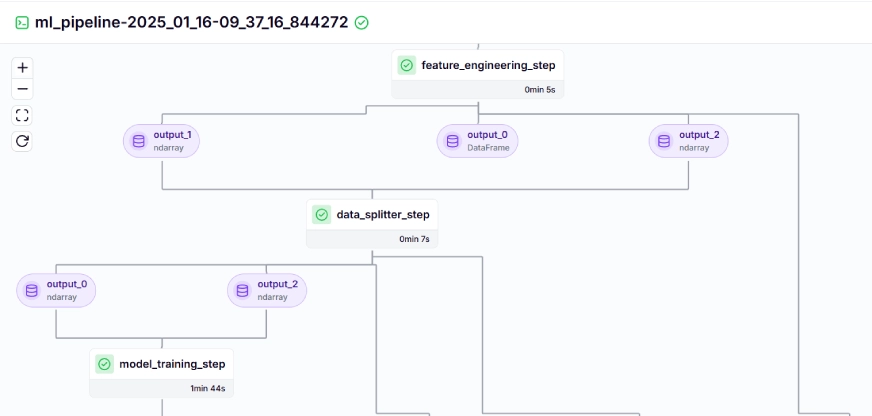
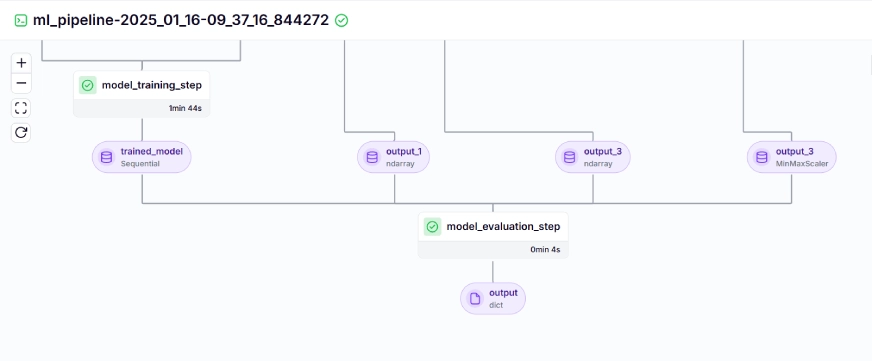
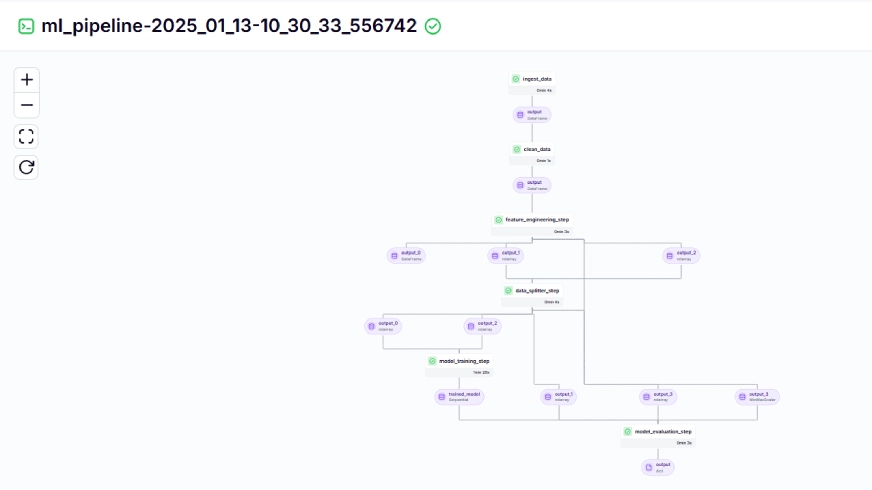
The training pipeline looks like this in the dashboard, given below:
Step 10: Model Deployment
Till now we have built the model and the pipelines. Now let’s push the pipeline into production where users can make predictions.
Continuous Deployment Pipeline
1 2 3 4 5 6 7 8 9 10 11 12 13 14 15 16 17 18 19 20 21 22 23 24 25 26 27 28 29 30 31 32 33 34 35 36 37 38 39 40 41 42 43 44 45 46 47 48 49 50 51 52 53 54 55 56 57 58 59 60 61 62 63 64 65 66 67 68 69 70 71 72 73 74 75 76 77 78 79 80 81 82 83 84 85 86 87 88 89 90 91 92 | import joblib
import pandas as pd
from abc import ABC, abstractmethod
from sklearn.preprocessing import MinMaxScaler
# Abstract class for Feature Engineering strategy
class FeatureEngineeringStrategy(ABC):
@abstractmethod
def generate_features(self, df: pd.DataFrame) -> pd.DataFrame:
pass
# Concrete class for calculating SMA, EMA, RSI, and other features
class TechnicalIndicators(FeatureEngineeringStrategy):
def generate_features(self, df: pd.DataFrame) -> pd.DataFrame:
# Calculate SMA, EMA, and RSI
df['SMA_20'] = df['CLOSE'].rolling(window=20).mean()
df['SMA_50'] = df['CLOSE'].rolling(window=50).mean()
df['EMA_20'] = df['CLOSE'].ewm(span=20, adjust=False).mean()
# Price difference features
df['OPEN_CLOSE_diff'] = df['OPEN'] - df['CLOSE']
df['HIGH_LOW_diff'] = df['HIGH'] - df['LOW']
df['HIGH_OPEN_diff'] = df['HIGH'] - df['OPEN']
df['CLOSE_LOW_diff'] = df['CLOSE'] - df['LOW']
# Lagged features
df['OPEN_lag1'] = df['OPEN'].shift(1)
df['CLOSE_lag1'] = df['CLOSE'].shift(1)
df['HIGH_lag1'] = df['HIGH'].shift(1)
df['LOW_lag1'] = df['LOW'].shift(1)
# Rolling statistics
df['CLOSE_roll_mean_14'] = df['CLOSE'].rolling(window=14).mean()
df['CLOSE_roll_std_14'] = df['CLOSE'].rolling(window=14).std()
# Drop rows with missing values (due to rolling windows, shifts)
df.dropna(inplace=True)
return df
# Abstract class for Scaling strategy
class ScalingStrategy(ABC):
@abstractmethod
def scale(self, df: pd.DataFrame, features: list, target: str):
pass
# Concrete class for MinMax Scaling
class MinMaxScaling(ScalingStrategy):
def scale(self, df: pd.DataFrame, features: list, target: str):
"""
Scales the features and target using MinMaxScaler.
Parameters:
df: pd.DataFrame
The DataFrame containing the features and target.
features: list
List of feature column names.
target: str
The target column name.
Returns:
pd.DataFrame, pd.DataFrame: Scaled features and target
"""
scaler_X = MinMaxScaler(feature_range=(0, 1))
scaler_y = MinMaxScaler(feature_range=(0, 1))
X_scaled = scaler_X.fit_transform(df[features].values)
y_scaled = scaler_y.fit_transform(df[[target]].values)
joblib.dump(scaler_X, 'saved_scalers/scaler_X.pkl')
joblib.dump(scaler_y, 'saved_scalers/scaler_y.pkl')
return X_scaled, y_scaled, scaler_y
# FeatureEngineeringContext: This will use the Strategy Pattern
class FeatureEngineering:
def __init__(self, feature_strategy: FeatureEngineeringStrategy, scaling_strategy: ScalingStrategy):
self.feature_strategy = feature_strategy
self.scaling_strategy = scaling_strategy
def process_features(self, df: pd.DataFrame, features: list, target: str):
# Generate features using the provided strategy
df_with_features = self.feature_strategy.generate_features(df)
# Scale features and target using the provided strategy
X_scaled, y_scaled, scaler_y = self.scaling_strategy.scale(df_with_features, features, target)
return df_with_features, X_scaled, y_scaled, scaler_y
|
Copy after login
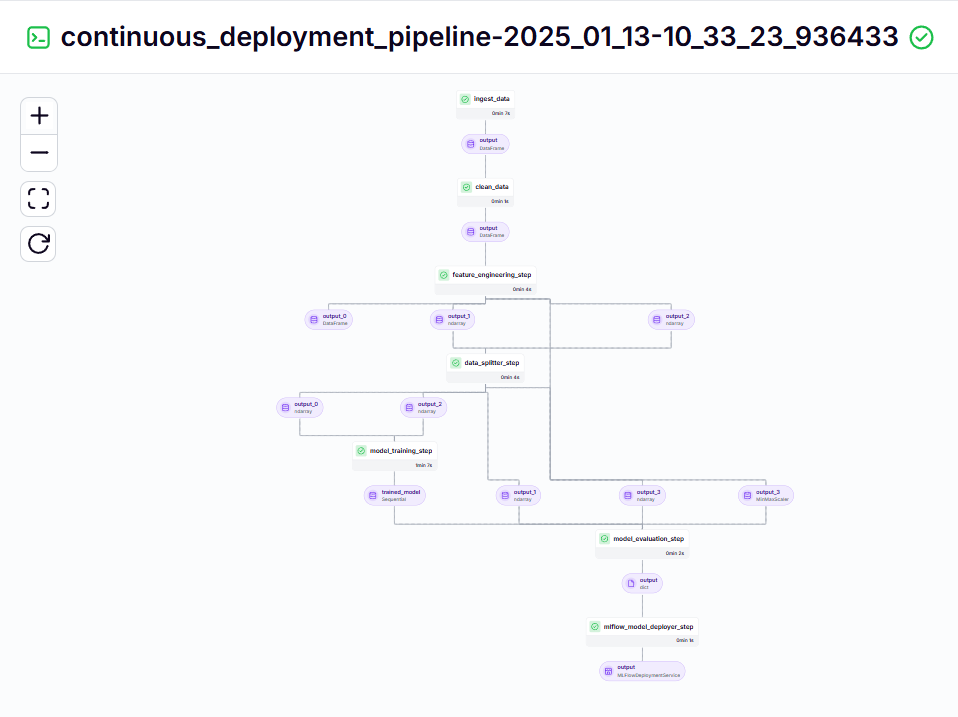
This pipeline is responsible for continuously deploying trained models. It first runs the ml_pipeline()from thetraining_pipeline.py file to train the model, then uses the Mlflow Model Deployerto deploy the trained model using the continuous_deployment_pipeline().
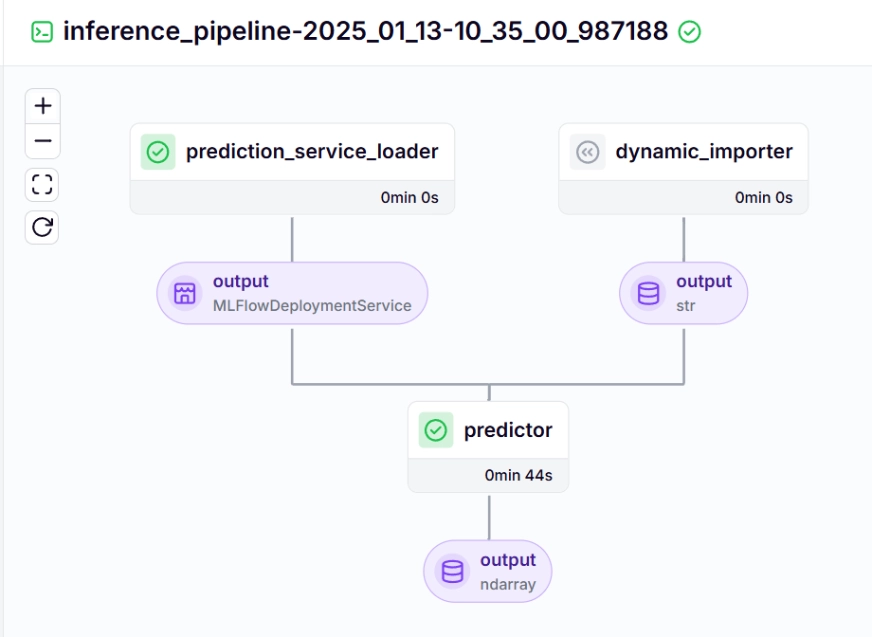
Inference Pipeline
We use an inference pipeline to make predictions on the new data, using the deployed model. Let’s take a look at how we implemented this pipeline in our project.
1 2 3 4 5 6 7 8 9 10 11 12 13 14 15 16 17 18 19 20 21 22 23 24 25 26 27 28 29 30 31 32 33 34 35 36 | import requests
import pandas as pd
from dotenv import load_dotenv
import os
# Load the .env file
load_dotenv()
def fetch_crypto_data(api_uri):
response = requests.get(
api_uri,
params={
"market": "cadli",
"instrument": "BTC-USD",
"limit": 5000,
"aggregate": 1,
"fill": "true",
"apply_mapping": "true",
"response_format": "JSON"
},
headers={"Content-type": "application/json; charset=UTF-8"}
)
if response.status_code == 200:
print('API Connection Successful! \nFetching the data...')
data = response.json()
data_list = data.get('Data', [])
df = pd.DataFrame(data_list)
df['DATE'] = pd.to_datetime(df['TIMESTAMP'], unit='s')
return df # Return the DataFrame
else:
raise Exception(f"API Error: {response.status_code} - {response.text}")
|
Copy after login
Copy after login
Copy after login
Copy after login
Let us see about each of the functions called in the inference pipeline below:
dynamic_importer()
This function loads the new data, performs data processing, and returns the data.
1 2 3 4 5 6 7 8 9 10 11 12 13 14 15 16 17 18 19 20 21 22 23 24 25 26 27 28 29 30 31 32 33 34 35 36 | import os
from pymongo import MongoClient
from dotenv import load_dotenv
from data.management.api import fetch_crypto_data # Import the API function
import pandas as pd
load_dotenv()
MONGO_URI = os.getenv("MONGO_URI")
API_URI = os.getenv("API_URI")
client = MongoClient(MONGO_URI, ssl=True, ssl_certfile=None, ssl_ca_certs=None)
db = client['crypto_data']
collection = db['historical_data']
try:
latest_entry = collection.find_one(sort=[("DATE", -1)]) # Find the latest date
if latest_entry:
last_date = pd.to_datetime(latest_entry['DATE']).strftime('%Y-%m-%d')
else:
last_date = '2011-03-27' # Default start date if MongoDB is empty
print(f"Fetching data starting from {last_date}...")
new_data_df = fetch_crypto_data(API_URI)
if latest_entry:
new_data_df = new_data_df[new_data_df['DATE'] > last_date]
if not new_data_df.empty:
data_to_insert = new_data_df.to_dict(orient='records')
result = collection.insert_many(data_to_insert)
print(f"Inserted {len(result.inserted_ids)} new records into MongoDB.")
else:
print("No new data to insert.")
except Exception as e:
print(f"An error occurred: {e}")
|
Copy after login
Copy after login
Copy after login
prediction_service_loader()
This function is decorated with @step. We load the deployment service w.r.t the deployed model based on the pipeline_name, and step_name, where our deployed model is ready to process prediction queries for the new data.
The lineexisting_services=mlflow_model_deployer_component.find_model_server()searches for an available deployment service based on the given parameters like pipeline name and pipeline step name. If no services are available, it indicates that the deployment pipeline has either not been carried out or encountered a problem with the deployment pipeline, so it throws a RuntimeError.
1 2 3 4 5 | #create a virtual environment
python3 -m venv venv
#Activate your virtual environmnent in your project folder
source venv/bin/activate
|
Copy after login
Copy after login
Copy after login
predictor()
The function takes in the MLFlow-deployed model through the MLFlowDeploymentService and the new data. The data is processed further to match the expected format of the model to make real-time inferences.
1 2 3 4 5 6 7 8 9 10 11 12 13 14 15 16 17 18 19 20 | #Install zenml
pip install zenml
#To Launch zenml server and dashboard locally
pip install "zenml[server]"
#To check the zenml Version:
zenml version
#To initiate a new repository
zenml init
#To run the dashboard locally:
zenml login --local
#To know the status of our zenml Pipelines
zenml show
#To shutdown the zenml server
zenml clean
|
Copy after login
Copy after login
Copy after login
To visualize the continuous deployment and inference pipeline, we need to run the run_deployment.py script, where the deployment and prediction configurations will be defined. (Please check the run_deployment.py code in the GitHub given below).
1 2 3 4 5 6 7 8 9 10 11 12 13 14 | #Integrating mlflow with ZenML
zenml integration install mlflow -y
#Register the experiment tracker
zenml experiment-tracker register mlflow_tracker --flavor=mlflow
#Registering the model deployer
zenml model-deployer register mlflow --flavor=mlflow
#Registering the stack
zenml stack register local-mlflow-stack-new -a default -o default -d mlflow -e mlflow_tracker --set
#To view the stack list
zenml stack --list
|
Copy after login
Copy after login
Copy after login
Now let’s run the run_deployment.py file to see the dashboard of the continuous deployment pipeline and inference pipeline.
1 2 3 4 5 6 7 8 9 10 11 12 13 14 15 16 17 18 19 20 21 22 23 24 25 26 27 28 29 30 31 32 33 34 35 36 37 38 39 40 41 42 43 | bitcoin_price_prediction_mlops/ # Project directory
├── data/
│ └── management/
│ ├── api_to_mongodb.py # Code to fetch data and save it to MongoDB
│ └── api.py # API-related utility functions
│
├── pipelines/
│ ├── deployment_pipeline.py # Deployment pipeline
│ └── training_pipeline.py # Training pipeline
│
├── saved_models/ # Directory for storing trained models
├── saved_scalers/ # Directory for storing scalers used in data preprocessing
│
├── src/ # Source code
│ ├── data_cleaning.py # Data cleaning and preprocessing
│ ├── data_ingestion.py # Data ingestion
│ ├── data_splitter.py # Data splitting
│ ├── feature_engineering.py # Feature engineering
│ ├── model_evaluation.py # Model evaluation
│ └── model_training.py # Model training
│
├── steps/ # ZenML steps
│ ├── clean_data.py # ZenML step for cleaning data
│ ├── data_splitter.py # ZenML step for data splitting
│ ├── dynamic_importer.py # ZenML step for importing dynamic data
│ ├── feature_engineering.py # ZenML step for feature engineering
│ ├── ingest_data.py # ZenML step for data ingestion
│ ├── model_evaluation.py # ZenML step for model evaluation
│ ├── model_training.py # ZenML step for training the model
│ ├── prediction_service_loader.py # ZenML step for loading prediction services
│ ├── predictor.py # ZenML step for prediction
│ └── utils.py # Utility functions for steps
│
├── .env # Environment variables file
├── .gitignore # Git ignore file
│
├── app.py # Streamlit user interface app
│
├── README.md # Project documentation
├── requirements.txt # List of required packages
├── run_deployment.py # Code for running deployment and prediction pipeline
├── run_pipeline.py # Code for running training pipeline
└── .zen/ # ZenML directory (created automatically after ZenML initialization)
|
Copy after login
Copy after login
Copy after login
Continuous Deployment Pipeline – Output
Inference Pipeline – Output
After running the run_deployment.py file you can see the MLflow dashboard link which looks like this.
1 2 3 4 5 6 7 8 9 10 11 12 13 14 15 16 17 18 19 20 21 22 23 24 25 26 27 28 29 30 31 32 33 34 35 36 37 38 39 40 41 42 43 44 45 46 47 48 49 50 51 52 53 54 55 56 57 58 59 60 61 62 63 64 65 66 67 68 69 70 71 72 | import os
import logging
from pymongo import MongoClient
from dotenv import load_dotenv
from zenml import step
import pandas as pd
# Load the .env file
load_dotenv()
# Get MongoDB URI from environment variables
MONGO_URI = os.getenv("MONGO_URI")
def fetch_data_from_mongodb(collection_name:str, database_name:str):
"""
Fetches data from MongoDB and converts it into a pandas DataFrame.
collection_name:
Name of the MongoDB collection to fetch data.
database_name:
Name of the MongoDB database.
return:
A pandas DataFrame containing the data
"""
# Connect to the MongoDB client
client = MongoClient(MONGO_URI)
db = client[database_name] # Select the database
collection = db[collection_name] # Select the collection
# Fetch all documents from the collection
try:
logging.info(f"Fetching data from MongoDB collection: {collection_name}...")
data = list(collection.find()) # Convert cursor to a list of dictionaries
if not data:
logging.info("No data found in the MongoDB collection.")
# Convert the list of dictionaries into a pandas DataFrame
df = pd.DataFrame(data)
# Drop the MongoDB ObjectId field if it exists (optional)
if '_id' in df.columns:
df = df.drop(columns=['_id'])
logging.info("Data successfully fetched and converted to a DataFrame!")
return df
except Exception as e:
logging.error(f"An error occurred while fetching data: {e}")
raise e
@step(enable_cache=False)
def ingest_data(collection_name: str = "historical_data", database_name: str = "crypto_data") -> pd.DataFrame:
logging.info("Started data ingestion process from MongoDB.")
try:
# Use the fetch_data_from_mongodb function to fetch data
df = fetch_data_from_mongodb(collection_name=collection_name, database_name=database_name)
if df.empty:
logging.warning("No data was loaded. Check the collection name or the database content.")
else:
logging.info(f"Data ingestion completed. Number of records loaded: {len(df)}.")
return df
except Exception as e:
logging.error(f"Error while reading data from {collection_name} in {database_name}: {e}")
raise e
|
Copy after login
Copy after login
Now you need to copy and paste the above MLflow UI link in your command line and run it.
Here isthe MLflow dashboard, where you can see the evaluation metrics and model parameters:
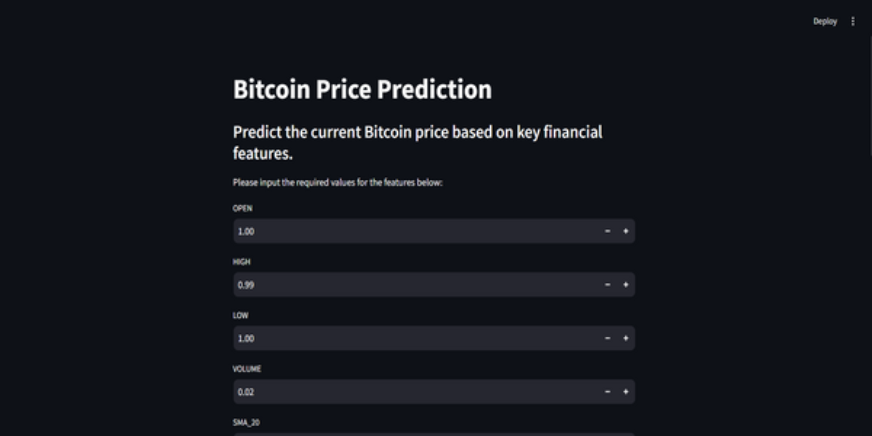
Step 11: Building the Streamlit App
Streamlit is an amazing open-source, Python-based framework, used to create interactive UI’s, we can use Streamlit to build web apps quickly, without knowing backend or frontend development. First, we need to install Streamlit on our system.
1 2 3 4 5 6 7 8 9 10 11 12 13 14 15 16 17 18 19 20 21 22 23 24 25 26 27 28 29 30 31 32 33 34 35 36 37 38 39 40 41 42 43 44 45 46 47 48 49 50 51 52 53 54 55 56 57 58 59 60 61 62 63 | class DataPreprocessor:
def __init__(self, data: pd.DataFrame):
self.data = data
logging.info("DataPreprocessor initialized with data of shape: %s", data.shape)
def clean_data(self) -> pd.DataFrame:
"""
Performs data cleaning by removing unnecessary columns, dropping columns with missing values,
and returning the cleaned DataFrame.
Returns:
pd.DataFrame: The cleaned DataFrame with unnecessary and missing-value columns removed.
"""
logging.info("Starting data cleaning process.")
# Drop unnecessary columns, including '_id' if it exists
columns_to_drop = [
'UNIT', 'TYPE', 'MARKET', 'INSTRUMENT',
'FIRST_MESSAGE_TIMESTAMP', 'LAST_MESSAGE_TIMESTAMP',
'FIRST_MESSAGE_VALUE', 'HIGH_MESSAGE_VALUE', 'HIGH_MESSAGE_TIMESTAMP',
'LOW_MESSAGE_VALUE', 'LOW_MESSAGE_TIMESTAMP', 'LAST_MESSAGE_VALUE',
'TOTAL_INDEX_UPDATES', 'VOLUME_TOP_TIER', 'QUOTE_VOLUME_TOP_TIER',
'VOLUME_DIRECT', 'QUOTE_VOLUME_DIRECT', 'VOLUME_TOP_TIER_DIRECT',
'QUOTE_VOLUME_TOP_TIER_DIRECT', '_id' # Adding '_id' to the list
]
logging.info("Dropping columns: %s")
self.data = self.drop_columns(self.data, columns_to_drop)
# Drop columns where the number of missing values is greater than 0
logging.info("Dropping columns with missing values.")
self.data = self.drop_columns_with_missing_values(self.data)
logging.info("Data cleaning completed. Data shape after cleaning: %s", self.data.shape)
return self.data
def drop_columns(self, data: pd.DataFrame, columns: list) -> pd.DataFrame:
"""
Drops specified columns from the DataFrame.
Returns:
pd.DataFrame: The DataFrame with the specified columns removed.
"""
logging.info("Dropping columns: %s", columns)
return data.drop(columns=columns, errors='ignore')
def drop_columns_with_missing_values(self, data: pd.DataFrame) -> pd.DataFrame:
"""
Drops columns with any missing values from the DataFrame.
Parameters:
data: pd.DataFrame
The DataFrame from which columns with missing values will be removed.
Returns:
pd.DataFrame: The DataFrame with columns containing missing values removed.
"""
missing_columns = data.columns[data.isnull().sum() > 0]
if not missing_columns.empty:
logging.info("Columns with missing values: %s", missing_columns.tolist())
else:
logging.info("No columns with missing values found.")
return data.loc[:, data.isnull().sum() == 0]
|
Copy after login
Copy after login
Again, you can find the code on GitHub for the Streamlit app.
Here’s the GitHub Code and Video Explanation of the Project for your better understanding.
Conclusion
In this article, we have successfully built an end-to-end, production-ready Bitcoin Price Prediction MLOps project. From acquiring data through an API and preprocessing it to model training, evaluation, and deployment, our project highlights the critical role of MLOps in connecting development with production. We’re one step closer to shaping the future of predicting Bitcoin prices in real time. APIs provide smooth access to external data, like Bitcoin price data from the CCData API, eliminating the need for a pre-existing dataset.
Key Takeaways
- APIs enable seamless access to external data, like Bitcoin price data from CCData API, eliminating the need for a pre-existing dataset.
- ZenML and MLflow are robust tools that facilitate the development, tracking, and deployment of machine learning models in real-world applications.
- We have followed best practices by properly performing data ingestion, cleaning, feature engineering, model training, and evaluation.
- Continuous deployment and inference pipelines are essential for ensuring that models remain efficient and available in production environments.
Frequently Asked Questions
Q1. Is ZenML free to use? A. Yes, ZenML is a fully open-source MLOps framework that makes the transition from local development to production pipelines as easy as 1 line of code.
Q2. What is MLflow used for? A. MLflow makes machine learning development easier by offering tools for tracking experiments, versioning models, and deploying them.
Q3. How to debug the server daemon is not running error? A. This is a common error you will face in the project. Just run `zenml logout –local` then `zenml clean`, and then `zenml login –local`, again run the pipeline. It will be resolved.
The above is the detailed content of Bitcoin Price Prediction Using MLops. For more information, please follow other related articles on the PHP Chinese website!


 Best AI Art Generators (Free & Paid) for Creative Projects
Apr 02, 2025 pm 06:10 PM
Best AI Art Generators (Free & Paid) for Creative Projects
Apr 02, 2025 pm 06:10 PM
 Getting Started With Meta Llama 3.2 - Analytics Vidhya
Apr 11, 2025 pm 12:04 PM
Getting Started With Meta Llama 3.2 - Analytics Vidhya
Apr 11, 2025 pm 12:04 PM
 Best AI Chatbots Compared (ChatGPT, Gemini, Claude & More)
Apr 02, 2025 pm 06:09 PM
Best AI Chatbots Compared (ChatGPT, Gemini, Claude & More)
Apr 02, 2025 pm 06:09 PM
 Top AI Writing Assistants to Boost Your Content Creation
Apr 02, 2025 pm 06:11 PM
Top AI Writing Assistants to Boost Your Content Creation
Apr 02, 2025 pm 06:11 PM
 Selling AI Strategy To Employees: Shopify CEO's Manifesto
Apr 10, 2025 am 11:19 AM
Selling AI Strategy To Employees: Shopify CEO's Manifesto
Apr 10, 2025 am 11:19 AM
 AV Bytes: Meta's Llama 3.2, Google's Gemini 1.5, and More
Apr 11, 2025 pm 12:01 PM
AV Bytes: Meta's Llama 3.2, Google's Gemini 1.5, and More
Apr 11, 2025 pm 12:01 PM
 Top 7 Agentic RAG System to Build AI Agents
Mar 31, 2025 pm 04:25 PM
Top 7 Agentic RAG System to Build AI Agents
Mar 31, 2025 pm 04:25 PM
 Choosing the Best AI Voice Generator: Top Options Reviewed
Apr 02, 2025 pm 06:12 PM
Choosing the Best AI Voice Generator: Top Options Reviewed
Apr 02, 2025 pm 06:12 PM
