Encountering the “Windows could not complete the installation” can be particularly frustrating, especially when you’re eager to enjoy new features or security updates. This issue often pops up mid-process, halting the upgrade and leaving your system in limbo, sometimes even stuck on a screen with that exact message.
The “Windows could not complete the installation” error typically occurs in the middle of a large Windows update, e.g., from Windows 10 to 11, or when upgrading to a newer Windows 11 build (for example, from 23H2 to 24H2).
It can also happen during a reboot, during the “Installing Windows” phase, or during setting up settings, usually with a percentage that is stuck at 0% or moving erratically. Some are forced to rollback, but some might get a boot loop, making the system unusable.
There can be a whole collection of culprits related to the “Windows could not complete the installation” error, including:
- Damaged system files or update components typically lead the list because they can ruin the installation process.
- Insufficient disk space is another common issue, especially when temporary files are unable to be written.
- Incompatible drivers or third-party software, like antivirus software, can conflict with the upgrade, and hardware issues (think buggy storage or RAM) can lead to failures as well.
- A slow or unstable internet connection during the downloading phase can lead to incomplete and damaged update files.
When considering the “Windows could not complete the installation” problem, consider freeing up some disk space, the removing unnecessary peripherals, or booting in Safe Mode to prevent software conflict. If the main cause of the issue is difficult to determine, software like FortectMac Washing Machine X9 repair can a real time-saver.

Fix 1. Free up disk space
Insufficient storage can halt the upgrade process, as Windows needs ample space to stage and install update files.
- Type Disk Cleanup in Windows search and press Enter.
- In the Disk Cleanup window, select the drive where your Windows operating system is installed (usually drive C:) and click OK.
- Click Clean up system files.
- Select the drive again and click OK.
- In the list of files that can be cleaned up, select the largest portions of data, such as Temporary Internet Files, Windows Update, Temporary Files, and others.
- Click OK to begin the cleanup process.
Fix 2. Disable third-party antivirus
Antivirus software can interfere with the upgrade by blocking critical setup processes, causing the installation to fail.
- Open your antivirus program from the system tray.
- Look for an option to disable real-time protection.
- Once off, restart the upgrade process.
Fix 3. Clear Windows Update cache
Corrupted update files in the cache can disrupt the installation, and clearing them forces Windows to download fresh files.
- Type cmd in Windows search.
- Right-click on Command Prompt and pick Run as administrator.
-
User Account Control (UAC) will ask whether you want to allow changes – click Yes.
- Type the following commands one by one in Command Prompt and press Enter after each:
net stop wuauserv
net stop cryptSvc
net stop bits
net stop msiserver
Ren C:\Windows\SoftwareDistribution SoftwareDistribution.old
Ren C:\Windows\System32\catroot2 Catroot2.old
- When these commands are executed, the last thing to do is to re-enable relevant services:
net start wuauserv
net start cryptSvc
net start bits
net start msiserver
-
Reboot your computer.
Fix 4. Run Startup Repair
For boot loop scenarios, corrupted system files might be the issue, and Startup Repair can fix them to complete the installation.
- Restart Windows – use the Power or Reset button.
- Once the system starts loading, interrupt the process by pressing and holding the Power button for several seconds – do this two more times, and you should enter Windows Recovery Environment.
- From here, select Troubleshoot > Advanced Options and click Startup Repair.
- Allow the Startup Repair process to run and follow any on-screen instructions.
- Wait for the repair to finish and reboot.
Fix 5. Use Windows installation media
For those stuck in a boot loop, using installation media can bypass corrupted update files and complete the setup.
Create Windows ISO
- Download Windows 11 Installation media from the official Microsoft website. [Windows 10 version]
- Double-click the MediaCreationTool.exe file to launch it.
- When UAC shows up, click Yes.
-
Accept license terms.
- Select Language and Edition (make sure it matches the one you have currently installed) or simply mark the Use the recommended options for this PC and click Next).
- Select the ISO file and click Next.
- Pick the location for your ISO file and wait till all the needed files are downloaded, then click Finish.
Repair-install Windows
- Mount your USB drive with Windows ISO in it.
- Boot into BIOS by pressing F2, F8, F12, Del, or another shortcut (refer to your laptop or motherboard manufacturer's website) during the Windows bootup process.
- Go to the Boot menu.
- Here, select the Boot priority option and set it to USB.
-
Restart the system.
- When the system boots, you will be presented with the Install now option – click it.
- Select all the preferences and click Next.
- Skip Windows activation for now – select I don't have a product key.
- Select the correct version of the operating system (if you were using Windows 11 Home before, use the same option).
- In the next step, select Keep personal files and apps.
- Select the correct partition and click Next.
-
Finalize the process – your Windows should be repaired.
Fix 6. Repair system files in WinRe
Repair files in the Windows Recovery environment.
- Access Windows Recovery Environment.
- Select Troubleshoot > Advanced options > Command Prompt.
- In the Command Prompt, type in the following command and press Enter. This command will initiate the scanning process.
sfc /scannow
- Allow some time for the scan to complete and repair any corrupted files found.
- When done, use the following command, pressing Enter after:
Dism /Online /Cleanup-Image /RestoreHealth
- Once finished, restart your system in normal mode.
Fix 7. Uninstall the most recent Windows update
When stuck in a boot loop, advanced startup options can help roll back the failed upgrade or repair the system.
- Access Windows Recovery Environment.
- Select Troubleshoot from the recovery screen.
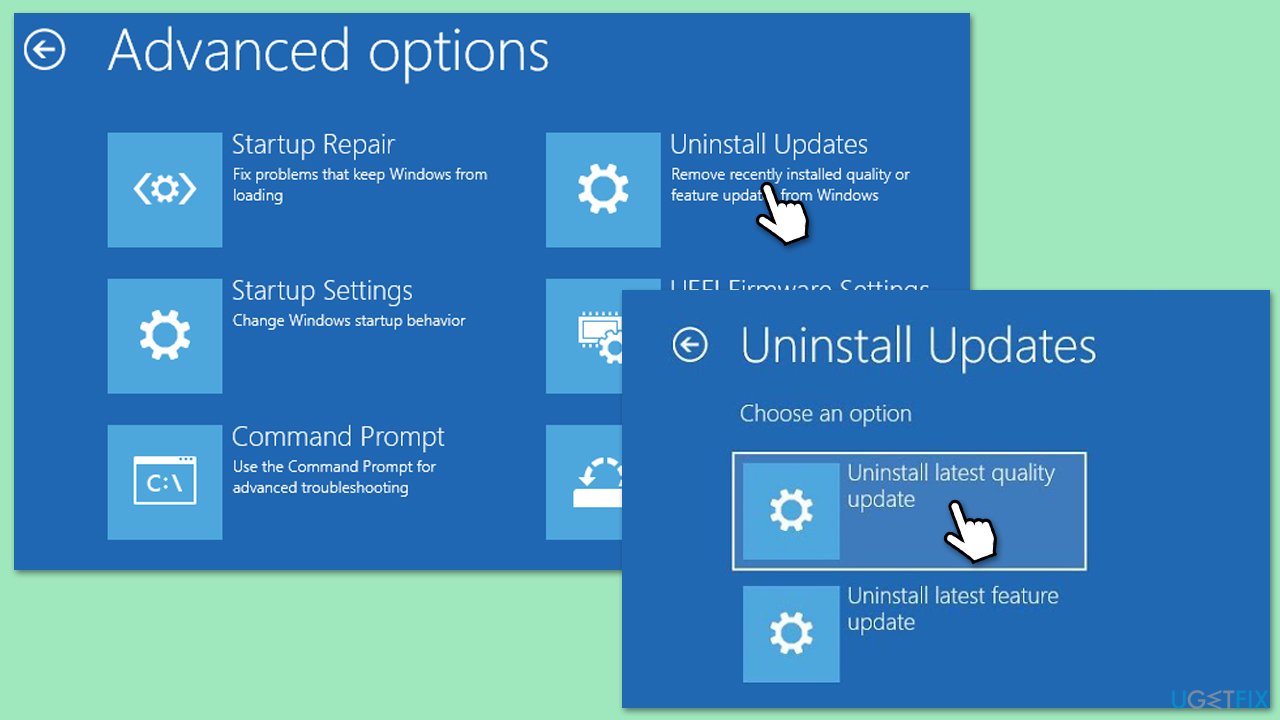
- Choose Advanced options, then select Uninstall Updates.
- Follow prompts to remove the failed update.
The above is the detailed content of How to fix 'Windows could not complete the installation' error during upgrade?. For more information, please follow other related articles on the PHP Chinese website!


![[Web front-end] Node.js quick start](https://img.php.cn/upload/course/000/000/067/662b5d34ba7c0227.png)


