

NVIDIA Shifts To Open-Source GPU Kernel Modules

NVIDIA fully moves to open source GPU core modules

NVIDIA has taken an important step in its commitment to open source software. The company announced that its upcoming R560 driver will be fully switched to open source GPU core modules . This move marks a significant shift in NVIDIA's strategy for driver development and distribution.
Table of contents
- Progress and improvements
- Supported GPUs
- Installer changes
- Package Manager using CUDA Metapackage
- Run file installation
- Install Assistant Script
- Package Manager Details
- Windows Subsystem for Linux
- CUDA toolkit installation
- in conclusion
background
In May 2022, NVIDIA introduced an open source Linux GPU core module in the R515 driver. These modules are released under dual GPL and MIT licenses and were originally targeted at data center computing GPUs. At that time, support for GeForce and workstation GPUs was in the alpha stage.
Progress and improvements
Over the past two years, NVIDIA has made substantial progress:
- Performance : The performance of open source modules has now reached or exceeded the performance of closed source drivers.
- New features :
- Heterogeneous memory management (HMM) support,
- Confidential computing function,
- Support for coherent memory architectures on the Grace platform.
Supported GPUs
The transition to open source modules has different effects on different GPU generations:
- Cutting-edge platforms : Grace Hopper and Blackwell platforms require open source modules.
- Supported GPUs : Newer architectures such as Turing, Ampere, Ada Lovelace and Hopper are fully supported by open source modules.
- Unsupported GPUs : Legacy GPUs from Maxwell, Pascal, and Volta architectures require continued use of proprietary drivers due to compatibility limitations.
- Hybrid deployment : Systems with a mix of old and new GPUs should continue to use proprietary drivers for optimal performance and stability.
If you are not sure which driver to install, don't worry! NVIDIA provides a detection assistant script to guide users to select the right driver.
Installer changes
NVIDIA is changing the default installation method for all installation methods from proprietary drivers to open source drivers.
1. Package Manager using CUDA Metapackage
When installing CUDA toolkits using the package manager, the top-level cuda package installs both the CUDA toolkit and the associated driver version. For example, installing cuda during CUDA version 12.5 provides the proprietary NVIDIA driver 555 and CUDA toolkit 12.5.
Previously, using open source GPU core modules required the installation of the distribution-specific NVIDIA driver open package and the selected cuda-toolkit-XY package.
Starting with CUDA 12.6, this process has changed. The default installation now includes open source drivers.
2. Run the file installation
The .run file installer for CUDA or NVIDIA drivers is now:
- Query your hardware,
- Automatically install the most suitable drivers.
- Provides UI switching to choose between proprietary and open source drivers.
For command line or automated installations (such as Ansible ), use the following override:
<code># 用于CUDA安装sh ./cuda_12.6.0_560.22_linux.run --override --kernel-module-type=proprietary # 用于NVIDIA驱动程序安装sh ./NVIDIA-Linux-x86_64-560.run --kernel-module-type=proprietary</code>
3. Install the Assistant Script
NVIDIA provides an assistant script to guide driver selection. To use it, first install the nvidia-driver-assistant package and then run the script:
<code>$ nvidia-driver-assistant</code>
4. Package Manager Details
NVIDIA recommends using a package manager for consistent CUDA toolkit and driver installation. Here are the release-specific instructions:
Debian-based system :
Install open source drivers:
<code>$ sudo apt-get install nvidia-open</code>
For Ubuntu 20.04, first upgrade to the open kernel module, and then install the open source driver like this:
<code>$ sudo apt-get install -V nvidia-kernel-source-open $ sudo apt-get install nvidia-open</code>
RHEL-based system :
Install open source drivers:
<code>$ sudo dnf module install nvidia-driver:open-dkms</code>
To upgrade using CUDA metapackage, disable module flow:
<code>$ echo "module_hotfixes=1" | tee -a /etc/yum.repos.d/cuda*.repo $ sudo dnf install --allowerasing nvidia-open $ sudo dnf module reset nvidia-driver</code>
SUSE or OpenSUSE :
Select the appropriate command according to your kernel:
<code># 默认内核版本$ sudo zypper install nvidia-open # Azure内核版本(sles15/x86_64) $ sudo zypper install nvidia-open-azure # 64kb内核版本(sles15/sbsa)适用于Grace-Hopper $ sudo zypper install nvidia-open-64k</code>
5. Windows Subsystem for Linux
WSL users do not need to do anything because it uses the NVIDIA kernel driver from the host Windows system.
6. CUDA toolkit installation
The installation process of the CUDA toolkit remains the same. Users can install it through their package manager as before.
<code>$ sudo apt-get/dnf/zypper install cuda-toolkit</code>
For more detailed information about driver installation or CUDA toolkit settings, users can refer to the CUDA installation guide .
in conclusion
NVIDIA's move to open source GPU core modules marks a significant shift in the company's approach to driver development.
I really hope this will improve compatibility, performance, and user choice for a variety of GPU generations and Linux distributions.
resource :
- NVIDIA fully moves to open source GPU core modules
Featured image from Pixabay's Mizter_X94 .
The above is the detailed content of NVIDIA Shifts To Open-Source GPU Kernel Modules. For more information, please follow other related articles on the PHP Chinese website!

Hot AI Tools

Undresser.AI Undress
AI-powered app for creating realistic nude photos

AI Clothes Remover
Online AI tool for removing clothes from photos.

Undress AI Tool
Undress images for free

Clothoff.io
AI clothes remover

AI Hentai Generator
Generate AI Hentai for free.

Hot Article
Hot Tools

Notepad++7.3.1
Easy-to-use and free code editor

SublimeText3 Chinese version
Chinese version, very easy to use

Zend Studio 13.0.1
Powerful PHP integrated development environment

Dreamweaver CS6
Visual web development tools

SublimeText3 Mac version
God-level code editing software (SublimeText3)
Hot Topics
 1379
1379
 52
52

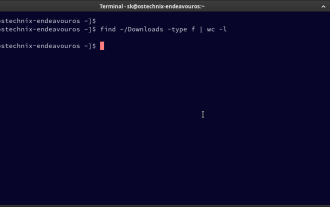 How To Count Files And Directories In Linux: A Beginner's Guide
Mar 19, 2025 am 10:48 AM
How To Count Files And Directories In Linux: A Beginner's Guide
Mar 19, 2025 am 10:48 AM
Efficiently Counting Files and Folders in Linux: A Comprehensive Guide Knowing how to quickly count files and directories in Linux is crucial for system administrators and anyone managing large datasets. This guide demonstrates using simple command-l
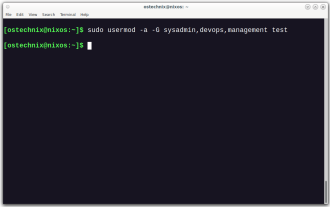 How To Add A User To Multiple Groups In Linux
Mar 18, 2025 am 11:44 AM
How To Add A User To Multiple Groups In Linux
Mar 18, 2025 am 11:44 AM
Efficiently managing user accounts and group memberships is crucial for Linux/Unix system administration. This ensures proper resource and data access control. This tutorial details how to add a user to multiple groups in Linux and Unix systems. We
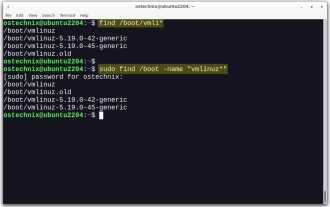 How To List Or Check All Installed Linux Kernels From Commandline
Mar 23, 2025 am 10:43 AM
How To List Or Check All Installed Linux Kernels From Commandline
Mar 23, 2025 am 10:43 AM
Linux Kernel is the core component of a GNU/Linux operating system. Developed by Linus Torvalds in 1991, it is a free, open-source, monolithic, modular, and multitasking Unix-like kernel. In Linux, it is possible to install multiple kernels on a sing
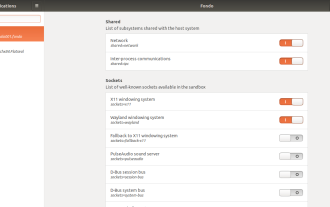 How To Easily Configure Flatpak Apps Permissions With Flatseal
Mar 22, 2025 am 09:21 AM
How To Easily Configure Flatpak Apps Permissions With Flatseal
Mar 22, 2025 am 09:21 AM
Flatpak application permission management tool: Flatseal User Guide Flatpak is a tool designed to simplify Linux software distribution and use. It safely encapsulates applications in a virtual sandbox, allowing users to run applications without root permissions without affecting system security. Because Flatpak applications are located in this sandbox environment, they must request permissions to access other parts of the operating system, hardware devices (such as Bluetooth, network, etc.) and sockets (such as pulseaudio, ssh-auth, cups, etc.). This guide will guide you on how to easily configure Flatpak with Flatseal on Linux
 How To Type Indian Rupee Symbol In Ubuntu Linux
Mar 22, 2025 am 10:39 AM
How To Type Indian Rupee Symbol In Ubuntu Linux
Mar 22, 2025 am 10:39 AM
This brief guide explains how to type Indian Rupee symbol in Linux operating systems. The other day, I wanted to type "Indian Rupee Symbol (₹)" in a word document. My keyboard has a rupee symbol on it, but I don't know how to type it. After
 What is the Linux best used for?
Apr 03, 2025 am 12:11 AM
What is the Linux best used for?
Apr 03, 2025 am 12:11 AM
Linux is best used as server management, embedded systems and desktop environments. 1) In server management, Linux is used to host websites, databases, and applications, providing stability and reliability. 2) In embedded systems, Linux is widely used in smart home and automotive electronic systems because of its flexibility and stability. 3) In the desktop environment, Linux provides rich applications and efficient performance.
 Linux Kernel 6.14 RC6 Released
Mar 24, 2025 am 10:21 AM
Linux Kernel 6.14 RC6 Released
Mar 24, 2025 am 10:21 AM
Linus Torvalds has released Linux Kernel 6.14 Release Candidate 6 (RC6), reporting no significant issues and keeping the release on track. The most notable change in this update addresses an AMD microcode signing issue, while the rest of the updates
 LocalSend - The Open-Source Airdrop Alternative For Secure File Sharing
Mar 24, 2025 am 09:20 AM
LocalSend - The Open-Source Airdrop Alternative For Secure File Sharing
Mar 24, 2025 am 09:20 AM
If you're familiar with AirDrop, you know it's a popular feature developed by Apple Inc. that enables seamless file transfer between supported Macintosh computers and iOS devices using Wi-Fi and Bluetooth. However, if you're using Linux and missing o
