

Mount Drives with Ease: A Guide to Automounting in Linux GUI and CLI


The Linux system automatically mounts the drive, making daily operations more convenient and efficient. This article will introduce in detail how to easily implement automatic drive mount in the GNOME desktop environment.
Why automatically mount?
Normally, storage drives connected to Linux systems are not immediately available and require manual mounts every time they boot. The automatic mount function eliminates this tedious step to ensure that the drive is automatically available when the system starts.
Before you begin: Install the Disk Utility
The GNOME desktop environment comes with a "disk" utility. If not, please install it as follows:
- Open the terminal.
- Enter the command:
sudo apt-get install gnome-disk-utility. - Enter your password and press Enter.
- Wait for the installation to be completed.
You can now use the Disk utility to automatically mount the drive.
Guide to automatically mount drives in GNOME environment
Start Disk Utility: Open the Disk Utility from the GNOME desktop menu. The left panel lists the drives connected to the system, select the drives to automatically mount.
Adjust the mount options: Find the gear icon (additional partition options) below the Volume section, click it, and select Edit mount options.
Setting automatic mount preferences: By default, the User Session Defaults option is enabled. Turn it off to manually set preferences. Check the "System Start Up" check box to ensure that the drive is automatically mounted at startup. You can also select the "Show in the user interface" option to see the drive in the file manager.
Save changes and test: After the settings are complete, click OK. You will be prompted for a password to verify the changes. After entering the password, restart the computer to test whether the drive is automatically mounted.
Automatic mount troubleshooting
If the drive is not automatically mounted at startup, double-check that the Mount Options settings are configured correctly. Also, verify that the drive is working properly and is connected correctly.
Summarize
Automatically mount the drive on Linux systems using GNOME, ensuring that external storage devices are accessible at startup. This guide simplifies the process of automatically mounting a drive, which can be easily operated by even beginners. Say goodbye to the repeated operation of manual mount and enjoy the convenience brought by automatic mount!
The above is the detailed content of Mount Drives with Ease: A Guide to Automounting in Linux GUI and CLI. For more information, please follow other related articles on the PHP Chinese website!

Hot AI Tools

Undresser.AI Undress
AI-powered app for creating realistic nude photos

AI Clothes Remover
Online AI tool for removing clothes from photos.

Undress AI Tool
Undress images for free

Clothoff.io
AI clothes remover

AI Hentai Generator
Generate AI Hentai for free.

Hot Article
Hot Tools

Notepad++7.3.1
Easy-to-use and free code editor

SublimeText3 Chinese version
Chinese version, very easy to use

Zend Studio 13.0.1
Powerful PHP integrated development environment

Dreamweaver CS6
Visual web development tools

SublimeText3 Mac version
God-level code editing software (SublimeText3)
Hot Topics
 1379
1379
 52
52

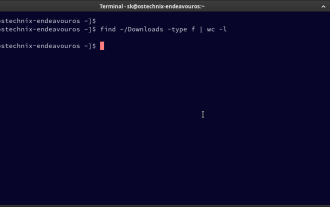 How To Count Files And Directories In Linux: A Beginner's Guide
Mar 19, 2025 am 10:48 AM
How To Count Files And Directories In Linux: A Beginner's Guide
Mar 19, 2025 am 10:48 AM
Efficiently Counting Files and Folders in Linux: A Comprehensive Guide Knowing how to quickly count files and directories in Linux is crucial for system administrators and anyone managing large datasets. This guide demonstrates using simple command-l
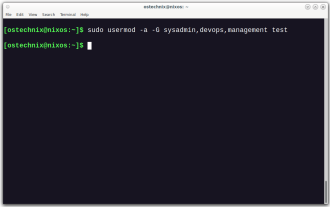 How To Add A User To Multiple Groups In Linux
Mar 18, 2025 am 11:44 AM
How To Add A User To Multiple Groups In Linux
Mar 18, 2025 am 11:44 AM
Efficiently managing user accounts and group memberships is crucial for Linux/Unix system administration. This ensures proper resource and data access control. This tutorial details how to add a user to multiple groups in Linux and Unix systems. We
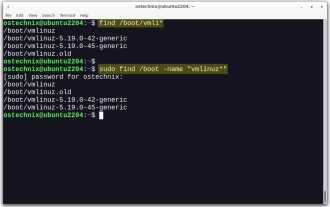 How To List Or Check All Installed Linux Kernels From Commandline
Mar 23, 2025 am 10:43 AM
How To List Or Check All Installed Linux Kernels From Commandline
Mar 23, 2025 am 10:43 AM
Linux Kernel is the core component of a GNU/Linux operating system. Developed by Linus Torvalds in 1991, it is a free, open-source, monolithic, modular, and multitasking Unix-like kernel. In Linux, it is possible to install multiple kernels on a sing
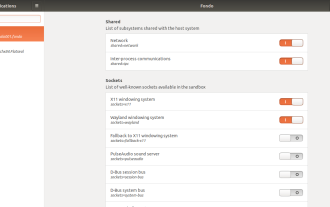 How To Easily Configure Flatpak Apps Permissions With Flatseal
Mar 22, 2025 am 09:21 AM
How To Easily Configure Flatpak Apps Permissions With Flatseal
Mar 22, 2025 am 09:21 AM
Flatpak application permission management tool: Flatseal User Guide Flatpak is a tool designed to simplify Linux software distribution and use. It safely encapsulates applications in a virtual sandbox, allowing users to run applications without root permissions without affecting system security. Because Flatpak applications are located in this sandbox environment, they must request permissions to access other parts of the operating system, hardware devices (such as Bluetooth, network, etc.) and sockets (such as pulseaudio, ssh-auth, cups, etc.). This guide will guide you on how to easily configure Flatpak with Flatseal on Linux
 How To Type Indian Rupee Symbol In Ubuntu Linux
Mar 22, 2025 am 10:39 AM
How To Type Indian Rupee Symbol In Ubuntu Linux
Mar 22, 2025 am 10:39 AM
This brief guide explains how to type Indian Rupee symbol in Linux operating systems. The other day, I wanted to type "Indian Rupee Symbol (₹)" in a word document. My keyboard has a rupee symbol on it, but I don't know how to type it. After
 What is the Linux best used for?
Apr 03, 2025 am 12:11 AM
What is the Linux best used for?
Apr 03, 2025 am 12:11 AM
Linux is best used as server management, embedded systems and desktop environments. 1) In server management, Linux is used to host websites, databases, and applications, providing stability and reliability. 2) In embedded systems, Linux is widely used in smart home and automotive electronic systems because of its flexibility and stability. 3) In the desktop environment, Linux provides rich applications and efficient performance.
 Linux Kernel 6.14 RC6 Released
Mar 24, 2025 am 10:21 AM
Linux Kernel 6.14 RC6 Released
Mar 24, 2025 am 10:21 AM
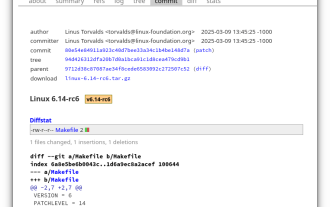
Linus Torvalds has released Linux Kernel 6.14 Release Candidate 6 (RC6), reporting no significant issues and keeping the release on track. The most notable change in this update addresses an AMD microcode signing issue, while the rest of the updates
 LocalSend - The Open-Source Airdrop Alternative For Secure File Sharing
Mar 24, 2025 am 09:20 AM
LocalSend - The Open-Source Airdrop Alternative For Secure File Sharing
Mar 24, 2025 am 09:20 AM
If you're familiar with AirDrop, you know it's a popular feature developed by Apple Inc. that enables seamless file transfer between supported Macintosh computers and iOS devices using Wi-Fi and Bluetooth. However, if you're using Linux and missing o
