
 System Tutorial
LINUX
Now You Can Write ISO Images To USB Disks Directly Using Pv Command In Linux
System Tutorial
LINUX
Now You Can Write ISO Images To USB Disks Directly Using Pv Command In Linux
Now You Can Write ISO Images To USB Disks Directly Using Pv Command In Linux

Say Goodbye to the dd command! The latest Pv (Pipe Viewer) utility can now write ISOs directly to USB disks!! This guide will show you how to use the pv command instead of dd for image writing in Linux.
Using pv command-line utility provides a real-time progress bar, an estimated transfer time (ETA), and greater transparency during the process.
Table of Contents
Introduction
Many of us are familiar with using the dd command to write installer images to storage devices. The dd command is the old-school method for creating bootable USB drives in Linux.
The dd command is quite powerful. It simply reads from one file and writes to another. The typical command to write images to a device looks like this:
sudo dd if=installer.img of=/dev/sda2 bs=1M status=progress
Of course, some other tools like pv (Pipe Viewer) and cat could perform the same task. The primary reason dd is commonly used for this purpose is that it can be run with root privileges, whereas redirecting the output of cat or pv typically requires running the shell with root access. The commandsudo dd ...is more concise thansudo sh -c 'cat ...', isn't?
Limitations of dd
While the dd command works just fine for creating images, it has some limitations:
- The progress information provided by dd does not display the progress as a percentage or calculate an estimated time of arrival (ETA). It only shows the number of bytes written.
- The default block size of dd is not optimized for modern systems, which is why thebs=parameter is often included.
- It's easy to forget to includestatus=progress, and having to specify it each time can be cumbersome.
What is pv Command?
Pv stands for Pipe Viewer, which is a command-line tool that allows users to monitor the progress of data through a pipeline.
It can be inserted into any ordinary pipeline between two processes to give a visual indication of how quickly data is passing through, how long it has taken, and an estimate of how long it will take to complete.
Here are some key features of pv:
- Progress Indication: pv displays a progress bar, percentage completion, elapsed time, and estimated time remaining.
- ETA Calculation: It calculates and updates the estimated time of arrival (ETA) for the completion of the data transfer.
- Buffering: pv can handle buffering, which is useful when dealing with slow devices or network transfers.
- Control and Statistics: It provides control over the data flow and can output statistics about the transfer.
- Flexibility: pv can be used in various scenarios, such as copying files, compressing data, or any other situation where data is piped from one process to another.
The pv command is particularly useful when you need to monitor the progress of operations that might otherwise be invisible, such as when using the dd command to write an image to a disk or when piping data through multiple commands without direct feedback on the transfer rate or progress.
Why Use pv for Writing Files to Block Devices?
The pv utility offers a few advantages over dd:
- pv displays a real-time progress bar and an ETA, providing more detailed information than just bytes written.
- pv automatically determines the optimal buffer sizes, eliminating the need for manual adjustments.
- pv is more concise, as there is no need to specifystatus=progressorbs=....
The Latest pv Command Can Flash ISOs to USB Directly
The recent version of pv (1.8.10) include a new --output (-o) option. This feature allows pv to write directly to a file or device, similar to dd.
The--outputoption in pv version 1.8.10 allows you to redirect the output of the pipe viewer to a file instead of displaying it on the standard output (usually the terminal).
This change can be particularly useful in scenarios where you want to monitor the progress of data transfer while simultaneously saving the output to a file, rather than just displaying it on the terminal.
Now let us go ahead and install the latest pv utility. The latest pv is not yet available in the default repositories of popular Linux operating systems. So we need to install it from source.
To install any software from source, you must install the development tools and GNU Stow. While Stow is optional, I highly recommend you to install it in order to efficiently manage software installed from source.
Install Development Tools
If you haven't install Development tools yet, it is mandatory to install them first. We have documented the steps to install Development tools on various Linux distributions in the link given below:
- How To Install Development Tools In Linux
Install GNU Stow
You can install a software from source without Stow. But I prefer to use GNU Stow to install software from source for efficiently managing them.
Here’s how you can install GNU Stow on various operating systems:
On Ubuntu/Debian
1. Update Package List:
sudo apt update
2. Install Stow:
sudo apt install stow
On Fedora/RHEL/AlmaLinux/Rocky Linux
1. Enable EPEL Repository:
sudo dnf install epel-release
2. Install Stow:
sudo dnf install stow
On older RHEL versions, use yum instead of `dnf'.
Install Latest pv from Source in Linux
After installing the necessary development tools and GNu Stow, you can install the GNU Stow in your Linux system as shown below:
1. Download the latest pv utility from its official releases page:
wget https://codeberg.org/a-j-wood/pv/releases/download/v1.8.10/pv-1.8.10.tar.gz
2. Go to the directory where you downloaded the pv tar file and extract it using command:
tar xvf pv-1.8.10.tar.gz
This will extract the contents of the tar file in a directory called pv-1.8.10 in your current directory.
3. Cd into the extracted directory:
cd pv-1.8.10
4. Configure the Build:
./configure --prefix=/usr/local/stow/pv-1.8.10
This command is used to configure the build process of the software with a specified installation prefix. In this case, it sets the installation directory to /usr/local/stow/pv-1.8.10.
5. Compile the Software:
make
6. Install the pv Software:
sudo make install
7. Use GNU Stow to Manage the Installation:
After installing the software in the specified directory, you can use GNU Stow to create symbolic links from the standard system directories (like /usr/local/bin, /usr/local/lib, etc.) to the files in /usr/local/stow/pv-1.8.10.
To do so, go to the /usr/local/stow directory:
cd /usr/local/stow
And run the following command to create the necessary symlinks:
sudo stow pv-1.8.10
This keeps your system directories clean and makes it easy to manage multiple versions of software.
Now check pv command is available using command:
pv --version
You will see an output like below:
pv 1.8.10
Copyright 2024 Andrew Wood
License: GPLv3  <https:>
This is free software: you are free to change and redistribute it.
There is NO WARRANTY, to the extent permitted by law.

Project web site: <https:></https:></https:>
Congratulations! We have successfully installed the latest 'pv' version 1.8.10.
How to Use pv for Image Writing
Once you installed pv version 1.8.10 in your system, you can use the following command to write an image:
sudo pv installer.iso -Yo /path/to/block/device
Here's the breakdown of the above command:
- sudo: Run the command with root privileges.
- pv: The Pipe Viewer utility.
- installer.iso: The input file (your installer image).
- -Y: Sync after every write, preventing hangs at 100% while flushing buffers.
- -o or --output: Use the new output option to write directly to a file or device.
- /path/to/block/device: The target device (e.g., /dev/sda).
For example, the following output shows that the KDE Neon ISO is being written to an external USB drive /dev/sda:
$ sudo pv neon-user-20240620-0718.iso -Yo /dev/sda
Sample Output:
$ sudo pv neon-user-20240620-0718.iso -Yo /dev/sda
152MiB 0:00:19 [8.25MiB/s] [>                                    ] 5% ETA 0:05:20

As you see in the output above, Pv shows the data transfer speed, progress bar and ETA.
You can now use the newly created USB bootable drive to install Linux on your system.
The latest Pv utility is not only for writing ISOs, but can also be used for writing files to locations that require elevated permissions.
Using pv with sudo for Privileged Locations
One of the significant advantages of the new --output option is its compatibility with sudo. This allows for a more straightforward approach when writing to locations that require elevated permissions, such as block devices.
Previous Workarounds:
Before the --output option, users had to resort to one of the following methods:
1. Using tee with sudo:
pv file | sudo tee /path/to/output >/dev/null
2. Using sudo with a shell command:
sudo sh -c 'pv file > /path/to/output'
3. Starting a root shell and then running pv.
New Simplified Approach:
With the --output option, you can now simply use:
sudo pv file -o /path/to/output
This method combines the progress monitoring capabilities of pv with the ability to write to privileged locations, all in a single, easy-to-use command.
Conclusion
I am not saying that pv is superior to dd. The dd utility is excellent. However, the latest version of pv includes a feature for writing ISO images to USB drives, which I found useful.
Using pv offers a more user-friendly image writing experience with better progress tracking and optimized performance.
The addition of the --output option further simplifies the process, especially when dealing with privileged write locations.
As distributions update to include the latest version of pv, this method will become increasingly accessible and beneficial to users.
Resources:
- pv Codeberg Repository
- pv Website
Suggested Read:
- Etcher – A Beautiful App To Create Bootable USB Drives And SD Cards
- How To Create Multiboot USB Drives With Ventoy In Linux
- Popsicle – Create Multiple Bootable USB Drives At Once
- Bootiso Lets You Safely Create Bootable USB Drive
- MultiCD – Create Multiboot CD, DVD, and USB Images
- How To Write An ISO To The USB Drive Directly From The Internet
- How To Create An ISO From A Bootable USB Drive In Linux
- How To Create Custom Ubuntu Live CD Image
The above is the detailed content of Now You Can Write ISO Images To USB Disks Directly Using Pv Command In Linux. For more information, please follow other related articles on the PHP Chinese website!

Hot AI Tools

Undresser.AI Undress
AI-powered app for creating realistic nude photos

AI Clothes Remover
Online AI tool for removing clothes from photos.

Undress AI Tool
Undress images for free

Clothoff.io
AI clothes remover

AI Hentai Generator
Generate AI Hentai for free.

Hot Article
Hot Tools

Notepad++7.3.1
Easy-to-use and free code editor

SublimeText3 Chinese version
Chinese version, very easy to use

Zend Studio 13.0.1
Powerful PHP integrated development environment

Dreamweaver CS6
Visual web development tools

SublimeText3 Mac version
God-level code editing software (SublimeText3)
Hot Topics
 1377
1377
 52
52

 Mastering Text Manipulation With the Sed Command
Mar 16, 2025 am 09:48 AM
Mastering Text Manipulation With the Sed Command
Mar 16, 2025 am 09:48 AM
The Linux command line interface provides a wealth of text processing tools, one of the most powerful tools is the sed command. sed is the abbreviation of Stream EDitor, a multi-functional tool that allows complex processing of text files and streams. What is Sed? sed is a non-interactive text editor that operates on pipeline inputs or text files. By providing directives, you can let it modify and process text in a file or stream. The most common use cases of sed include selecting text, replacing text, modifying original files, adding lines to text, or removing lines from text. It can be used from the command line in Bash and other command line shells. Sed command syntax sed
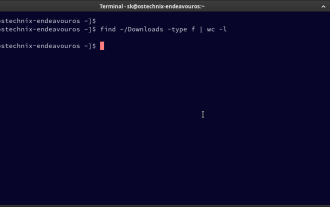 How To Count Files And Directories In Linux: A Beginner's Guide
Mar 19, 2025 am 10:48 AM
How To Count Files And Directories In Linux: A Beginner's Guide
Mar 19, 2025 am 10:48 AM
Efficiently Counting Files and Folders in Linux: A Comprehensive Guide Knowing how to quickly count files and directories in Linux is crucial for system administrators and anyone managing large datasets. This guide demonstrates using simple command-l
 How To Add A User To Multiple Groups In Linux
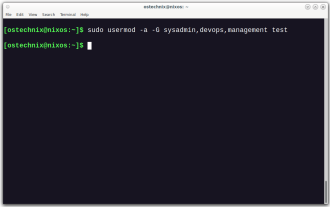
Mar 18, 2025 am 11:44 AM
How To Add A User To Multiple Groups In Linux
Mar 18, 2025 am 11:44 AM
Efficiently managing user accounts and group memberships is crucial for Linux/Unix system administration. This ensures proper resource and data access control. This tutorial details how to add a user to multiple groups in Linux and Unix systems. We
 How To List Or Check All Installed Linux Kernels From Commandline
Mar 23, 2025 am 10:43 AM
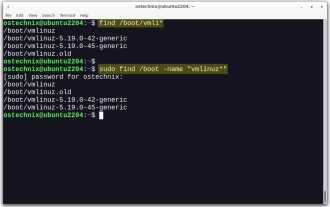
How To List Or Check All Installed Linux Kernels From Commandline
Mar 23, 2025 am 10:43 AM
Linux Kernel is the core component of a GNU/Linux operating system. Developed by Linus Torvalds in 1991, it is a free, open-source, monolithic, modular, and multitasking Unix-like kernel. In Linux, it is possible to install multiple kernels on a sing
 How To Type Indian Rupee Symbol In Ubuntu Linux
Mar 22, 2025 am 10:39 AM
How To Type Indian Rupee Symbol In Ubuntu Linux
Mar 22, 2025 am 10:39 AM
This brief guide explains how to type Indian Rupee symbol in Linux operating systems. The other day, I wanted to type "Indian Rupee Symbol (₹)" in a word document. My keyboard has a rupee symbol on it, but I don't know how to type it. After
 Linux Kernel 6.14 RC6 Released
Mar 24, 2025 am 10:21 AM
Linux Kernel 6.14 RC6 Released
Mar 24, 2025 am 10:21 AM
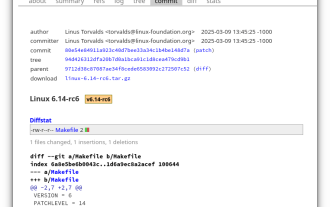
Linus Torvalds has released Linux Kernel 6.14 Release Candidate 6 (RC6), reporting no significant issues and keeping the release on track. The most notable change in this update addresses an AMD microcode signing issue, while the rest of the updates
 The 8 Best SSH Clients for Linux
Mar 15, 2025 am 11:06 AM
The 8 Best SSH Clients for Linux
Mar 15, 2025 am 11:06 AM
Recommended 8 best SSH clients for Linux system SSH (Secure Shell Protocol) is an encrypted network protocol used to securely run network services on an unsecure network. It is an important part of modern server management and provides secure remote access to the system. SSH clients (applications that utilize the SSH protocol) are an indispensable tool for system administrators, developers and IT professionals. Remote server management is common in the Linux world, and choosing the right SSH client is crucial. This article will discuss 8 best SSH clients for Linux. Selection criteria When choosing the best SSH client for Linux, the following factors must be considered: Performance: Speed and efficiency of SSH clients
 LocalSend - The Open-Source Airdrop Alternative For Secure File Sharing
Mar 24, 2025 am 09:20 AM
LocalSend - The Open-Source Airdrop Alternative For Secure File Sharing
Mar 24, 2025 am 09:20 AM
If you're familiar with AirDrop, you know it's a popular feature developed by Apple Inc. that enables seamless file transfer between supported Macintosh computers and iOS devices using Wi-Fi and Bluetooth. However, if you're using Linux and missing o
