

How I Run the Flux Model on 8GB GPU RAM? - Analytics Vidhya

Black Forest Labs' recently released Flux model has gained popularity for its impressive image generation capabilities. However, its size initially prevented its use on standard consumer hardware. This limitation spurred the use of API services to avoid local model loading. However, on-premise deployment remained costly due to GPU requirements. Fortunately, Hugging Face's Diffusers library now supports quantization via BitsAndBytes, allowing Flux inference on machines with only 8GB of GPU RAM.

Learning Objectives:
- Configure dependencies for using Flux in a Colab environment.
- Encode text prompts using a 4-bit quantized text encoder for memory efficiency.
- Implement memory-saving techniques for loading and running image generation models in mixed precision.
- Generate images from text prompts using the Flux pipeline in Colab.
This article is part of the Data Science Blogathon.
Table of Contents:
- Learning Objectives
- What is Flux?
- Why Quantization Matters?
- Quantization with BitsAndBytes
- How BitsAndBytes Works?
- Running Flux on Consumer Hardware
- Step 1: Environment Setup
- Step 2: GPU Memory Management
- Step 3: Loading the 4-Bit T5 Text Encoder
- Step 4: Generating Text Embeddings
- Step 5: Loading the 4-Bit Transformer and VAE
- Step 6: Image Generation
- The Future of On-Device Image Generation
- Conclusion
- Key Takeaways
- Frequently Asked Questions
What is Flux?
Flux, developed by Black Forest Labs (the creators of Stable Diffusion), represents a significant advancement in text-to-image models. It builds upon Stable Diffusion, offering improved performance and output quality. While initially resource-intensive, optimizations allow for efficient execution on consumer hardware. This article demonstrates how quantization enhances Flux's accessibility. The image below illustrates the trade-off between creative potential and computational cost.

Flux boasts several key architectural components:
- Two pre-trained text encoders (CLIP and T5): These encoders improve text prompt understanding and translation into images.
- Transformer-based DiT model: This denoising backbone leverages Transformers for efficiency and accuracy.
- Variational Auto-Encoder (VAE): Processing in latent space reduces computational demands while maintaining image quality.
Flux is available in several versions: Flux-Schnell (open-source), Flux-Dev (open, with a more restrictive license), and Flux-Pro (closed-source, API-accessible).

Why Quantization Matters?
Quantization, a technique to reduce model size by storing parameters using fewer bits, is crucial for running large models on limited hardware. While less common in image generation, it significantly reduces memory footprint without substantial performance loss. Neural network parameters are typically stored in 32 bits, but quantization can reduce this to 4 bits.
Quantization with BitsAndBytes
The BitsAndBytes library enables efficient k-bit quantization for PyTorch. Its integration into the Diffusers library makes running Flux on 8GB GPUs feasible.
How BitsAndBytes Works?
BitsAndBytes quantizes to 8 and 4-bit precision. 8-bit quantization handles outliers differently to minimize performance degradation. 4-bit quantization further compresses the model, often used with QLoRA for fine-tuning.
Running Flux on Consumer Hardware
Step 1: Environment Setup
Ensure a GPU-enabled environment (e.g., NVIDIA T4/L4 or Google Colab). Install necessary packages:
!pip install -Uq git https://github.com/huggingface/diffusers@main
!pip install -Uq git https://github.com/huggingface/transformers@main
!pip install -Uq bitsandbytes
Import dependencies:
import diffusers
import transformers
import bitsandbytes as bnb
from diffusers import FluxPipeline, FluxTransformer2DModel
from transformers import T5EncoderModel
import torch
import gc
Step 2: GPU Memory Management
Define a function to clear GPU memory between model loads:
def flush():
    gc.collect()
    torch.cuda.empty_cache()
    torch.cuda.reset_max_memory_allocated()
    torch.cuda.reset_peak_memory_stats()

flush()Step 3: Loading the 4-Bit T5 Text Encoder
Load the T5 encoder using 4-bit quantization:
ckpt_id = "black-forest-labs/FLUX.1-dev"
ckpt_4bit_id = "hf-internal-testing/flux.1-dev-nf4-pkg"
prompt = "a cute dog in paris photoshoot"

text_encoder_2_4bit = T5EncoderModel.from_pretrained(
    ckpt_4bit_id,
    subfolder="text_encoder_2",
)Step 4: Generating Text Embeddings
Encode the prompt using the quantized encoder:
pipeline = FluxPipeline.from_pretrained(
    "black-forest-labs/FLUX.1-dev",
    text_encoder_2=text_encoder_2_4bit,
    transformer=None,
    vae=None,
    torch_dtype=torch.float16,
)

with torch.no_grad():
    prompt_embeds, pooled_prompt_embeds, text_ids = pipeline.encode_prompt(
        prompt=prompt, prompt_2=None, max_sequence_length=256
    )

del pipeline
flush()Step 5: Loading the 4-Bit Transformer and VAE
Load the Transformer and VAE in 4-bit mode:
transformer_4bit = FluxTransformer2DModel.from_pretrained(ckpt_4bit_id, subfolder="transformer")
pipeline = FluxPipeline.from_pretrained(
    ckpt_id,
    text_encoder=None,
    text_encoder_2=None,
    tokenizer=None,
    tokenizer_2=None,
    transformer=transformer_4bit,
    torch_dtype=torch.float16,
)

pipeline.enable_model_cpu_offload()Step 6: Image Generation
Generate the image:
print("Running denoising.")
height, width = 512, 768
images = pipeline(
    prompt_embeds=prompt_embeds,
    pooled_prompt_embeds=pooled_prompt_embeds,
    num_inference_steps=50,
    guidance_scale=5.5,
    height=height,
    width=width,
    output_type="pil",
).images

images[0]
The Future of On-Device Image Generation
Quantization and efficient model handling bring powerful AI to consumer hardware, democratizing access to advanced image generation.
Conclusion
Flux, combined with quantization, enables high-quality image generation on 8GB GPUs. This advancement makes sophisticated AI accessible to a wider audience.
Key Takeaways:
- Flux runs efficiently in Colab using 4-bit quantization and mixed precision.
-
diffusersandtransformerssimplify image generation. - Effective memory management enables large model execution on limited resources.
Frequently Asked Questions (same as original, but reformatted for better readability)
Q1. Purpose of 4-bit quantization? 4-bit quantization reduces memory usage, allowing large models like Flux to run efficiently on limited resources.
Q2. Changing the text prompt? Replace the prompt variable with your desired text description.
Q3. Adjusting image quality/style? Adjust num_inference_steps (quality) and guidance_scale (prompt adherence) in the pipeline call.
Q4. Handling memory errors in Colab? Ensure GPU usage, 4-bit quantization, and mixed precision. Consider lowering num_inference_steps or using CPU offloading.
Q5. Running the script locally? Yes, but ensure sufficient GPU resources and memory.
The above is the detailed content of How I Run the Flux Model on 8GB GPU RAM? - Analytics Vidhya. For more information, please follow other related articles on the PHP Chinese website!

Hot AI Tools

Undresser.AI Undress
AI-powered app for creating realistic nude photos

AI Clothes Remover
Online AI tool for removing clothes from photos.

Undress AI Tool
Undress images for free

Clothoff.io
AI clothes remover

AI Hentai Generator
Generate AI Hentai for free.

Hot Article
Hot Tools

Notepad++7.3.1
Easy-to-use and free code editor

SublimeText3 Chinese version
Chinese version, very easy to use

Zend Studio 13.0.1
Powerful PHP integrated development environment

Dreamweaver CS6
Visual web development tools

SublimeText3 Mac version
God-level code editing software (SublimeText3)
Hot Topics
 1384
1384
 52
52

 I Tried Vibe Coding with Cursor AI and It's Amazing!
Mar 20, 2025 pm 03:34 PM
I Tried Vibe Coding with Cursor AI and It's Amazing!
Mar 20, 2025 pm 03:34 PM
Vibe coding is reshaping the world of software development by letting us create applications using natural language instead of endless lines of code. Inspired by visionaries like Andrej Karpathy, this innovative approach lets dev
 Top 5 GenAI Launches of February 2025: GPT-4.5, Grok-3 & More!
Mar 22, 2025 am 10:58 AM
Top 5 GenAI Launches of February 2025: GPT-4.5, Grok-3 & More!
Mar 22, 2025 am 10:58 AM
February 2025 has been yet another game-changing month for generative AI, bringing us some of the most anticipated model upgrades and groundbreaking new features. From xAI’s Grok 3 and Anthropic’s Claude 3.7 Sonnet, to OpenAI’s G
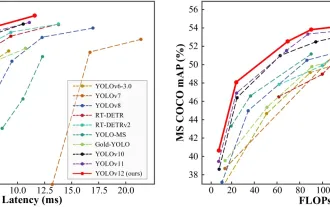 How to Use YOLO v12 for Object Detection?
Mar 22, 2025 am 11:07 AM
How to Use YOLO v12 for Object Detection?
Mar 22, 2025 am 11:07 AM
YOLO (You Only Look Once) has been a leading real-time object detection framework, with each iteration improving upon the previous versions. The latest version YOLO v12 introduces advancements that significantly enhance accuracy
 Best AI Art Generators (Free & Paid) for Creative Projects
Apr 02, 2025 pm 06:10 PM
Best AI Art Generators (Free & Paid) for Creative Projects
Apr 02, 2025 pm 06:10 PM
The article reviews top AI art generators, discussing their features, suitability for creative projects, and value. It highlights Midjourney as the best value for professionals and recommends DALL-E 2 for high-quality, customizable art.
 Is ChatGPT 4 O available?
Mar 28, 2025 pm 05:29 PM
Is ChatGPT 4 O available?
Mar 28, 2025 pm 05:29 PM
ChatGPT 4 is currently available and widely used, demonstrating significant improvements in understanding context and generating coherent responses compared to its predecessors like ChatGPT 3.5. Future developments may include more personalized interactions and real-time data processing capabilities, further enhancing its potential for various applications.
 Which AI is better than ChatGPT?
Mar 18, 2025 pm 06:05 PM
Which AI is better than ChatGPT?
Mar 18, 2025 pm 06:05 PM
The article discusses AI models surpassing ChatGPT, like LaMDA, LLaMA, and Grok, highlighting their advantages in accuracy, understanding, and industry impact.(159 characters)
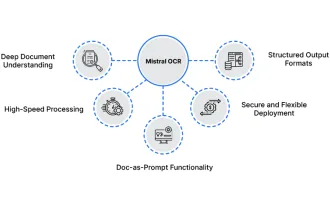 How to Use Mistral OCR for Your Next RAG Model
Mar 21, 2025 am 11:11 AM
How to Use Mistral OCR for Your Next RAG Model
Mar 21, 2025 am 11:11 AM
Mistral OCR: Revolutionizing Retrieval-Augmented Generation with Multimodal Document Understanding Retrieval-Augmented Generation (RAG) systems have significantly advanced AI capabilities, enabling access to vast data stores for more informed respons
 Best AI Chatbots Compared (ChatGPT, Gemini, Claude & More)
Apr 02, 2025 pm 06:09 PM
Best AI Chatbots Compared (ChatGPT, Gemini, Claude & More)
Apr 02, 2025 pm 06:09 PM
The article compares top AI chatbots like ChatGPT, Gemini, and Claude, focusing on their unique features, customization options, and performance in natural language processing and reliability.
