

Excel Power Query tutorial for beginners: how to get, use and auto-refresh

This comprehensive Power Query tutorial is your entry point to mastering advanced data transformations in Excel. You will learn how to import data from diverse sources, transform and merge it according to your requirements, write formulas in the M language, automate query refreshes, and more.
In the ever-evolving world, data is essential for practically everything we do, from making crucial business decisions to settling friendly debates about the best pizza toppings. However, information often comes from different sources, in different formats, and sometimes seems as organized as a toddler's toy chest. So, here's the conundrum - how can we import, transform, and analyze data in Excel without spending hours on manual manipulations or writing complex formulas? The solution is Power Query, an invaluable tool for any data analyst, saving hours of time, reducing manual errors, and transforming an unruly informational chaos into a harmonious symphony of insights.
What is Power Query in Excel?
Power Query, also known as Get & Transform, is a multi-purpose tool in Microsoft Excel and Power BI programs that allows you to import data from a wide variety of sources and transform that data to meet your specific needs.
It was first introduced as an add-in for Excel 2010 and later became a native feature in Excel 2016 and subsequent versions. Power Query (PQ) provides a user-friendly interface for connecting to various data sources, shaping, merging and cleaning your data, and then loading it into Excel for in-depth analysis and polished reporting in the form of pivot tables, charts, dashboards, and more.

In essence, Power Query empowers Excel users to effortlessly extract, manipulate, and organize data from an expansive array of sources, making it a game-changer for professionals dealing with complex datasets.
What can Power Query be used for?
Power Query is a versatile tool with a multitude of applications. Here are some common uses:
Data extraction. Connect to various data sources, including databases, Excel files, text files, and online services.
Data transformation. A wide range of data transformation functions are available to reshape your data into a more suitable structure for analysis, such as filtering, sorting, grouping, merging, splitting columns into multiple fields, creating calculated columns, and more.
Data cleansing. Data quality is crucial for accurate analysis. PQ provides tools to identify and correct errors, remove duplicates, trim extra spaces, fill missing values, and standardize formats, ensuring that your data is clean and reliable.
Combining data. PQ makes it simple to combine and merge data from different locations into a single cohesive dataset, facilitating comprehensive analysis.
Automating workflows. Power Query records every step you take, creating a query that can be easily modified or reused later. This is especially useful when dealing with recurring data sources or when you want to keep your analysis up to date with minimal effort. Also, you can refresh your query to get the latest data from the source at any time, on demand or on a schedule.
Now that we've established what Power Query is and its potential applications, let's see how you can get this useful feature in your Excel.
How to get Power Query in Excel
The Power Query tool is available in all modern versions, spanning from Excel 2010 to Excel 365. Depending on the specific version you are using, you may need to install it as an add-in or access it directly from the ribbon.
Note.. In Excel 2007 and earlier, Power Query is not supported.
How to open Power Query in Excel 2016 – 365
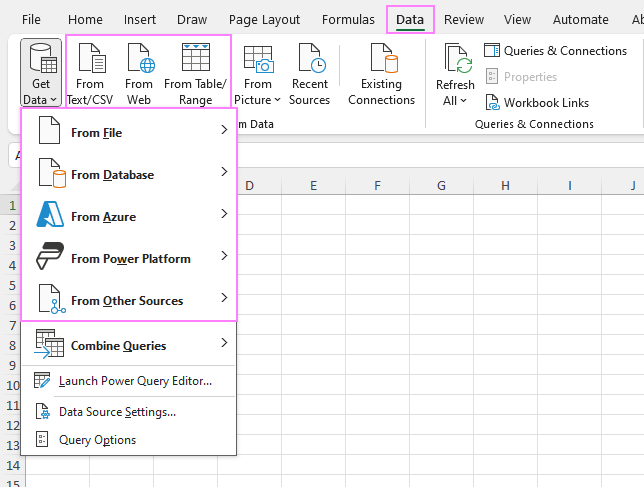
In newer versions of Excel, Power Query is a built-in feature, readily accessible without any additional installations. It can be found on the Data tab under the Get & Transform Data group. To start using its features, just click on any of the commands in this group.

How to add Power Query to Excel 2013 and 2010
In older Excel versions, Power Query is not included by default, but you can download and install it as an add-in from the Microsoft website.
After installing the add-in and restarting Excel, you should see a new tab in the ribbon labeled Power Query. To start importing data from various sources, click one of these buttons: From File, From Database, From Web or From Other Sources.

Tip. Be sure to download the correct package for your version of Excel and operating system. To check your version and bitness (32-bit or 64-bit), go to File > Account > About Excel.
Power Query Editor in Excel
The heart and soul of all data transformations lies within the Power Query Editor. It is a separate graphical interface within Excel that plays host to your queries. It is the primary workspace where you'll spend most of your time refining and reshaping your data.
You can access the Editor in two ways:
- On the Data tab, in the Get & Transform group, click Get Data and select Launch Power Query Editor.
- Alternatively, on the Data tab, click the Queries & Connections button to open this pane. Then, double-click a query in the pane to launch the editor.
When you connect to a data source or create a new query, the Editor opens automatically.

Here are the six main elements of Power Query Editor:
- Ribbon. At the top of the Editor, you'll find the Ribbon, which organizes various commands and options across five main tabs: File, Home, Transform, Add Column, and View. Each tab has different groups of commands that are relevant to the specific task you want to perform.
- Queries. This is kind of navigations pane on the left side of the editor window that shows all the queries in your workbook. You can use this pane to rename, duplicate, reference, delete, reorder or organize your queries into groups. Just right-click on a query to see available options.
- Data Preview. Positioned front and center, the Data Preview pane provides a snapshot of your dataset after applying each step in your query in real-time. While its primary purpose is to facilitate data inspection, it also allows you to perform some basic transformations, such as sorting and filtering columns, changing data types, etc.
- Properties. On the right-hand side of the editor window, within the Querry Settings pane, you'll find the Properties section. It shows the properties of the selected query, such as its name, description and load settings. Click the All Properties link to view and modify these parameters as needed.
- Applied Steps: Just below the Properties section, there is the Applied Steps area that provides a chronological list of all the actions you've taken during your data transformation. You can use this list to review, edit, reorder, or delete any step in your query. You can also click on a specific step to see how it affects your data in the data preview area.
- Formula Bar. This is the bar at the top of the data preview area that shows the formula or expression for the selected step in your query. You can use this bar to edit or write your own formulas using the Power Query M language.
Advanced Power Query Editor
The Advanced Editor is a text-based interface that allows you to write and edit M code, the language behind Power Query. Think of it as your VIP pass to the Power Query transformation backstage. While the standard PQ interface enables you to reshape data with point-and-click actions, the Advanced Editor gives you precise control over your data transformations.
Every action you perform in Power Query generates a corresponding code in the background, using the M Language. You can view and edit this code in the Advanced Editor. To open it, click the Advanced Editor button on the Home tab, in the Query group.

How to use Power Query in Excel
This section provides an overview of how to use Power Query for data analysis. You will learn the main steps involved in importing, transforming, combining, and exporting data. These steps are:
- Get data – connect to different data sources and load them into Power Query.
- Transform – clean and reshape the data to tailor it to your specific requirements.
- Combine – merge data from various sources into a single, organized dataset.
- Write formulas – craft custom formulas using the Power Query formula language.
- Load – export your final data table to Excel and refresh it manually or automatically.
Get data
To start working with your data in Power Query, you need to import it from a source. PQ supports many different data sources such as files, databases, online services, and more.
The three most common sources can be accessed directly from the Excel ribbon - on the Data tab, in the Get & Transform Data group. These primary sources are:
- From Text/CSV - use this option if your data is stored in a text or CSV file.
- From Web - ideal for importing data directly from a web page.
- From Table/Range - suitable for data that's already in Excel, organized within a table or a range.
If you need to import data from other sources, click the Get Data button, and then explore further options:
- From File - import various file types like Excel worksheets, TXT/CSV, XML, JSON, and PDF.
- From Database - connect to databases such as SQL Server or Microsoft Access.
- From Azure - access data from Azure SQL Database, Azure Data Lake Storage, and other Azure services.
- From Power Platforms - import data from Microsoft Power BI services.
- From Other Sources - this category offers even more options, including data from Excel tables/ranges, from the web, OData feeds, ODBC, OLEDB, and others.
For example, to use a CSV file as a data source, you can either click the From Text/CSV button on the ribbon or go a longer way: Get Data > From File > From Text/CSV. If you have multiple CSV files to combine, save them in one folder and choose the From Folder option.
In the next screen, you'll see a preview of the imported data, along with these choices:
- Combine (for multiple files only) - lets you merge different datasets from different sources and file types.
- Load - allows you to load the data directly into an Excel worksheet as a table, pivot table, or connection.
- Transform Data - opens the Power Query Editor, where you can make various transformations, such as filtering, splitting, grouping, pivoting, etc. This is the option you'll use most often.
- Cancel - lets you cancel the import process and close the dialog box.

If you aim to reshape your data, the Transform Data option is the logical next step.
Transform data
Once your data is loaded into Power Query, you're in the driver's seat to refine it according to your needs. All data transformations are done within a separate interface called the Power Query Editor, where you have four main tabs to explore. You can think of data transformation as sculpting. You start with a raw material that you shape into a form that suits your purpose and that allows you to create appealing reports and dashboards.
Here are some common transformations you can perform using Power Query:
- Sort and filter. Arrange data in ascending or descending order and filter out unwanted rows to focus on the information that matters most.
- Add, remove or duplicate columns. Modify your dataset by adding new columns, removing unnecessary ones, or duplicating existing columns when needed.
- Change data type. You can specify the type of data in each column, such as text, number, date, time, etc.
- Transpose row to column and vice versa. Change the orientation of your data, transforming rows into columns for better analysis and visualization.
- Remove duplicate rows. You can eliminate any rows that have identical values in all columns to reduce the size of your data and to avoid double-counting.
- Trim and clean. Remove leading or trailing spaces from your text values, or any extra characters that are not part of the data to improve the quality and readability of your dataset.
- Extract values. Extract parts of your text values based on a delimiter, position, or pattern. For example, you can extract the first name from a full name column, or the domain name from an email address column.
- Split column. Divide a column into multiple columns based on a delimiter or a specific pattern. For example, you can split a date column into year, month, and day columns.
- Replace or remove values or errors. You can replace any values or errors in your data with another value, such as a blank, zero, or custom value. You can also delete any rows that contain errors or missing values.
- Add conditional column. Create new columns based on predefined conditions, allowing for dynamic data categorization. For example, you can create a column that assigns a category based on a numerical range.
- Add column from example. Utilize examples to guide Power Query in creating new columns with desired data patterns. PQ will try to infer the logic behind your examples and apply it to the rest of the rows.
- Group and summarize data. Aggregate data by groups, calculate sums, averages, or other statistical measures for deeper insights.

These transformations empower you to sculpt your data into a work of art that's not only functional but also elegant and insightful. For detailed instructions, refer to this article: How to use Power Query in Excel – practical examples.
Note. All modifications you make in the editor, collectively forming a query, constitute a new representation of the original data. When you refresh a query, each step runs automatically, eliminating the need to manually repeat the same actions. However, to use your refined data in Excel, you must load it into your workbook.
Merge and combine
One of the most useful features of Power Query is the ability to combine data from different sources into a single table. There are two main ways to do this: append and merge.
- Appending adds rows from one table to another, as long as they have the same columns. For example, you can append sales data from different regions or months into a single table.
- Merging joins two tables based on one or more common columns (unique identifies) like a SQL join. For example, you can merge students data from different courses based on a student name or ID column.
To combine data in the Power Query Editor, use the Merge Queries or Append Queries command, on the Home tab, in the Combine group.

To combine data that is not in Power Query yet, click Get Data > Combine Queries on the Data tab of the Excel ribbon, and then choose Merge or Append.

For a detailed end-to-end example of merging two tables by a common column, see How to join tables with Power Query.
Write formulas in Power Query
Similar to using functions and formulas in Excel worksheets, PQ also has its own set of functions to perform various calculations. These formulas are written in the Power Query formula language, also known as M. Now, here's the great news: you don't need to learn the intricacies of M language syntax to build your custom formulas. Unlike traditional coding, Power Query makes it wonderfully simple and user-friendly using a visual interface.
Let’s take an example. Imagine you want to create a column that calculates the net donation amount after tax deduction based on the values in the Donation and Tax Rate columns. The steps are:
- Go to the Add Column tab and click on Custom Column.
- In the Custom Column dialog box, enter “Net Donation” or any name you want for the New Column Name
- The Custom Column Formula box is where you write the formula itself. So, enter the following formula in it:
=[Donation] * (1 - [Tax Rate])To refer to a specific column in the formula, select its name under Available Columns on the right side of the dialog and click Insert, or just double click the column name.
- As you enter a formula, Power Query checks it, and if no errors are found, displays the message “No syntax error have been detected”. If there’s an error in your formula, it will show an error message indicating the error type.
- Click OK, and the formula will be applied to all rows in the new column.

That's it! You've successfully created a custom column with a formula in Power Query. The formula bar shows its syntax:

Load data to Excel
All the transformations you apply to your data connections collectively constitute a query, which is a new representation of the original (and unchanged) data source. When you refresh a query, each step runs automatically. Queries replace the need to manually connect and shape data in Excel.
Once you've performed the necessary data transformations within Power Query, the final step is to load the resulting data into your Excel workbook. You have two options:
- From the Power Query Editor - use the Close and Load commands on the Home tab.
- From the Queries & Connections pane in Excel sheet - right-click a query and choose Load To.
The following steps show you how to do it from the Power Query Editor:
- In the Query pane on the left, select the query you want to load.
- On the Home tab, in the Close group, click the arrow next to Close & Load, and choose one of these options:
- Close and Load – loads the query as a table into a new worksheet (default settings).
- Close and Load To… – lets you specify the format and location for the output.
If you select the first option, the loading process is already complete. If you choose the second option, proceed to the next step.

- In the Import Data dialog box, choose how you want to import the data (as Table, PivotTable or PivotChart) and where you want to place it (in a new or existing sheet). Then click OK to finish the process.


Excel Power Query refresh
When working with Power Query, you may need to refresh your queries from time to time to get the latest data. Here are some ways to do that:
Refresh Power Query preview
To update the data displayed in the Power Query preview, simply click the Refresh Preview button on the Home tab of the editor:
- Refresh Preview – updates the preview results for the current query.
- Refresh All – updates the preview results for all queries in the editor.
This will reload the data from the source to reflect any changes made to your original data. All the changes you’ve made to the query steps will be applied to the new data automatically.

Refresh Power Query results in Excel
To refresh the Power Query results that have been loaded into an Excel workbook, do one of the following:
- To update a specific query, right-click the query name in the Queries & Connections pane and select Refresh.
- To refresh all queries in the workbook, press the Ctrl + Alt + F5 shortcut. Or, click the Refresh All button on the Data tab, in the Queries & Connections

How to auto refresh Power Query without opening the file
If you need Power Query in Excel to refresh automatically without having to open the source file, you can schedule these refreshes at specified intervals. Here's how to set it up:
- On the Data tab, click on Queries & Connections. This will open the Queries and Connection pane on the right side of the Excel window.
- In the pane, right click a query that you want to schedule for automatic refresh, and then select Properties.
- In the Query Properties dialog box, go to the Usage tab and check the box labeled Refresh every … minutes and enter the number of minutes.
- Make sure the Enable background refresh option is checked.
- To refresh the query when you open your Excel file, select the Refresh data when opening the file check box (unselected by default).
- Click OK to save the changes.
That’s it! From now on, your query will be refreshed automatically every time you open the workbook or at the specified time interval, whichever comes first. This way, you can always have the latest data in your Excel file without manually refreshing it.

These are the essentials of Excel Power Query - your secret weapon for making data work for you. Now, you can easily connect to various data sources, transform, combine and clean your data, and then load it into Excel or Power BI. And don't forget the cherry on top – automatic refreshes that keep your data always up-to-date, even when you're not looking :)
The above is the detailed content of Excel Power Query tutorial for beginners: how to get, use and auto-refresh. For more information, please follow other related articles on the PHP Chinese website!

Hot AI Tools

Undresser.AI Undress
AI-powered app for creating realistic nude photos

AI Clothes Remover
Online AI tool for removing clothes from photos.

Undress AI Tool
Undress images for free

Clothoff.io
AI clothes remover

AI Hentai Generator
Generate AI Hentai for free.

Hot Article
Hot Tools

Notepad++7.3.1
Easy-to-use and free code editor

SublimeText3 Chinese version
Chinese version, very easy to use

Zend Studio 13.0.1
Powerful PHP integrated development environment

Dreamweaver CS6
Visual web development tools

SublimeText3 Mac version
God-level code editing software (SublimeText3)
Hot Topics
 1377
1377
 52
52

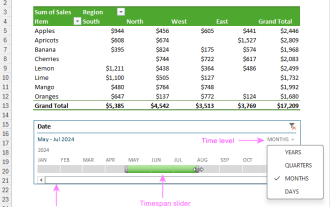 How to create timeline in Excel to filter pivot tables and charts
Mar 22, 2025 am 11:20 AM
How to create timeline in Excel to filter pivot tables and charts
Mar 22, 2025 am 11:20 AM
This article will guide you through the process of creating a timeline for Excel pivot tables and charts and demonstrate how you can use it to interact with your data in a dynamic and engaging way. You've got your data organized in a pivo
 how to sum a column in excel
Mar 14, 2025 pm 02:42 PM
how to sum a column in excel
Mar 14, 2025 pm 02:42 PM
The article discusses methods to sum columns in Excel using the SUM function, AutoSum feature, and how to sum specific cells.
 how to make pie chart in excel
Mar 14, 2025 pm 03:32 PM
how to make pie chart in excel
Mar 14, 2025 pm 03:32 PM
The article details steps to create and customize pie charts in Excel, focusing on data preparation, chart insertion, and personalization options for enhanced visual analysis.
 how to make a table in excel
Mar 14, 2025 pm 02:53 PM
how to make a table in excel
Mar 14, 2025 pm 02:53 PM
Article discusses creating, formatting, and customizing tables in Excel, and using functions like SUM, AVERAGE, and PivotTables for data analysis.
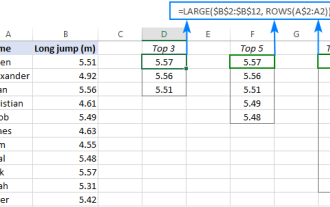 Excel formula to find top 3, 5, 10 values in column or row
Apr 01, 2025 am 05:09 AM
Excel formula to find top 3, 5, 10 values in column or row
Apr 01, 2025 am 05:09 AM
This tutorial demonstrates how to efficiently locate the top N values within a dataset and retrieve associated data using Excel formulas. Whether you need the highest, lowest, or those meeting specific criteria, this guide provides solutions. Findi
 how to calculate mean in excel
Mar 14, 2025 pm 03:33 PM
how to calculate mean in excel
Mar 14, 2025 pm 03:33 PM
Article discusses calculating mean in Excel using AVERAGE function. Main issue is how to efficiently use this function for different data sets.(158 characters)
 how to add drop down in excel
Mar 14, 2025 pm 02:51 PM
how to add drop down in excel
Mar 14, 2025 pm 02:51 PM
Article discusses creating, editing, and removing drop-down lists in Excel using data validation. Main issue: how to manage drop-down lists effectively.
 All you need to know to sort any data in Google Sheets
Mar 22, 2025 am 10:47 AM
All you need to know to sort any data in Google Sheets
Mar 22, 2025 am 10:47 AM
Mastering Google Sheets Sorting: A Comprehensive Guide Sorting data in Google Sheets needn't be complex. This guide covers various techniques, from sorting entire sheets to specific ranges, by color, date, and multiple columns. Whether you're a novi
