

Excel EDATE function to add or subtract months from date

In this tutorial, you will learn how to use EDATE formula in Excel and combine it with other functions for a variety of purposes beyond its basic use.
Microsoft Excel provides a variety of functions to calculate dates. When it comes to adding or subtracting months to/from a given date, EDATE is the function to use. Additionally, it can help you calculate expiration dates, anniversary dates, due dates, and a lot more.
Excel EDATE function
The EDATE function in Excel returns a date on the same day of the month, n months before or after a given date.
The syntax has two arguments:
EDATE(start_date, months)Where:
- Start_date (required) - the start date in the form of a valid Excel date. It can be supplied as a text string in the format that Excel interprets as a date (e.g. "10-Jan-2025"), as a reference to a cell containing a date, or as a result of another function such as DATE(2025,1,10).
- Months (required) - the number of months to add to or subtract from the start date. A positive value returns a future date, a negative value - a past date.
And here are a few examples of using the EDATE function in Excel:

Note. By default, the EDATE function returns a serial number representing a date internally in Excel. To display the result as a date, apply a Date format of your choosing.
How to use EDATE formula in Excel
To make a basic EDATE formula in Excel, follow these steps:
- For the start_date argument, supply a valid Excel date in one of these forms:
- a string enclosed in quotation marks, e.g. "1/30/2025" or "30-Jan-2025"
- a DATE formula, e.g. DATE(2025, 1, 30)
- a reference to the cell containing the start date
- For the months argument, provide an integer specifying how many months to add to or subtract from the start date. To shift the date forward, use a positive number - the output will be a future date. To move the date backwards, supply a negative number - the result will be a past date.
- Apply the desired DATE format to the formula cell.
For example, to return a date 5 months after 30 January 2025, use one of these formulas:
=EDATE("1/30/2025", 5)
=EDATE("30-Jan-2025", 5)
=EDATE(DATE(2025, 1, 30), 5)
To get a date 5 months before 30 January 2025, the formulas go as follows:
=EDATE("1/30/2025", -5)
=EDATE("30-Jan-2025", -5)
=EDATE(DATE(2025, 1, 30), -5)
With the start date in a predefined cell, say C4, the formulas are:
=EDATE(C4, 5)
=EDATE(C4, -5)
The result is a date on the same day of the month, a specified number of months before or after the initial date.

Tips and notes
The EDATE function falls under the category of DATE and TIME functions. Dates in Excel may have different formats, but they are actually stored as numbers. Only valid Excel dates can be used in calculations.
- If start_date is not a valid date, an EDATE formula returns a #VALUE! error.
- If the start_date value has a fractional part representing time, it will be truncated. To force EDATE to keep time, use this formula.
- If the months argument is not an integer, its decimal part will be removed.
- The EDATE function returns a serial number corresponding to the date (General format). For the result to display correctly, it must be formatted as a date.
With the Excel EDATE basics in mind, let's drill into a few practical examples that highlight particular aspects and show how to accomplish some common tasks.
How to get a date n months from today
To return a date n months before or after today's date, use EDATE in combination with the TODAY function:
EDATE(TODAY(), months)For example, to find a date that is 3 months from today, you can use this formula:
=EDATE(TODAY(), 3)
To get a date exactly 3 months before today, the formula is:
=EDATE(TODAY(), -3)
More formula examples are shown in the screenshot below:

How to calculate n years from date
To calculate a date shifted a certain number of years in future or past, you can multiply the number of years by 12:
EDATE(start_date, years*12)For instance, to move a date 10 years forward from the date in A3, you can use one of these formulas:
=EDATE(A3, 120)
=EDATE(A3, 10*12)
To move a date 10 years backward, the formulas are:
=EDATE(A3, -120)
=EDATE(A3, -10*12)
The first form is more contact while the second variation is more convenient to use when you have a number of years in another cell. For example:
=EDATE(A3, B3*12)

EDATE formula to get last day of month
The EDATE function correctly returns the last day of month if the start day is 31.
For example, the formula below returns 30-Apr-2023, which is a date 3 months after 31-Jan-2023:
=EDATE("31-Jan-2023", 3)
It also maintains the last day of February in leap years. For instance, the result of this formula is 29-Feb-2024:
=EDATE("31-Dec-2023", 2)
However, if the start day value is less than 31, EDATE will return a date exactly on the same day of the month in the past or future, as per its main purpose. In this case, you can compute the last day of month by using the EOMONTH function. For example:
=EOMONTH("26-May-2023", 3)
The screenshot below shows the results of both formulas - the wrong ones are in the red font color:

EDATE formula to calculate expiry dates
Knowing the start date and duration in months, calculating an expiry, due, anniversary or retirement date is as easy as pie.
All you have to do is to supply the start date in the first argument of EDATE and the number of months in the second argument. For example, with the start date in A3 and months in B3, the formula is:
=EOMONTH(A3, B3)

EDATE formula inside of Excel IF statement
In situation when you need to add or subtract a different number of months to/from a date based on one or more conditions, you can nest an EDATE formula inside of an IF statement.
Let's say you want to calculate an expiry date based on the subscription type - monthly or annual. To have it done, you construct the following nested IF formula:
=IF(B3="monthly", EDATE(A3, 1), IF(B3="annual", EDATE(A3, 12), "N/A"))
If B3 contains the word "monthly", the first EDATE function adds one month to the start date in A3. If B3 has "annual", another EDATE function adds 12 months to the start date. If B3 contains anything else or is blank, the formula returns "N/A".

EDATE to keep time value
When the start date value also includes time, the EDATE function drops the time part. To preserve time, extract it from the datetime value with the help of the MOD function, and then add to the EDATE's result:
EDATE(start_date, months) MOD(start_date, 1)For instance, to add a certain number of months (B3) to a datetime value in A3 preserving the time, use this formula:
=EDATE(A3, B3) MOD(A3, 1)

That's how to use the EDATE function in Excel to add or subtract months to/from a given date. Thank you for reading and see you on our blog next week!
Practice workbook for download
Using EDATE formula in Excel - examples (.xlsx file)
The above is the detailed content of Excel EDATE function to add or subtract months from date. For more information, please follow other related articles on the PHP Chinese website!

Hot AI Tools

Undresser.AI Undress
AI-powered app for creating realistic nude photos

AI Clothes Remover
Online AI tool for removing clothes from photos.

Undress AI Tool
Undress images for free

Clothoff.io
AI clothes remover

Video Face Swap
Swap faces in any video effortlessly with our completely free AI face swap tool!

Hot Article
Hot Tools

Notepad++7.3.1
Easy-to-use and free code editor

SublimeText3 Chinese version
Chinese version, very easy to use

Zend Studio 13.0.1
Powerful PHP integrated development environment

Dreamweaver CS6
Visual web development tools

SublimeText3 Mac version
God-level code editing software (SublimeText3)
Hot Topics


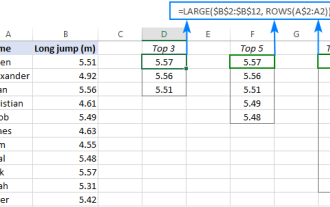 Excel formula to find top 3, 5, 10 values in column or row
Apr 01, 2025 am 05:09 AM
Excel formula to find top 3, 5, 10 values in column or row
Apr 01, 2025 am 05:09 AM
This tutorial demonstrates how to efficiently locate the top N values within a dataset and retrieve associated data using Excel formulas. Whether you need the highest, lowest, or those meeting specific criteria, this guide provides solutions. Findi
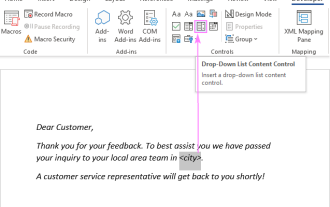 Add a dropdown list to Outlook email template
Apr 01, 2025 am 05:13 AM
Add a dropdown list to Outlook email template
Apr 01, 2025 am 05:13 AM
This tutorial shows you how to add dropdown lists to your Outlook email templates, including multiple selections and database population. While Outlook doesn't directly support dropdowns, this guide provides creative workarounds. Email templates sav
 How to use Flash Fill in Excel with examples
Apr 05, 2025 am 09:15 AM
How to use Flash Fill in Excel with examples
Apr 05, 2025 am 09:15 AM
This tutorial provides a comprehensive guide to Excel's Flash Fill feature, a powerful tool for automating data entry tasks. It covers various aspects, from its definition and location to advanced usage and troubleshooting. Understanding Excel's Fla
 How to add calendar to Outlook: shared, Internet calendar, iCal file
Apr 03, 2025 am 09:06 AM
How to add calendar to Outlook: shared, Internet calendar, iCal file
Apr 03, 2025 am 09:06 AM
This article explains how to access and utilize shared calendars within the Outlook desktop application, including importing iCalendar files. Previously, we covered sharing your Outlook calendar. Now, let's explore how to view calendars shared with
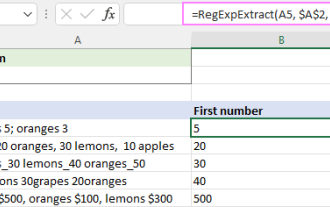 Regex to extract strings in Excel (one or all matches)
Mar 28, 2025 pm 12:19 PM
Regex to extract strings in Excel (one or all matches)
Mar 28, 2025 pm 12:19 PM
In this tutorial, you'll learn how to use regular expressions in Excel to find and extract substrings matching a given pattern. Microsoft Excel provides a number of functions to extract text from cells. Those functions can cope with most
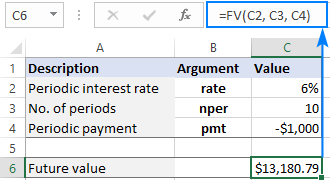 FV function in Excel to calculate future value
Apr 01, 2025 am 04:57 AM
FV function in Excel to calculate future value
Apr 01, 2025 am 04:57 AM
This tutorial explains how to use Excel's FV function to determine the future value of investments, encompassing both regular payments and lump-sum deposits. Effective financial planning hinges on understanding investment growth, and this guide prov
 MEDIAN formula in Excel - practical examples
Apr 11, 2025 pm 12:08 PM
MEDIAN formula in Excel - practical examples
Apr 11, 2025 pm 12:08 PM
This tutorial explains how to calculate the median of numerical data in Excel using the MEDIAN function. The median, a key measure of central tendency, identifies the middle value in a dataset, offering a more robust representation of central tenden
 How to remove / split text and numbers in Excel cell
Apr 01, 2025 am 05:07 AM
How to remove / split text and numbers in Excel cell
Apr 01, 2025 am 05:07 AM
This tutorial demonstrates several methods for separating text and numbers within Excel cells, utilizing both built-in functions and custom VBA functions. You'll learn how to extract numbers while removing text, isolate text while discarding numbers
