

How to upload photos to iCloud quickly and easily

Photos of iPhone cameras are amazing and record precious moments of our lives. To properly save these photos, iCloud provides convenient storage and cross-device synchronization to avoid the concerns of missing photos. Of course, if you prefer manual operations, you can also choose to upload manually or use other tools to manage your photo library.
This guide will cover a variety of ways to upload photos to iCloud, including from iPhone, iPad, and Mac. In addition, we will recommend some practical applications that improve storage efficiency and simplify the upload process. Let's get started!

Access all cloud services in Finder
Use CloudMounter to connect all drives and manage them like you would on your Mac. Get it on Setapp.
Free trial security beta version
How to upload directly to iCloud
Apple users initially get 5GB of free iCloud storage. If you need more space, you can pay to upgrade to 50GB, 200GB or even 2TB. If you want to upload photos manually, just log in to iCloud.com, which is very simple.
Steps to upload photos to iCloud:
- Visit iCloud.com in your web browser.
- Sign in with your Apple account.
- Click Photos on the main panel.
- Click the Upload button at the top of the screen (with the up arrow cloud icon).
- Select the Mac photo you want to upload, or drag and drop the photo directly into the iCloud Photos window.

This method is suitable for occasionally uploading small photos, but may be less efficient for large numbers of photos.
Personal advice: Due to limited storage space for iCloud, uploading unoptimized photos will quickly take up unnecessary space. When iCloud is out of space, you will have to buy more space. To avoid this, it is best to compress the photos. Squash is an excellent compression tool that reduces file size without losing quality, keeping the image perfect. The app is great for preparing images before uploading them to iCloud.
How to upload all photos to iCloud on iPhone
Uploading photos manually can be cumbersome. If you want all images to sync automatically, iCloud photos are the best solution. When enabled, it ensures that every photo taken on your iPhone or iPad is backed up immediately.
How to upload all photos to iCloud on iPhone:
- Go to Settings on your iPhone.
- Click "Apple ID" > "iCloud".
- Click "Photo" > enable "Sync this iPhone".
- Select one of the following two options:
- Optimize iPhone storage: This option saves device space by saving full resolution photos in iCloud, only the lightweight version on your iPhone.
- Download and keep the original image: This option retains full resolution photos in both iPhone and iCloud.

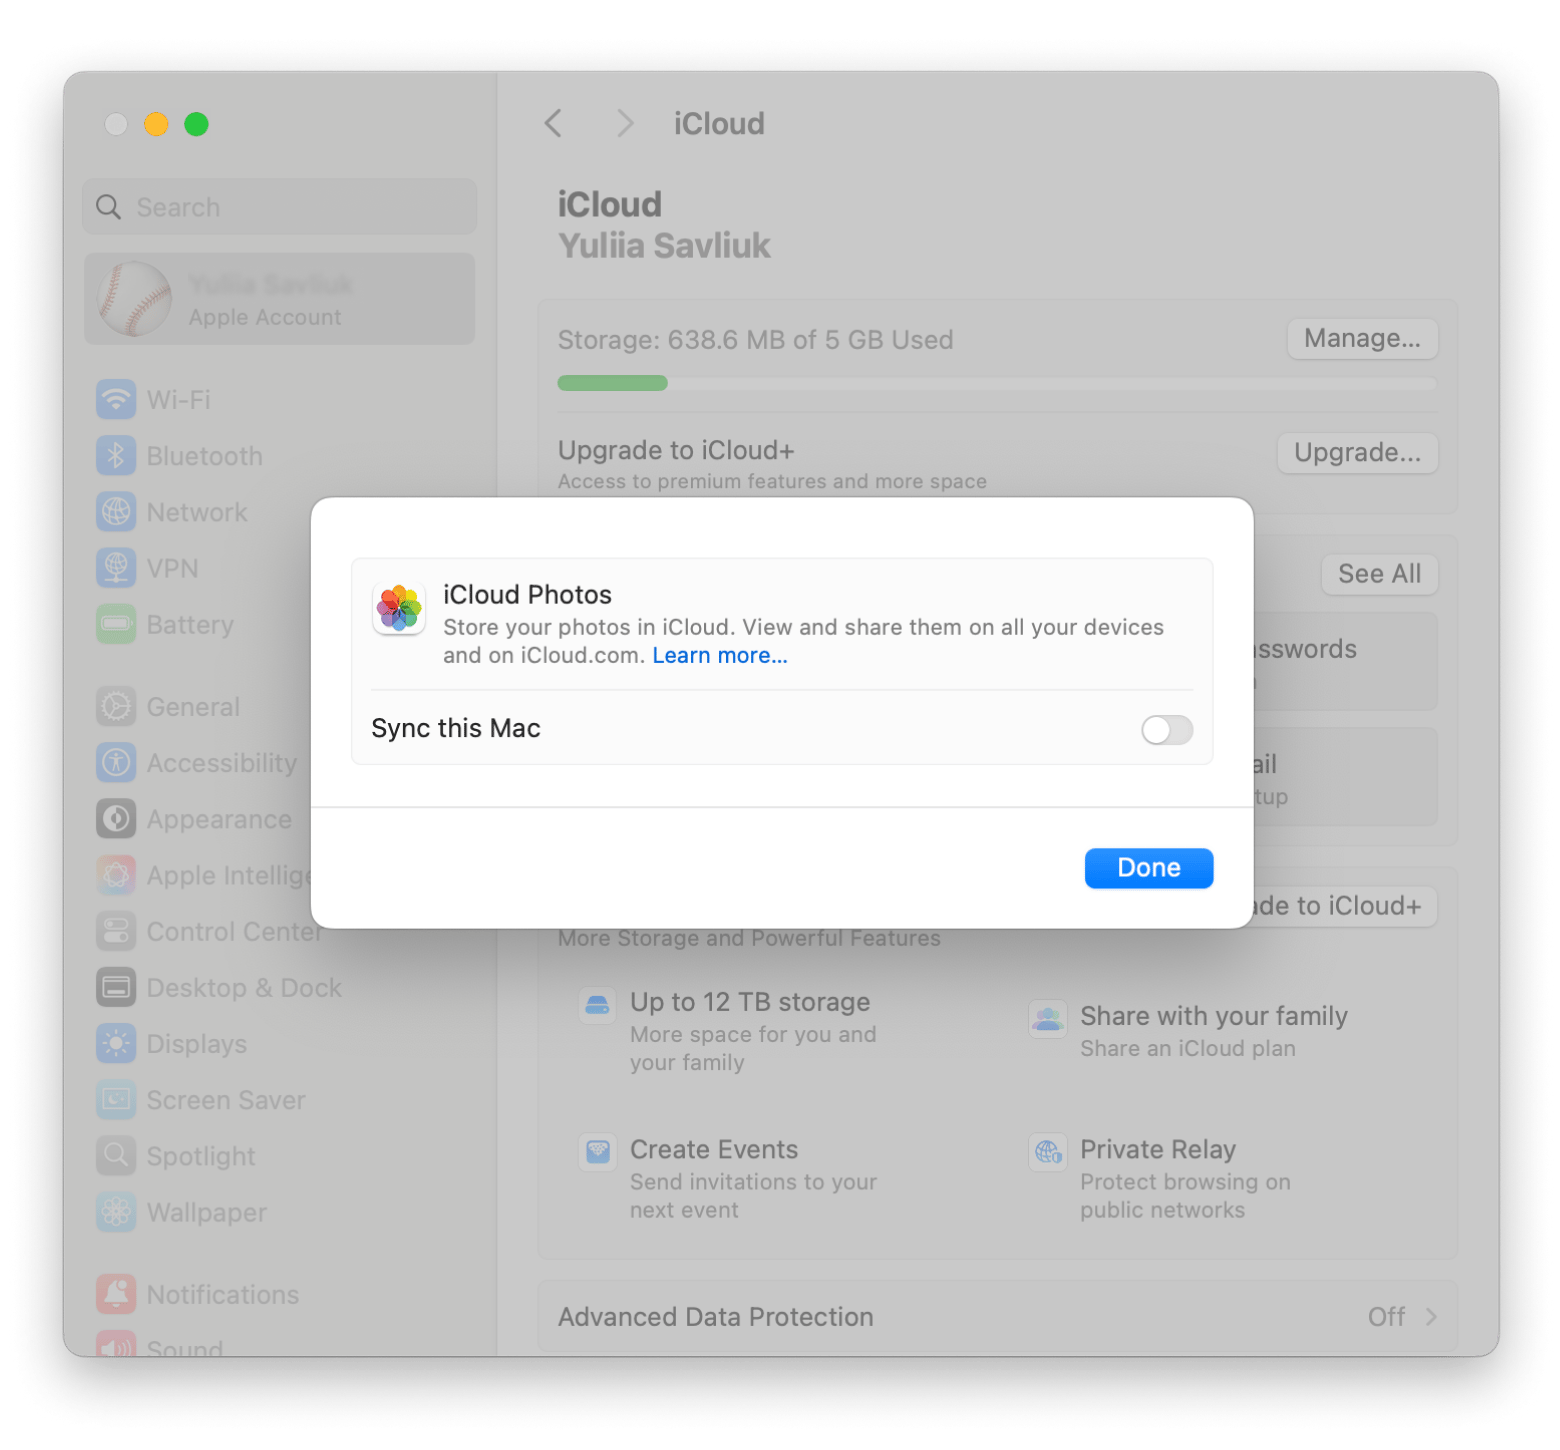
How to upload all photos to iCloud on Mac
If you are using a Mac, follow these steps:
- Click on the Apple menu > System Settings.
- Click "Apple ID" > "iCloud".
- Click "Photo" > enable "Sync this Mac".
Tip: CloudMounter is a great tool if you want to manage all your cloud storage in one place. It allows you to connect directly to services like Dropbox and Google Drive through Finder, so you can transfer files as easily as you move folders on your Mac.
Please read also:
- Transfer photos from Android to Mac
- Sync contacts from iPhone to Mac
- Shared albums in photos
- Download from Google Drive
Additional tip: Delete unnecessary photos before uploading to iCloud
Before uploading photos to iCloud, it is best to delete any duplicate or similar photos to avoid taking up cloud storage space. Gemini can help you do this by scanning your photo library for exact matches and nearly identical images. Gemini's AI-powered recommendations quickly and accurately identify which images to keep, rather than manually filtering thousands of photos.
How to use Gemini:
- Install and open the Gemini app on your Mac.
- Drag and drop the file into the application window.
- Click "Scan Duplicates".
- After the scan is complete, click "View Results" or "Smart Cleanup".

How to upload photos from iPhone to iCloud storage
If iCloud photos are not enabled, you can still upload photos manually. Some people prefer to only back up selected images rather than synchronize the entire photo library. Fortunately, iCloud Drive makes this process simple and gives you complete control over what you want to upload.
How to upload photos from iPhone manually:
- Open the Photos app > select the photo you want to upload.
- Click the "Share" button.
- Select Save to file from the options.
- Select iCloud Drive as the destination location.
- Select or create a folder to store the image.
- Click "Save" to upload.

Also check out how to access iCloud photos (whether using a Mac or not).
Why can't photos on iPhone be uploaded to iCloud?
Even with iCloud photos enabled, images are not always synchronized as expected. We know this is very frustrating, especially if you rely on iCloud to save memories. If your iPhone photos cannot be uploaded to iCloud, there may be several reasons:
- Insufficient storage: You may not have enough iCloud storage space.
- iCloud is off: iCloud photo switch on your Mac or iPhone may not be on.
- No internet connection: iCloud needs to be connected to the internet to sync.
- Log out: Check if you are logged into iCloud on your iPhone or Mac.
How to manage multiple iCloud accounts
If you have multiple iCloud accounts or are processing backups, AnyTrans for iOS can help. It allows you to easily sync all your iCloud accounts, transfer data between them, and even easily access backups. You can batch save files to iCloud, save them directly to your Mac or move content from your library to your Mac or iPhone.
How to manage multiple accounts:
- Install and open AnyTrans for iOS.
- Go to the iCloud tab > Sign in to your account.
- After logging in, you can manage your storage space by transferring files between two iCloud accounts, starting iCloud synchronization, and more.

Easily upload photos to iCloud: Solved
iCloud is good at syncing photos, but you don't have to rely solely on automatic uploads. iCloud Photos handle full library backups, while iCloud Drive lets you control individual files.
If you want everything to be centralized in one place, CloudMounter allows you to connect your drive to Finder, which simplifies photo transfer. AnyTrans for iOS is a great tool for managing multiple iCloud accounts.
Remember that duplicate photos or uncompressed images fill up storage space quickly. Tools like Squash help reduce file size without losing quality, enabling faster synchronization and more space. Gemini is my preferred tool for finding and deleting duplicates. These applications are available through Setapp.
Setapp gives you access to over 250 Mac and iOS apps with just one subscription. You can try it for a free week and check out a number of tools to get your job done, get creative, and more.
The above is the detailed content of How to upload photos to iCloud quickly and easily. For more information, please follow other related articles on the PHP Chinese website!

Hot AI Tools

Undresser.AI Undress
AI-powered app for creating realistic nude photos

AI Clothes Remover
Online AI tool for removing clothes from photos.

Undress AI Tool
Undress images for free

Clothoff.io
AI clothes remover

Video Face Swap
Swap faces in any video effortlessly with our completely free AI face swap tool!

Hot Article
Hot Tools

Notepad++7.3.1
Easy-to-use and free code editor

SublimeText3 Chinese version
Chinese version, very easy to use

Zend Studio 13.0.1
Powerful PHP integrated development environment

Dreamweaver CS6
Visual web development tools

SublimeText3 Mac version
God-level code editing software (SublimeText3)
Hot Topics
 1664
1664
 14
1422
52
1316
25
1267
29
1239
24
14
1422
52
1316
25
1267
29
1239
24

 Fix your Mac running slow after update to Sequoia
Apr 14, 2025 am 09:30 AM
Fix your Mac running slow after update to Sequoia
Apr 14, 2025 am 09:30 AM
After upgrading to the latest macOS, does the Mac run slower? Don't worry, you are not alone! This article will share my experience in solving slow Mac running problems after upgrading to macOS Sequoia. After the upgrade, I can’t wait to experience new features such as recording and transcription of voice notes and improved trail map planning capabilities. But after installation, my Mac started running slowly. Causes and solutions for slow Mac running after macOS update Here is my summary of my experience, I hope it can help you solve the problem of slow Mac running after macOS Sequoia update: Cause of the problem Solution Performance issues Using Novabe
 How to make a video into a live photo on Mac and iPhone: Detailed steps
Apr 11, 2025 am 10:59 AM
How to make a video into a live photo on Mac and iPhone: Detailed steps
Apr 11, 2025 am 10:59 AM
This guide explains how to convert between Live Photos, videos, and GIFs on iPhones and Macs. Modern iPhones excel at image processing, but managing different media formats can be tricky. This tutorial provides solutions for various conversions, al
 How to reduce WindowServer Mac CPU usage
Apr 16, 2025 pm 12:07 PM
How to reduce WindowServer Mac CPU usage
Apr 16, 2025 pm 12:07 PM
macOS WindowServer: Understanding High CPU Usage and Solutions Have you noticed WindowServer consuming significant CPU resources on your Mac? This process is crucial for your Mac's graphical interface, rendering everything you see on screen. High C
 How to type hashtag on Mac
Apr 13, 2025 am 09:43 AM
How to type hashtag on Mac
Apr 13, 2025 am 09:43 AM
You can’t really use the internet nowadays without encountering the hashtag symbol that looks like this — #. Popularized on a global scale by Twitter as a way to define common tweet themes and later adopted by Instagram and other apps to c
 Mac Disk Utility: How to Repair Disk with First Aid? How to Recover It?
Apr 13, 2025 am 11:49 AM
Mac Disk Utility: How to Repair Disk with First Aid? How to Recover It?
Apr 13, 2025 am 11:49 AM
You might need to repair your Mac disk if your computer won’t start up, apps keep freezing, you can’t open certain documents, or the performance has slowed to a halt. Luckily, Apple includes a handy tool you can use to
 Is Google Chrome Not Working on Mac? Why Are Websites Not Loading?
Apr 12, 2025 am 11:36 AM
Is Google Chrome Not Working on Mac? Why Are Websites Not Loading?
Apr 12, 2025 am 11:36 AM
With a market share of over 65.7%, Google Chrome is the biggest web browser in the world. You can use it if you use other operating systems like Windows and Android, but many Mac users also prefer Chrome over Safari. Mo
 How to delete files on Mac
Apr 15, 2025 am 10:22 AM
How to delete files on Mac
Apr 15, 2025 am 10:22 AM
Managing Mac storage: A comprehensive guide to deleting files Daily Mac usage involves installing apps, creating files, and downloading data. However, even high-end Macs have limited storage. This guide provides various methods for deleting unneces
 How to connect bluetooth headphones to Mac?
Apr 12, 2025 pm 12:38 PM
How to connect bluetooth headphones to Mac?
Apr 12, 2025 pm 12:38 PM
From the dawn of time to just about a few years ago, all of us sported a pair of wired headphones and were convinced that this is simply how it will be done forever. After all, they are the easiest technology around: just plug them in, put them
