

Beginner's Guide to Pantheon: Rise of the Fallen

Step into the fantasy world of Pantheon: Rise of the Fallen! This beginner’s guide will help you get started quickly, avoid common problems, and experience this unique and fascinating game. Let's learn some introductory tips to help you get started smoothly in the game.
1. The game begins
After logging into the game, you will appear in the novice area, depending on your profession:
- Spellcasting Career Will be born on a floating island with portals leading to other novices areas.
- The area for novices in other professions is close to the main city.
Check out your backpack and you will find spell reels, skill reels, and mission reels. Use them now (press the <strong>B</strong> key) to unlock your skills. You can drag and drop skills onto the skill bar or adjust the position to suit your play style.
2. Tasks and Collections
Why do tasks?
- Early quests reward you with collection tools such as skinning knives or mining picks.
- These tools allow you to collect resources such as wood, leather or ore that are essential for making.
- Complete tasks ensures that you don't miss some of the key mechanics early in the game, such as crafting.
Where to start?
Follow the trails in the novice area to the nearby town. All trails lead to town where you can find crafting stations, banks (for storing items), and mainline mission NPCs.
3. Production
Production is an important part of the game, and you will start making it very early. You can check out our production guide (add link here).
- Make Token: You will get two tokens to unlock the crafting career. Choose carefully! Once you choose a career, you may not be able to change it.
- Deposit the token in the bank until you decide which direction to make.
- Collect materials such as leather, jute or ore for later use or sale.

4. Navigation
There is no map in the game, so it is very important to understand the game layout. Here is a quick start guide:
Town Center: All trails in the beginner area lead to the town.
Bridge: Crossing the bridge will take you into higher-level areas.
-
Compass Direction:
- East: Bank
- South: Leave town and enter a higher level area
- West: Return to the beginner area
5. Fighting skills
- Level 1 Survival: Attack only enemies that appear as "white" (these are neutral and easy to deal with). Avoid attacking more powerful enemies before reaching level 2.
- Team First: This is not a game for single player play. Find the team as early as possible (press the
<strong>L</strong>key to open the team finder). If you receive an invitation, be sure to join the team at any time. - Skin and Robbery: Use your tools to collect material from defeated enemies, such as collecting leather from bats, or collecting beeswax from wasps.
Check out our basic upgrade guide (add link here).
6. Backpack and bank
There is limited space for backpacks, so you have to manage it wisely:
- Sell "normal" items to merchants for money.
- Keep "materials" such as leather or ore for crafting or trading with players.
- Buy or make better backpacks as soon as possible to increase your storage space.

7. Join the Guild
This is a very social-oriented game, so you should try your best to join a guild.
If you have to play solo, check out our compilation of the best single-player career guide (add link here).
- Take the initiative to form a team or join the team. It is difficult to play solo at level 1-3, but with help, the situation will improve.
- Interact with other players, seek advice, make a crafting deal or just chat.
8. Career Choice
Choose the career you want to play, but know that all careers have their functions and different pros and cons. Check out our guide on all the different professions (add link here).
- Tanks (Warrior, Paladin): Very suitable for team games.
- Therapist (shaman, priest): Always needed and is good at providing buffs.
- DPS (Ranker, Mage, Necromancer): Focus on dealing damage and possess unique skills such as pet or group control.
- Auxiliary (Enhanced Teacher): Very suitable for group control and auxiliary.
Final explanation
- Learn about the layout of the newbie area: It is a circular area that eventually leads to the town.
- Use the "/stuck" command: This will teleport you back to your soul-bound location, usually your trainer.
- Gather wisely: Don't collect everything – focus on valuable resources such as jute, ore or leather.
- Waiting patiently: The upgrade is slow, the game is designed for team games.
If it feels difficult at first, don't be discouraged - stick with it and you'll find a world full of depth and charm. I wish you a happy game!
The above is the detailed content of Beginner's Guide to Pantheon: Rise of the Fallen. For more information, please follow other related articles on the PHP Chinese website!

Hot AI Tools

Undresser.AI Undress
AI-powered app for creating realistic nude photos

AI Clothes Remover
Online AI tool for removing clothes from photos.

Undress AI Tool
Undress images for free

Clothoff.io
AI clothes remover

AI Hentai Generator
Generate AI Hentai for free.

Hot Article
Hot Tools

Notepad++7.3.1
Easy-to-use and free code editor

SublimeText3 Chinese version
Chinese version, very easy to use

Zend Studio 13.0.1
Powerful PHP integrated development environment

Dreamweaver CS6
Visual web development tools

SublimeText3 Mac version
God-level code editing software (SublimeText3)
Hot Topics
 1371
1371
 52
52

 R.E.P.O. Energy Crystals Explained and What They Do (Yellow Crystal)
Mar 18, 2025 am 12:07 AM
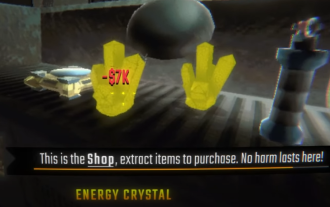
R.E.P.O. Energy Crystals Explained and What They Do (Yellow Crystal)
Mar 18, 2025 am 12:07 AM
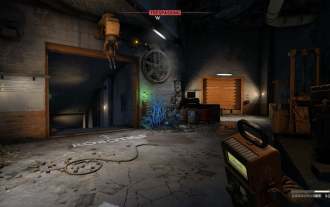
I bought expensive weapons or drones in R.E.P.O. but found that the energy was exhausted and became useless? Don't worry, you don't have to spend $50,000 on replacements, just charge your gear! That strange machine at the back of your truck is not a decoration. Here are how to get energy crystals and use them to keep your gear running continuously to avoid bankruptcy. More Reads: All R.E.P.O. Items How to get energy crystal You can buy energy crystals from the service store between levels. They usually cost between $7,000 and $9,000 — while expensive, they are far cheaper than repurchasing gear. In the first few levels, no purchase is required. You don't need them for the time being, so
 R.E.P.O. Best Graphic Settings
Mar 18, 2025 am 01:33 AM
R.E.P.O. Best Graphic Settings
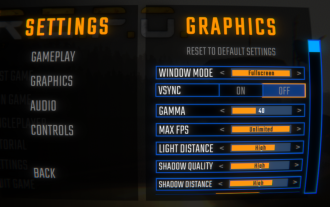
Mar 18, 2025 am 01:33 AM
R.E.P.O. Game Screen Setting Guide: How to improve frame rate while ensuring picture quality? This article will guide you to optimize game settings and find the best balance point. Step 1: Full Screen Mode and Frame Rate Adjustment Before adjusting other settings, make sure the game is running in the best mode: Display Mode: Full Screen - Always use Full Screen Mode for optimal performance. Window mode will reduce the frame rate. Vertical Sync (V-Sync): Off - Unless a screen tear occurs, turn off vertical synchronization for a smoother gaming experience. Maximum FPS: Unlimited - If your computer is configured strongly, you can set it to Unlimited. Otherwise, it is recommended to limit it to 60 frames or match your monitor refresh rate. second
 Assassin's Creed Shadows: Seashell Riddle Solution
Mar 28, 2025 am 01:58 AM
Assassin's Creed Shadows: Seashell Riddle Solution
Mar 28, 2025 am 01:58 AM
Assassin's Creed: Shadows boasts a vast world brimming with activities beyond the main storyline. Side missions and various encounters significantly enrich the immersive experience of in-game Japan. One particularly memorable encounter is the Seashe
 R.E.P.O. How to Fix Audio if You Can't Hear Anyone
Mar 17, 2025 pm 06:10 PM
R.E.P.O. How to Fix Audio if You Can't Hear Anyone
Mar 17, 2025 pm 06:10 PM
Can't hear other players' voices in the R.E.P.O. game? Even if your microphone is working properly, it can be a problem caused by audio settings or device conflicts. Here are some effective solutions to help you restore your voice chat functionality. 1. Check the output device Open the audio settings of R.E.P.O. and check the output device settings. If set to "Default", manually select your headset or speaker. Restart the game and test voice chat again. 2. Adjust Windows sound settings If R.E.P.O. does not output the sound to the correct device, check the Windows Sound Settings: Right-click the speaker icon in the taskbar and select Sound Settings. Under "Output",
 Where to find the Crane Control Keycard in Atomfall
Mar 28, 2025 am 02:17 AM
Where to find the Crane Control Keycard in Atomfall
Mar 28, 2025 am 02:17 AM
In Atomfall, discover hidden keys and passages, including multiple ways to access key locations. This guide focuses on using the Crane Control Keycard for easy, unguarded Entry to Skethermoor Prison, bypassing the need to cooperate with Captain Sims
 WWE 2K25: How To Unlock Everything In MyRise
Mar 15, 2025 pm 12:03 PM
WWE 2K25: How To Unlock Everything In MyRise
Mar 15, 2025 pm 12:03 PM
WWE 2K25's MyRise mode is one of the best career modes in WWE games in recent years, telling an exciting story: a group of disgruntled NXT superstars take over WWE. However, enjoying the plot is not the only reason to play this mode. By playing MyRise, you can also unlock many content such as new superstars, new arenas, extra costumes, special weapons, and more. However, you can't get everything in a round of games, so you may want to prioritize certain items. Before you do this, you need to know what unlockable content is and how to get them. All this information is included here. Unlocked content through plot promotion By advancing the main plot and completing the chapters, you can solve
 R.E.P.O. Chat Commands and How to Use Them
Mar 17, 2025 pm 06:13 PM
R.E.P.O. Chat Commands and How to Use Them
Mar 17, 2025 pm 06:13 PM
R.E.P.O. provides some convenient chat instructions in the game to help you optimize the gaming experience. These instructions do not affect game balance, but are useful for taking clear screenshots or setting up visuals for content creation. How to use chat commands in R.E.P.O. To activate the command, please follow the steps below: Press the “T” key to open the chat window. Enter the “/” symbol, and then enter the command you want to use. Press Enter and the effect will take effect. To cancel the effect, enter the same command again or restart the game. Please note that these commands are only valid in multiplayer games and are not available in single player mode. Available chat commands /cinematic commands remove the game world
 Arise Crossover codes for March 2025
Mar 10, 2025 pm 08:03 PM
Arise Crossover codes for March 2025
Mar 10, 2025 pm 08:03 PM
Arise Crossover, a Roblox game inspired by the popular anime Solo Leveling, lets players summon fallen enemies to fight alongside them, much like the anime's protagonist, Sung Jin-woo. Explore a vast world, battle foes, recruit powerful Shadows to b
