

Excel Data Validation using regular expressions (Regex)

The tutorial shows how to do data validation in Excel using regular expressions with the help of a custom RegexMatch function.
When it comes to restricting user input in Excel worksheets, Data Validation is indispensable. Want to allow only numbers or dates in a given cell? Or limit text values to a specific length? Or maybe disallow times outside a given range? No problem, all this can be easily done with preset or custom validation criteria. But what if I want to allow only valid email addresses or strings that match a specific pattern? Alas, that's not possible. Regex you say? Hmm… that might work!
How to do Excel Data Validation with Regex
Regrettably, none of the built-in Excel features support regexes, and Data Validation is no exception. To be able to validate cell input using regular expressions, you need to create a custom Regex function first. Another complication is that VBA user-defined functions cannot be served to Data Validation directly - you'll need a mediator in the form of a named formula.
Considering the above, let us briefly outline the steps to be taken to validate data in Excel using regexes:
- Create a custom Regex function that checks whether an input value matches a regular expression.
- Define a name for your Regex formula.
- Configure a Data Validation rule based on the named formula.
- Copy the validation settings to as many cells as you want.
Sounds like a plan? Let's try to implement it in practice!
Excel data validation using custom regular expressions
This example addresses a very common case - how to allow only the values of a specific pattern.
Supposing you keep some SKU codes in your worksheet and want to be sure that only the codes matching a given pattern get into the list. Provided that each SKU consists of 2 groups of characters separated with a hyphen, the first group including 3 capital letters and the second group - 3 digits, you can identify such values using the below regex.
Pattern: ^[A-Z]{3}-\d{3}$
Please notice that the start (^) and end ($) of the string are anchored, so no characters other than in the pattern could be entered in a cell.
1. Add a custom Regex Match function
Start with inserting the RegExpMatch function in your workbook. The code is already written by our Excel gurus, so you just need to copy it from the above-linked page and paste in your VBA editor.
Here's the function's syntax for your reference:
RegExpMatch(text, pattern, [match_case])Where:
- Text (required) - a source string (in our context - a validated cell).
- Pattern (required) - a regular expression to match.
- Match_case (optional) - match type. TRUE or omitted - case-sensitive; FALSE - case-insensitive.
Tip. If you are a user of our Ultimate Suite, then you can do Regex Data Validation in Excel without adding any VBA code to your workbooks. Just leverage a custom AblebitsRegexMatch function included with our Regex Tools.
2. Create a named formula
In your target worksheet, select cell A1 (regardless of its contents and no matter which cell you are actually going to validate), press Ctrl F3 to open the Name Manager, and define a name for this formula:
=RegExpMatch(Sheet1!A1, "^[A-Z]{3}-\d{3}$")
Or you can enter the regex in some cell (A2 in this example) and supply $A$2 to the second argument:
=RegExpMatch(Sheet1!A1, Sheet1!$A$2)
For the formula to work correctly, be sure to use a relative reference for the text argument (A1) and absolute reference for pattern ($A$2).
Given that our formula is purposed for validating SKU numbers, we name it accordingly: Validate_SKU.

Important note! When defining the formula, please double check that the first argument refers to the currently selected cell, otherwise the formula won't work. For example, if cell A1 is selected on the sheet, put A1 in the first argument (as per our recommendations); if B2 is selected, then use B2 for the first argument, and so one. It does not really matter which particular reference you use as long as it matches the currently selected cell.
For step-by-step instructions, please see How to make a named formula in Excel.
3. Set up Data Validation
Select the first cell to be checked (A5 in our case) and make a custom data validation rule based on the named formula. For this, do the following:
- Click Data tab > Data Validation.
- In the Allow drop-down list, select Custom.
- Enter the below formula in the corresponding box.
=Validate_SKU - Unselect the Ignore blank option, otherwise your rule won't work.

Optionally, you can type a custom error message to be displayed when invalid data is entered in a cell.

If you feel like you need the detailed steps, here you go: How to set up custom Data Validation in Excel.
4. Copy Data Validation to more cells
To copy the validation settings to more cells, this is what you need to do:
- Select the cell with data validation and press Ctrl C to copy it.
- Select other cells you want to validate, right-click them, click Paste Special, and choose the Validation option.
- Click OK.


More information can be found in How to copy Data Validation.
Now, every time someone attempts to enter an invalid SKU in any of the validated cells, the following warning message will appear:

Email validation with Regex
To perform email validation, you start with writing a regular expression that matches an email address.
Pattern: ^[\w\.\-] @[A-Za-z0-9] [A-Za-z0-9\.\-]*[A-Za-z0-9] \.[A-Za-z]{2,24}$
For the detailed explanation of the syntax, please see Regex to match valid email addresses.
And now, specify the validation criteria by performing the already familiar steps:
- Enter the above regex in B2.
- Select cell A1 and define a name called Validate_Email that refers to:
=RegExpMatch(Sheet1!A1, Sheet1!$B$2) - For cell B5, apply custom Data Validation using the below formula. It is essential that the Ignore blank option should be unselected.
=Validate_EmailAdditionally, you can configure a custom error message prompting the user to enter a valid email address.
- Copy the rule to the below cells.


If an email address you enter in a validated cell does not match a regex pattern, the following alert will pop up:

Validating passwords using regular expressions
When using regex for password validation, the first thing to decide is exactly what your regular expression should check. Here are some examples that might set you on the right track.
A password must be at least 6 characters long and can only contain letters (uppercase or lowercase) and digits:
Pattern: ^[A-Za-z0-9]{6,}$
A password must be minimum 6 characters long and include at least one letter and one digit:
Pattern: ^(?=.*[A-Za-z])(?=.*\d)[A-Za-z\d]{6,}$
A password must be min 6 characters long and include at least one uppercase letter, one lowercase letter and one digit:
Pattern: ^(?=.*[A-Z])(?=.*[a-z])(?=.*\d)[A-Za-z\d]{6,}$
A password must be min 6 characters long and include at least one letter, one digit and one special character:
Pattern: ^(?=.*[A-Za-z])(?=.*\d)(?=.*[@$!%*#?&_-])[A-Za-z\d@$!%*#?&_-]{6,}$
With the pattern established, you can move on to setting up Data Validation:
- Enter your password regex in C2.
- Select cell A1 and create a named formula called Validate_Password:
=RegExpMatch(Sheet1!A1, Sheet1!$C$2) - For cell C5, create a custom validation rule with the below formula. Remember to unselect the Ignore blank check box.
=Validate_Password - Copy the rule to as many cells as you want.


Now, you can safely add new passwords to the list. If an input string does not match the regex, the following alert will remind you what kinds of values are accepted:

Regex Data Validation not working
If Regex Data Validation does not work in your Excel, most likely it's because of one of the following reasons.
RegExpMatch function missing
Before applying Data Validation, be sure to insert the code of the RegExpMatch function in your workbook.
Incorrect regular expression
To make sure your regex works as expected, you can enter a RegExpMatch formula in some cell and examine the results. For more information, please see Excel Regular expression matching with examples.
To analyze and debug your regular expressions, you can use free online regex testing services such as RegEx101 or RegExr.
Wrong named formula
A very common reason of data validation failure is a Regex named formula referring to a wrong cell. In all the examples, we recommended to define a formula referring to A1:
=RegExpMatch(A1, regex)
This only works if cell A1 is active when defining a name and a relative reference (without the $ sign) is used.
The idea is that a relative reference specified in the formula (A1) will automatically change based on the relative position of the validated cell. In other words, cell A1 is chosen just for convenience and consistency. In fact, you can select cell B1 and refer to B1, select cell C1 and refer to C1, and so on. The key thing is that the referenced cell should be the active cell.
To check if your named formula is correct, select any cell in your worksheet, open the Name Manager, and see which cell the formula points to. If it refers to the currently selected cell, the formula is right. Otherwise, you should change the reference in the first argument.
In the screenshot below, cell A7 is selected, meaning a named formula should have A7 in the first argument. The second argument ($A$2) refers to the regex - this reference is supposed to remain constant, so it is locked with the $ sign.

Ignore blank option selected
When setting up a custom Data Validation rule, it is important to unselect the Ignore blank check box. Otherwise, the rule won't work because of the following reason:
If a match is not found, the RegExpMatch function returns FALSE. With the Ignore blank option selected, FALSE equates to blank and is ignored.
An alternative solution is explicitly stating that the formula should return TRUE:
=RegExpMatch(…)=TRUE
That's how to do Data Validation in Excel using regular expressions. I thank you for reading and look forward to seeing you on our blog next week!
Practice workbook for download
Regex Data Validation examples (.xlsm file)
The above is the detailed content of Excel Data Validation using regular expressions (Regex). For more information, please follow other related articles on the PHP Chinese website!

Hot AI Tools

Undresser.AI Undress
AI-powered app for creating realistic nude photos

AI Clothes Remover
Online AI tool for removing clothes from photos.

Undress AI Tool
Undress images for free

Clothoff.io
AI clothes remover

Video Face Swap
Swap faces in any video effortlessly with our completely free AI face swap tool!

Hot Article
Hot Tools

Notepad++7.3.1
Easy-to-use and free code editor

SublimeText3 Chinese version
Chinese version, very easy to use

Zend Studio 13.0.1
Powerful PHP integrated development environment

Dreamweaver CS6
Visual web development tools

SublimeText3 Mac version
God-level code editing software (SublimeText3)
Hot Topics
 1392
1392
 52
36
110
52
36
110

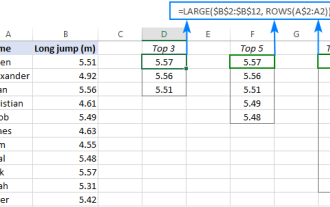 Excel formula to find top 3, 5, 10 values in column or row
Apr 01, 2025 am 05:09 AM
Excel formula to find top 3, 5, 10 values in column or row
Apr 01, 2025 am 05:09 AM
This tutorial demonstrates how to efficiently locate the top N values within a dataset and retrieve associated data using Excel formulas. Whether you need the highest, lowest, or those meeting specific criteria, this guide provides solutions. Findi
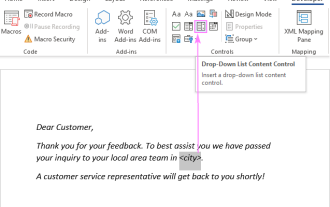 Add a dropdown list to Outlook email template
Apr 01, 2025 am 05:13 AM
Add a dropdown list to Outlook email template
Apr 01, 2025 am 05:13 AM
This tutorial shows you how to add dropdown lists to your Outlook email templates, including multiple selections and database population. While Outlook doesn't directly support dropdowns, this guide provides creative workarounds. Email templates sav
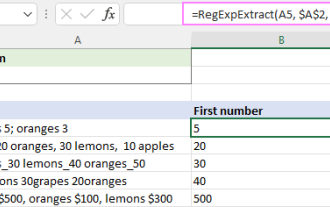 Regex to extract strings in Excel (one or all matches)
Mar 28, 2025 pm 12:19 PM
Regex to extract strings in Excel (one or all matches)
Mar 28, 2025 pm 12:19 PM
In this tutorial, you'll learn how to use regular expressions in Excel to find and extract substrings matching a given pattern. Microsoft Excel provides a number of functions to extract text from cells. Those functions can cope with most
 How to customize Google Docs: guide on styles & formatting
Mar 24, 2025 am 10:24 AM
How to customize Google Docs: guide on styles & formatting
Mar 24, 2025 am 10:24 AM
In this blog post, we delve into the various techniques and features available to customize your Google Docs. Follow these tips and tricks to be well on your way to creating documents that convey your content effectively and look polished
 How to use Flash Fill in Excel with examples
Apr 05, 2025 am 09:15 AM
How to use Flash Fill in Excel with examples
Apr 05, 2025 am 09:15 AM
This tutorial provides a comprehensive guide to Excel's Flash Fill feature, a powerful tool for automating data entry tasks. It covers various aspects, from its definition and location to advanced usage and troubleshooting. Understanding Excel's Fla
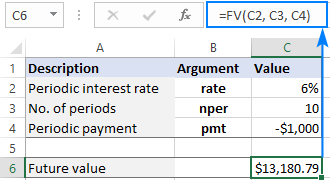 FV function in Excel to calculate future value
Apr 01, 2025 am 04:57 AM
FV function in Excel to calculate future value
Apr 01, 2025 am 04:57 AM
This tutorial explains how to use Excel's FV function to determine the future value of investments, encompassing both regular payments and lump-sum deposits. Effective financial planning hinges on understanding investment growth, and this guide prov
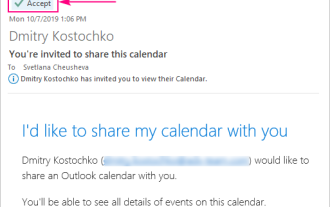 How to add calendar to Outlook: shared, Internet calendar, iCal file
Apr 03, 2025 am 09:06 AM
How to add calendar to Outlook: shared, Internet calendar, iCal file
Apr 03, 2025 am 09:06 AM
This article explains how to access and utilize shared calendars within the Outlook desktop application, including importing iCalendar files. Previously, we covered sharing your Outlook calendar. Now, let's explore how to view calendars shared with
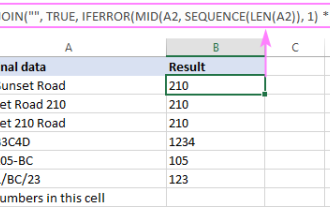 How to remove / split text and numbers in Excel cell
Apr 01, 2025 am 05:07 AM
How to remove / split text and numbers in Excel cell
Apr 01, 2025 am 05:07 AM
This tutorial demonstrates several methods for separating text and numbers within Excel cells, utilizing both built-in functions and custom VBA functions. You'll learn how to extract numbers while removing text, isolate text while discarding numbers
