

The First Berserker: Khazan - Blade Phantom Boss Guide

The First Berserker: Khazan offers many challenging encounters, making any soulslike fan feel at home, forcing you to learn their patterns and strike at the right moment. While your bout with the Yetuga was a taste of things to come, the Blade Phantom will serve as your first skill check, so be prepared.
4:12
Squaring off against the Blade Phantom isn't too complex, but it will be a noticeable step up from anything you've defeated. The tempo is much faster, he hits harder, and you must utilize everything at your disposal to come out on top, which can be very difficult to adapt to at first!
Blade Phantom Overview
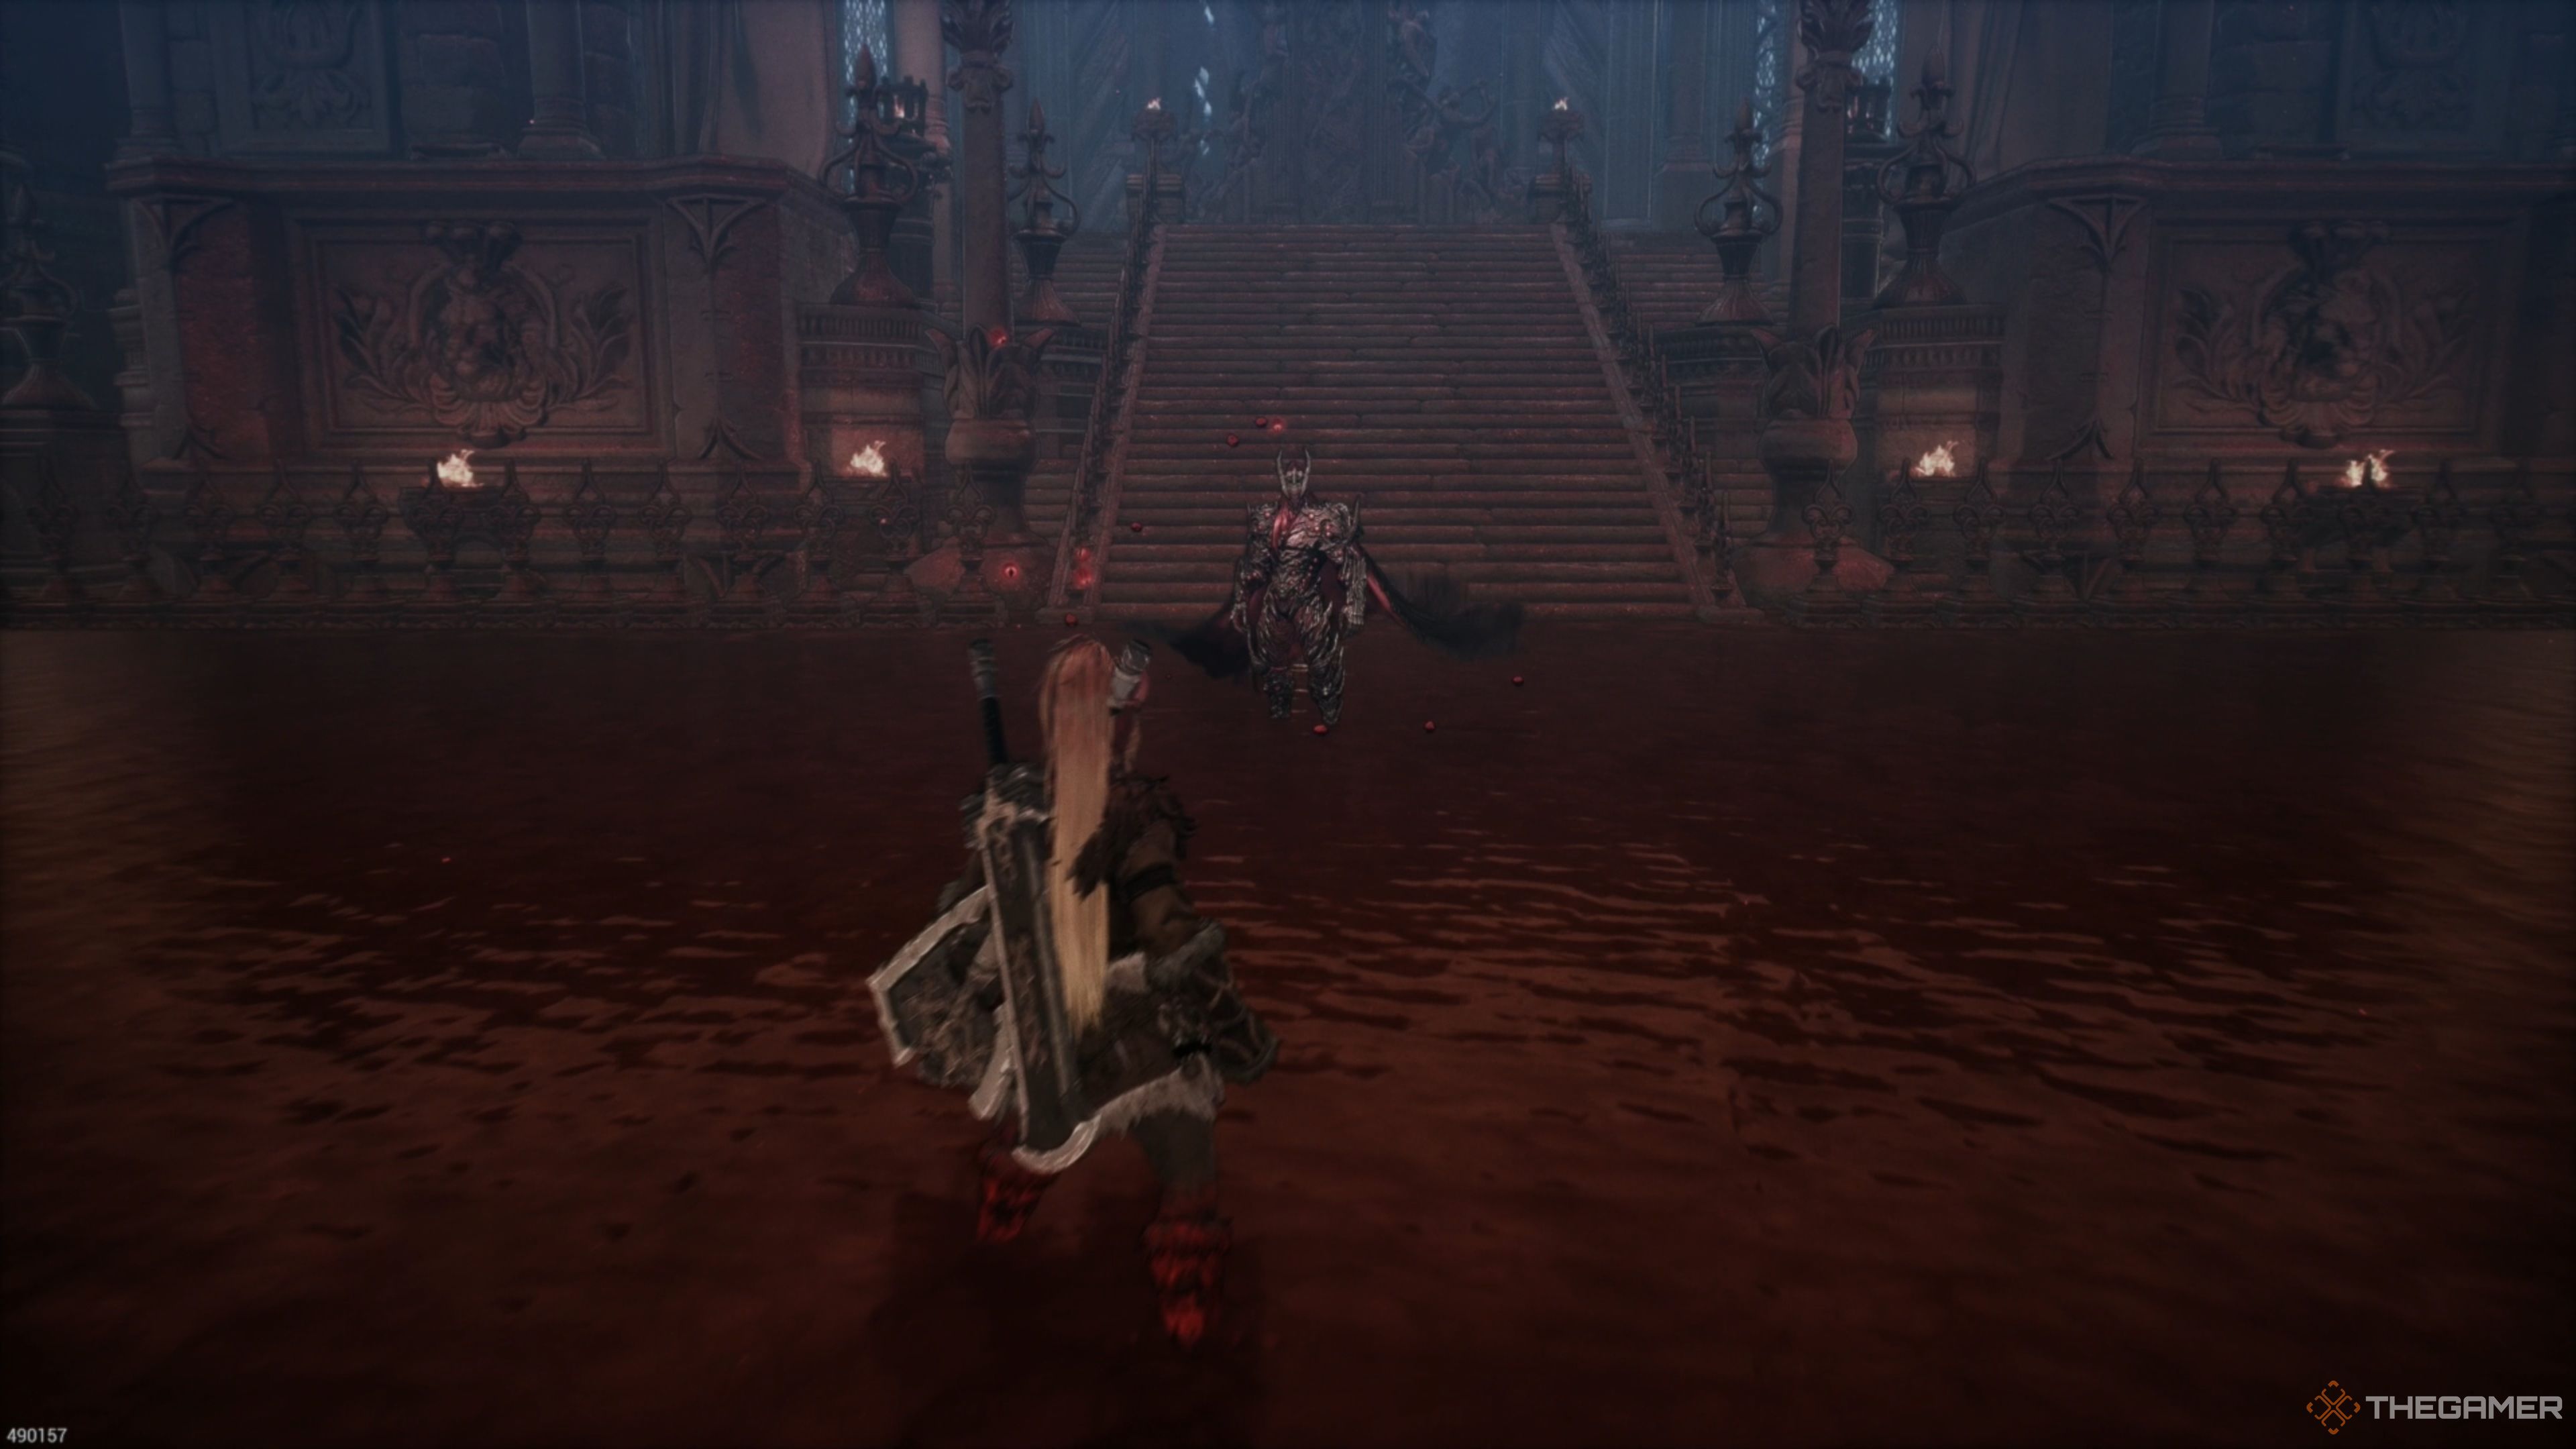
Blade Phantom serves as the first significant skill check in The First Berserker: Khazan, forcing you to use all your newly acquired Skills to overcome him in combat. Despite being the second boss in the game, your work will be cut out for you in this multi-phased encounter.
Prior to dissecting his moves and how to counter them, let's dive into all the rewards you will receive when finally defeating the Blade Phantom for the first time!
Blade Phantom Information
|
Mission |
Trials of the Frozen Mountain |
|---|---|
|
Recommended Level |
Level 9 |
|
Optional? |
No |
|
Rewards |
How To Defeat Blade Phantom

Due to the Phantom Blade being the second boss in the game, you can expect a wide range of moves, two phases, and massive damage, making it a substantially more formidable encounter than the first boss fight. Still, with proper execution and matchup knowledge, you will overcome this obstacle in no time!
Blade Phantom: Punch Combo

When the encounter starts, the Blade Phantom will always do a short Punch Combo that ends with a devastating Axe Kick. This is telegraphed with him reeling his arm back before tossing out the first punch, which is swiftly followed up with another punch, then with him raising his leg high above his head before swinging it downward with great force.
For this attack string, you will want to try to perfectly Reflect all three actions, which isn't as hard as it sounds. When you see him pull his arm back, wait until he throws it forward, then guard to Reflect the first punch. Then, release the guard button for a brief moment, then press it again. From here, wait for him to lift his leg up, and the moment you see him move it downward, guard again to get another perfect Reflection.
After he performs these actions, he will always wait a little while before attacking, so you will be able to land several attacks on him before having to go back on the defensive!
Blade Phantom: Kick Combo

Another combo he likes tossing out is his Kick Combo, having him start things off with a devastating Roundhouse Kick, followed instantly by a Dive Kick. When you see him turn his body slightly to the side, the first kick is about to come out. The moment you see his back leg swing forward, hit the guard button to Reflect the attack.
From here, he will leap into the air and perform a devastating Dive Kick. This can be tricky to Reflect, but waiting until you see him begin to descend toward the ground will be the key to guard, allowing you to land a perfect Reflection if timed correctly. If you perfect Reflect both attacks, you should be able to get a hit or two in afterward!
Blade Phantom: Heavy Punch

A common, yet simple, attack in Blade Phantom's repertoire is a standard Heavy Punch, having him cock his arm back and unleash a potent right hook that has some heat behind it. When you see him pull his arm back, prepare yourself for what's to come.
Whenever he throws his first forward, guard to land a perfect Reflection, which will deal substantial damage to his Stamina Gauge. If you have a decent amount of Stamina yourself, you can land a quick hit or two on him afterward!
Blade Phantom: Hammer Spikes

Throughout the encounter, Blade Phantom will often materialize an enormous Hammer before slamming it into the blood-filled ground, generating an explosion of Blood Spikes in multiple directions. You can either perfectly Reflect this attack or evade it; it doesn't matter too much.
We recommend evading it if you have the Stamina available, as it's much easier. The moment you see him begin slamming the Hammer into the ground, evading to the left or right will have you avoid it altogether. Since this attack takes a lot out of him, he will be left open, allowing you to land several attacks of your own!
Blade Phantom: Spear Toss

Next up is his Spear Toss, where he will materialize a Spear that he will throw at you with tremendous force and velocity. This move can be tricky to deal with initially, but since it's so fast, you can deal with it a few ways and make it much more manageable.
Perfectly Reflecting it will be your best bet, and the closer you are, the easier it is to do, as the moment it leaves his hands, you essentially just have to guard to land it. However, evading to the left or right will be better if you're further away. If you're close enough to him, you can get about two hits on him if you manage to Reflect it!
Blade Phantom: Claw Rampage

Following that, another common action of Blade Phantom's is his Claw Rampage, which has him wield a pair of extremely sharp and long Claws, having him quickly dash in front of you before unleashing a barrage of slashes that will ultimately leave him exhausted if you manage to perfect Reflect them.
He will create distance between you two before pulling out the Claws, giving you time to prepare yourself. As soon as he dashes forward, wait for him to begin swinging his arms and quickly guard to land a perfect Reflection. From here, release the guard button and press it again the instant you see him begin to swing again for another perfect Reflection.
Repeat this process until he winds up for the last slash. As he lunges forward, hit the guard button once more to land another perfect Reflection, draining his Stamina Gauge and allowing you to unleash a barrage of attacks of your own for massive damage!
Blade Phantom: Swift Grab

An action that's very potent but not super common, thankfully, is his Swift Grab, having him pull his arm back as it illuminates with a bright red light, alerting you that he's about to attempt to Grab you. Grabs cannot be guarded or Reflected in The First Berserker: Khazan, so you must evade it.
If you see him pull his arm back and it glows red, wait for him to begin charging forward and evade to the left or right just before he reaches you to avoid the attack altogether. The hitbox can be a bit... rough, so if he manages to get you, just shake it off and prepare for what's next!
Blade Phantom: Exhausted/Second Phase

You will essentially repeat everything above until you get his health down roughly halfway, causing the Blade Phantom to begin emitting a strange dark aura around himself, triggering the start of the second phase, which is a mix of things you've dealt with here and a whole lot of new moves for you to learn how to deal with!
Blade Phantom - Second Phase: Claw Barrage

Typically, but not always, Blade Phantom will kick off the second phase by wielding his Claws again; this time, he is substantially faster and deals much more damage. He will perform four slashes in rapid succession and will almost always top it off with the Leaping Spear Toss.
Again, these moves are quick, so as soon as he teleports in front of you, begin guarding the moment he starts to attack. You cannot just guard these actions, as you will need Stamina to avoid the following action, so you must get the timing of the perfect Reflections down.
While they are fast, there will be a brief delay between all four attacks, so after landing one Reflection, release the guard button and then press it again when you see him begin attacking again. You won't be able to attack him after this, so just try and get the timing down to a science!
Blade Phantom - Second Phase: Leaping Spear Toss

As mentioned above, the previous attack almost always leads to this one. The Blade Phantom leaps backward high into the air, and an enormous eye of blood appears behind him as he materializes a Spear. After a brief pause, he will hurl the Spear at you with immense speed and precision.
If you have enough Stamina, you can evade this attack, but Reflecting it is easier in our experience. When he throws the Spear, you must wait just before it reaches you to guard to get the perfect Reflect and save your Stamina. You can't attack him afterward, so however you want to deal with it is up to you. We just prefer saving our Stamina, especially during this phase!
Blade Phantom - Second Phase: Greatsword Slashes

During this phase, Blade Phantom will constantly be switching to new weapons, and the Greatsword is one of his go-to's. When you see him begin materializing his Greatsword, be prepared for a devastating downward slash that will be followed by another one in quick succession.
Since the Greatsword is a bit cumbersome, you will be able to see him load this attack up from a mile away, so it won't be terribly challenging to Reflect. As the Greatsword is coming downward, guard just before it hits you, then do that once more for the second attack. From here, you should be able to hit him two to three times!
Blade Phantom - Second Phase: Hammer Spikes

Surprise, the enormous Hammer is back, and the attack is pretty much the same as before, except it deals more damage and covers a broader area. Fortunately, it is handled the same way. When he pulls the Hammer out, wait for him to swing it downward, then evade or Reflect just before it hits the ground.
Dodging or Reflecting the Blood Spikes will leave him vulnerable for a brief moment, allowing you to run up and land several hits of your own on him, which is massive in this phase!
Blade Phantom - Second Phase: Spear Lunges

Reaching into his bag of weapons once more, Blade Phantom will often materialize a Spear, which is surprisingly tricky to deal with in the second phase. He is FAST with this weapon and will perform two quick Lunge Attacks with it before throwing it at you.
The Lunge Attacks are by far the hardest to deal with, as you have to guard the moment you see him move to get a perfect Reflection. Missing the timing even slightly will cause you to receive massive damage, and he will do this back-to-back, so be prepared.
Following the second Lunge Attack, he will cock the Spear behind his head and chuck it at you with great speed, having you either evade or Reflect it. Like the first phase, if you're close, Reflecting it will be easier and will allow you to get a hit or two in afterward!
Blade Phantom - Second Phase: Exhausted

Around this point of the encounter, the Blade Phantom will likely be close to being placed in an exhausted state, so focus on draining the rest of his Stamina Gauge by going for perfect Reflections and well-placed hits. Once he's exhausted, unleash a barrage of attacks on him for substantial damage!
Blade Phantom - Second Phase: Greatsword Burst Attack

Finally, the last trick up the Blade Phantom's sleeve is a devastating chain of attacks with his Greatsword. He will materialize the Greatsword and instantly teleport high into the air, leaving a trail of darkness behind. From here, he will perform a Plunging Slash before teleporting away and blinking back into the arena with another devastating slash from his Greatsword.
When he teleports into the air, wait until he starts his descent and guard the moment you see him start swinging the Greatsword to land the perfect Reflection. Then, wait for him to teleport away, and when he blinks back into the arena, guard the moment he swings again to land yet another perfect Reflection.
From here, he will perform a Burst Attack that can only be Countered by pressing L1 Circle/LB B as the attack hits you. If you land this Counter, he will be temporarily staggered, allowing you to deal tremendous amounts of damage to him, so it's worth going for. You can also evade it by running away when you see the icon appear on Khazan, but we strongly recommend Countering it.
Now, you must simply rinse and repeat everything covered above in the second phase until the Blade Phantom is defeated, allowing you to finally access The Crevice!

The above is the detailed content of The First Berserker: Khazan - Blade Phantom Boss Guide. For more information, please follow other related articles on the PHP Chinese website!

Hot AI Tools

Undresser.AI Undress
AI-powered app for creating realistic nude photos

AI Clothes Remover
Online AI tool for removing clothes from photos.

Undress AI Tool
Undress images for free

Clothoff.io
AI clothes remover

Video Face Swap
Swap faces in any video effortlessly with our completely free AI face swap tool!

Hot Article
Hot Tools

Notepad++7.3.1
Easy-to-use and free code editor

SublimeText3 Chinese version
Chinese version, very easy to use

Zend Studio 13.0.1
Powerful PHP integrated development environment

Dreamweaver CS6
Visual web development tools

SublimeText3 Mac version
God-level code editing software (SublimeText3)
Hot Topics


 Assassin's Creed Shadows: Seashell Riddle Solution
Mar 28, 2025 am 01:58 AM
Assassin's Creed Shadows: Seashell Riddle Solution
Mar 28, 2025 am 01:58 AM
Assassin's Creed: Shadows boasts a vast world brimming with activities beyond the main storyline. Side missions and various encounters significantly enrich the immersive experience of in-game Japan. One particularly memorable encounter is the Seashe
 Where to find the Crane Control Keycard in Atomfall
Mar 28, 2025 am 02:17 AM
Where to find the Crane Control Keycard in Atomfall
Mar 28, 2025 am 02:17 AM
In Atomfall, discover hidden keys and passages, including multiple ways to access key locations. This guide focuses on using the Crane Control Keycard for easy, unguarded Entry to Skethermoor Prison, bypassing the need to cooperate with Captain Sims
 Roblox: Dead Rails - How To Complete Every Challenge
Mar 26, 2025 am 02:14 AM
Roblox: Dead Rails - How To Complete Every Challenge
Mar 26, 2025 am 02:14 AM
If you've already taken on the Monumental task of beating Dead Rails on Roblox and are looking for an even greater challenge — or simply need some extra Bonds — look no further than the Challenge Board. Here, you'll find challenges of varying difficu
 Atomfall guide: item locations, quest guides, and tips
Mar 25, 2025 am 02:25 AM
Atomfall guide: item locations, quest guides, and tips
Mar 25, 2025 am 02:25 AM
It’s your first foray into Rebellion’s Atomfall, a post-apocalyptic survival-action game set in England. As a result, you can expect plenty of dodgy accents, tea, cornish pasties, and Britishisms such as the need to call people ‘boffins&
 How to activate all Radio Towers for Joyce Tanner in Atomfall
Mar 28, 2025 am 12:04 AM
How to activate all Radio Towers for Joyce Tanner in Atomfall
Mar 28, 2025 am 12:04 AM
At this point in Atomfall, you’ve no doubt wandered into the Interchange, restored power to your first Data Store, and met the enigmatic Joyce Tanner inside. Tanner is more than happy to see someone who hasn’t immediately tried to kill her, an
 InZoi: How To Apply To School And University
Apr 02, 2025 am 12:08 AM
InZoi: How To Apply To School And University
Apr 02, 2025 am 12:08 AM
In the vibrant world of InZoi, you're free to shape your character's life, from exploring its diverse environments to mastering various skills. Whether it's culinary adventures, household chores, or relaxing on the beach, the choices are yours. But
 R.E.P.O. Guide drones
Mar 25, 2025 am 02:30 AM
R.E.P.O. Guide drones
Mar 25, 2025 am 02:30 AM
R.E.P.O. The drone in the game offers a variety of upgrades, from letting you jump like an acrobat to preventing your valuables from turning into scrap. Some drones are very useful, others are…do their best. Note: Prices may fluctuate according to grade All UAVs in R.E.P.O. Zero Gravity Drone ($24K) Attach to an object and make it float. It may be a life-saving straw, or it may be just another floating trouble - it is up to you. Charging Drone ($4K - $5K) Charge electronic devices such as trackers. Cheap, reliable and very practical. These are rare characteristics in this economic system. Feather Drone ($16K) Let you jump higher, or make objects
 Atomfall: How To Get The Sewer Tunnels Key
Mar 26, 2025 am 02:39 AM
Atomfall: How To Get The Sewer Tunnels Key
Mar 26, 2025 am 02:39 AM
The Sewer Tunnels in Atomfall serve as an underground connection between several of the Quarantine Zone's regions. As if swarms of infected rats and bloodthirsty humans weren't enough, there are a number of locked doors impeding your Progress down th
